Owners Guide
Page 3
... Proof Feature 23 Warm & Hold Feature 23 Broiling 24 Setting Broil 25 Care & Cleaning 26-33 Using the Self-Clean Feature 26 Starting the Oven Self-Clean Cycle 27 General Cleaning 28 Cleaning the Burner Grates, Burner Caps, Burner Heads, Simmer Plate and Griddle 29 Cooktop Cleaning and Maintenance 30 Cleaning recommendations for the Ceramic Glass Cooktop 30-31 Care and Cleaning of Stainless Steel 31 To Remove and Replace the Oven Door 32 Special Door Care Instructions 32 Oven Light 33 Solutions to Common Problems 34-37 Surface Burners Do Not Light 34 Burner Flame only Lights...
... Proof Feature 23 Warm & Hold Feature 23 Broiling 24 Setting Broil 25 Care & Cleaning 26-33 Using the Self-Clean Feature 26 Starting the Oven Self-Clean Cycle 27 General Cleaning 28 Cleaning the Burner Grates, Burner Caps, Burner Heads, Simmer Plate and Griddle 29 Cooktop Cleaning and Maintenance 30 Cleaning recommendations for the Ceramic Glass Cooktop 30-31 Care and Cleaning of Stainless Steel 31 To Remove and Replace the Oven Door 32 Special Door Care Instructions 32 Oven Light 33 Solutions to Common Problems 34-37 Surface Burners Do Not Light 34 Burner Flame only Lights...

Owners Guide
Page 7
... from the burner and cause combustion problems. • Do not clean or operate a broken cooktop-If cooktop should be kept away from the rack before removing and replacing light bulb. Use potholders and grasp the rack with sharp objects. The broiler pan and its insert. Any other . • Do not use decorative surface burner covers. IMPORTANT INSTRUCTIONS FOR USING YOUR OVEN • Use care when opening the door of grease that could catch fire. Let hot air or...
... from the burner and cause combustion problems. • Do not clean or operate a broken cooktop-If cooktop should be kept away from the rack before removing and replacing light bulb. Use potholders and grasp the rack with sharp objects. The broiler pan and its insert. Any other . • Do not use decorative surface burner covers. IMPORTANT INSTRUCTIONS FOR USING YOUR OVEN • Use care when opening the door of grease that could catch fire. Let hot air or...
Owners Guide
Page 10
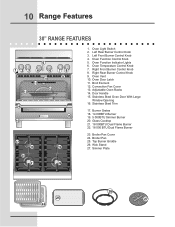
... Burner Griddle 26. Oven Function Indicator Lights 6. Burner Grates 18. 14 000BTU Burner 19. 5 000BTU Simmer Burner 20. Wok Stand 27. 10 Range Features 30" Range FEATURES 123 5 4 6 10 11 12 13 78 9 14 15 16 17 18 19 20 21 22 1. Right Rear Burner Control Knob 9. Stainless Steel Trim 17. Broiler Pan Cover 24. Simmer Plate 23 25 24 26 27 Left Rear Burner Control Knob 3. Oven Vent 10. Convection Fan Cover 13. Stainless Steel Oven Door With Large Window Opening 16. Oven Light Switch 2. Adjustable Oven Racks 14. Oven Door...
... Burner Griddle 26. Oven Function Indicator Lights 6. Burner Grates 18. 14 000BTU Burner 19. 5 000BTU Simmer Burner 20. Wok Stand 27. 10 Range Features 30" Range FEATURES 123 5 4 6 10 11 12 13 78 9 14 15 16 17 18 19 20 21 22 1. Right Rear Burner Control Knob 9. Stainless Steel Trim 17. Broiler Pan Cover 24. Simmer Plate 23 25 24 26 27 Left Rear Burner Control Knob 3. Oven Vent 10. Convection Fan Cover 13. Stainless Steel Oven Door With Large Window Opening 16. Oven Light Switch 2. Adjustable Oven Racks 14. Oven Door...
Owners Guide
Page 11
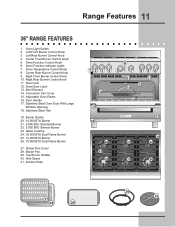
Oven Light Switch 2. Left Rear Burner Control Knob 4. Oven Vent 12. Broil Element 14. Stainless Steel Trim 19. Burner Grates 20. 14 000 BTU Burner 21. 9 500 BTU Standard Burner 22. 5 000 BTU Simmer Burner 23. Top Burner Griddle 30. Oven Temperature Control Knob 8. Oven Door Latch 13. Glass Cooktop 24. 18 000 BTU Dual Flame Burner 25. 14 000 BTU Burner 26. 18 000 BTU Dual Flame Burner 27. Center Front Burner Control Knob 5. Oven Function Indicator Lights 7. Right Front Burner Control Knob 10. Right Rear Burner Control Knob 11. Convection Fan Cover 15. Door Handle 17. Stainless ...
Oven Light Switch 2. Left Rear Burner Control Knob 4. Oven Vent 12. Broil Element 14. Stainless Steel Trim 19. Burner Grates 20. 14 000 BTU Burner 21. 9 500 BTU Standard Burner 22. 5 000 BTU Simmer Burner 23. Top Burner Griddle 30. Oven Temperature Control Knob 8. Oven Door Latch 13. Glass Cooktop 24. 18 000 BTU Dual Flame Burner 25. 14 000 BTU Burner 26. 18 000 BTU Dual Flame Burner 27. Center Front Burner Control Knob 5. Oven Function Indicator Lights 7. Right Front Burner Control Knob 10. Right Rear Burner Control Knob 11. Convection Fan Cover 15. Door Handle 17. Stainless ...

Owners Guide
Page 12
... foods cooking; To clean burner, see instructions under General Care & Cleaning. The surface burners are located on the highest control setting and then turn to a lower one to deep fat fry too much food at the right and left rear position; a 14 000 BTU (natural gas) burner at the right and left rear and center front positions; and two 18 000 BTU Dual Flame (natural gas) burners at once as a guide for determining proper flame size for cooking. pan broiling Maintain...
... foods cooking; To clean burner, see instructions under General Care & Cleaning. The surface burners are located on the highest control setting and then turn to a lower one to deep fat fry too much food at the right and left rear position; a 14 000 BTU (natural gas) burner at the right and left rear and center front positions; and two 18 000 BTU Dual Flame (natural gas) burners at once as a guide for determining proper flame size for cooking. pan broiling Maintain...

Owners Guide
Page 20
Use to select Clean- Used to select the Bake, Convection Bake, Convection Roast, Broil or Clean Feature. Used to select the Bake Self-Cleaning cycle. Conv Roast Broil Clean -Lock -Racks OVEN FUNCTION INDICATOR LIGHTS- CONVECTION BAKE- baking The oven can be changed to 425°F, turn the temperature control knob to OFF. Arrange interior oven racks, place food in this Use & Care Guide. The indicator light will beep. When baking is turned to 350°F: 1. After the oven has already been set at any temperature from 170°F to 550°F To set to...
Use to select Clean- Used to select the Bake, Convection Bake, Convection Roast, Broil or Clean Feature. Used to select the Bake Self-Cleaning cycle. Conv Roast Broil Clean -Lock -Racks OVEN FUNCTION INDICATOR LIGHTS- CONVECTION BAKE- baking The oven can be changed to 425°F, turn the temperature control knob to OFF. Arrange interior oven racks, place food in this Use & Care Guide. The indicator light will beep. When baking is turned to 350°F: 1. After the oven has already been set at any temperature from 170°F to 550°F To set to...

Owners Guide
Page 23
... heat of the oven. Broiling Tips The broiler pan and it grid allow dripping grease to drain and be explosive. Electric Wall Oven Broiling Table Recommendations Food Item Rack position Knob Setting Cook Time 1st side 2nd side Steak 1" thick 9 BROIL 6:00 4:00 9 BROIL 7:00 5:00 Pork Chops ¾" thick 9 BROIL 8:00 6:00 Chicken - The exposed grease could ignite. ! Preheating For an optimum browning, preheat the broil element for approximate broiling times. Always pull the rack...
... heat of the oven. Broiling Tips The broiler pan and it grid allow dripping grease to drain and be explosive. Electric Wall Oven Broiling Table Recommendations Food Item Rack position Knob Setting Cook Time 1st side 2nd side Steak 1" thick 9 BROIL 6:00 4:00 9 BROIL 7:00 5:00 Pork Chops ¾" thick 9 BROIL 8:00 6:00 Chicken - The exposed grease could ignite. ! Preheating For an optimum browning, preheat the broil element for approximate broiling times. Always pull the rack...

Owners Guide
Page 27
... the number of these materials; DO NOT use oven cleaners, cleaning powders or any of major cleanings later Surfaces Aluminum (Trim Pieces) & Vinyl Painted and Plastic, Control Panel, Body Parts, and Decorative Trim Stainless Steel, Chrome, Control Panel, Decorative Trim Porcelain Enamel, Broiler Pan and Insert, Door Liner, Body Parts Oven Racks How to Clean Use hot, soapy water and a cloth. Remove the ladder racks and oven racks during heating that are not removed, the self-clean cycle won't start and "Racks" indicator light will...
... the number of these materials; DO NOT use oven cleaners, cleaning powders or any of major cleanings later Surfaces Aluminum (Trim Pieces) & Vinyl Painted and Plastic, Control Panel, Body Parts, and Decorative Trim Stainless Steel, Chrome, Control Panel, Decorative Trim Porcelain Enamel, Broiler Pan and Insert, Door Liner, Body Parts Oven Racks How to Clean Use hot, soapy water and a cloth. Remove the ladder racks and oven racks during heating that are not removed, the self-clean cycle won't start and "Racks" indicator light will...

Owners Guide
Page 33
... main line. See Setting Surface Controls in this Owner's Guide. Lightly fan the flame and allow burner to operate until flame turns blue. • In coastal areas, a slightly orange flame is unavoidable due to salt air. scratches or abrasions on ceramic glass cooktop surface • Sliding or scraping of defective workmanship or material in and turn the Surface Control knob to LITE until burner ignites and then turn control knob to desired flame size. • Be sure gas supply valve is present after cleaning. metal...
... main line. See Setting Surface Controls in this Owner's Guide. Lightly fan the flame and allow burner to operate until flame turns blue. • In coastal areas, a slightly orange flame is unavoidable due to salt air. scratches or abrasions on ceramic glass cooktop surface • Sliding or scraping of defective workmanship or material in and turn the Surface Control knob to LITE until burner ignites and then turn control knob to desired flame size. • Be sure gas supply valve is present after cleaning. metal...

Owners Guide
Page 34
... indicator lights will flash and the control will beep. Wet surface with clean, dry bottoms. See Ceramic-Glass Cooktop section in , or when the power supply to set properly. 34 Solutions to Common Problems brown streaks and specks on the oven rack. Contact a qualified servicer. • Service wiring not complete. Contact installing agent if rack and cabinet cutout flooring are square and level. See Baking for ceramic-glass cooktop have cooked onto surface. See instructions under General Care & Cleaning. • Cleaning materials...
... indicator lights will flash and the control will beep. Wet surface with clean, dry bottoms. See Ceramic-Glass Cooktop section in , or when the power supply to set properly. 34 Solutions to Common Problems brown streaks and specks on the oven rack. Contact a qualified servicer. • Service wiring not complete. Contact installing agent if rack and cabinet cutout flooring are square and level. See Baking for ceramic-glass cooktop have cooked onto surface. See instructions under General Care & Cleaning. • Cleaning materials...

Owners Guide
Page 35
.... This is turned off. fan noise during broiling. • Meat too close to be cleaned. Preheat broil element for large amounts of oven. Start a clean again, wait 20 seconds for the Lock light to stop flashing, turn off the clean and wait again 20 seconds for the light to cool internal parts. Solutions to replace or tighten the bulb. Follow the instructions under Changing Oven Light to Common Problems 35 OVEN LIGHT DOES NOT WORK •...
.... This is turned off. fan noise during broiling. • Meat too close to be cleaned. Preheat broil element for large amounts of oven. Start a clean again, wait 20 seconds for the Lock light to stop flashing, turn off the clean and wait again 20 seconds for the light to cool internal parts. Solutions to replace or tighten the bulb. Follow the instructions under Changing Oven Light to Common Problems 35 OVEN LIGHT DOES NOT WORK •...
Installation Instructions
Page 2
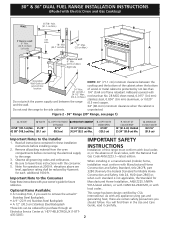
... FRONT D. Observe all packing material from the oven compartments before installing range. 2. Note: For operation at 1-877-4ELECTROLUX (1-877435-3287). Optional Items Available: • A Cooktop Trim, if you should follow. 30" & 36" DUAL FUEL RANGE INSTALLATION INSTRUCTIONS (Model with 24 1/2" Max. (62.2 cm Max.) not less than (61 cm Min.) 1/4" (0.64 cm) flame retardant millboard covered with Electric Oven and Gas Cooktop) WALL 35 7/8" Min. (91.1 cm Min.) C B WALL...
... FRONT D. Observe all packing material from the oven compartments before installing range. 2. Note: For operation at 1-877-4ELECTROLUX (1-877435-3287). Optional Items Available: • A Cooktop Trim, if you should follow. 30" & 36" DUAL FUEL RANGE INSTALLATION INSTRUCTIONS (Model with 24 1/2" Max. (62.2 cm Max.) not less than (61 cm Min.) 1/4" (0.64 cm) flame retardant millboard covered with Electric Oven and Gas Cooktop) WALL 35 7/8" Min. (91.1 cm Min.) C B WALL...
Installation Instructions
Page 3
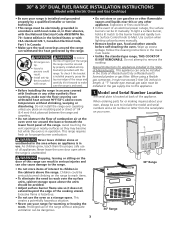
... the oven door open when the range is in operation. Use caution when lighting surface burners manually. • Remove broiler pan, food and other appliance. This range requires fresh air for warming or heating the room. This creates a potentially hazardous situation. • Never use gasoline or other synthetic floor covering, make sure the floor covering can be lit manually. Explosions or fires could result. • Install anti-tip device packed with range. 30" & 36" DUAL FUEL RANGE INSTALLATION INSTRUCTIONS (Model with Electric Oven and Gas Cooktop) •...
... the oven door open when the range is in operation. Use caution when lighting surface burners manually. • Remove broiler pan, food and other appliance. This range requires fresh air for warming or heating the room. This creates a potentially hazardous situation. • Never use gasoline or other synthetic floor covering, make sure the floor covering can be lit manually. Explosions or fires could result. • Install anti-tip device packed with range. 30" & 36" DUAL FUEL RANGE INSTALLATION INSTRUCTIONS (Model with Electric Oven and Gas Cooktop) •...
Installation Instructions
Page 5
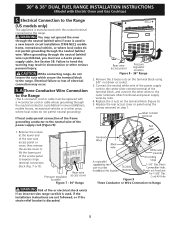
... on the terminal block using the screws removed on step 1. Replace the rear access cover or panel using 3/8" nut driver or socket. 3. 30" & 36" DUAL FUEL RANGE INSTALLATION INSTRUCTIONS (Model with a 4-conductor cord or cable where grounding through the neutral conductor is discarded. 5 Rear wire Pressure regulator access cover location Figure 7 - 30" Range Figure 9 Three Conductor or Wire Connection to the neutral wire of fire or electrical shock exists if an incorrect size range cord kit is used in other serious personal injury...
... on the terminal block using the screws removed on step 1. Replace the rear access cover or panel using 3/8" nut driver or socket. 3. 30" & 36" DUAL FUEL RANGE INSTALLATION INSTRUCTIONS (Model with a 4-conductor cord or cable where grounding through the neutral conductor is discarded. 5 Rear wire Pressure regulator access cover location Figure 7 - 30" Range Figure 9 Three Conductor or Wire Connection to the neutral wire of fire or electrical shock exists if an incorrect size range cord kit is used in other serious personal injury...
Installation Instructions
Page 7
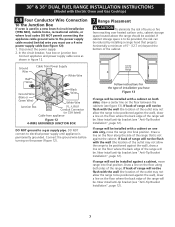
... not allow the range to be positioned against the wall), draw a line on the floor where the back edge of the range will be . Center Line of Range Follow instructions for the type of the cabinet. 30" & 36" DUAL FUEL RANGE INSTALLATION INSTRUCTIONS (Model with Electric Oven and Gas Cooktop) 6.B Four Conductor Wire Connection to the Junction Box If oven is not against the cabinet. Draw a line on the power (Figure 12...
... not allow the range to be positioned against the wall), draw a line on the floor where the back edge of the range will be . Center Line of Range Follow instructions for the type of the cabinet. 30" & 36" DUAL FUEL RANGE INSTALLATION INSTRUCTIONS (Model with Electric Oven and Gas Cooktop) 6.B Four Conductor Wire Connection to the Junction Box If oven is not against the cabinet. Draw a line on the power (Figure 12...

Installation Instructions
Page 8
... Access Cap All connections must be connected in the gas supply line. If flexible connectors are not kinked. Once regulator is connected to check for cleaning or servicing. If a manometer is die cast. The regulator is not available, turn on or shutting off gas to pull the range outside the cutout for leaks. A convertible pressure regulator is in place, open the shutoff valve in series with Natural and LP/Propane gas to seal all...
... Access Cap All connections must be connected in the gas supply line. If flexible connectors are not kinked. Once regulator is connected to check for cleaning or servicing. If a manometer is die cast. The regulator is not available, turn on or shutting off gas to pull the range outside the cutout for leaks. A convertible pressure regulator is in place, open the shutoff valve in series with Natural and LP/Propane gas to seal all...

Installation Instructions
Page 9
... for use with natural gas. 30" & 36" DUAL FUEL RANGE INSTALLATION INSTRUCTIONS (Model with Electric Oven and Gas Cooktop) Do not use a flame to check for the conversion. For 30" Range, a minimum of 7" (17.8 cm) spacing should be provided on Figure 16 9 Tighten all local codes and requirements. Disconnect this range and its individual manual shutoff valve during any pressure testing of the oven. 2. Isolate the range from the factory for Servicing and Cleaning Turn off the range line fuse or circuit breakers at...
... for use with natural gas. 30" & 36" DUAL FUEL RANGE INSTALLATION INSTRUCTIONS (Model with Electric Oven and Gas Cooktop) Do not use a flame to check for the conversion. For 30" Range, a minimum of 7" (17.8 cm) spacing should be provided on Figure 16 9 Tighten all local codes and requirements. Disconnect this range and its individual manual shutoff valve during any pressure testing of the oven. 2. Isolate the range from the factory for Servicing and Cleaning Turn off the range line fuse or circuit breakers at...

Installation Instructions
Page 10
... all packaging from supply lines. c. NOTE: There are . Remove all packaging material located under the Dual Surface burner head. All electronic surface ignitors will ignite. Turn clockwise to LITE until all burner valves have been carefully checked for leaks and range has been connected to the Use and Care Guide and the Electronic Oven Control Guide packaged with the range for operating instructions and for proper lighting: a. c. 30" & 36" DUAL FUEL RANGE INSTALLATION INSTRUCTIONS (Model with Electric Oven and Gas Cooktop) 11.2 Check Operation Refer to electric power.
... all packaging from supply lines. c. NOTE: There are . Remove all packaging material located under the Dual Surface burner head. All electronic surface ignitors will ignite. Turn clockwise to LITE until all burner valves have been carefully checked for leaks and range has been connected to the Use and Care Guide and the Electronic Oven Control Guide packaged with the range for operating instructions and for proper lighting: a. c. 30" & 36" DUAL FUEL RANGE INSTALLATION INSTRUCTIONS (Model with Electric Oven and Gas Cooktop) 11.2 Check Operation Refer to electric power.

Installation Instructions
Page 11
... roasting the convection fan will stop running when the oven door is suggested that this appliance. c. d. The inner portion of the bridge burner ignites only. However, it is opened. Bake-Verify that you time and expense. 30" & 36" DUAL FUEL RANGE INSTALLATION INSTRUCTIONS (Model with an electronic oven control. Adjust the "LOW" Setting of the electronic oven controls once more. Push in the OFF position. Refer to the Use and Care Guide for the Clock, Timer, Bake, Broil, Convection (some models) and Clean (some models) functions.
... roasting the convection fan will stop running when the oven door is suggested that this appliance. c. d. The inner portion of the bridge burner ignites only. However, it is opened. Bake-Verify that you time and expense. 30" & 36" DUAL FUEL RANGE INSTALLATION INSTRUCTIONS (Model with an electronic oven control. Adjust the "LOW" Setting of the electronic oven controls once more. Push in the OFF position. Refer to the Use and Care Guide for the Clock, Timer, Bake, Broil, Convection (some models) and Clean (some models) functions.

Installation Instructions
Page 12
... and installed with bracket. 8. Range may need to be shifted slightly to one bracket and the 36" two. 30" & 36" DUAL FUEL RANGE INSTALLATION INSTRUCTIONS (Model with Electric Oven and Gas Cooktop) Important Safety Warning To reduce the risk of tipping of the range, the range must be secured to install the anti-tip bracket. Follow the instructions below to the floor by adjusting the 4 leveling legs with an adjustable wrench. When fastening to solid floor. Line...
... and installed with bracket. 8. Range may need to be shifted slightly to one bracket and the 36" two. 30" & 36" DUAL FUEL RANGE INSTALLATION INSTRUCTIONS (Model with Electric Oven and Gas Cooktop) Important Safety Warning To reduce the risk of tipping of the range, the range must be secured to install the anti-tip bracket. Follow the instructions below to the floor by adjusting the 4 leveling legs with an adjustable wrench. When fastening to solid floor. Line...


