
Owners Guide
Page 2
For toll-free telephone support in the USA Printed in the U.S. 2 Finding Information MAKE A RECORD FOR FUTURE USE Brand Purchase Date Model Number Serial Number MODEL AND SERIAL NUMBER LOCATION NOTE The serial plate is located along the interior side trim of the oven and visible when the door is opened. See picture below. and Canada: 1-877-4ELECTROLUX (1-877-435-3287) For online support and internet product information: www.electroluxicon.com ©2008 Electrolux Home Products, Inc. QUESTIONS? Post Office Box 212378, Augusta, Georgia 30917, USA All rights reserved.
For toll-free telephone support in the USA Printed in the U.S. 2 Finding Information MAKE A RECORD FOR FUTURE USE Brand Purchase Date Model Number Serial Number MODEL AND SERIAL NUMBER LOCATION NOTE The serial plate is located along the interior side trim of the oven and visible when the door is opened. See picture below. and Canada: 1-877-4ELECTROLUX (1-877-435-3287) For online support and internet product information: www.electroluxicon.com ©2008 Electrolux Home Products, Inc. QUESTIONS? Post Office Box 212378, Augusta, Georgia 30917, USA All rights reserved.

Owners Guide
Page 3
...Model and Serial Number Location 2 Questions 2 Table of Stainless Steel 39 To Remove and Replace Oven Door 39 Special Door Care Instructions 39 Oven Light 40 Broiler Pan Cleaning Tips 40 Solutions to Default Factory Settings 32 Oven...4 Important Safety Instructions 4-6 Feature Overview 7 Your Wall Oven 7 Oven Rack Supports and Oven Vents 8 Oven Racks 9 Control Pad Functions - Model B 12-13 Getting Started 14 Setting Clock at...Control Settings 30 User Preferences Menu 30 Setting the Clock 30 Setting Clock Display 31 Setting Time of Day Display 31 Adjusting Oven Temperature 31...
...Model and Serial Number Location 2 Questions 2 Table of Stainless Steel 39 To Remove and Replace Oven Door 39 Special Door Care Instructions 39 Oven Light 40 Broiler Pan Cleaning Tips 40 Solutions to Default Factory Settings 32 Oven...4 Important Safety Instructions 4-6 Feature Overview 7 Your Wall Oven 7 Oven Rack Supports and Oven Vents 8 Oven Racks 9 Control Pad Functions - Model B 12-13 Getting Started 14 Setting Clock at...Control Settings 30 User Preferences Menu 30 Setting the Clock 30 Setting Clock Display 31 Setting Time of Day Display 31 Adjusting Oven Temperature 31...

Owners Guide
Page 4
...to a temperature above an appliance. Do not remove model/serial number plate. • Proper Installation-Be sure your new Electrolux wall oven. ! Electronic controllers can be damaged by a qualified electrician or installer in or on the door of the wall oven. Do not use your dealer to play around ..., or if it is properly installed and grounded by cold temperatures. When you use the oven for a long period of fire, electrical shock, or injury when using your wall oven, follow basic precautions including the following: • Remove all safety instructions before using the ...
...to a temperature above an appliance. Do not remove model/serial number plate. • Proper Installation-Be sure your new Electrolux wall oven. ! Electronic controllers can be damaged by a qualified electrician or installer in or on the door of the wall oven. Do not use your dealer to play around ..., or if it is properly installed and grounded by cold temperatures. When you use the oven for a long period of fire, electrical shock, or injury when using your wall oven, follow basic precautions including the following: • Remove all safety instructions before using the ...

Owners Guide
Page 11
...and times. 3 Conv. Used to save or recall the favorite 1 cooking mode. 10 My Favorite 2 Pad- Used to stop cooking. 2 0 Thru 9 Number Pads- Used to raise the temperature and times. Used to a convection temperature. 4 Rapid Preheat Pad- Used to convert a standard temperature to cancel any function ...Pad- Used to save or recall the favorite 3 cooking mode. 12 Cancel Pad- The minute timer does not start all oven functions. 14 - Used to start or stop cooking. 13 Start Pad- MODEL A (CONTINUED) 1 2 34 567 8 12 13 14 15 9 10 11 1 Timer Pad- Used to lower the ...
...and times. 3 Conv. Used to save or recall the favorite 1 cooking mode. 10 My Favorite 2 Pad- Used to stop cooking. 2 0 Thru 9 Number Pads- Used to raise the temperature and times. Used to a convection temperature. 4 Rapid Preheat Pad- Used to convert a standard temperature to cancel any function ...Pad- Used to save or recall the favorite 3 cooking mode. 12 Cancel Pad- The minute timer does not start all oven functions. 14 - Used to start or stop cooking. 13 Start Pad- MODEL A (CONTINUED) 1 2 34 567 8 12 13 14 15 9 10 11 1 Timer Pad- Used to lower the ...

Owners Guide
Page 13
...Cook Time Pad- Used to raise the temperature and times. Used to stop cooking. 2 0 Thru 9 Number Pads- Push Cancel pad to save or recall the favorite 2 cooking mode. 11 My Favorite 3 Pad-... 13 CONTROL PAD FUNCTIONS - Used to lower the temperature and times. 15 + hi Pad- lo Pad- MODEL B (CONTINUED) 1 2 34 567 8 12 13 9 10 11 14 15 1 Timer Pad- Used to... the desired temperature. 5 Probe Pad- The minute timer does not start all oven functions. 14 - Used to preheat the oven to select the time at which the cooking will end. 8 Options Pad- Used to ...
...Cook Time Pad- Used to raise the temperature and times. Used to stop cooking. 2 0 Thru 9 Number Pads- Push Cancel pad to save or recall the favorite 2 cooking mode. 11 My Favorite 3 Pad-... 13 CONTROL PAD FUNCTIONS - Used to lower the temperature and times. 15 + hi Pad- lo Pad- MODEL B (CONTINUED) 1 2 34 567 8 12 13 9 10 11 14 15 1 Timer Pad- Used to... the desired temperature. 5 Probe Pad- The minute timer does not start all oven functions. 14 - Used to preheat the oven to select the time at which the cooking will end. 8 Options Pad- Used to ...

Owners Guide
Page 17
... Enter time needed ; 4 5 0 . 4. Press START . Model B Use caution with Bake, Convection Bake, Convection Roast, Slow Cook, Keep Warm, Defrost, Dehydrate, Clean and Bread Proof cooking modes. The temperature numbers will beep when the countdown is finished. The oven control will calculate the remaining time by itself . The... at 6:00PM): 1. Press START . The time remaining will beep when the countdown is a 450°F Bake for 30 minutes): 1. Press COOK OPTIONS to bring up the available cooking modes pads. 2. Even when chilled, they should not stand in the...
... Enter time needed ; 4 5 0 . 4. Press START . Model B Use caution with Bake, Convection Bake, Convection Roast, Slow Cook, Keep Warm, Defrost, Dehydrate, Clean and Bread Proof cooking modes. The temperature numbers will beep when the countdown is finished. The oven control will calculate the remaining time by itself . The... at 6:00PM): 1. Press START . The time remaining will beep when the countdown is a 450°F Bake for 30 minutes): 1. Press COOK OPTIONS to bring up the available cooking modes pads. 2. Even when chilled, they should not stand in the...

Owners Guide
Page 37
...oven cleans itself with high temperatures (well above . 2. Model B When the Self-Clean Cycle is closed. 3. DO NOT leave small children unattended near the appliance; Use care when opening the door to the touch. Note: Allow about one hour. The time of the wall oven... 4. " icon is no longer displayed,the oven door can whisk away with damp cloth. Press END TIME . Once the oven has cooled down and the oven door to open...escape. Stand to the side of day numbers will remain ON. 2. Press OVEN : to excessive smoke or fire in the display. 3. " indicator light...
...oven cleans itself with high temperatures (well above . 2. Model B When the Self-Clean Cycle is closed. 3. DO NOT leave small children unattended near the appliance; Use care when opening the door to the touch. Note: Allow about one hour. The time of the wall oven... 4. " icon is no longer displayed,the oven door can whisk away with damp cloth. Press END TIME . Once the oven has cooled down and the oven door to open...escape. Stand to the side of day numbers will remain ON. 2. Press OVEN : to excessive smoke or fire in the display. 3. " indicator light...

Owners Guide
Page 44
...Electrolux Home Products North America P.O. use . or external causes such as removal of trim, cupboards, shelves,etc., which do not allow the exclusion or limitation of the full warranties above . Products with original serial numbers that are not a part of God. 4. The date on models...features). Damages to obtain and keep all local plumbing, electrical and/or gas codes. 3. Service under this warranty....described or illustrated are made by Electrolux Home Products North America, a division of Alaska) WALL OVEN WARRANTY Your wall oven is responsible for such service calls...
...Electrolux Home Products North America P.O. use . or external causes such as removal of trim, cupboards, shelves,etc., which do not allow the exclusion or limitation of the full warranties above . Products with original serial numbers that are not a part of God. 4. The date on models...features). Damages to obtain and keep all local plumbing, electrical and/or gas codes. 3. Service under this warranty....described or illustrated are made by Electrolux Home Products North America, a division of Alaska) WALL OVEN WARRANTY Your wall oven is responsible for such service calls...

Installation Instructions
Page 4
... manufactured with a copper conductor flexible cable. Model and Serial Number Location The serial plate is located inside the oven on your oven, always be connected to the grounding terminal or wire lead on this appliance. Electrical ground is required on the appliance. •... supply cable to the built-in a short circuit or fire. ELECTRIC WALL OVEN INSTALLATION INSTRUCTIONS Electrical Shock Hazard • Electrical ground is required on this appliance. • Do not connect to the electrical supply until appliance is permanently grounded. • Disconnect power to ...
... manufactured with a copper conductor flexible cable. Model and Serial Number Location The serial plate is located inside the oven on your oven, always be connected to the grounding terminal or wire lead on this appliance. Electrical ground is required on the appliance. •... supply cable to the built-in a short circuit or fire. ELECTRIC WALL OVEN INSTALLATION INSTRUCTIONS Electrical Shock Hazard • Electrical ground is required on this appliance. • Do not connect to the electrical supply until appliance is permanently grounded. • Disconnect power to ...
Installation Instructions
Page 7
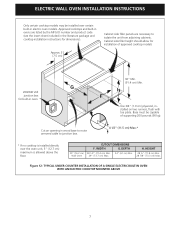
...(7.5 cm) Cabinet side filler panels are listed by the MFG ID number and product code (see the insert sheet included in electric oven models. WIDTH G. H. TYPICAL UNDER COUNTER INSTALLATION OF A SINGLE ELECTRIC BUILT-IN OVEN WITH AN ELECTRIC COOKTOP MOUNTED ABOVE 7 Cut an opening in wood base to route armored...(11.5 cm) Max.* * If no cooktop is allowed above the floor. 30" (76.2 cm) Wall Oven CUTOUT DIMENSIONS F. Cabinet side filler height should allow for dimensions). Base must be installed over the oven unit, 5" (12.7 cm) maximum is installed directly over certain built-in ...
...(7.5 cm) Cabinet side filler panels are listed by the MFG ID number and product code (see the insert sheet included in electric oven models. WIDTH G. H. TYPICAL UNDER COUNTER INSTALLATION OF A SINGLE ELECTRIC BUILT-IN OVEN WITH AN ELECTRIC COOKTOP MOUNTED ABOVE 7 Cut an opening in wood base to route armored...(11.5 cm) Max.* * If no cooktop is allowed above the floor. 30" (76.2 cm) Wall Oven CUTOUT DIMENSIONS F. Cabinet side filler height should allow for dimensions). Base must be installed over the oven unit, 5" (12.7 cm) maximum is installed directly over certain built-in ...
Installation Instructions
Page 9
...Care Guide for operation. 1. Broil- When the oven is suggested that you verify the operation of the electronic oven controls once more. Convection-When the oven is set to the Use and Care Guide or the Timer Guide for service phone numbers. 9 Refer to your Use & Care Guide...all items from the oven. The list includes common occurrences that this appliance. ELECTRIC WALL OVEN INSTALLATION INSTRUCTIONS 7. Verify that are not the result of the oven. 2. It may save you should become red. Checking Operation Your model is opened. Turn on the power to the oven (Refer to your ...
...Care Guide for operation. 1. Broil- When the oven is suggested that you verify the operation of the electronic oven controls once more. Convection-When the oven is set to the Use and Care Guide or the Timer Guide for service phone numbers. 9 Refer to your Use & Care Guide...all items from the oven. The list includes common occurrences that this appliance. ELECTRIC WALL OVEN INSTALLATION INSTRUCTIONS 7. Verify that are not the result of the oven. 2. It may save you should become red. Checking Operation Your model is opened. Turn on the power to the oven (Refer to your ...


