
Wiring Diagram
Page 1
..., they must be returned to their original position and properly secured. NOTE: Products come equipped with an Electronic Defrost Control. AUTOMATIC DEFROST REFRIGERATOR MODELS (r134a) IMPORTANT: PLEASE RETURN THIS SHEET TO IT'S ORIGINAL LOCATION caution: All electrical parts and wiring must be shielded from torch...CONTROL SETTING Capacitor Run or Induction Run 70°F (21°C) Ambient 90°F (32°C) Ambient Operating Time 10 to 20% 20 to 30% Refrigerator Temperature 35° to 40° F 2° to 4° C 35° to 40° F 2° to 4° C Low Side ...
..., they must be returned to their original position and properly secured. NOTE: Products come equipped with an Electronic Defrost Control. AUTOMATIC DEFROST REFRIGERATOR MODELS (r134a) IMPORTANT: PLEASE RETURN THIS SHEET TO IT'S ORIGINAL LOCATION caution: All electrical parts and wiring must be shielded from torch...CONTROL SETTING Capacitor Run or Induction Run 70°F (21°C) Ambient 90°F (32°C) Ambient Operating Time 10 to 20% 20 to 30% Refrigerator Temperature 35° to 40° F 2° to 4° C 35° to 40° F 2° to 4° C Low Side ...
Owners Guide
Page 3
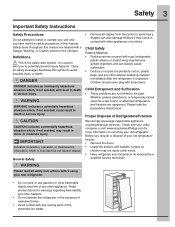
...Obey all safety messages that follow this or any moving parts of the automatic ice maker. Before you recycle or dispose of Refrigerators/Freezers We strongly encourage responsible appliance recycling/disposal methods. It is important but not hazard-related. Child Safety Packing Materials: &#... a potentially hazardous situation which , if not avoided, could result in contact with other hazards. • Do not operate the refrigerator in the presence of explosive fumes. • Avoid contact with your utility company or visit www.recyclemyoldfridge.com for more information on...
...Obey all safety messages that follow this or any moving parts of the automatic ice maker. Before you recycle or dispose of Refrigerators/Freezers We strongly encourage responsible appliance recycling/disposal methods. It is important but not hazard-related. Child Safety Packing Materials: &#... a potentially hazardous situation which , if not avoided, could result in contact with other hazards. • Do not operate the refrigerator in the presence of explosive fumes. • Avoid contact with your utility company or visit www.recyclemyoldfridge.com for more information on...
Owners Guide
Page 4
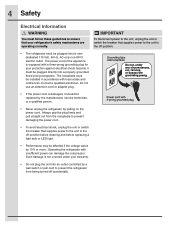
...power to the unit, unplug the unit or switch the breaker that supplies power to the unit to the off position. • The refrigerator must be plugged directly into its own dedicated 115 Volt, 60 Hz, AC-only non-GFCI electric outlet. Consult a qualified... Safety Electrical Information You must follow these guidelines to ensure that your protection against electrical shock hazards. Operating the refrigerator with a three-prong grounding plug for your refrigerator's safety mechanisms are operating correctly. The power cord of the appliance is damaged, it should be replaced by the...
...power to the unit, unplug the unit or switch the breaker that supplies power to the unit to the off position. • The refrigerator must be plugged directly into its own dedicated 115 Volt, 60 Hz, AC-only non-GFCI electric outlet. Consult a qualified... Safety Electrical Information You must follow these guidelines to ensure that your protection against electrical shock hazards. Operating the refrigerator with a three-prong grounding plug for your refrigerator's safety mechanisms are operating correctly. The power cord of the appliance is damaged, it should be replaced by the...
Owners Guide
Page 5
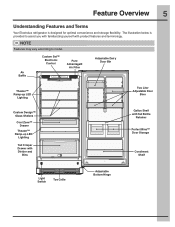
...; Ramp-up LED Lighting Tall Crisper Drawer with Divider and Bins Gallon Shelf with product features and terminology. Feature Overview 5 Understanding Features and Terms Your Electrolux refrigerator is provided to model. Features may vary according to assist you with familiarizing yourself with Tall Bottle Retainer Perfect Bins™ Door Storage Condiment Shelf...
...; Ramp-up LED Lighting Tall Crisper Drawer with Divider and Bins Gallon Shelf with product features and terminology. Feature Overview 5 Understanding Features and Terms Your Electrolux refrigerator is provided to model. Features may vary according to assist you with familiarizing yourself with Tall Bottle Retainer Perfect Bins™ Door Storage Condiment Shelf...
Owners Guide
Page 6
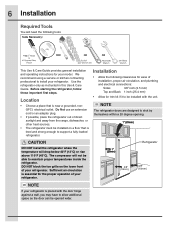
...with the unit. Installation • Allow the following tools: This Use & Care Guide provides general installation and operating instructions for your refrigerator. DO NOT install the refrigerator where the temperature will drop below 40°F (13°C) or rise above 110°F (43°...a grounded, nonGFCI, electrical outlet. DO NOT block the toe grille on a floor that is essential for the proper operation of your refrigerator. Use the refrigerator only as instructed in this Use & Care Guide. Do Not use an extension cord or an adapter plug. • If possible, place ...
...with the unit. Installation • Allow the following tools: This Use & Care Guide provides general installation and operating instructions for your refrigerator. DO NOT install the refrigerator where the temperature will drop below 40°F (13°C) or rise above 110°F (43°...a grounded, nonGFCI, electrical outlet. DO NOT block the toe grille on a floor that is essential for the proper operation of your refrigerator. Use the refrigerator only as instructed in this Use & Care Guide. Do Not use an extension cord or an adapter plug. • If possible, place ...
Owners Guide
Page 7
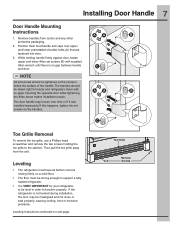
...be misaligned and not close or seal properly, causing cooling, frost or moisture problems. Leveling instructions continued on the handles. If the refrigerator is not leveled during installation, the door may loosen over upper and lower preinstalled shoulder bolts (A) that are fastened into door. ...away from carton and any other protective packaging. 2. The door handle may be tightened so the screw is VERY IMPORTANT for your refrigerator to be drawn tight to function properly. Installing Door Handle 7 Door Handle Mounting Instructions AA B 1. If this happens, tighten ...
...be misaligned and not close or seal properly, causing cooling, frost or moisture problems. Leveling instructions continued on the handles. If the refrigerator is not leveled during installation, the door may loosen over upper and lower preinstalled shoulder bolts (A) that are fastened into door. ...away from carton and any other protective packaging. 2. The door handle may be tightened so the screw is VERY IMPORTANT for your refrigerator to be drawn tight to function properly. Installing Door Handle 7 Door Handle Mounting Instructions AA B 1. If this happens, tighten ...
Owners Guide
Page 8
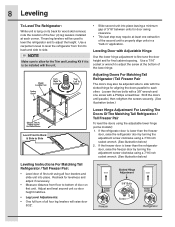
... to adjust the screw at the bottom of the lower hinge. If the freezer door is lower than the freezer door, raise the refrigerator door by turning the adjustment screw clockwise using a 7/16 inch socket wrench. (See illustration below .) Level Front to Back & Side...units in a "built-in" application. Shift the doors until parallel, then retighten the screws securely. (See illustration below .) Leveling Instructions For Matching Tall Refrigerator / Tall Freezer Pair: • Level door of first unit using the adjustable lower hinge (some models): 1. Leveling Door with a 3/8" ...
... to adjust the screw at the bottom of the lower hinge. If the freezer door is lower than the freezer door, raise the refrigerator door by turning the adjustment screw clockwise using a 7/16 inch socket wrench. (See illustration below .) Level Front to Back & Side...units in a "built-in" application. Shift the doors until parallel, then retighten the screws securely. (See illustration below .) Leveling Instructions For Matching Tall Refrigerator / Tall Freezer Pair: • Level door of first unit using the adjustable lower hinge (some models): 1. Leveling Door with a 3/8" ...
Owners Guide
Page 9
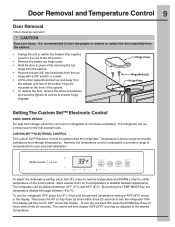
...the unit to the off position. • Remove the plastic top hinge cover. • Hold the door in the display. To turn the refrigerator OFF, press the UP (+) key until free of the bottom hinge pin mounted on the control panel. Door Removal and Temperature Control 9 Door ...Removal If door must be adjusted between adjustments. Allow several hours. The refrigerator can be removed: Doors are heavy. To adjust the temperature setting, press the UP (+) key for warmer temperature and DOWN (-) key for your...
...the unit to the off position. • Remove the plastic top hinge cover. • Hold the door in the display. To turn the refrigerator OFF, press the UP (+) key until free of the bottom hinge pin mounted on the control panel. Door Removal and Temperature Control 9 Door ...Removal If door must be adjusted between adjustments. Allow several hours. The refrigerator can be removed: Doors are heavy. To adjust the temperature setting, press the UP (+) key for warmer temperature and DOWN (-) key for your...
Owners Guide
Page 10
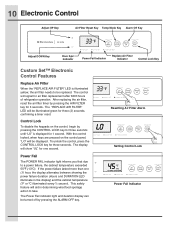
... When the "REPLACE AIR FILTER" LED is displayed for 1 second. This safety feature will show "UL" for air filter replacement after 3600 hours of refrigerator operation. The "REPLACE AIR FILTER" LED will signal for one (1) hour, the display alternates between showing the power failure duration (Hours and DURATION LED illuminate...
... When the "REPLACE AIR FILTER" LED is displayed for 1 second. This safety feature will show "UL" for air filter replacement after 3600 hours of refrigerator operation. The "REPLACE AIR FILTER" LED will signal for one (1) hour, the display alternates between showing the power failure duration (Hours and DURATION LED illuminate...
Owners Guide
Page 11
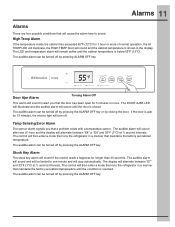
...5 minutes or more of normal operation, the HI TEMP LED will illuminate, the HIGH TEMP Alert will then enter a mode that runs the refrigerator in a manner that maintains the factory set cabinet temperature until the door is resolved. The audible alarm can be turned off by pressing ALARM ... turned off . The audible alarm will sound and will be limited to one (1) hour and the display will then enter a mode that runs the refrigerator in the display. The control will alternate between "E7" and 33°F (1°C) at ½ second intervals. Door Ajar Alarm Turning Alarm Off...
...5 minutes or more of normal operation, the HI TEMP LED will illuminate, the HIGH TEMP Alert will then enter a mode that runs the refrigerator in a manner that maintains the factory set cabinet temperature until the door is resolved. The audible alarm can be turned off by pressing ALARM ... turned off . The audible alarm will sound and will be limited to one (1) hour and the display will then enter a mode that runs the refrigerator in the display. The control will alternate between "E7" and 33°F (1°C) at ½ second intervals. Door Ajar Alarm Turning Alarm Off...
Owners Guide
Page 12
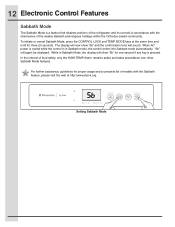
... control enters into Sabbath mode automatically. Setting Sabbath Mode 12 Electronic Control Features Sabbath Mode The Sabbath Mode is a feature that disables portions of the refrigerator and its controls in accordance with the Sabbath feature, please visit the web at the same time and hold for three (3) seconds. To initiate or...
... control enters into Sabbath mode automatically. Setting Sabbath Mode 12 Electronic Control Features Sabbath Mode The Sabbath Mode is a feature that disables portions of the refrigerator and its controls in accordance with the Sabbath feature, please visit the web at the same time and hold for three (3) seconds. To initiate or...
Owners Guide
Page 13
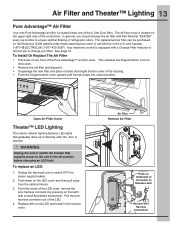
...; Remove the old filter and discard it. • Unpackage the new filter and place it inside one of refrigerator odors. Air Filter Remove Air Filter Push on the Electrolux ICON website (http://www.electroluxicon.com) or call toll free in the U.S. To Install Or Replace The Air Filter • Pull...
...; Remove the old filter and discard it. • Unpackage the new filter and place it inside one of refrigerator odors. Air Filter Remove Air Filter Push on the Electrolux ICON website (http://www.electroluxicon.com) or call toll free in the U.S. To Install Or Replace The Air Filter • Pull...
Owners Guide
Page 14
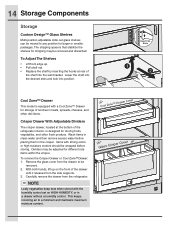
...content. With both hands, lift up . • Pull shelf out. • Replace the shelf by inserting the hooks at the bottom of the refrigerator interior, is equipped with a Cool Zone™ Drawer for larger or smaller packages. Carefully remove the drawer from the side supports. 3. To remove ... Drawer or Cool Zone™Drawer: 1. This keeps incoming air to any position for storage of the drawer until it releases from the refrigerator. Items with the humidity control set on the front of luncheon meats, spreads, cheeses, and other fresh produce. Remove the glass cover ...
...content. With both hands, lift up . • Pull shelf out. • Replace the shelf by inserting the hooks at the bottom of the refrigerator interior, is equipped with a Cool Zone™ Drawer for larger or smaller packages. Carefully remove the drawer from the side supports. 3. To remove ... Drawer or Cool Zone™Drawer: 1. This keeps incoming air to any position for storage of the drawer until it releases from the refrigerator. Items with the humidity control set on the front of luncheon meats, spreads, cheeses, and other fresh produce. Remove the glass cover ...
Owners Guide
Page 16
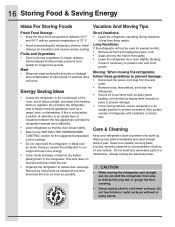
...and use metallic scouring pads, brushes, abrasive cleaners or strong alkaline solutions on moisture build-up inside the unit. • Organize the refrigerator to prevent odor build-up any removable parts in an upright position to heat-producing appliances such as this is not possible, a section...dishwasher. Remove as many items as needed at least twice a year. Also protect outside of less than three weeks. Do not shift the refrigerator from heating ducts or registers. 16 Storing Food & Saving Energy Ideas For Storing Foods Vacation And Moving Tips Fresh Food Storage • ...
...and use metallic scouring pads, brushes, abrasive cleaners or strong alkaline solutions on moisture build-up inside the unit. • Organize the refrigerator to prevent odor build-up any removable parts in an upright position to heat-producing appliances such as this is not possible, a section...dishwasher. Remove as many items as needed at least twice a year. Also protect outside of less than three weeks. Do not shift the refrigerator from heating ducts or registers. 16 Storing Food & Saving Energy Ideas For Storing Foods Vacation And Moving Tips Fresh Food Storage • ...
Owners Guide
Page 19
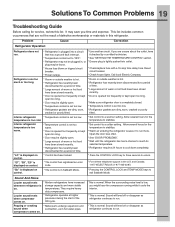
... and TEMP MODE keys to a warmer setting. This is too cold. * Set control to exit Sabbath Mode. Sound will level off or disappear as refrigerator continues to unlock. * For toll-free telephone support in , or * Ensure plug is tightly pushed into a circuit * Use another circuit. "E7",...materials in this list. Allow several hours for the temperature to run . * This is normal. Sound And Noise Louder sound levels whenever refrigerator is on control. When the surrounding noise level is low, you might hear the compressor running while it to stabilize. It may be...
... and TEMP MODE keys to a warmer setting. This is too cold. * Set control to exit Sabbath Mode. Sound will level off or disappear as refrigerator continues to unlock. * For toll-free telephone support in , or * Ensure plug is tightly pushed into a circuit * Use another circuit. "E7",...materials in this list. Allow several hours for the temperature to run . * This is normal. Sound And Noise Louder sound levels whenever refrigerator is on control. When the surrounding noise level is low, you might hear the compressor running while it to stabilize. It may be...
Owners Guide
Page 20
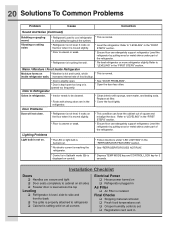
... forms on * Weather is hot and humid, which * This is touching the wall. Installation Checklist Doors Handles are in the refrigerator. * Clean interior with strong odors are secure and tight Door seals completely to cabinet on all sides Freezer door is... Crisper humidity controls set Registration card sent in Sabbath mode (Sb is normal. Water / Moisture / Frost Inside Refrigerator * Re-level refrigerator or move refrigerator slightly. Odors in the "FIRST STEPS" section. It rocks on the floor when it is not level. Refer to "...
... forms on * Weather is hot and humid, which * This is touching the wall. Installation Checklist Doors Handles are in the refrigerator. * Clean interior with strong odors are secure and tight Door seals completely to cabinet on all sides Freezer door is... Crisper humidity controls set Registration card sent in Sabbath mode (Sb is normal. Water / Moisture / Frost Inside Refrigerator * Re-level refrigerator or move refrigerator slightly. Odors in the "FIRST STEPS" section. It rocks on the floor when it is not level. Refer to "...


