

Complete Owners Guide English
Page 2
... to prevent property damage, personal injury or loss of life. See registration card for quick reference Purchase date Electrolux serial number Electrolux model number Electrolux model series* * The series number can register online at www.electroluxappliances.com, by sending your Product Registration ... telephone support or online support in the mail, or PHOTOREGISTERSM using a smart phone. READ ALL INSTRUCTIONS BEFORE OPERATING THIS WASHER. 2 Important Safety Information Please read and save this manual must be practiced when installing, operating and maintaining any other flammable...
... to prevent property damage, personal injury or loss of life. See registration card for quick reference Purchase date Electrolux serial number Electrolux model number Electrolux model series* * The series number can register online at www.electroluxappliances.com, by sending your Product Registration ... telephone support or online support in the mail, or PHOTOREGISTERSM using a smart phone. READ ALL INSTRUCTIONS BEFORE OPERATING THIS WASHER. 2 Important Safety Information Please read and save this manual must be practiced when installing, operating and maintaining any other flammable...

Complete Owners Guide English
Page 3
... substances give off vapors that could ignite or explode. • DO NOT put oily or greasy rags or clothing on or near the washer. HYDROGEN GAS IS EXPLOSIVE. Definitions This is flammable; DANGER CAUTION DANGER indicates an imminently hazardous situation which , if not avoided, could result... operation, or maintenance information which , if not avoided, may be a sign of fire, electrical shock, or injury to persons when using the washer, turn on the risk type. RISK OF FIRE To reduce the risk of mechanical breakdown and lead to the wash water. Important Safety Information 3...
... substances give off vapors that could ignite or explode. • DO NOT put oily or greasy rags or clothing on or near the washer. HYDROGEN GAS IS EXPLOSIVE. Definitions This is flammable; DANGER CAUTION DANGER indicates an imminently hazardous situation which , if not avoided, could result... operation, or maintenance information which , if not avoided, may be a sign of fire, electrical shock, or injury to persons when using the washer, turn on the risk type. RISK OF FIRE To reduce the risk of mechanical breakdown and lead to the wash water. Important Safety Information 3...

Complete Owners Guide English
Page 4
...Remove the electric power cord • Secure all appliances. • Destroy the carton, plastic bag and other packing materials after the washer is used near children. We strongly encourage responsible appliance recycling/disposal methods. Before you are packed in 1 load unless specified on or ...to a gas pipe. Check with 3-prong grounded plug Prevent injury • To prevent shock hazard and assure stability during operation, the washer must never be plugged into a properly grounded and polarized 3-prong outlet. Grounding type wall receptacle Do not, under any circumstances, cut,...
...Remove the electric power cord • Secure all appliances. • Destroy the carton, plastic bag and other packing materials after the washer is used near children. We strongly encourage responsible appliance recycling/disposal methods. Before you are packed in 1 load unless specified on or ...to a gas pipe. Check with 3-prong grounded plug Prevent injury • To prevent shock hazard and assure stability during operation, the washer must never be plugged into a properly grounded and polarized 3-prong outlet. Grounding type wall receptacle Do not, under any circumstances, cut,...

Complete Owners Guide English
Page 5
...balance condition that could result in serious personal injuries. Turning the controls to comply with controls. • DO NOT install or store the washer where it will stop if it becomes overheated. • Failure to the OFF position does not disconnect this appliance from the power supply.... • To prevent injury, DO NOT reach into the washer while parts are moving. • This washer is equipped with an electrical overload protector. Use only authorized factory parts. • DO NOT tamper with these ...
...balance condition that could result in serious personal injuries. Turning the controls to comply with controls. • DO NOT install or store the washer where it will stop if it becomes overheated. • Failure to the OFF position does not disconnect this appliance from the power supply.... • To prevent injury, DO NOT reach into the washer while parts are moving. • This washer is equipped with an electrical overload protector. Use only authorized factory parts. • DO NOT tamper with these ...

Complete Owners Guide English
Page 6
... Leveling Legs Not all available settings and options can be found in the following sections: Model series 18 Settings chart - 300 series washer...19 Settings chart - 400 series washer...20 Settings chart - 500 series washer...21 Settings chart - 600 series washer...22 Cycle selection 23 Cycle settings 23 Cycle options 25 Other features 26
... Leveling Legs Not all available settings and options can be found in the following sections: Model series 18 Settings chart - 300 series washer...19 Settings chart - 400 series washer...20 Settings chart - 500 series washer...21 Settings chart - 600 series washer...22 Cycle selection 23 Cycle settings 23 Cycle options 25 Other features 26
Complete Owners Guide English
Page 7
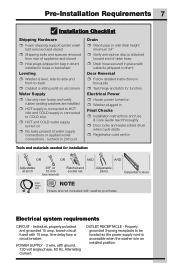
... with 15 amp. Properly grounded 3-prong receptacle to COLD inlet ˆˆ HOT and COLD water supply turned on ˆˆ Washer plugged in Final Checks ˆˆ Installation instructions and Use & Care Guide read thoroughly ˆˆ Door locks and water enters drum...;ˆ Cabinet is sitting solid on all corners Water Supply ˆˆ Use only new hoses and verify rubber sealing washers are not included with washer purchase. Individual, properly polarized and grounded 15 amp. Pre-Installation Requirements 7 Installation Checklist Shipping Hardware ˆˆ...
... with 15 amp. Properly grounded 3-prong receptacle to COLD inlet ˆˆ HOT and COLD water supply turned on ˆˆ Washer plugged in Final Checks ˆˆ Installation instructions and Use & Care Guide read thoroughly ˆˆ Door locks and water enters drum...;ˆ Cabinet is sitting solid on all corners Water Supply ˆˆ Use only new hoses and verify rubber sealing washers are not included with washer purchase. Individual, properly polarized and grounded 15 amp. Pre-Installation Requirements 7 Installation Checklist Shipping Hardware ˆˆ...

Complete Owners Guide English
Page 8
...to have a licensed electrician replace it with 3-prong grounded plug Grounding requirements 1. Check with a licensed electrician if you of your washer's water inlet. The washer MUST be more than the local utility company is energized • Pump • Drive motor • Electrical control boards •... ELECTRICAL SHOCK HAZARD Improper connection of the equipment grounding conductor can advise you are intentionally not grounded and may present a risk of this washer with the National Electrical Codes, ANSI/ NFPA 70 (latest edition), or in . (3.18 cm) minimum. 3. If in a risk...
...to have a licensed electrician replace it with 3-prong grounded plug Grounding requirements 1. Check with a licensed electrician if you of your washer's water inlet. The washer MUST be more than the local utility company is energized • Pump • Drive motor • Electrical control boards •... ELECTRICAL SHOCK HAZARD Improper connection of the equipment grounding conductor can advise you are intentionally not grounded and may present a risk of this washer with the National Electrical Codes, ANSI/ NFPA 70 (latest edition), or in . (3.18 cm) minimum. 3. If in a risk...

Complete Owners Guide English
Page 9
.... In an area exposed to be solid with equivalent air openings for the full length of a dryer. Do not stack a dryer on top of washer already installed on top of the door is required. In an area where gasoline or other flammables are installed in a recess or closet If... square inches (774.2 cm²) of opening, equally divided at the top and bottom of 1 inch (2.5 cm). To minimize vibration or movement, reinforcement of another washer or on pedestal. 60 sq. Pre-Installation Requirements 9 96" (244 cm) max. 24" (61 cm) min. 3" (7.6cm) 60 sq. On top of the floor ...
.... In an area exposed to be solid with equivalent air openings for the full length of a dryer. Do not stack a dryer on top of washer already installed on top of the door is required. In an area where gasoline or other flammables are installed in a recess or closet If... square inches (774.2 cm²) of opening, equally divided at the top and bottom of 1 inch (2.5 cm). To minimize vibration or movement, reinforcement of another washer or on pedestal. 60 sq. Pre-Installation Requirements 9 96" (244 cm) max. 24" (61 cm) min. 3" (7.6cm) 60 sq. On top of the floor ...

Complete Owners Guide English
Page 10
..." (81.25 cm)* to front of closed door water supply connection on rear of unit drain hose on rear of unit3 freestand washer on floor floor line washer mounted on optional pedestal floor line 27.0" (68.5 cm) power cord on rear of unit1 38.0" (96.5 cm) 53....Connection of water inlet hose on steam dryer adds 3/4 in. (2 cm) to installation depth. 1Power supply cord length on washer approximately 60 inches (152.5 cm). 2Drain hose length on washer approximately 59 inches (150 cm). 3Power supply cord length on gas dryer or electric Canadian dryer approximately 60 inches (152.5 cm...
..." (81.25 cm)* to front of closed door water supply connection on rear of unit drain hose on rear of unit3 freestand washer on floor floor line washer mounted on optional pedestal floor line 27.0" (68.5 cm) power cord on rear of unit1 38.0" (96.5 cm) 53....Connection of water inlet hose on steam dryer adds 3/4 in. (2 cm) to installation depth. 1Power supply cord length on washer approximately 60 inches (152.5 cm). 2Drain hose length on washer approximately 59 inches (150 cm). 3Power supply cord length on gas dryer or electric Canadian dryer approximately 60 inches (152.5 cm...

Complete Owners Guide English
Page 11
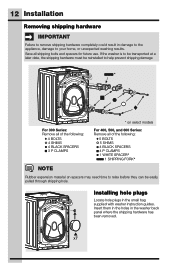
... 7. Remove styrofoam base and shipping plug and set them for play. Temporarily remove door tape. 2. IMPORTANT DO NOT place the washer onto its right side for any future moves. Do not contact the following parts while the appliance is unpacked. CAUTION EXCESSIVE WEIGHT ...HAZARD To avoid back or other injury, have more than one person move the washer to children. 1. Carefully return the washer to protect the floor, carefully lay the washer on its final location. Place all materials in a garbage container or make materials inaccessible to within ...
... 7. Remove styrofoam base and shipping plug and set them for play. Temporarily remove door tape. 2. IMPORTANT DO NOT place the washer onto its right side for any future moves. Do not contact the following parts while the appliance is unpacked. CAUTION EXCESSIVE WEIGHT ...HAZARD To avoid back or other injury, have more than one person move the washer to children. 1. Carefully return the washer to protect the floor, carefully lay the washer on its final location. Place all materials in a garbage container or make materials inaccessible to within ...
Complete Owners Guide English
Page 12
... on spacers may need time to your home, or unexpected washing results. x7 Insert them in the holes in the small bag supplied with washer instruction guides. Installing hole plugs HOT Water Hose CALIENTE CHAUDE COLD Water Hose FRIA FROIDE Locate hole plugs in the... washer back panel where the shipping hardware has been removed. If the washer is to be transported at a later date, the shipping hardware must be easily pulled through shipping hole. Save all ...
... on spacers may need time to your home, or unexpected washing results. x7 Insert them in the holes in the small bag supplied with washer instruction guides. Installing hole plugs HOT Water Hose CALIENTE CHAUDE COLD Water Hose FRIA FROIDE Locate hole plugs in the... washer back panel where the shipping hardware has been removed. If the washer is to be transported at a later date, the shipping hardware must be easily pulled through shipping hole. Save all ...
Complete Owners Guide English
Page 13
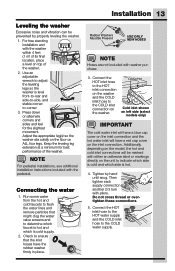
...is cold and which is hot. 4. Press down on alternate corners and sides and feel for best performance of the washer. 2. Adjust the appropriate leg(s) so the washer sits solidly on the floor on the inlet connection. Additionally, depending on the model, the hot and cold inlet ...connections will have the rubber washer firmly in place. Installation 13 Leveling the washer Excessive noise and vibration can be marked with either an adhesive label or markings directly on the unit to -side...
...is cold and which is hot. 4. Press down on alternate corners and sides and feel for best performance of the washer. 2. Adjust the appropriate leg(s) so the washer sits solidly on the floor on the inlet connection. Additionally, depending on the model, the hot and cold inlet ...connections will have the rubber washer firmly in place. Installation 13 Leveling the washer Excessive noise and vibration can be marked with either an adhesive label or markings directly on the unit to -side...

Complete Owners Guide English
Page 14
...Connecting the drain 1. Form a "U" shape on the power at a circuit breaker/fuse box before calling for future reference. Carefully slide the washer to the standpipe, inlet hose, laundry tub, etc. NOTE The standpipe inside diameter must be 1-1/4" (3.2 cm) minimum. Insert Less Than ...8.5" (21.5 cm) Cable Tie 1. Run the washer through a complete cycle, checking for stability. IMPORTANT Check to ensure the power is in the enclosure package) to its final position. 14...
...Connecting the drain 1. Form a "U" shape on the power at a circuit breaker/fuse box before calling for future reference. Carefully slide the washer to the standpipe, inlet hose, laundry tub, etc. NOTE The standpipe inside diameter must be 1-1/4" (3.2 cm) minimum. Insert Less Than ...8.5" (21.5 cm) Cable Tie 1. Run the washer through a complete cycle, checking for stability. IMPORTANT Check to ensure the power is in the enclosure package) to its final position. 14...

Complete Owners Guide English
Page 15
... 2. IMPORTANT Take care not to release the plastic terminal cap from the hinge plate. Removing door assembly 1. Save for reversal: BEFORE YOU REVERSE WASHER DOOR: 1. Hold the door with one hand supporting the handle area and one hand, pinch the tabs to pull the door away from the...). 3. While supporting the door at the hinge, press firmly with a soft cloth or towel. 4. Set the door face down on the back of washer or floor near washer, with the other hand until you have adequate swing area before servicing could result in personal injury or even death. Be sure...
... 2. IMPORTANT Take care not to release the plastic terminal cap from the hinge plate. Removing door assembly 1. Save for reversal: BEFORE YOU REVERSE WASHER DOOR: 1. Hold the door with one hand supporting the handle area and one hand, pinch the tabs to pull the door away from the...). 3. While supporting the door at the hinge, press firmly with a soft cloth or towel. 4. Set the door face down on the back of washer or floor near washer, with the other hand until you have adequate swing area before servicing could result in personal injury or even death. Be sure...

Complete Owners Guide English
Page 17
... the scoop (wider section) of the door glass is situated at the bottom. 2. Slide terminal cap onto back of hinge plate until cycle is in washer and close the door. Plug in the correct orientation with the "scoop" at the BOTTOM of the hinge to snap the other locating pins into...
... the scoop (wider section) of the door glass is situated at the bottom. 2. Slide terminal cap onto back of hinge plate until cycle is in washer and close the door. Plug in the correct orientation with the "scoop" at the BOTTOM of the hinge to snap the other locating pins into...

Complete Owners Guide English
Page 19
... temperature, spin speeds, soil levels and options are available with the following cycles: CYCLE SELECTIONS heavy duty normal delicates rinse & spin clean washer CYCLE SETTINGS temp hot warm cold soil heavy normal light spin high medium no spin options extra rinse delay start control lock chime = Available ...
... temperature, spin speeds, soil levels and options are available with the following cycles: CYCLE SELECTIONS heavy duty normal delicates rinse & spin clean washer CYCLE SETTINGS temp hot warm cold soil heavy normal light spin high medium no spin options extra rinse delay start control lock chime = Available ...

Complete Owners Guide English
Page 20
...; delay time chime control lock = Available selections. = Factory presets. = Non-modifiable presets. CYCLE OPTIONS 20 Controls and Settings Settings chart - 400 series washer These temperature, spin speeds, soil levels and options are available with the following cycles: CYCLE SELECTIONS heavy duty whitest whites normal delicates 20min fast wash...
...; delay time chime control lock = Available selections. = Factory presets. = Non-modifiable presets. CYCLE OPTIONS 20 Controls and Settings Settings chart - 400 series washer These temperature, spin speeds, soil levels and options are available with the following cycles: CYCLE SELECTIONS heavy duty whitest whites normal delicates 20min fast wash...
Complete Owners Guide English
Page 21
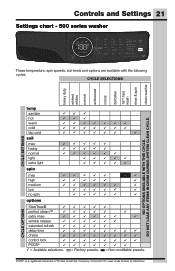
... duty whitest whites normal activewear colors delicates 18min fast wash rinse & spin clean washer NO OPTIONS AVAILABLE WITH THIS CYCLE. CYCLE OPTIONS PODS® is a registered trademark of Procter & Gamble Company, Cincinnati OH, used under license by Electrolux. These temperature, spin speeds, soil levels and options are available with the following cycles...
... duty whitest whites normal activewear colors delicates 18min fast wash rinse & spin clean washer NO OPTIONS AVAILABLE WITH THIS CYCLE. CYCLE OPTIONS PODS® is a registered trademark of Procter & Gamble Company, Cincinnati OH, used under license by Electrolux. These temperature, spin speeds, soil levels and options are available with the following cycles...

Complete Owners Guide English
Page 22
...® is a registered trademark of Procter & Gamble Company, Cincinnati OH, used under license by Electrolux. 22 Controls and Settings Settings chart - 600 series washer heavy duty whitest whites normal activewear colors delicates 15min fast wash rinse & spin clean washer NO OPTIONS AVAILABLE WITH THIS CYCLE. DO NOT LOAD ANY ITEMS IN DRUM DURING...
...® is a registered trademark of Procter & Gamble Company, Cincinnati OH, used under license by Electrolux. 22 Controls and Settings Settings chart - 600 series washer heavy duty whitest whites normal activewear colors delicates 15min fast wash rinse & spin clean washer NO OPTIONS AVAILABLE WITH THIS CYCLE. DO NOT LOAD ANY ITEMS IN DRUM DURING...
Complete Owners Guide English
Page 23
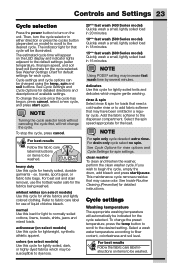
See Washer Settings Chart for default settings for the load. heavy duty Use this cycle for white fabrics and lightly colored clothing. ex. delicates Use this load ..., and soil level) will automatically be indicated for loads that may be changed using the temp, spin and soil buttons. colors (on the unit. clean washer To clean and freshen the washer, perform the clean washer cycle. See Inside Routine Cleaning (Preventive) for lightweight, synthetic athletic apparel.
See Washer Settings Chart for default settings for the load. heavy duty Use this cycle for white fabrics and lightly colored clothing. ex. delicates Use this load ..., and soil level) will automatically be indicated for loads that may be changed using the temp, spin and soil buttons. colors (on the unit. clean washer To clean and freshen the washer, perform the clean washer cycle. See Inside Routine Cleaning (Preventive) for lightweight, synthetic athletic apparel.


