
Complete Owner's Guide (English)
Page 5
..., do not operate the oven and contact your dealer or ELECTROLUX AUTHORIZED SERVICER. Check the oven for any electric wall oven or warming drawer using built-in kit models EI27MO45T or EI30MO45T for Your Microwave Oven Your oven can be built into a cabinet or wall by itself or above any damage..., such as misaligned or bent door, damaged door seals and sealing surfaces, broken or loose door hinges and latches and dents inside the oven cavity. Choosing a Location for microwave oven model...
..., do not operate the oven and contact your dealer or ELECTROLUX AUTHORIZED SERVICER. Check the oven for any electric wall oven or warming drawer using built-in kit models EI27MO45T or EI30MO45T for Your Microwave Oven Your oven can be built into a cabinet or wall by itself or above any damage..., such as misaligned or bent door, damaged door seals and sealing surfaces, broken or loose door hinges and latches and dents inside the oven cavity. Choosing a Location for microwave oven model...

Wiring Diagram (English Español Français)
Page 1
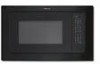
Electrolux Major Appliances EI24MO45I P.O. BOX 212378 AUGUSTA, GA 30917 Publication No. 5995567723 10/06/03 (EN/SERVICE/KC) 099 GRAIN DIRECTION (ALL PARTS) Product No. EI24MO45IBB Market North America Color black Volts 120 Watts 1100 Wiring Diagram 5995567723 Owner's Guide TINSEB263WRRZ Installation Instructions TINS-B003MRR1 BUILT-IN MICROWAVE EI27MO45GS cover.eps EI24MO45IBA cabinet.eps EI27MO45GSA controls.eps EI27MO45GSA wiring.eps Model No.
Electrolux Major Appliances EI24MO45I P.O. BOX 212378 AUGUSTA, GA 30917 Publication No. 5995567723 10/06/03 (EN/SERVICE/KC) 099 GRAIN DIRECTION (ALL PARTS) Product No. EI24MO45IBB Market North America Color black Volts 120 Watts 1100 Wiring Diagram 5995567723 Owner's Guide TINSEB263WRRZ Installation Instructions TINS-B003MRR1 BUILT-IN MICROWAVE EI27MO45GS cover.eps EI24MO45IBA cabinet.eps EI27MO45GSA controls.eps EI27MO45GSA wiring.eps Model No.

Installation Instructions (All Languages)
Page 1
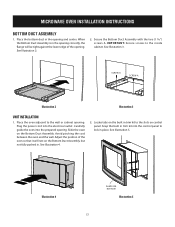
... 1) Front Frame Assembly QTY 1 2) Bottom Duct Assembly QTY 1 3) Screw A (1 3/16" length) QTY 2 4) Screw B (1 3/4" length) QTY 4 MICROWAVE OVEN INSTALLATION INSTRUCTIONS INSTALLATION AND SERVICE MUST BE PERFORMED BY A QUALIFIED INSTALLER. This may void the warranty. • Please observe all local and national codes...; Do not remove permanently affixed labels, warnings, or plates from the electrical outlet before installing the built-in handling and installation to DISCONNECT THE PLUG of the microwave oven from the product. IMPORTANT: SAVE FOR LOCAL ELECTRICAL INSPECTOR'S USE.
... 1) Front Frame Assembly QTY 1 2) Bottom Duct Assembly QTY 1 3) Screw A (1 3/16" length) QTY 2 4) Screw B (1 3/4" length) QTY 4 MICROWAVE OVEN INSTALLATION INSTRUCTIONS INSTALLATION AND SERVICE MUST BE PERFORMED BY A QUALIFIED INSTALLER. This may void the warranty. • Please observe all local and national codes...; Do not remove permanently affixed labels, warnings, or plates from the electrical outlet before installing the built-in handling and installation to DISCONNECT THE PLUG of the microwave oven from the product. IMPORTANT: SAVE FOR LOCAL ELECTRICAL INSPECTOR'S USE.
Installation Instructions (All Languages)
Page 3
... in . Adjust the position of the oven so that it will be tight against the lower edge of the opening . Snap the built in trim kit into the control panel to lock in trim kit to the inside cabinet. See Illustration 4. 2. IMPORTANT: Secure screws ...to the slots on the Bottom Duct Assembly, but not fully pushed in the opening . Illustration 4 Shape on the Bottom Duct Assembly. MICROWAVE OVEN INSTALLAITlluIsOtrNatioInN1STRUCTIONS BOTTOM DUCT ASSEMBLY 1. Avoid pinching the cord between the oven and the wall. See Illustration 3. Carefully guide the oven into the ...
... in . Adjust the position of the oven so that it will be tight against the lower edge of the opening . Snap the built in trim kit into the control panel to lock in trim kit to the inside cabinet. See Illustration 4. 2. IMPORTANT: Secure screws ...to the slots on the Bottom Duct Assembly, but not fully pushed in the opening . Illustration 4 Shape on the Bottom Duct Assembly. MICROWAVE OVEN INSTALLAITlluIsOtrNatioInN1STRUCTIONS BOTTOM DUCT ASSEMBLY 1. Avoid pinching the cord between the oven and the wall. See Illustration 3. Carefully guide the oven into the ...
Installation Instructions (All Languages)
Page 4
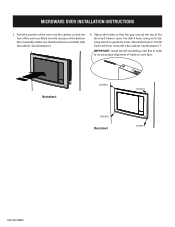
Make sure that the feet of the oven are fitted into the recesses of frame to oven face. Attach the built-in order to secure proper alignment of the Bottom Duct Assembly. Push the position of the door and frame is even. Adjust the frame so ... an ¹⁄₈" bit, using the kit to the cabinet. Important: Install top left mounting screw first in trim kit frame with the cabinet. MICROWAVE OVEN INSTALLATION INSTRUCTIONS 3.
Make sure that the feet of the oven are fitted into the recesses of frame to oven face. Attach the built-in order to secure proper alignment of the Bottom Duct Assembly. Push the position of the door and frame is even. Adjust the frame so ... an ¹⁄₈" bit, using the kit to the cabinet. Important: Install top left mounting screw first in trim kit frame with the cabinet. MICROWAVE OVEN INSTALLATION INSTRUCTIONS 3.

Product Specifications Sheet (English)
Page 1
...- A 13" x 9" pan - Ft. 1,200 White Yes Yes Control Panel ...Cu. Wall Ovens Warmer Drawers Built-In Microwave EI24MO45I B Cooktops Built-In Ranges Freestanding Ranges Microwaves Vent Hoods Dishwashers / Kitchen Cleanup Microwave...Microwave EI24MO45I B with 30" Stainless Steel Trim Kit EI30MO45T S Microwave EI24MO45I B with 30" White Trim Kit EI30MO45T W Microwave EI24MO45I B with 30" Black Trim Kit EI30MO45T B Microwave EI24MO45I B with 27" Stainless Steel Trim Kit EI27MO45T S Microwave EI24MO45I B with 27" White Trim Kit EI27MO45T W Microwave EI24MO45I B with any Electrolux...
...- A 13" x 9" pan - Ft. 1,200 White Yes Yes Control Panel ...Cu. Wall Ovens Warmer Drawers Built-In Microwave EI24MO45I B Cooktops Built-In Ranges Freestanding Ranges Microwaves Vent Hoods Dishwashers / Kitchen Cleanup Microwave...Microwave EI24MO45I B with 30" Stainless Steel Trim Kit EI30MO45T S Microwave EI24MO45I B with 30" White Trim Kit EI30MO45T W Microwave EI24MO45I B with 30" Black Trim Kit EI30MO45T B Microwave EI24MO45I B with 27" Stainless Steel Trim Kit EI27MO45T S Microwave EI24MO45I B with 27" White Trim Kit EI27MO45T W Microwave EI24MO45I B with any Electrolux...

Product Specifications Sheet (English)
Page 2
...• Installation requires use on web.) • When used in combination with another Electrolux built-in product, a minimum clearance of 2 7/8" required from bottom of Built-In Microwave cutout to top edge of companion product's faceplate, leaving a 2" visible gap between ... 2 5/16" 25 1/4" min. 25 3/8" max. 20" min. Built-In Microwave EI24MO45I B *Note: When used in combination with another Electrolux built-in product, a minimum clearance of 2-7/8" required from bottom of Built-In Microwave cutout to top edge of companion product's faceplate, leaving a 2" visible gap...
...• Installation requires use on web.) • When used in combination with another Electrolux built-in product, a minimum clearance of 2 7/8" required from bottom of Built-In Microwave cutout to top edge of companion product's faceplate, leaving a 2" visible gap between ... 2 5/16" 25 1/4" min. 25 3/8" max. 20" min. Built-In Microwave EI24MO45I B *Note: When used in combination with another Electrolux built-in product, a minimum clearance of 2-7/8" required from bottom of Built-In Microwave cutout to top edge of companion product's faceplate, leaving a 2" visible gap...

Product Specifications Sheet (English)
Page 3
... ON L5V 3E4 • 1-800-265-8352 • electroluxappliances.ca MOSS_EW 30INST EL 07/11 © 2011 Electrolux Major Appliances, NA High standards of Built-In Microwave cutout to improve our products. mean we are constantly working to top edge of Wall Oven's faceplate, leaving a ... will fit flush against cabinet front. • Bases must be level and cabinet front must be grounded for detailed instructions. Built-In Microwave/Single Wall Oven 30" Combination Installation Specifications • Always consult local and national electric codes. (Refer to product-specific electrical...
... ON L5V 3E4 • 1-800-265-8352 • electroluxappliances.ca MOSS_EW 30INST EL 07/11 © 2011 Electrolux Major Appliances, NA High standards of Built-In Microwave cutout to improve our products. mean we are constantly working to top edge of Wall Oven's faceplate, leaving a ... will fit flush against cabinet front. • Bases must be level and cabinet front must be grounded for detailed instructions. Built-In Microwave/Single Wall Oven 30" Combination Installation Specifications • Always consult local and national electric codes. (Refer to product-specific electrical...

Product Specifications Sheet (English)
Page 4
...Way • Mississauga, ON L5V 3E4 • 1-800-265-8352 • electroluxappliances.ca MOSS_EW 27INST EL 07/11 © 2011 Electrolux Major Appliances, NA High standards of quality at bottom. (Standard 1"- Refer to Product Installation Guide on both product faceplates. 27" Electric ...top and oven's 1"-high bottom trim will hide larger cutout opening under oven side rails. Note: For planning purposes only. Built-In Microwave/Single Wall Oven 27" Combination Installation Specifications • Always consult local and national electric codes. (Refer to product-specific ...
...Way • Mississauga, ON L5V 3E4 • 1-800-265-8352 • electroluxappliances.ca MOSS_EW 27INST EL 07/11 © 2011 Electrolux Major Appliances, NA High standards of quality at bottom. (Standard 1"- Refer to Product Installation Guide on both product faceplates. 27" Electric ...top and oven's 1"-high bottom trim will hide larger cutout opening under oven side rails. Note: For planning purposes only. Built-In Microwave/Single Wall Oven 27" Combination Installation Specifications • Always consult local and national electric codes. (Refer to product-specific ...

Product Specifications Sheet (English)
Page 5
... Way • Mississauga, ON L5V 3E4 • 1-800-265-8352 • electroluxappliances.ca MOSS_EW_WD 30INST EL 07/11 © 2011 Electrolux Major Appliances, NA High standards of supporting 200 Lbs. Built-In Microwave/Single Wall Oven/Warmer Drawer 30" Combination Installation Specifications • Always consult local and national electric codes. (Refer to product...
... Way • Mississauga, ON L5V 3E4 • 1-800-265-8352 • electroluxappliances.ca MOSS_EW_WD 30INST EL 07/11 © 2011 Electrolux Major Appliances, NA High standards of supporting 200 Lbs. Built-In Microwave/Single Wall Oven/Warmer Drawer 30" Combination Installation Specifications • Always consult local and national electric codes. (Refer to product...

Product Specifications Sheet (English)
Page 6
... Way • Mississauga, ON L5V 3E4 • 1-800-265-8352 • electroluxappliances.ca MOSS_EW_WD 27INST EL 07/11 © 2011 Electrolux Major Appliances, NA High standards of quality at electroluxappliances.com for detailed instructions. or 4-wire cable, 120 / 240 or 120 / 208 ... change specifications or discontinue models without notice. Refer to improve our products. Appliance must be grounded for Wall Oven door depth when open. 27" Built-In Microwave Specifications • Product Weight - 48 Lbs. • Voltage Rating - 120V / 60 Hz / 15 or 20 Amps • Connected Load...
... Way • Mississauga, ON L5V 3E4 • 1-800-265-8352 • electroluxappliances.ca MOSS_EW_WD 27INST EL 07/11 © 2011 Electrolux Major Appliances, NA High standards of quality at electroluxappliances.com for detailed instructions. or 4-wire cable, 120 / 240 or 120 / 208 ... change specifications or discontinue models without notice. Refer to improve our products. Appliance must be grounded for Wall Oven door depth when open. 27" Built-In Microwave Specifications • Product Weight - 48 Lbs. • Voltage Rating - 120V / 60 Hz / 15 or 20 Amps • Connected Load...


