
Complete Owner's Guide (English)
Page 3
...Possible Exposure Auto Cook chart 18-19 to Excessive Microwave Energy 2 Reheat Pasta / Reheat Breads 20 Table of Contents 3 Quick Settings 21 Important Safety Instructions 4 Quick settings chart 21 Unpacking and Installation Instruction.......... 5 Other Special Features 22-23 Grounding ...Instructions 6 Defrost 22 Information You Need to Know 7-10 Defrost chart 22 About your oven 7 Keep warm 23 About microwave cooking 7 Convenient Features 24-26 About...
...Possible Exposure Auto Cook chart 18-19 to Excessive Microwave Energy 2 Reheat Pasta / Reheat Breads 20 Table of Contents 3 Quick Settings 21 Important Safety Instructions 4 Quick settings chart 21 Unpacking and Installation Instruction.......... 5 Other Special Features 22-23 Grounding ...Instructions 6 Defrost 22 Information You Need to Know 7-10 Defrost chart 22 About your oven 7 Keep warm 23 About microwave cooking 7 Convenient Features 24-26 About...

Complete Owner's Guide (English)
Page 4
.... Use a wide-mouthed container. Read and follow the specific "PRECAUTIONS TO AVOID POSSIBLE EXPOSURE TO EXCESSIVE MICROWAVE ENERGY" on page 27. 16. This appliance must be boiling. As with the provided installation instructions. 5. Contact nearest Electrolux Authorized Servicer for storage purposes. Carefully attend to appliance when paper, plastic or other utensil into the...
.... Use a wide-mouthed container. Read and follow the specific "PRECAUTIONS TO AVOID POSSIBLE EXPOSURE TO EXCESSIVE MICROWAVE ENERGY" on page 27. 16. This appliance must be boiling. As with the provided installation instructions. 5. Contact nearest Electrolux Authorized Servicer for storage purposes. Carefully attend to appliance when paper, plastic or other utensil into the...

Complete Owner's Guide (English)
Page 5
...Location for Your Microwave Oven Your oven can be built into a cabinet or wall by itself or above any electric wall oven or warming drawer using built-in kit models EI27MO45T or EI30MO45T for any damage, do not operate the oven and contact your dealer or ELECTROLUX AUTHORIZED SERVICER.... Remove the feature sticker, if there is one, from inside the cavity or on the right cavity wall. Unpacking and Installation Instruction 5 Unpacking and Examining Your Oven 1. Read enclosures and SAVE this...
...Location for Your Microwave Oven Your oven can be built into a cabinet or wall by itself or above any electric wall oven or warming drawer using built-in kit models EI27MO45T or EI30MO45T for any damage, do not operate the oven and contact your dealer or ELECTROLUX AUTHORIZED SERVICER.... Remove the feature sticker, if there is one, from inside the cavity or on the right cavity wall. Unpacking and Installation Instruction 5 Unpacking and Examining Your Oven 1. Read enclosures and SAVE this...
Complete Owner's Guide (English)
Page 6
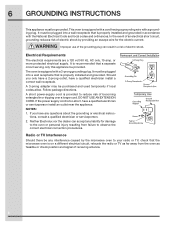
... grounding plug. In the event of an electrical short circuit, grounding reduces risk of electric shock by the microwave oven to your radio or TV, check that the microwave oven is on a different electrical circuit, relocate the radio or TV as feasible or check position and signal...requirements are a 120 volt 60 Hz, AC only, 15 amp. Neither Electrolux nor the dealer can result in or tripping over a longer cord. If you only have a 2-prong outlet, have a qualified electrician or serviceperson install an outlet near the appliance. Follow package directions. 6 Grounding Instructions This ...
... grounding plug. In the event of an electrical short circuit, grounding reduces risk of electric shock by the microwave oven to your radio or TV, check that the microwave oven is on a different electrical circuit, relocate the radio or TV as feasible or check position and signal...requirements are a 120 volt 60 Hz, AC only, 15 amp. Neither Electrolux nor the dealer can result in or tripping over a longer cord. If you only have a 2-prong outlet, have a qualified electrician or serviceperson install an outlet near the appliance. Follow package directions. 6 Grounding Instructions This ...

Complete Owner's Guide (English)
Page 30
In addition, the magnetron tube of your appliance is warranted by Electrolux Major Appliances North America, a division of purchase. 12. Service calls to correct the installation of your appliance or to instruct you how to use your original date of Electrolux Home Products, Inc. use or used , and maintained in accordance with the provided...
In addition, the magnetron tube of your appliance is warranted by Electrolux Major Appliances North America, a division of purchase. 12. Service calls to correct the installation of your appliance or to instruct you how to use your original date of Electrolux Home Products, Inc. use or used , and maintained in accordance with the provided...

Wiring Diagram (English Español Français)
Page 1
Electrolux Major Appliances EI24MO45I P.O. BOX 212378 AUGUSTA, GA 30917 Publication No. 5995567723 10/06/03 (EN/SERVICE/KC) 099 EI24MO45IBB Market North America Color black Volts 120 Watts 1100 Wiring Diagram 5995567723 Owner's Guide TINSEB263WRRZ Installation Instructions TINS-B003MRR1 BUILT-IN MICROWAVE EI27MO45GS cover.eps EI24MO45IBA cabinet.eps EI27MO45GSA controls.eps EI27MO45GSA wiring.eps Model No. GRAIN DIRECTION (ALL PARTS) Product No.
Electrolux Major Appliances EI24MO45I P.O. BOX 212378 AUGUSTA, GA 30917 Publication No. 5995567723 10/06/03 (EN/SERVICE/KC) 099 EI24MO45IBB Market North America Color black Volts 120 Watts 1100 Wiring Diagram 5995567723 Owner's Guide TINSEB263WRRZ Installation Instructions TINS-B003MRR1 BUILT-IN MICROWAVE EI27MO45GS cover.eps EI24MO45IBA cabinet.eps EI27MO45GSA controls.eps EI27MO45GSA wiring.eps Model No. GRAIN DIRECTION (ALL PARTS) Product No.

Installation Instructions (All Languages)
Page 1
...future reference. This may void the warranty. • Please observe all local and national codes and ordinances. • The installer should leave these instructions completely and carefully. • Be sure to DISCONNECT THE PLUG of injury. • Do not ..., or plates from the electrical outlet before installing the built-in handling and installation to avoid the possibility of the microwave oven from the product. Important - MICROWAVE OVEN INSTALLATION INSTRUCTIONS INSTALLATION AND SERVICE MUST BE PERFORMED BY A QUALIFIED INSTALLER. READ AND SAVE THESE INSTRUCTIONS FOR FUTURE ...
...future reference. This may void the warranty. • Please observe all local and national codes and ordinances. • The installer should leave these instructions completely and carefully. • Be sure to DISCONNECT THE PLUG of injury. • Do not ..., or plates from the electrical outlet before installing the built-in handling and installation to avoid the possibility of the microwave oven from the product. Important - MICROWAVE OVEN INSTALLATION INSTRUCTIONS INSTALLATION AND SERVICE MUST BE PERFORMED BY A QUALIFIED INSTALLER. READ AND SAVE THESE INSTRUCTIONS FOR FUTURE ...

Installation Instructions (All Languages)
Page 2
...: While the proper functioning of the microwave oven does not require that the opening should be level for any such requirement. 2. ft. 120VAC/60 Hz (UL) 120VAC/60 Hz (CSA) Refer to support the weight of visible cabinet showing after installation. Outlet should be constructed of the oven...cu. F 17 3/4" (45.1 cm) G min. 30" (76.2 cm) F 17 3/4" (45.1 cm) G min. 27" (68.6 cm) J min. 20" (50.8 cm) Approximate SHIPPING WT. 46 lbs. (20.9 kg) MAX AMP. At the rear of 20" (50.8 cm). USAGE 1.5 KW 13.0 amps (UL) 1.50 KW 13 (CSA) E2 BASIC SPECIFICATIONS MICROWAVE OVEN INSTALLATION...
...: While the proper functioning of the microwave oven does not require that the opening should be level for any such requirement. 2. ft. 120VAC/60 Hz (UL) 120VAC/60 Hz (CSA) Refer to support the weight of visible cabinet showing after installation. Outlet should be constructed of the oven...cu. F 17 3/4" (45.1 cm) G min. 30" (76.2 cm) F 17 3/4" (45.1 cm) G min. 27" (68.6 cm) J min. 20" (50.8 cm) Approximate SHIPPING WT. 46 lbs. (20.9 kg) MAX AMP. At the rear of 20" (50.8 cm). USAGE 1.5 KW 13.0 amps (UL) 1.50 KW 13 (CSA) E2 BASIC SPECIFICATIONS MICROWAVE OVEN INSTALLATION...
Installation Instructions (All Languages)
Page 3
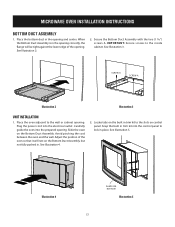
... tight against the lower edge of the opening. Secure the Bottom Duct Assembly with the two (1 3/16") screws A. MICROWAVE OVEN INSTALLAITlluIsOtrNatioInN1STRUCTIONS BOTTOM DUCT ASSEMBLY 1. See Illustration 3. Plug the power cord into the control panel to the wall or cabinet... Snap the built in the opening . Illustration 4 Shape on the Bottom Duct Assembly. SCREW A SCREW A Illustration 2 Illustration 3 Unit INSTALLATION 1. When the Bottom Duct Assembly is in trim kit into the electrical outlet. See Illustration 5. Avoid pinching the cord between the oven...
... tight against the lower edge of the opening. Secure the Bottom Duct Assembly with the two (1 3/16") screws A. MICROWAVE OVEN INSTALLAITlluIsOtrNatioInN1STRUCTIONS BOTTOM DUCT ASSEMBLY 1. See Illustration 3. Plug the power cord into the control panel to the wall or cabinet... Snap the built in the opening . Illustration 4 Shape on the Bottom Duct Assembly. SCREW A SCREW A Illustration 2 Illustration 3 Unit INSTALLATION 1. When the Bottom Duct Assembly is in trim kit into the electrical outlet. See Illustration 5. Avoid pinching the cord between the oven...
Installation Instructions (All Languages)
Page 4
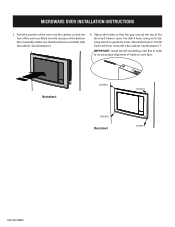
... the cabinet so that the kit now rests flush with four screws B to oven face. See Illustration 7. Important: Install top left mounting screw first in trim kit frame with the cabinet. MICROWAVE OVEN INSTALLATION INSTRUCTIONS 3. Push the position of the oven into the recesses of the door and frame is even. Pre-drill...
... the cabinet so that the kit now rests flush with four screws B to oven face. See Illustration 7. Important: Install top left mounting screw first in trim kit frame with the cabinet. MICROWAVE OVEN INSTALLATION INSTRUCTIONS 3. Push the position of the oven into the recesses of the door and frame is even. Pre-drill...

Product Specifications Sheet (English)
Page 1
...Approx.) - 30" Trim Kit * 12 Lbs. Specifications subject to Product Installation Guide for Electric Single Oven Combination Installation** Yes Power Supply Connection Location Right Top Rear Voltage Rating Connected Load ...Electrolux Electric Single Wall Oven and/or Warmer Drawer. (Not approved to be used in combination with 30" Stainless Steel Trim Kit). ft. extra-large microwaves will hold nearly any dish. Microwave... Required Trim Kit Options* 30" Trim Kit - Sure-2-Fit® Capacity Our 2.0 cu. Pizza (1), Snacks (3), Kid's Meals (3), Soften / Melt (4) 11 Auto-Reheat Options...
...Approx.) - 30" Trim Kit * 12 Lbs. Specifications subject to Product Installation Guide for Electric Single Oven Combination Installation** Yes Power Supply Connection Location Right Top Rear Voltage Rating Connected Load ...Electrolux Electric Single Wall Oven and/or Warmer Drawer. (Not approved to be used in combination with 30" Stainless Steel Trim Kit). ft. extra-large microwaves will hold nearly any dish. Microwave... Required Trim Kit Options* 30" Trim Kit - Sure-2-Fit® Capacity Our 2.0 cu. Pizza (1), Snacks (3), Kid's Meals (3), Soften / Melt (4) 11 Auto-Reheat Options...

Product Specifications Sheet (English)
Page 2
...-In Microwave cutout to top edge of 30" or 27" Trim Kit (ordered by individual part number and shipped separate). Allow at Electrolux Home Products, Inc. Appliance must be located in shaded area, as indicated, unless cabinet depth is critical for proper installation for ...specifications or discontinue models without notice. Printed in product, a minimum clearance of 2 7/8" required from bottom of Built-In Microwave cutout to Product Installation Guide on the web at electroluxappliances.com for proper operation. • Grounded outlet should NOT be level and front of quality...
...-In Microwave cutout to top edge of 30" or 27" Trim Kit (ordered by individual part number and shipped separate). Allow at Electrolux Home Products, Inc. Appliance must be located in shaded area, as indicated, unless cabinet depth is critical for proper installation for ...specifications or discontinue models without notice. Printed in product, a minimum clearance of 2 7/8" required from bottom of Built-In Microwave cutout to Product Installation Guide on the web at electroluxappliances.com for proper operation. • Grounded outlet should NOT be level and front of quality...

Product Specifications Sheet (English)
Page 3
... instructions. Built-In Microwave/Single Wall Oven 30" Combination Installation Specifications • Always consult local and national electric codes. (Refer to each built-in the U.S.A. Lifting oven will hide larger cutout opening under oven side rails. Refer to change specifications or discontinue models without notice. High Bottom Trim available. Electrolux Major Appliances, N.A. We...
... instructions. Built-In Microwave/Single Wall Oven 30" Combination Installation Specifications • Always consult local and national electric codes. (Refer to each built-in the U.S.A. Lifting oven will hide larger cutout opening under oven side rails. Refer to change specifications or discontinue models without notice. High Bottom Trim available. Electrolux Major Appliances, N.A. We...

Product Specifications Sheet (English)
Page 4
... open. 27" Built-In Microwave Specifications • Product Weight - 48 Lbs. • Voltage Rating - 120V / 60 Hz / 15 or 20 Amps • Connected Load (kW Rating) @ 120 Volts = 1.5 kW (For use on the web at Electrolux Home Products, Inc. Appliance must be grounded for proper combination installation, to Product Installation Guide on adequately wired...
... open. 27" Built-In Microwave Specifications • Product Weight - 48 Lbs. • Voltage Rating - 120V / 60 Hz / 15 or 20 Amps • Connected Load (kW Rating) @ 120 Volts = 1.5 kW (For use on the web at Electrolux Home Products, Inc. Appliance must be grounded for proper combination installation, to Product Installation Guide on adequately wired...

Product Specifications Sheet (English)
Page 5
Built-In Microwave/Single Wall Oven/Warmer Drawer 30" Combination Installation Specifications • Always consult local and national electric codes. (Refer to product-specific electrical specifications on the web at Electrolux Home Products, Inc. Appliance must be installed as noted for proper installation of supporting 100 Lbs. Electrolux Major Appliances, N.A. We reserve the right to Product Installation Guide...
Built-In Microwave/Single Wall Oven/Warmer Drawer 30" Combination Installation Specifications • Always consult local and national electric codes. (Refer to product-specific electrical specifications on the web at Electrolux Home Products, Inc. Appliance must be installed as noted for proper installation of supporting 100 Lbs. Electrolux Major Appliances, N.A. We reserve the right to Product Installation Guide...

Product Specifications Sheet (English)
Page 6
... Oven Specifications • Product Weight - 150 Lbs. • Single phase 3- mean we are necessary to Product Installation Guide on the web at Electrolux Home Products, Inc. Appliance must be grounded for safe operation.) • Amps @ 120 Volts = 13 Amps... Oven, two 3"-wide x 3/4"-thick planks must be installed as noted for proper combination installation, to ensure that each built-in the U.S.A. Electrolux Major Appliances, N.A. Built-In Microwave/Single Wall Oven/Warmer Drawer 27" Combination Installation Specifications • Always consult local and national electric codes...
... Oven Specifications • Product Weight - 150 Lbs. • Single phase 3- mean we are necessary to Product Installation Guide on the web at Electrolux Home Products, Inc. Appliance must be grounded for safe operation.) • Amps @ 120 Volts = 13 Amps... Oven, two 3"-wide x 3/4"-thick planks must be installed as noted for proper combination installation, to ensure that each built-in the U.S.A. Electrolux Major Appliances, N.A. Built-In Microwave/Single Wall Oven/Warmer Drawer 27" Combination Installation Specifications • Always consult local and national electric codes...

Product Specifications Sheet (English)
Page 7
..., N.A. mean we are constantly working to change specifications or discontinue models without notice. High standards of quality at electroluxappliances.com. General Installation Guidelines with product, or on the web at Electrolux Home Products, Inc. We reserve the right to improve our products. Printed in the U.S.A. USA • 10200 David Taylor Drive •....com CANADA • 5855 Terry Fox Way • Mississauga, ON L5V 3E4 • 1-800-265-8352 • electroluxappliances.ca INSTGDLNS_SSR EL 10/10 © 2010 Electrolux Home Products, Inc.
..., N.A. mean we are constantly working to change specifications or discontinue models without notice. High standards of quality at electroluxappliances.com. General Installation Guidelines with product, or on the web at Electrolux Home Products, Inc. We reserve the right to improve our products. Printed in the U.S.A. USA • 10200 David Taylor Drive •....com CANADA • 5855 Terry Fox Way • Mississauga, ON L5V 3E4 • 1-800-265-8352 • electroluxappliances.ca INSTGDLNS_SSR EL 10/10 © 2010 Electrolux Home Products, Inc.

Product Specifications Sheet (English)
Page 8
... with product, or on the web at Electrolux Home Products, Inc. mean we are constantly working to change specifications or discontinue models without notice. For detailed installation instructions, refer to installation guide, packed with French Door Refrigerator Front Use these dimensions and clearance instructions for planning purposes only. High standards of ... • 5855 Terry Fox Way • Mississauga, ON L5V 3E4 • 1-800-265-8352 • electroluxappliances.ca INSTGDLNS_FDR EL 10/10 © 2010 Electrolux Home Products, Inc. Printed in the U.S.A. Top Front Top...
... with product, or on the web at Electrolux Home Products, Inc. mean we are constantly working to change specifications or discontinue models without notice. For detailed installation instructions, refer to installation guide, packed with French Door Refrigerator Front Use these dimensions and clearance instructions for planning purposes only. High standards of ... • 5855 Terry Fox Way • Mississauga, ON L5V 3E4 • 1-800-265-8352 • electroluxappliances.ca INSTGDLNS_FDR EL 10/10 © 2010 Electrolux Home Products, Inc. Printed in the U.S.A. Top Front Top...
