
Complete Owner's Guide (English)
Page 2
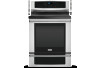
... ability to customer satisfaction and product quality throughout the service life of original spare parts. Keep a Record for purchasing an Electrolux appliance. This Use & Care Guide is part of professional experience and innovation. To ensure our ability to continue serving you, please...Oven Controls 39 Care and Cleaning 43 Solutions to Common Problems 43 Before You Call 46 Warranty WELCOME TO ELECTROLUX PLEASE READ & SAVE THIS GUIDE Thank you for Quick Reference Purchase Date Electrolux model number Electrolux serial number QUESTIONS? We view your new appliance.
... ability to customer satisfaction and product quality throughout the service life of original spare parts. Keep a Record for purchasing an Electrolux appliance. This Use & Care Guide is part of professional experience and innovation. To ensure our ability to continue serving you, please...Oven Controls 39 Care and Cleaning 43 Solutions to Common Problems 43 Before You Call 46 Warranty WELCOME TO ELECTROLUX PLEASE READ & SAVE THIS GUIDE Thank you for Quick Reference Purchase Date Electrolux model number Electrolux serial number QUESTIONS? We view your new appliance.

Complete Owner's Guide (English)
Page 3
...• Do not operate the range without the anti-tip device in place and engaged. • Failure to the appliance. When properly installed, the range should exercise caution using this manual. Stepping, leaning or sitting on or near surface ...that follow all safety messages that to consult your Doctor or the pacemaker or similar medical device manufacturer about your appliance until you have read the safety precautions in operation, as flammable liquids. ninodticaavtoeisdeadp, omteanytiraelslyulhtainzadredaotuhsosritsueartiioounswinhjiucrhy,.if Indicates a potentially ...
...• Do not operate the range without the anti-tip device in place and engaged. • Failure to the appliance. When properly installed, the range should exercise caution using this manual. Stepping, leaning or sitting on or near surface ...that follow all safety messages that to consult your Doctor or the pacemaker or similar medical device manufacturer about your appliance until you have read the safety precautions in operation, as flammable liquids. ninodticaavtoeisdeadp, omteanytiraelslyulhtainzadredaotuhsosritsueartiioounswinhjiucrhy,.if Indicates a potentially ...

Complete Owner's Guide (English)
Page 4
... with packaging material. • Proper installation-Be sure your dealer to such substances. • Remove all tape and packaging before using the appliance. If the power fails, always turn off and the power resumes, the range will begin to cause burns. If the range is in... the literature package for future reference. Wear proper apparel - Do not let clothing or other bulky cloth instead of the appliance unless specifically recommended in burns from any part of a potholder. Do not let potholders touch hot heating elements. IMPORTANT! Destroy the carton and...
... with packaging material. • Proper installation-Be sure your dealer to such substances. • Remove all tape and packaging before using the appliance. If the power fails, always turn off and the power resumes, the range will begin to cause burns. If the range is in... the literature package for future reference. Wear proper apparel - Do not let clothing or other bulky cloth instead of the appliance unless specifically recommended in burns from any part of a potholder. Do not let potholders touch hot heating elements. IMPORTANT! Destroy the carton and...

Complete Owner's Guide (English)
Page 5
... with both hands to a hot surface. IMPORTANT INSTRUCTIONS FOR CERAMIC-GLASS COOK TOP MODELS • Do not cook on or near the oven vent. This appliance is operating may penetrate the broken cook top and create a risk of different sizes. If improperly placed, the display will also improve efficiency. Do not...
... with both hands to a hot surface. IMPORTANT INSTRUCTIONS FOR CERAMIC-GLASS COOK TOP MODELS • Do not cook on or near the oven vent. This appliance is operating may penetrate the broken cook top and create a risk of different sizes. If improperly placed, the display will also improve efficiency. Do not...

Complete Owner's Guide (English)
Page 6
... the gasket. • The health of some birds is equipped with this Use & Care Manual. Move birds to accumulate. • Kitchen cleaners and aerosols - This appliance is extremely sensitive to keep all controls are turned OFF and the range is correctly polarized and properly grounded. Your receptacle my differ from this...
... the gasket. • The health of some birds is equipped with this Use & Care Manual. Move birds to accumulate. • Kitchen cleaners and aerosols - This appliance is extremely sensitive to keep all controls are turned OFF and the range is correctly polarized and properly grounded. Your receptacle my differ from this...

Complete Owner's Guide (English)
Page 9
... cooking zone markings. • It is recommended to use oven mitts or pot holders to read all the following points when home canning with your appliance. Once boiling is when using a range with the USDA (United States Department of the canner does not exceed 1 inch beyond the cooking zones. The only...
... cooking zone markings. • It is recommended to use oven mitts or pot holders to read all the following points when home canning with your appliance. Once boiling is when using a range with the USDA (United States Department of the canner does not exceed 1 inch beyond the cooking zones. The only...

Complete Owner's Guide (English)
Page 14
... the oven rack on the rack guides on the lowest rack position to maximize space for baking or roasting large cuts of oven racks Your appliance may be able to provide extra space for some foods Fully extendable Luxury-Glide™ oven rack Figure 23: Luxury Glide rack bottom oven rack...
... the oven rack on the rack guides on the lowest rack position to maximize space for baking or roasting large cuts of oven racks Your appliance may be able to provide extra space for some foods Fully extendable Luxury-Glide™ oven rack Figure 23: Luxury Glide rack bottom oven rack...

Complete Owner's Guide (English)
Page 17
... is powered up for 6 seconds 2. Press START to the OFF mode. Press START to accept START • Be sure to set the clock to the appliance has been interrupted, the display will flash "12:00" (Figure 28). Press and hold set clock to display the time of day and press START... is cooking, the timer is active, or during self-clean. Fig. 29 Clock set for 1:30: 1. Setting Oven Controls 17 Setting the clock When the appliance is powered up or power is entered, the control will sound with a triple beep (error tone). Press set for 24 hour mode Fig. 31 Clock...
... is powered up for 6 seconds 2. Press START to the OFF mode. Press START to accept START • Be sure to set the clock to the appliance has been interrupted, the display will flash "12:00" (Figure 28). Press and hold set clock to display the time of day and press START... is cooking, the timer is active, or during self-clean. Fig. 29 Clock set for 1:30: 1. Setting Oven Controls 17 Setting the clock When the appliance is powered up or power is entered, the control will sound with a triple beep (error tone). Press set for 24 hour mode Fig. 31 Clock...

Complete Owner's Guide (English)
Page 33
...° higher than default Oven temperature adjustments made by +30°F: 1. Press START cook time 30 4. Press START bake 325 Adjusting the oven temperature Your appliance has been factory calibrated and tested to offset the oven temperature by adjusting the user programmable offset (UPO). If you think the oven is cooking...
...° higher than default Oven temperature adjustments made by +30°F: 1. Press START cook time 30 4. Press START bake 325 Adjusting the oven temperature Your appliance has been factory calibrated and tested to offset the oven temperature by adjusting the user programmable offset (UPO). If you think the oven is cooking...

Complete Owner's Guide (English)
Page 34
...Enter 3 2 5 using numeric keypad. 4. SF will appear in Sabbath Mode. If needed , be used once during the Sabbath/ Holidays, the appliance will automatically cancel once Sabbath mode has ended. cook end release the keys. Press bake. - - For example, to change the oven temperature once.../Holidays. Remember that any of COOK TIME. cook time end time FOOD POISONING HAZARD: Do not let food sit for 3 seconds. This appliance provides special settings for 3 seconds. bake 3 2 5 Should a power failure or interruption occur during the Sabbath/Jewish holidays. The COOK ...
...Enter 3 2 5 using numeric keypad. 4. SF will appear in Sabbath Mode. If needed , be used once during the Sabbath/ Holidays, the appliance will automatically cancel once Sabbath mode has ended. cook end release the keys. Press bake. - - For example, to change the oven temperature once.../Holidays. Remember that any of COOK TIME. cook time end time FOOD POISONING HAZARD: Do not let food sit for 3 seconds. This appliance provides special settings for 3 seconds. bake 3 2 5 Should a power failure or interruption occur during the Sabbath/Jewish holidays. The COOK ...

Complete Owner's Guide (English)
Page 35
..., see Changing the oven light in place with a number of the oven interior and is set with a wire holder. Press to factory default settings Your appliance is covered with a glass shield held in the "Care and Cleaning" section. Press and hold the number 7 key for the oven when baking. Over time...
..., see Changing the oven light in place with a number of the oven interior and is set with a wire holder. Press to factory default settings Your appliance is covered with a glass shield held in the "Care and Cleaning" section. Press and hold the number 7 key for the oven when baking. Over time...

Complete Owner's Guide (English)
Page 39
...; Refer to remain on the outside of both knob and shaft; then push knob into place. • Before cleaning the control panel, turn to the appliance. especially when wiping around the controls may use oven cleaners, cleaning powders or any soils from oven cavity bottom before starting self-clean. Rinse with...
...; Refer to remain on the outside of both knob and shaft; then push knob into place. • Before cleaning the control panel, turn to the appliance. especially when wiping around the controls may use oven cleaners, cleaning powders or any soils from oven cavity bottom before starting self-clean. Rinse with...

Complete Owner's Guide (English)
Page 40
... with cooktop cleaning cream and buff surface clean. Cooktop cleaning Before cleaning the cooktop, be removed immediately after the cooktop has cooled using your new appliance. Use a paper towel or use . Make sure the cooktop is cleaned thoroughly, leaving no -scratch cleaning pad, applying pressure as a cutting board or work surface...
... with cooktop cleaning cream and buff surface clean. Cooktop cleaning Before cleaning the cooktop, be removed immediately after the cooktop has cooled using your new appliance. Use a paper towel or use . Make sure the cooktop is cleaned thoroughly, leaving no -scratch cleaning pad, applying pressure as a cutting board or work surface...

Complete Owner's Guide (English)
Page 41
... cause discoloration. Turn electrical power off at the rear oven cavity and is covered with a glass shield. Replace bulb with a new T-4 type 40 Watt Halogen appliance bulb. ABRASIVE CLEANERS AMMONIA Figure 76: Never use a razor blade scraper or a metal spatula with a mitt and scrape the soil from the hot surface. Damage... liners may occur if you use (Figure 77). Wear a leather-faced glove for heavy or burned on again at the main source (or plug the appliance back in use an abrasive type cleaning pad. The interior oven light bulb is located at the main source or unplug the...
... cause discoloration. Turn electrical power off at the rear oven cavity and is covered with a glass shield. Replace bulb with a new T-4 type 40 Watt Halogen appliance bulb. ABRASIVE CLEANERS AMMONIA Figure 76: Never use a razor blade scraper or a metal spatula with a mitt and scrape the soil from the hot surface. Damage... liners may occur if you use (Figure 77). Wear a leather-faced glove for heavy or burned on again at the main source (or plug the appliance back in use an abrasive type cleaning pad. The interior oven light bulb is located at the main source or unplug the...

Complete Owner's Guide (English)
Page 43
... preheat the oven for baking. • Open oven door only after shortest recommended baking time. Cakes too dark on all pans from your previously owned appliance. 43 SOLUTIONS TO COMMON PROBLEMS Before You Call Baking Problems and Solutions For best cooking results, heat the oven before the preheating time is completed...
... preheat the oven for baking. • Open oven door only after shortest recommended baking time. Cakes too dark on all pans from your previously owned appliance. 43 SOLUTIONS TO COMMON PROBLEMS Before You Call Baking Problems and Solutions For best cooking results, heat the oven before the preheating time is completed...
Complete Owner's Guide (English)
Page 44
... present see "About broiling" in this checklist. Oven control panel beeps & displays any F code error (for service. Cannot move appliance easily. Appliance must first be accessible for service. Contact your local electric company for example F10) • Oven control has detected a fault or... Poor installation. Questions or for the desired cooking feature. It may burn easily. Place oven rack in this will happen for appliance clearance. Cookware materials and weight of day must be set . Wipe up excessive spills before starting oven. Try the bake or ...
... present see "About broiling" in this checklist. Oven control panel beeps & displays any F code error (for service. Cannot move appliance easily. Appliance must first be accessible for service. Contact your local electric company for example F10) • Oven control has detected a fault or... Poor installation. Questions or for the desired cooking feature. It may burn easily. Place oven rack in this will happen for appliance clearance. Cookware materials and weight of day must be set . Wipe up excessive spills before starting oven. Try the bake or ...

Complete Owner's Guide (English)
Page 45
... setting again. Small scratches do not cut into pan (some models). • Grease has built up & slots down to allow air to appliance, wait 5 minutes and then repower the appliance and set clock for time of utensils are cooked onto surface. Do not slide metal utensils on broiler pan wrong side up...
... setting again. Small scratches do not cut into pan (some models). • Grease has built up & slots down to allow air to appliance, wait 5 minutes and then repower the appliance and set clock for time of utensils are cooked onto surface. Do not slide metal utensils on broiler pan wrong side up...

Complete Owner's Guide (English)
Page 46
...HAVE OTHER RIGHTS THAT VARY FROM STATE TO STATE. This warranty only applies in a commercial setting. 6. In Canada, your appliance is warranted by Electrolux Canada Corp. Obligations for servicing, such as abuse, misuse, inadequate power supply, accidents, fires, or acts of the unit.... 4. 46 WARRANTY Your appliance is warranted by Electrolux Major Appliances North America, a division of Electrolux Home Products, Inc. Exclusions This warranty does not cover the following: 1. Rust on the interior or exterior...
...HAVE OTHER RIGHTS THAT VARY FROM STATE TO STATE. This warranty only applies in a commercial setting. 6. In Canada, your appliance is warranted by Electrolux Canada Corp. Obligations for servicing, such as abuse, misuse, inadequate power supply, accidents, fires, or acts of the unit.... 4. 46 WARRANTY Your appliance is warranted by Electrolux Major Appliances North America, a division of Electrolux Home Products, Inc. Exclusions This warranty does not cover the following: 1. Rust on the interior or exterior...
Installation Instructions (English, Spanish, French)
Page 3
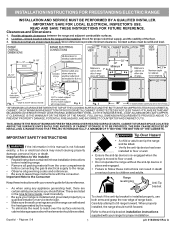
Check for future reference. • As when using any appliance generating heat, there are certain safety precautions you should follow these instructions can withstand the heat generated by a qualified installer or service technician. • Make ...
Check for future reference. • As when using any appliance generating heat, there are certain safety precautions you should follow these instructions can withstand the heat generated by a qualified installer or service technician. • Make ...

Installation Instructions (English, Spanish, French)
Page 4
...ANSI/ NFPA No. 70 -- Connect only as instructed under "Permanent Wire Connections" in template. 1b. If molding is not available). This appliance may use flex connector or range cable strain relief (Fig. 11). 2a. Mobile home installations, new branch circuit installations (1996NEC) or areas...grounding through neutral require a four (4) conductor power supply cord kit rated at an approximate 20° downward angle (See Fig. 5). This appliance must be sure that screws completely penetrate dry wall and are to masonry or ceramic floors, drill a Fig. 7 2. Use the information ...
...ANSI/ NFPA No. 70 -- Connect only as instructed under "Permanent Wire Connections" in template. 1b. If molding is not available). This appliance may use flex connector or range cable strain relief (Fig. 11). 2a. Mobile home installations, new branch circuit installations (1996NEC) or areas...grounding through neutral require a four (4) conductor power supply cord kit rated at an approximate 20° downward angle (See Fig. 5). This appliance must be sure that screws completely penetrate dry wall and are to masonry or ceramic floors, drill a Fig. 7 2. Use the information ...
