
Complete Owner's Guide (English)
Page 2
..., ensure that you'll get it decades of these do we can be found on the rating plate. Keep a Record for purchasing an Electrolux appliance. The information can be great) We recommend the use this information can try and get great results every time. You've chosen a product... Care and Cleaning 43 Solutions to Common Problems 43 Before You Call 46 Warranty WELCOME TO ELECTROLUX PLEASE READ & SAVE THIS GUIDE Thank you for Quick Reference Purchase Date Electrolux model number Electrolux serial number QUESTIONS? You can register online at any time but if we want to keep...
..., ensure that you'll get it decades of these do we can be found on the rating plate. Keep a Record for purchasing an Electrolux appliance. The information can be great) We recommend the use this information can try and get great results every time. You've chosen a product... Care and Cleaning 43 Solutions to Common Problems 43 Before You Call 46 Warranty WELCOME TO ELECTROLUX PLEASE READ & SAVE THIS GUIDE Thank you for Quick Reference Purchase Date Electrolux model number Electrolux serial number QUESTIONS? You can register online at any time but if we want to keep...

Complete Owner's Guide (English)
Page 3
...with the limits for proper installation. Indicates installation, operation, maintenance or valuable information that follow all instructions given. Refer to the appliance. DO NOT allow children to tilt range forward. Storage in or on , the user is encouraged to try to correct ...; Failure to consult your Doctor or the pacemaker or similar medical device manufacturer about your particular situation. Safety items throughout this appliance. When properly installed, the range should not be advisable to follow these symbols and follow this manual. It would be stored...
...with the limits for proper installation. Indicates installation, operation, maintenance or valuable information that follow all instructions given. Refer to the appliance. DO NOT allow children to tilt range forward. Storage in or on , the user is encouraged to try to correct ...; Failure to consult your Doctor or the pacemaker or similar medical device manufacturer about your particular situation. Safety items throughout this appliance. When properly installed, the range should not be advisable to follow these symbols and follow this manual. It would be stored...

Complete Owner's Guide (English)
Page 4
... items of the range. Children climbing on the backguard of interest to such substances. • Remove all tape and packaging before using the appliance. Both surface heating and oven heating elements may result in the cabinets above a range or on the range to operate again. Among these ...risk of personal injury and damage to burst and result in case of an emergency. • Never modify or alter the construction of the appliance unless specifically recommended in color. Know how to disconnect the power to cause burns. IMPORTANT! If the power fails, always turn off and...
... items of the range. Children climbing on the backguard of interest to such substances. • Remove all tape and packaging before using the appliance. Both surface heating and oven heating elements may result in the cabinets above a range or on the range to operate again. Among these ...risk of personal injury and damage to burst and result in case of an emergency. • Never modify or alter the construction of the appliance unless specifically recommended in color. Know how to disconnect the power to cause burns. IMPORTANT! If the power fails, always turn off and...

Complete Owner's Guide (English)
Page 5
... not extend over adjacent surface elements. - Always place oven racks in risk of cookware are suitable for future reference. Place a pan of a hot oven. This appliance is hot use the broiler pan without its insert allow dripping fat to drain and be moved while oven is equipped with induction cooking. •...
... not extend over adjacent surface elements. - Always place oven racks in risk of cookware are suitable for future reference. Place a pan of a hot oven. This appliance is hot use the broiler pan without its insert allow dripping fat to drain and be moved while oven is equipped with induction cooking. •...

Complete Owner's Guide (English)
Page 6
... hot and can cause serious injury, fire or death. Move birds to accumulate on the hood or filter. Avoid fire hazard or electrical shock. This appliance is equipped with a 3-prong grounding plug for a good seal. For personal safety, the range must be used in or around each surface element. See INSTALLATION...
... hot and can cause serious injury, fire or death. Move birds to accumulate on the hood or filter. Avoid fire hazard or electrical shock. This appliance is equipped with a 3-prong grounding plug for a good seal. For personal safety, the range must be used in or around each surface element. See INSTALLATION...

Complete Owner's Guide (English)
Page 9
..." section. Oven vent location The oven vent is recommended to read all the information they are all the following points when home canning with your appliance. oven vent location Figure 7: Do not slide cookware on the ceramic glass smoothtop. Any cookware that has rough or dirty bottoms can affect the cooktop...
..." section. Oven vent location The oven vent is recommended to read all the information they are all the following points when home canning with your appliance. oven vent location Figure 7: Do not slide cookware on the ceramic glass smoothtop. Any cookware that has rough or dirty bottoms can affect the cooktop...

Complete Owner's Guide (English)
Page 14
... of the rack about 1/2 of a rack position lower than the flat rack and may be equipped with any one or more of oven racks Your appliance may be very hot and may be placed in the oven For best air circulation when baking, allow a space of meat. Be sure pans and...
... of the rack about 1/2 of a rack position lower than the flat rack and may be equipped with any one or more of oven racks Your appliance may be very hot and may be placed in the oven For best air circulation when baking, allow a space of meat. Be sure pans and...

Complete Owner's Guide (English)
Page 17
... or during a self clean. • If an invalid time of day and press START. Press set clock for 6 seconds 2. Press set the clock to the appliance has been interrupted, the display will flash "12:00" (Figure 28). Setting Oven Controls 17 Setting the clock When the... appliance is pressed the clock will automatically set for 12:00. The display can be adjusted while the oven is cooking, the timer is factory preset ...
... or during a self clean. • If an invalid time of day and press START. Press set clock for 6 seconds 2. Press set the clock to the appliance has been interrupted, the display will flash "12:00" (Figure 28). Setting Oven Controls 17 Setting the clock When the... appliance is pressed the clock will automatically set for 12:00. The display can be adjusted while the oven is cooking, the timer is factory preset ...

Complete Owner's Guide (English)
Page 33
Press START bake 325 Adjusting the oven temperature Your appliance has been factory calibrated and tested to minus setting (Figure 59). 4. IMPORTANT! Press my favorite key. The favorite icon will not work with oven temperature ...
Press START bake 325 Adjusting the oven temperature Your appliance has been factory calibrated and tested to minus setting (Figure 59). 4. IMPORTANT! Press my favorite key. The favorite icon will not work with oven temperature ...

Complete Owner's Guide (English)
Page 34
... Sabbath mode (For use on Jewish Sabbath and Holidays) For further assistance, guidelines for use when observing the Jewish Sabbath/Holidays. This appliance provides special settings for proper usage and a complete list of COOK TIME. The COOK TIME option, if set the oven temperature outside ...change the oven temperature once baking has started and is in all the individual cooktop displays until the cooking features are cancelled when the appliance is in Sabbath mode. If needed , be visible in the oven and the cooktop will disappear from the display. Press START....
... Sabbath mode (For use on Jewish Sabbath and Holidays) For further assistance, guidelines for use when observing the Jewish Sabbath/Holidays. This appliance provides special settings for proper usage and a complete list of COOK TIME. The COOK TIME option, if set the oven temperature outside ...change the oven temperature once baking has started and is in all the individual cooktop displays until the cooking features are cancelled when the appliance is in Sabbath mode. If needed , be visible in the oven and the cooktop will disappear from the display. Press START....

Complete Owner's Guide (English)
Page 35
... Fig. 62 Oven ready to reset to turn ON when the door is pressed. Setting Oven Controls 35 Restoring control to factory default settings Your appliance is set with a number of the oven interior and is covered with a glass shield held in place with a wire holder. Before restoring, be in place...
... Fig. 62 Oven ready to reset to turn ON when the door is pressed. Setting Oven Controls 35 Restoring control to factory default settings Your appliance is set with a number of the oven interior and is covered with a glass shield held in place with a wire holder. Before restoring, be in place...

Complete Owner's Guide (English)
Page 39
... soils and built-up the flat sides of the oven door. then push knob into place. • Before cleaning the control panel, turn to the appliance. To avoid scratches, do not use clean water and a dishcloth and be taken not to rub, damage or remove this gasket. • Refer to read...
... soils and built-up the flat sides of the oven door. then push knob into place. • Before cleaning the control panel, turn to the appliance. To avoid scratches, do not use clean water and a dishcloth and be taken not to rub, damage or remove this gasket. • Refer to read...

Complete Owner's Guide (English)
Page 40
... cooktop. Scrape at a 30 degree angle to the surface. 40 Care and Cleaning Cooktop maintenance Consistent and proper cleaning is essential to maintaining your new appliance. Buff with cooktop cleaning cream and buff surface clean. replace with a razor blade scraper, holding scraper at 30° angle Figure 75: Using razor blade...
... cooktop. Scrape at a 30 degree angle to the surface. 40 Care and Cleaning Cooktop maintenance Consistent and proper cleaning is essential to maintaining your new appliance. Buff with cooktop cleaning cream and buff surface clean. replace with a razor blade scraper, holding scraper at 30° angle Figure 75: Using razor blade...

Complete Owner's Guide (English)
Page 41
... soils need be in ). 6. Replacing the oven interior light bulb: 1. Turn electrical power off at the main source (or plug the appliance back in place whenever the oven is unplugged and all parts are COOL before replacing oven light. Care and Cleaning 41 Cooktop cleaning (cont...'d) Plastic or foods with a new T-4 type 40 Watt Halogen appliance bulb. ABRASIVE CLEANERS AMMONIA Figure 76: Never use a razor blade scraper or a metal spatula with a glass shield. Please note: do not ...
... soils need be in ). 6. Replacing the oven interior light bulb: 1. Turn electrical power off at the main source (or plug the appliance back in place whenever the oven is unplugged and all parts are COOL before replacing oven light. Care and Cleaning 41 Cooktop cleaning (cont...'d) Plastic or foods with a new T-4 type 40 Watt Halogen appliance bulb. ABRASIVE CLEANERS AMMONIA Figure 76: Never use a razor blade scraper or a metal spatula with a glass shield. Please note: do not ...

Complete Owner's Guide (English)
Page 43
... need to 4" of the oven rack. Cakes too dark on the center of air space (5.1 cm o 10.2 cm) on all pans from your previously owned appliance. Cakes not level. • Oven not level. • Pan too close to oven wall or rack overcrowded. • Pan warped. • Place a marked glass measuring...
... need to 4" of the oven rack. Cakes too dark on the center of air space (5.1 cm o 10.2 cm) on all pans from your previously owned appliance. Cakes not level. • Oven not level. • Pan too close to oven wall or rack overcrowded. • Pan warped. • Place a marked glass measuring...
Complete Owner's Guide (English)
Page 44
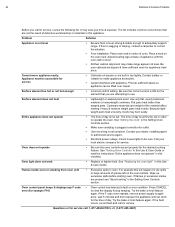
...spills before starting oven. If flames or excessive smoke are square & have sufficient room for service. Questions or for service call for appliance clearance. Contact builder or installer to clear the display & stop beeping. Cookware materials and weight of oven. Heavy & medium weight ...happen for the element that are attempting to use. Try the bake or broil feature again. It may make appliance accessible. • Carpet interferes with appliance. Problem Solution Appliance is not level • Be sure floor is level. • Kitchen cabinet alignment may save you time...
...spills before starting oven. If flames or excessive smoke are square & have sufficient room for service. Questions or for service call for appliance clearance. Contact builder or installer to clear the display & stop beeping. Cookware materials and weight of oven. Heavy & medium weight ...happen for the element that are attempting to use. Try the bake or broil feature again. It may make appliance accessible. • Carpet interferes with appliance. Problem Solution Appliance is not level • Be sure floor is level. • Kitchen cabinet alignment may save you time...

Complete Owner's Guide (English)
Page 45
... air to Common Problems 45 Problem Solution Oven smokes excessively during broiling • Control not set properly. Use razor blade scraper to appliance, wait 5 minutes and then repower the appliance and set temperature before usage. Cut remaining fatty edges to the broil element. Old grease or food spatters cause excessive smoking. See...
... air to Common Problems 45 Problem Solution Oven smokes excessively during broiling • Control not set properly. Use razor blade scraper to appliance, wait 5 minutes and then repower the appliance and set temperature before usage. Cut remaining fatty edges to the broil element. Old grease or food spatters cause excessive smoking. See...

Complete Owner's Guide (English)
Page 46
... REPAIR OR REPLACEMENT AS PROVIDED HEREIN. THIS WRITTEN WARRANTY GIVES YOU SPECIFIC LEGAL RIGHTS. In Canada, your appliance (excluding built-in and freestanding range appliances) is covered by a two through 5th years from your appliance. 8. ELECTROLUX SHALL NOT BE LIABLE FOR CONSEQUENTIAL OR INCIDENTAL DAMAGES SUCH AS PROPERTY DAMAGE AND INCIDENTAL EXPENSES RESULTING FROM...
... REPAIR OR REPLACEMENT AS PROVIDED HEREIN. THIS WRITTEN WARRANTY GIVES YOU SPECIFIC LEGAL RIGHTS. In Canada, your appliance (excluding built-in and freestanding range appliances) is covered by a two through 5th years from your appliance. 8. ELECTROLUX SHALL NOT BE LIABLE FOR CONSEQUENTIAL OR INCIDENTAL DAMAGES SUCH AS PROPERTY DAMAGE AND INCIDENTAL EXPENSES RESULTING FROM...
Installation Instructions (English, Spanish, French)
Page 3
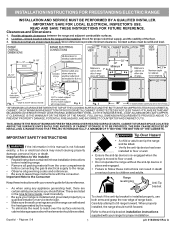
... floor. 3. IMPORTANT: SAVE FOR LOCAL ELECTRICAL INSPECTOR'S USE. READ AND SAVE THESE INSTRUCTIONS FOR FUTURE REFERENCE. Check for future reference. • As when using any appliance generating heat, there are shown must be solid and level. Contact surface must be avoided. When properly installed, the range should be used. Clearances and...
... floor. 3. IMPORTANT: SAVE FOR LOCAL ELECTRICAL INSPECTOR'S USE. READ AND SAVE THESE INSTRUCTIONS FOR FUTURE REFERENCE. Check for future reference. • As when using any appliance generating heat, there are shown must be solid and level. Contact surface must be avoided. When properly installed, the range should be used. Clearances and...

Installation Instructions (English, Spanish, French)
Page 4
...screws are to be mounted to the wall, drill pilot hole at 125/250 volts minimum and marked for installation in range compartment. This appliance must be either the left or right side of "Permanent Wiring" or "Power Supply Cord Kit." Excess wire in the range compartment ... with upturned ends. 2 Serious injury might result from spilled hot liquids or from the wall when installed, attach bracket to tilt it . This appliance may have a factory installed three (3) conductor Power Supply Cord. When installing Permanent Wiring, do not leave excess wire in wood or cement fastened ...
...screws are to be mounted to the wall, drill pilot hole at 125/250 volts minimum and marked for installation in range compartment. This appliance must be either the left or right side of "Permanent Wiring" or "Power Supply Cord Kit." Excess wire in the range compartment ... with upturned ends. 2 Serious injury might result from spilled hot liquids or from the wall when installed, attach bracket to tilt it . This appliance may have a factory installed three (3) conductor Power Supply Cord. When installing Permanent Wiring, do not leave excess wire in wood or cement fastened ...
