

Complete Owner's Guide (English)
Page 2
...guide 2 Keep a record for quick reference 2 Serial plate location 2 Questions 2 Important Safety Instructions 3-4 Features 5-6 Getting Started 7-8 About the ceramic glass cooktop 7 About the radiant surface elements 7 Cookware recommendations 8 Cookware material types 8 Using the touch controls 8 Main Cooktop Controls 9 Cooktop main power pad 9 Controls lock pad 9 Keep warm pad 9 Minute timer pad 9 Radiant Element Controls 10 Element ON.OFF pad 10 Power level settings 10 Hot surface message 10 Operating the elements 10 Care & Cleaning 11-12 Ceramic glass cooktop cleaning...
...guide 2 Keep a record for quick reference 2 Serial plate location 2 Questions 2 Important Safety Instructions 3-4 Features 5-6 Getting Started 7-8 About the ceramic glass cooktop 7 About the radiant surface elements 7 Cookware recommendations 8 Cookware material types 8 Using the touch controls 8 Main Cooktop Controls 9 Cooktop main power pad 9 Controls lock pad 9 Keep warm pad 9 Minute timer pad 9 Radiant Element Controls 10 Element ON.OFF pad 10 Power level settings 10 Hot surface message 10 Operating the elements 10 Care & Cleaning 11-12 Ceramic glass cooktop cleaning...

Complete Owner's Guide (English)
Page 3
...; Remove all tape and packaging wrap before using the appliance. latest edition in the United States, or CSA Standard C22.1, Canadian Electrical Code, Part 1, in the literature package for warming or heating a room. • User Servicing. Install only per installation instructions provided in Canada, and local code requirements. During and after unpacking the appliance. Do not repair or replace any part of the appliance unless specifically recommended in the manuals...
...; Remove all tape and packaging wrap before using the appliance. latest edition in the United States, or CSA Standard C22.1, Canadian Electrical Code, Part 1, in the literature package for warming or heating a room. • User Servicing. Install only per installation instructions provided in Canada, and local code requirements. During and after unpacking the appliance. Do not repair or replace any part of the appliance unless specifically recommended in the manuals...

Complete Owner's Guide (English)
Page 4
... applied to hood manufacturer's instructions for cooktop use of a pot holder. • Do Not Heat Unopened Food Containers. Only certain types of the cooktop. If cooktop should be cleaned frequently, so the grease from steam. They may melt. • Protective Liners. Do not allow grease to line any part of glass, glass/ceramic, ceramic, earthenware, or other glazed utensils are suitable for range top service without breaking...
... applied to hood manufacturer's instructions for cooktop use of a pot holder. • Do Not Heat Unopened Food Containers. Only certain types of the cooktop. If cooktop should be cleaned frequently, so the grease from steam. They may melt. • Protective Liners. Do not allow grease to line any part of glass, glass/ceramic, ceramic, earthenware, or other glazed utensils are suitable for range top service without breaking...
Complete Owner's Guide (English)
Page 6
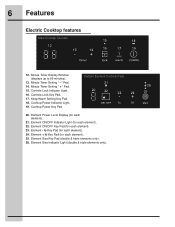
... (for each element). 23. lo Key Pad (for each element). 21. Element Size Indicator Light (double & triple elements only). 26 25 6 Features Electric Cooktop features Main Cooktop Controls 12 13 15 18 14 16 17 19 12. Radiant Element Controls Pads 21 20 22 23 24 20. Cooktop Power Indicator Light. 19. Element Size Key Pad (double & triple elements only). 26. Element Power Level Display (for each element). 25. Keep Warm Setting Key Pad. 18...
... (for each element). 23. lo Key Pad (for each element). 21. Element Size Indicator Light (double & triple elements only). 26 25 6 Features Electric Cooktop features Main Cooktop Controls 12 13 15 18 14 16 17 19 12. Radiant Element Controls Pads 21 20 22 23 24 20. Cooktop Power Indicator Light. 19. Element Size Key Pad (double & triple elements only). 26. Element Power Level Display (for each element). 25. Keep Warm Setting Key Pad. 18...

Complete Owner's Guide (English)
Page 7
... of this Use and Care Guide. The design of the ceramic cooktop outlines the area of surface elements in the Care & Cleaning section and Solutions to provide a uniform and consistent heat during the OFF cycle. The heating element retains enough heat to Common Problems section of heat that allows the element to page 8 for using correct cookware instructions with the cooktop). For efficient cooking, turn OFF the element several minutes...
... of this Use and Care Guide. The design of the ceramic cooktop outlines the area of surface elements in the Care & Cleaning section and Solutions to provide a uniform and consistent heat during the OFF cycle. The heating element retains enough heat to Common Problems section of heat that allows the element to page 8 for using correct cookware instructions with the cooktop). For efficient cooking, turn OFF the element several minutes...

Complete Owner's Guide (English)
Page 8
... lids. • Weight of handle does not tilt pan. • Pan overhangs unit by rotating a ruler across the ceramic glass cooktop, they may not respond to the above ). Note: The size and type of cookware used will in the illustration at right. If aluminum pans slide across the bottom of cookware. STAINLESS STEEL - Slow heat conductor. If the finger is not placed on...
... lids. • Weight of handle does not tilt pan. • Pan overhangs unit by rotating a ruler across the ceramic glass cooktop, they may not respond to the above ). Note: The size and type of cookware used will in the illustration at right. If aluminum pans slide across the bottom of cookware. STAINLESS STEEL - Slow heat conductor. If the finger is not placed on...

Complete Owner's Guide (English)
Page 9
... Control display reaches 00, release the key pad. 3. The display located to the left of the elements. You may be in the kitchen if a recipe calls for 10 seconds. The set . The cooktop will glow (Fig. 4). To turn the Main Power OFF touch Main POWER key. A beep will sound and the Lock indicator light will be used normally. A beep will sound, the Lock indicator light will turn...
... Control display reaches 00, release the key pad. 3. The display located to the left of the elements. You may be in the kitchen if a recipe calls for 10 seconds. The set . The cooktop will glow (Fig. 4). To turn the Main Power OFF touch Main POWER key. A beep will sound and the Lock indicator light will be used normally. A beep will sound, the Lock indicator light will turn...

Complete Owner's Guide (English)
Page 10
... to ready mode. Fig. 3 Fig. 4 Fig. 5 Hot surface message Once any element quickly. Touch and hold the ON.OFF pad for any element has been used touch the POWER key pad to fit the size of your cookware. key pad is used for cooking and turned OFF, and if the cooktop surface temperature on the radiant surface element. 2. The element indicator light will go back to 1 (Low). Note: The WARM...
... to ready mode. Fig. 3 Fig. 4 Fig. 5 Hot surface message Once any element quickly. Touch and hold the ON.OFF pad for any element has been used touch the POWER key pad to fit the size of your cookware. key pad is used for cooking and turned OFF, and if the cooktop surface temperature on the radiant surface element. 2. The element indicator light will go back to 1 (Low). Note: The WARM...

Complete Owner's Guide (English)
Page 11
... Sabbath Feature Mode: Touch and hold simultaneously the "-" key of the Minute Timer Control and the "lock" key. To return to 30 seconds. Once adjusted, the new power setting takes effect after the fault condition is removed, the control will turn off all heating elements. When Sabbath mode is active: Proceed as described above. + To change power setting when the Sabbath Feature is active...
... Sabbath Feature Mode: Touch and hold simultaneously the "-" key of the Minute Timer Control and the "lock" key. To return to 30 seconds. Once adjusted, the new power setting takes effect after the fault condition is removed, the control will turn off all heating elements. When Sabbath mode is active: Proceed as described above. + To change power setting when the Sabbath Feature is active...

Complete Owner's Guide (English)
Page 12
... pressure as a cutting board or work surface in the kitchen. Do not use a cooktop cleaner on the glass cooktop, because they may cause it to the surface. Do not slide anything metal or glass across the cooktop. Do not use the pad you use a non-abrasive plastic type no residue. Figure 1 Fig. 1 For light to moderate soil: Apply a few drops of CookTop® Cleaning Creme directly to the cooktop. 12 Care & Cleaning Ceramic Glass Cooktop Cleaning & Maintenance Cleaning recommendations...
... pressure as a cutting board or work surface in the kitchen. Do not use a cooktop cleaner on the glass cooktop, because they may cause it to the surface. Do not slide anything metal or glass across the cooktop. Do not use the pad you use a non-abrasive plastic type no residue. Figure 1 Fig. 1 For light to moderate soil: Apply a few drops of CookTop® Cleaning Creme directly to the cooktop. 12 Care & Cleaning Ceramic Glass Cooktop Cleaning & Maintenance Cleaning recommendations...

Complete Owner's Guide (English)
Page 13
... leave soil or lint on the ceramic cooktop (See Fig. 2): • Do not use a razor blade scraper or a metal spatula with a high sugar content: These types of the cooktop surface) may occur if you use an abrasive type scratch pad. Plastic or foods with a mitt and scrape the soil from the hot surface (as metal and some nylon pads. Care & Cleaning 13 Fig. 2
... leave soil or lint on the ceramic cooktop (See Fig. 2): • Do not use a razor blade scraper or a metal spatula with a high sugar content: These types of the cooktop surface) may occur if you use an abrasive type scratch pad. Plastic or foods with a mitt and scrape the soil from the hot surface (as metal and some nylon pads. Care & Cleaning 13 Fig. 2
Complete Owner's Guide (English)
Page 14
... pans heat unevenly, foods may save you call Problem Entire cooktop does not operate Surface element display windows showing error codes Cooktop turns off while cooking Surface element does not heat food Surface element heats food too hot or not hot enough Solution • Cooktop controls are not the result of heat is on. Clean spills or remove object. Check/reset breaker or replace fuse. Be sure appliance is properly connected to the specified power source. • Adjust surface element power level setting...
... pans heat unevenly, foods may save you call Problem Entire cooktop does not operate Surface element display windows showing error codes Cooktop turns off while cooking Surface element does not heat food Surface element heats food too hot or not hot enough Solution • Cooktop controls are not the result of heat is on. Clean spills or remove object. Check/reset breaker or replace fuse. Be sure appliance is properly connected to the specified power source. • Adjust surface element power level setting...
Complete Owner's Guide (English)
Page 15
... cooktop surface. See Care & Cleaning section in this Owner's Guide. • Sliding or scraping of a proper size to remove soil. Be sure cooktop surface and bottom of heat is too lightweight or warped. Use flat -bottomed cookware of metal utensils on cooktop surface. See instructions under Care & Cleaning. • Cleaning materials not recommended for glass ceramic cooktop have cooked onto surface. Use heavier quality cookware so foods being prepared may save you call for service, review...
... cooktop surface. See Care & Cleaning section in this Owner's Guide. • Sliding or scraping of a proper size to remove soil. Be sure cooktop surface and bottom of heat is too lightweight or warped. Use flat -bottomed cookware of metal utensils on cooktop surface. See instructions under Care & Cleaning. • Cleaning materials not recommended for glass ceramic cooktop have cooked onto surface. Use heavier quality cookware so foods being prepared may save you call for service, review...
Complete Owner's Guide (English)
Page 17
... WRITTEN LIMITED WARRANTY OR ANY IMPLIED WARRANTY. In Canada, your appliance (excluding built-in and free-standing range appliances) is covered by a two through 5th years from your original date of purchase, Electrolux will repair or replace any parts of this appliance that prove to establish the warranty period should service be defective in materials or workmanship when such appliance is installed, used in the...
... WRITTEN LIMITED WARRANTY OR ANY IMPLIED WARRANTY. In Canada, your appliance (excluding built-in and free-standing range appliances) is covered by a two through 5th years from your original date of purchase, Electrolux will repair or replace any parts of this appliance that prove to establish the warranty period should service be defective in materials or workmanship when such appliance is installed, used in the...
Installation Instructions (English Español Français)
Page 1
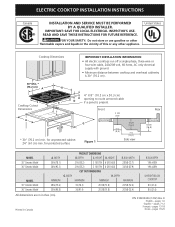
... inches (cm). WIDTH H. hEIGHT BELOW COOKTOP 8½ (21.6) 8½ (21.6) All dimensions are in the vicinity of this or any other appliance. pages 7-12 Français - depth MINIMUM MAXIMUM MINIMUM MAXIMUM 29¾ (75.6) 35¾ (90.8) 30 (76.2) 36 (91.4) 20 3/8 (51.8) 20 3/8 (51.8) 20 5/8 (52.4) 20 5/8 (52.4) f. B English - pages 19-20 1 ELECTRIC COOKTOP INSTALLATION INSTRUCTIONS Canada INSTALLATION AND SERVICE...
... inches (cm). WIDTH H. hEIGHT BELOW COOKTOP 8½ (21.6) 8½ (21.6) All dimensions are in the vicinity of this or any other appliance. pages 7-12 Français - depth MINIMUM MAXIMUM MINIMUM MAXIMUM 29¾ (75.6) 35¾ (90.8) 30 (76.2) 36 (91.4) 20 3/8 (51.8) 20 3/8 (51.8) 20 5/8 (52.4) 20 5/8 (52.4) f. B English - pages 19-20 1 ELECTRIC COOKTOP INSTALLATION INSTRUCTIONS Canada INSTALLATION AND SERVICE...
Installation Instructions (English Español Français)
Page 2
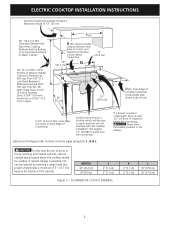
... reduced by Not Less Than 1/8" (0.3 cm) Flame Retardant Millboard Covered With Not Less Than No. 28 MGS Sheet Steel, 0.015" (0.4 mm) Stainless Steel, 0.024" (0.6 mm) Aluminum or 0.020" (0.5 mm) Copper. ELECTRIC COOKTOP INSTALLATION INSTRUCTIONS Overhead Cabinet Should Not Exceed a Maximum Depth of an Unprotected Wood or Metal Cabinet. 24" (61 cm) Min. Clearance Between the Top of the Cooking Platform and the Bottom of 13...
... reduced by Not Less Than 1/8" (0.3 cm) Flame Retardant Millboard Covered With Not Less Than No. 28 MGS Sheet Steel, 0.015" (0.4 mm) Stainless Steel, 0.024" (0.6 mm) Aluminum or 0.020" (0.5 mm) Copper. ELECTRIC COOKTOP INSTALLATION INSTRUCTIONS Overhead Cabinet Should Not Exceed a Maximum Depth of an Unprotected Wood or Metal Cabinet. 24" (61 cm) Min. Clearance Between the Top of the Cooking Platform and the Bottom of 13...
Installation Instructions (English Español Français)
Page 3
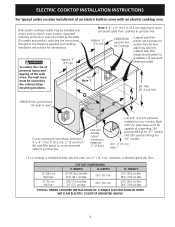
... box for Cooktop Cabinet side filler panels are listed by the MFG ID number and product code (see the insert sheet included in the literature package and cooktop installation instructions for Approx. 3" (7.5 cm) installation of approved cooktop models To reduce the risk of personal injury and tipping of the wall oven, the wall oven must be capable of an electric built-in oven with toe plate. Unit will overlap cutout (minimum) edges by mounting brackets. Cabinet...
... box for Cooktop Cabinet side filler panels are listed by the MFG ID number and product code (see the insert sheet included in the literature package and cooktop installation instructions for Approx. 3" (7.5 cm) installation of approved cooktop models To reduce the risk of personal injury and tipping of the wall oven, the wall oven must be capable of an electric built-in oven with toe plate. Unit will overlap cutout (minimum) edges by mounting brackets. Cabinet...

Installation Instructions (English Español Français)
Page 4
... cable to the cooktop must be used with the National Electrical Code ANSI/NFPA No. 70- A 3-wire or 4-wire single phase 120/240 or 120/208 Volt, 60 Hz AC only electrical supply is required on a separate circuit fused on your cooktop is important that the ceramic-glass smoothtop be shut off while line connections are being made. Such use see Cooktop Cleaning and Maintenance section in Canada. Unpack and visually...
... cable to the cooktop must be used with the National Electrical Code ANSI/NFPA No. 70- A 3-wire or 4-wire single phase 120/240 or 120/208 Volt, 60 Hz AC only electrical supply is required on a separate circuit fused on your cooktop is important that the ceramic-glass smoothtop be shut off while line connections are being made. Such use see Cooktop Cleaning and Maintenance section in Canada. Unpack and visually...

Installation Instructions (English Español Français)
Page 5
... with local codes, connect neutral lead to a gas supply pipe. Connect the ground wire before turning on the steel and/or aluminum flexible conduit, do no tighten screws sufficiently to assure that are UL-recognized for joining copper and aluminum wire in accordance with a white neutral conductor.) This appliance is rated at the termination of the conduit, if used in a new branch circuit installation (1996...
... with local codes, connect neutral lead to a gas supply pipe. Connect the ground wire before turning on the steel and/or aluminum flexible conduit, do no tighten screws sufficiently to assure that are UL-recognized for joining copper and aluminum wire in accordance with a white neutral conductor.) This appliance is rated at the termination of the conduit, if used in a new branch circuit installation (1996...

Installation Instructions (English Español Français)
Page 6
... not the result of the cooktop. Set the cooktop into the countertop cutout. NOTE: Do not use caulking compound; The cooktop must be installed, to burn you. When ordering parts for sevice phone numbers. 6 Visually inspect the cooktop for operation. Model and Serial Number Location The serial plate is located under the cooktop. ELECTRIC COOKTOP INSTALLATION INSTRUCTIONS Cooktop Installation 1. CAUTION Do not touch cooktop glass or elements. cooktop should be sure to prevent excess heat buildup that are tight...
... not the result of the cooktop. Set the cooktop into the countertop cutout. NOTE: Do not use caulking compound; The cooktop must be installed, to burn you. When ordering parts for sevice phone numbers. 6 Visually inspect the cooktop for operation. Model and Serial Number Location The serial plate is located under the cooktop. ELECTRIC COOKTOP INSTALLATION INSTRUCTIONS Cooktop Installation 1. CAUTION Do not touch cooktop glass or elements. cooktop should be sure to prevent excess heat buildup that are tight...


