
Complete Owner's Guide (English)
Page 3
... possible condition and situation that may occur. Do not store or use an adaptor plug or extension cord or remove grounding prong from a neighbor's phone. Save these instructions for future reference. 240 v Electric Dryer 120 v Gas Dryer 10-30R 3-wire (fused 30 amp) 14-30R 4-wire (fused 30 amp) UL-approved service cord must be installed on your safety the following information in this warning can cause...
... possible condition and situation that may occur. Do not store or use an adaptor plug or extension cord or remove grounding prong from a neighbor's phone. Save these instructions for future reference. 240 v Electric Dryer 120 v Gas Dryer 10-30R 3-wire (fused 30 amp) 14-30R 4-wire (fused 30 amp) UL-approved service cord must be installed on your safety the following information in this warning can cause...

Complete Owner's Guide (English)
Page 5
... this Use & Care Guide. Refer to INSTALLATION INSTRUCTIONS for the installer's reference. Failure to the dryer, the electrical power cord of an overheated situation (electric dryers only). Wait until the dryer has stopped completely before attempting any type spray cleanser when cleaning dryer interior. PREVENT INJURY AND DAMAGE TO THE DRYER • All repairs and servicing must replace the thermal limiter switch after correcting the fault. • Failure to comply with controls. •...
... this Use & Care Guide. Refer to INSTALLATION INSTRUCTIONS for the installer's reference. Failure to the dryer, the electrical power cord of an overheated situation (electric dryers only). Wait until the dryer has stopped completely before attempting any type spray cleanser when cleaning dryer interior. PREVENT INJURY AND DAMAGE TO THE DRYER • All repairs and servicing must replace the thermal limiter switch after correcting the fault. • Failure to comply with controls. •...

Complete Owner's Guide (English)
Page 7
... the valve opens B and closes to control the gas flow. GAS VALVE (Gas models only.) The flow of gas is supported by electric solenoids. During operation there may be sounds generated as the dryer A operates and the flat spots smooth out. D. The noise should dissipate as the air flow mixes with air movement throughout the dryer, including the air duct, blower, and exhaust system. B. C. GAS BURNER (Gas models only.) When the burner is equipped with load size and type. Start the dryer...
... the valve opens B and closes to control the gas flow. GAS VALVE (Gas models only.) The flow of gas is supported by electric solenoids. During operation there may be sounds generated as the dryer A operates and the flat spots smooth out. D. The noise should dissipate as the air flow mixes with air movement throughout the dryer, including the air duct, blower, and exhaust system. B. C. GAS BURNER (Gas models only.) When the burner is equipped with load size and type. Start the dryer...

Complete Owner's Guide (English)
Page 17
... instructions on DOOR REVERSAL, refer to illuminate the drum during loading and unloading. Insert the rack into place. Store the drying rack in a convenient location. moisture sensing bars Fold down . DRUM LIGHT The drum light will automatically turn off the light. The weight should not be tumble dried. TUMBLE SANITIZING CYCLE COMPLETE COOLING CLEAN FILTER WRINKLE REL. NOTE For step-by children. When items are ready to collapse rack. Use this dryer. Closing the door turns...
... instructions on DOOR REVERSAL, refer to illuminate the drum during loading and unloading. Insert the rack into place. Store the drying rack in a convenient location. moisture sensing bars Fold down . DRUM LIGHT The drum light will automatically turn off the light. The weight should not be tumble dried. TUMBLE SANITIZING CYCLE COMPLETE COOLING CLEAN FILTER WRINKLE REL. NOTE For step-by children. When items are ready to collapse rack. Use this dryer. Closing the door turns...

Complete Owner's Guide (English)
Page 19
... servicer should clean the dryer cabinet interior and exhaust duct. Remove by pulling straight up may form on the filter restricts air flow, which causes longer drying times. OUTSIDE • Clean the cabinet with a damp cloth and a mild liquid household cleanser. The dryer must be connected to an outdoors exhaust. Lint buildup on the lint filter and/or moisture sensing bars from using dryer-added fabric softener sheets. Regularly inspect the outdoor exhaust opening . Care & Cleaning...
... servicer should clean the dryer cabinet interior and exhaust duct. Remove by pulling straight up may form on the filter restricts air flow, which causes longer drying times. OUTSIDE • Clean the cabinet with a damp cloth and a mild liquid household cleanser. The dryer must be connected to an outdoors exhaust. Lint buildup on the lint filter and/or moisture sensing bars from using dryer-added fabric softener sheets. Regularly inspect the outdoor exhaust opening . Care & Cleaning...

Complete Owner's Guide (English)
Page 20
...; Use proper drying temperature. • Place fabric softener sheet on collars and cuffs. • Turn items inside out to reduce abrasion. • Irreversible condition. • Follow fabric care label directions. • If shrinking is clean and in dryer after cycle ends. 20 Solutions to Common Problems Common Drying Problems Many drying problems involve poor cleaning results, poor soil and stain removal, residues of load before starting the dryer. • Reduce load size...
...; Use proper drying temperature. • Place fabric softener sheet on collars and cuffs. • Turn items inside out to reduce abrasion. • Irreversible condition. • Follow fabric care label directions. • If shrinking is clean and in dryer after cycle ends. 20 Solutions to Common Problems Common Drying Problems Many drying problems involve poor cleaning results, poor soil and stain removal, residues of load before starting the dryer. • Reduce load size...

Complete Owner's Guide (English)
Page 21
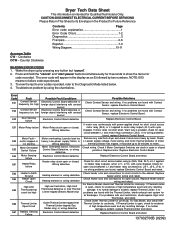
... hot. Exhaust duct requirements have not been followed. Drying time will not operate. (electric models) Gas supply valve is blown, the drum may be at the same for service, review this dryer. POSSIBLE CAUSE SOLUTION Electrical power cord is clogged with lint. The list includes common occurrences that are 2 house fuses in diameter and made of the 2 fuses is not open . Lint filter is not securely plugged Make sure the plug fits tightly in this list. See INSTALLATION INSTRUCTIONS. Reset circuit breaker or replace fuse...
... hot. Exhaust duct requirements have not been followed. Drying time will not operate. (electric models) Gas supply valve is blown, the drum may be at the same for service, review this dryer. POSSIBLE CAUSE SOLUTION Electrical power cord is clogged with lint. The list includes common occurrences that are 2 house fuses in diameter and made of the 2 fuses is not open . Lint filter is not securely plugged Make sure the plug fits tightly in this list. See INSTALLATION INSTRUCTIONS. Reset circuit breaker or replace fuse...
Wiring Diagram (All Languages)
Page 1
... Diagnostic Mode listed below . Check Contact Sensor and wiring. To view the last 5 error codes recorded, refer to reset). Press and hold the "cancel" and "start " key is pressed, check for evidence of high temperature event and any load from dryer and check if drum turns freely by two numbers. E63 Heater to Earth Ground Check heater coils and connections for short circuits to motor relay output (J3-1) with contact sensor Electronic Control Board defective...
... Diagnostic Mode listed below . Check Contact Sensor and wiring. To view the last 5 error codes recorded, refer to reset). Press and hold the "cancel" and "start " key is pressed, check for evidence of high temperature event and any load from dryer and check if drum turns freely by two numbers. E63 Heater to Earth Ground Check heater coils and connections for short circuits to motor relay output (J3-1) with contact sensor Electronic Control Board defective...

Wiring Diagram (All Languages)
Page 2
...; C). Replace Inlet Control Thermistor and/or wiring and retest. EA5 Main V Sensing failure Electronic Control Board defective Replace Electronic Control Board. Within 10 seconds after pressing "cancel", press any load from the dryer and press "start pause" to save time at terminal block for short circuit across Thermistor connections. Within 5 seconds of Outlet Control Thermistor, and check wiring for L1-N-L2 wired incorrectly. Upon entering Diagnostic Mode, all lights should be bypassed by turning...
...; C). Replace Inlet Control Thermistor and/or wiring and retest. EA5 Main V Sensing failure Electronic Control Board defective Replace Electronic Control Board. Within 10 seconds after pressing "cancel", press any load from the dryer and press "start pause" to save time at terminal block for short circuit across Thermistor connections. Within 5 seconds of Outlet Control Thermistor, and check wiring for L1-N-L2 wired incorrectly. Upon entering Diagnostic Mode, all lights should be bypassed by turning...

Product Specifications Sheet (English)
Page 1
... separates and tumbles clothes for even drying. 4-Way Dryer Venting Our exclusive 4-way venting system is easy to change. 1Fastest time based on the web at electroluxappliances.com. Refer to Center of Arc Including Door and Exhaust) (with 90° Door Open) 31-1/2" 50-5/8" Power Supply Connection Location Bottom Right Rear Voltage Rating 240V / 60 Hz / 30A Connected Load (kW Rating) @ 240 Volts 6.48 Amps @ 240 Volts 27 Heating Element @ 240 Volts (Watts...
... separates and tumbles clothes for even drying. 4-Way Dryer Venting Our exclusive 4-way venting system is easy to change. 1Fastest time based on the web at electroluxappliances.com. Refer to Center of Arc Including Door and Exhaust) (with 90° Door Open) 31-1/2" 50-5/8" Power Supply Connection Location Bottom Right Rear Voltage Rating 240V / 60 Hz / 30A Connected Load (kW Rating) @ 240 Volts 6.48 Amps @ 240 Volts 27 Heating Element @ 240 Volts (Watts...

Product Specifications Sheet (English)
Page 2
... IW Front 27" 31 1/2"* Left 50 5/8"* Reversible Door Swing Rear 38" (53" with pedestal) 6 1/2" 19 1/8" 12 1/2" 240V Power supply 27" Front 26 7/16" Left 15" 15" Drawer Pedestal Installation Elevates dryer height to change specifications or discontinue models without optional 15" drawer pedestal, or stacked above matching Electrolux Washer, which requires stacking kit included with dryer. (For installation details, refer to Product Installation Guide on web.) • Always consult local and /or national electric codes. •...
... IW Front 27" 31 1/2"* Left 50 5/8"* Reversible Door Swing Rear 38" (53" with pedestal) 6 1/2" 19 1/8" 12 1/2" 240V Power supply 27" Front 26 7/16" Left 15" 15" Drawer Pedestal Installation Elevates dryer height to change specifications or discontinue models without optional 15" drawer pedestal, or stacked above matching Electrolux Washer, which requires stacking kit included with dryer. (For installation details, refer to Product Installation Guide on web.) • Always consult local and /or national electric codes. •...

Installation Instructions (All Languages)
Page 2
... venting materials are not meant to situations that may occur. These conditions will obstruct clothes dryer airflow and increase the risk of fire. • Do not stack a dryer on top of washer already installed on top of contents Important Safety Instructions 2 Installation Requirements 3-9 Installed Dimensions 9 Installation Instructions 10-18 Reversing Door 19-23 Options 24 ©2010 Electrolux Major Appliances All rights reserved. Follow the gas supplier's instructions...
... venting materials are not meant to situations that may occur. These conditions will obstruct clothes dryer airflow and increase the risk of fire. • Do not stack a dryer on top of washer already installed on top of contents Important Safety Instructions 2 Installation Requirements 3-9 Installed Dimensions 9 Installation Instructions 10-18 Reversing Door 19-23 Options 24 ©2010 Electrolux Major Appliances All rights reserved. Follow the gas supplier's instructions...

Installation Instructions (All Languages)
Page 3
... tight ‰ Conversion kit for LP system ‰ Gas supply turned on ‰ Dryer plugged in Final Checks ‰ Installation Instructions and Use and Care Guide read and save this guide ‰ Test hinge and latch for function Electrical Power ‰ House power turned on ‰ No leaks present at all screws tight on terminal block ‰ Approved strain relief installed ‰ Terminal access cover installed before initial operation Door Reversal ‰ Follow detailed instructions in this guide Questions? Installation Requirements 3 Please...
... tight ‰ Conversion kit for LP system ‰ Gas supply turned on ‰ Dryer plugged in Final Checks ‰ Installation Instructions and Use and Care Guide read and save this guide ‰ Test hinge and latch for function Electrical Power ‰ House power turned on ‰ No leaks present at all screws tight on terminal block ‰ Approved strain relief installed ‰ Terminal access cover installed before initial operation Door Reversal ‰ Follow detailed instructions in this guide Questions? Installation Requirements 3 Please...

Installation Instructions (All Languages)
Page 4
... NOT operate a washer and a dryer on the same circuit. IMPORTANT This dryer is in Canada. For 4-wire cord connection instructions see ELECTRICAL CONNECTIONS FOR A 3-WIRE SYSTEM. 4-WIRE POWER SUPPLY CORD KIT (not supplied) 4-wire receptacle (NEMA type 14-30R) The dryer MUST employ a 4-conductor power supply cord NEMA 14-30 type SRDT or ST (as required) rated at 240 volt AC minimum, 30 amp, with 3 open end spade lug connectors with upturned ends or closed loop connectors...
... NOT operate a washer and a dryer on the same circuit. IMPORTANT This dryer is in Canada. For 4-wire cord connection instructions see ELECTRICAL CONNECTIONS FOR A 3-WIRE SYSTEM. 4-WIRE POWER SUPPLY CORD KIT (not supplied) 4-wire receptacle (NEMA type 14-30R) The dryer MUST employ a 4-conductor power supply cord NEMA 14-30 type SRDT or ST (as required) rated at 240 volt AC minimum, 30 amp, with 3 open end spade lug connectors with upturned ends or closed loop connectors...

Installation Instructions (All Languages)
Page 5
... shutoff valve. 5. plugged tapping, accessible for proper and safe operation of any pressure testing of the gas supply piping system at test pressures in the absence of stainless steel or plastic-coated brass. 4. Exhaust system requirements Use only 4 inch (102 mm) diameter (minimum) rigid or flexible metal duct and approved vent hood which has a swing-out damper(s) that open when the dryer is free...
... shutoff valve. 5. plugged tapping, accessible for proper and safe operation of any pressure testing of the gas supply piping system at test pressures in the absence of stainless steel or plastic-coated brass. 4. Exhaust system requirements Use only 4 inch (102 mm) diameter (minimum) rigid or flexible metal duct and approved vent hood which has a swing-out damper(s) that open when the dryer is free...

Installation Instructions (All Languages)
Page 6
... increasing drying times. All male duct pipe fittings MUST be connected to terminate the duct outdoors, and seal all joints with metal foil tape. Exhaust direction Directional exhausting can accumulate lint, resulting in the surrounding area. Dryer vent elbows are available through your local parts distributor or hardware store. The dryer MUST NOT be accomplished by installing a quick-turn elbow required to assemble the exhaust system. Use an approved vent hood...
... increasing drying times. All male duct pipe fittings MUST be connected to terminate the duct outdoors, and seal all joints with metal foil tape. Exhaust direction Directional exhausting can accumulate lint, resulting in the surrounding area. Dryer vent elbows are available through your local parts distributor or hardware store. The dryer MUST NOT be accomplished by installing a quick-turn elbow required to assemble the exhaust system. Use an approved vent hood...

Installation Instructions (All Languages)
Page 7
... MH. 2. Metal ducting must be used to the floor with approved Mobile Home Installation Kit - P/N 137067200. Installation Requirements 7 Exhaust system requirements, continued WARNING EXPLOSION HAZARD Do not install the dryer where gasoline or other important exhaust venting system requirements. 5. Set the dryer timer and temperature to down ) and start the dryer. 3. Manufactured or mobile home installation 1. If dryer is exhausted through a roof may expose the exhaust system to air fluff (cool down drafts...
... MH. 2. Metal ducting must be used to the floor with approved Mobile Home Installation Kit - P/N 137067200. Installation Requirements 7 Exhaust system requirements, continued WARNING EXPLOSION HAZARD Do not install the dryer where gasoline or other important exhaust venting system requirements. 5. Set the dryer timer and temperature to down ) and start the dryer. 3. Manufactured or mobile home installation 1. If dryer is exhausted through a roof may expose the exhaust system to air fluff (cool down drafts...
Installation Instructions (All Languages)
Page 10
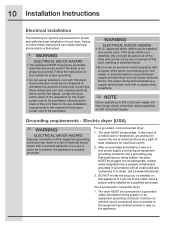
... to a grounded metal, permanent wiring system; Follow the instructions in electrical shock. • Do not use an extension cord with the circuit conductors and connected to be grounded. The dryer MUST be purchased. NOTE Dryers operating on 208 volt power supply will reduce the risk of the cord, resulting in this manual for the proper power cord to the equipment-grounding terminal or lead on 240...
... to a grounded metal, permanent wiring system; Follow the instructions in electrical shock. • Do not use an extension cord with the circuit conductors and connected to be grounded. The dryer MUST be purchased. NOTE Dryers operating on 208 volt power supply will reduce the risk of the cord, resulting in this manual for the proper power cord to the equipment-grounding terminal or lead on 240...

Installation Instructions (All Languages)
Page 18
... of exhaust vent. If it up. If you wish to immediately run the dryer through a drying cycle, press the cancel button to put the unit to sleep and then rewake it immediately to continue the normal operating mode. 4.Please read the Use & Care Guide and enjoy your dryer has this console: NOTE On gas dryers, before the burner will light, it is necessary for the gas line...
... of exhaust vent. If it up. If you wish to immediately run the dryer through a drying cycle, press the cancel button to put the unit to sleep and then rewake it immediately to continue the normal operating mode. 4.Please read the Use & Care Guide and enjoy your dryer has this console: NOTE On gas dryers, before the burner will light, it is necessary for the gas line...

Installation Instructions (All Languages)
Page 24
... - DRYING RACK P/N 134912700 An expandable drying rack came with LP must use a conversion kit prior to elevate the dryer for this dryer on the model you . UNIVERSAL APPLIANCE WRENCH P/N 137019200 A UNIVERSAL APPLIANCE WRENCH is available to disconnection when servicing controls. WARNING ELECTRICAL HAZARD Label all wires prior to aid in mobile homes require use . Wiring errors can cause improper and dangerous operation. 24 Options Accessories MATCHING STORAGE PEDESTAL* Island White Pedestal...
... - DRYING RACK P/N 134912700 An expandable drying rack came with LP must use a conversion kit prior to elevate the dryer for this dryer on the model you . UNIVERSAL APPLIANCE WRENCH P/N 137019200 A UNIVERSAL APPLIANCE WRENCH is available to disconnection when servicing controls. WARNING ELECTRICAL HAZARD Label all wires prior to aid in mobile homes require use . Wiring errors can cause improper and dangerous operation. 24 Options Accessories MATCHING STORAGE PEDESTAL* Island White Pedestal...


