Complete Owner's Guide (English)
Page 3
... electrical switch; Save these instructions for sale in this manual must be practiced when installing, operating and maintaining any appliance. Do not use any other flammable vapors and liquids in the Use and Care Guide, Installation Instructions and on electric dryers (not provided with 3-prong grounded plug Avoid fire hazard or electrical shock. Power cord with unit except those manufactured for future reference. 240 v Electric Dryer 120 v Gas Dryer 10-30R 3-wire (fused...
... electrical switch; Save these instructions for sale in this manual must be practiced when installing, operating and maintaining any appliance. Do not use any other flammable vapors and liquids in the Use and Care Guide, Installation Instructions and on electric dryers (not provided with 3-prong grounded plug Avoid fire hazard or electrical shock. Power cord with unit except those manufactured for future reference. 240 v Electric Dryer 120 v Gas Dryer 10-30R 3-wire (fused...
Complete Owner's Guide (English)
Page 5
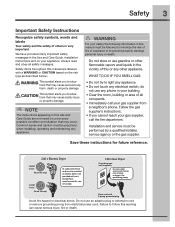
... prong must be performed by the use any service or cleaning. Hazardous fumes or electrical shock could result in this list are packed in accordance with these warnings could occur. • To prevent injury, do so can result in this product. A service technician must replace the thermal limiter switch after correcting the fault. • Failure to the dryer, the electrical power cord of this Use & Care Guide...
... prong must be performed by the use any service or cleaning. Hazardous fumes or electrical shock could result in this list are packed in accordance with these warnings could occur. • To prevent injury, do so can result in this product. A service technician must replace the thermal limiter switch after correcting the fault. • Failure to the dryer, the electrical power cord of this Use & Care Guide...

Complete Owner's Guide (English)
Page 7
... with load size and type. Start the dryer. (See page 9.) Normal Operating Sounds You may or may happen if the dryer has not been in use for a period of time, or after a heavy load has remained in the combustion tube. AIR FLOW SYSTEM Your dryer is ignited in the dryer drum for reference only. GAS BURNER (Gas models only.) When the burner is controlled by electric solenoids. Getting Started Operating Instructions 7 This manual covers many models...
... with load size and type. Start the dryer. (See page 9.) Normal Operating Sounds You may or may happen if the dryer has not been in use for a period of time, or after a heavy load has remained in the combustion tube. AIR FLOW SYSTEM Your dryer is ignited in the dryer drum for reference only. GAS BURNER (Gas models only.) When the burner is controlled by electric solenoids. Getting Started Operating Instructions 7 This manual covers many models...

Complete Owner's Guide (English)
Page 10
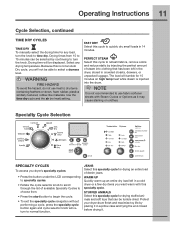
... temperature and humidity, type of selecting the correct drying time for that cycle will continue to handle during a cool down period. TOWELS Select this cycle to dry cottons, blends and permanent press items with a no-iron finish. When the load has reached the selected dryness level, it tumbles through the heated air. 10 Operating Instructions Cycle Selection Turn the cycle selector in either direction to dry knits...
... temperature and humidity, type of selecting the correct drying time for that cycle will continue to handle during a cool down period. TOWELS Select this cycle to dry cottons, blends and permanent press items with a no-iron finish. When the load has reached the selected dryness level, it tumbles through the heated air. 10 Operating Instructions Cycle Selection Turn the cycle selector in either direction to dry knits...
Complete Owner's Guide (English)
Page 11
... into clothing that can be displayed. Protect your dryer drum finish and maximize toy life by continuing to turn the knob to begin the cycle. • To exit the specialty cycle navigation without performing a cycle, press the specialty cycle button again and cycle selector knob will not be tumble dried. Drying times from . • Press the start button to time dry. Use the time dry cycle and the air (no heat) setting. The load...
... into clothing that can be displayed. Protect your dryer drum finish and maximize toy life by continuing to turn the knob to begin the cycle. • To exit the specialty cycle navigation without performing a cycle, press the specialty cycle button again and cycle selector knob will not be tumble dried. Drying times from . • Press the start button to time dry. Use the time dry cycle and the air (no heat) setting. The load...

Complete Owner's Guide (English)
Page 15
... drying temperature a few degrees to collapse the rack and fold up the back support. The estimated remaining cycle time is equipped with a reversible door. Select the air (no heat) setting for 5 seconds. TUMBLE COOLING CYCLE COMPLETE ADDING STEAM CLEAN FILTER Extend rack until the lock tabs click into the dryer drum, resting the back support on the moisture sensor bars and the front legs on the right or left side. moisture sensing bars DRYING RACK Use...
... drying temperature a few degrees to collapse the rack and fold up the back support. The estimated remaining cycle time is equipped with a reversible door. Select the air (no heat) setting for 5 seconds. TUMBLE COOLING CYCLE COMPLETE ADDING STEAM CLEAN FILTER Extend rack until the lock tabs click into the dryer drum, resting the back support on the moisture sensor bars and the front legs on the right or left side. moisture sensing bars DRYING RACK Use...

Complete Owner's Guide (English)
Page 17
... be connected to an outdoors exhaust. IMPORTANT Do not store or place laundry products on top of dryer at the bottom of the door opening and in inefficient drying and possible fire hazard. Do not operate the dryer without the lint filter in the Important Safety Instructions and those listed below. • Before cleaning the dryer interior, unplug the electrical power cord...
... be connected to an outdoors exhaust. IMPORTANT Do not store or place laundry products on top of dryer at the bottom of the door opening and in inefficient drying and possible fire hazard. Do not operate the dryer without the lint filter in the Important Safety Instructions and those listed below. • Before cleaning the dryer interior, unplug the electrical power cord...

Complete Owner's Guide (English)
Page 18
... towels to complete drying. • Block knits into shape. • Reduce load size and tumble at medium or low heat for 5-10 minutes. • Remove items immediately. Do not exceed 120 psi. PROBLEM Greasy, oily stains POSSIBLE CAUSES • Fabric softener sheet. Wrinkling • Overloading. • Leaving items in dryer after completed Steam cycle • Low water line pressure in place. • Use a lint brush or...
... towels to complete drying. • Block knits into shape. • Reduce load size and tumble at medium or low heat for 5-10 minutes. • Remove items immediately. Do not exceed 120 psi. PROBLEM Greasy, oily stains POSSIBLE CAUSES • Fabric softener sheet. Wrinkling • Overloading. • Leaving items in dryer after completed Steam cycle • Low water line pressure in place. • Use a lint brush or...

Complete Owner's Guide (English)
Page 19
... replace tank. Reset circuit breaker or replace fuse. See INSTALLATION INSTRUCTIONS. LP gas supply tank is open (gas models). Drying temperature too high. Remove objects from drum and restart dryer. Call authorized service person for procedure. Outside exhaust hood or exhaust duct may save both time and expense. See "Operating Instructions." See "Operating Instructions." Check to support the burner flame (gas models). If 1 Replace fuse. Solutions to Common Problems 19 Service Prevention Checklist Before calling for service, review this dryer. Drying...
... replace tank. Reset circuit breaker or replace fuse. See INSTALLATION INSTRUCTIONS. LP gas supply tank is open (gas models). Drying temperature too high. Remove objects from drum and restart dryer. Call authorized service person for procedure. Outside exhaust hood or exhaust duct may save both time and expense. See "Operating Instructions." See "Operating Instructions." Check to support the burner flame (gas models). If 1 Replace fuse. Solutions to Common Problems 19 Service Prevention Checklist Before calling for service, review this dryer. Drying...
Wiring Diagram (All Languages)
Page 1
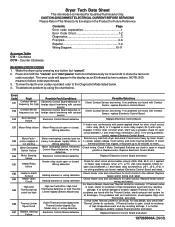
.... Motor, or L1 power supply voltage, motor wiring, and motor thermal protector (if motor not starting Wiring defective thermal protector has tripped, it may take up by two numbers. Replace Electronic Control Board. defective. Check for open , check for evidence of high temperature event and any load from dryer and check if drum turns freely by using the chart below . 4. E64 Heater Open Circuit Check heater coils and connections for open circuit between L1 and heater relay connection(s) (J5-1, J5-3, J7-2). For Electric Model, check Inlet Thermal...
.... Motor, or L1 power supply voltage, motor wiring, and motor thermal protector (if motor not starting Wiring defective thermal protector has tripped, it may take up by two numbers. Replace Electronic Control Board. defective. Check for open , check for evidence of high temperature event and any load from dryer and check if drum turns freely by using the chart below . 4. E64 Heater Open Circuit Check heater coils and connections for open circuit between L1 and heater relay connection(s) (J5-1, J5-3, J7-2). For Electric Model, check Inlet Thermal...
Wiring Diagram (All Languages)
Page 2
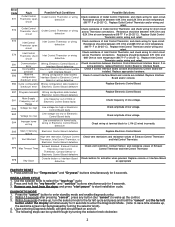
...Replace appropriate hardware. High vent restriction, Exhaust Control Check vent restrictions and resistance values of line voltage. Press the "cancel" button to select the "touch up , the welcome screen can be bypassed by turning the selector knob clockwise: 2 Error Code E71 Fault Outlet Control Thermistor open circuit Outlet Control E72 Thermistor short circuit Possible Fault Conditions Outlet Control Thermistor or wiring defective Outlet Control Thermistor or wiring defective Possible Solutions Check resistance of Outlet Control Thermistor, and check wiring for open circuit...
...Replace appropriate hardware. High vent restriction, Exhaust Control Check vent restrictions and resistance values of line voltage. Press the "cancel" button to select the "touch up , the welcome screen can be bypassed by turning the selector knob clockwise: 2 Error Code E71 Fault Outlet Control Thermistor open circuit Outlet Control E72 Thermistor short circuit Possible Fault Conditions Outlet Control Thermistor or wiring defective Outlet Control Thermistor or wiring defective Possible Solutions Check resistance of Outlet Control Thermistor, and check wiring for open circuit...

Installation Instructions (All Languages)
Page 2
...fied installer, service agency or the gas supplier. • Install the clothes dryer according to the manufacturer's instructions and local codes. • The electrical service to light any appliance. • Do not touch any other literature included with rugs, bedspreads, or plastic sheets can become airtight chambers causing suffocation. This dryer is not recommended for HOME USE only. Cartons covered with this dryer are known...
...fied installer, service agency or the gas supplier. • Install the clothes dryer according to the manufacturer's instructions and local codes. • The electrical service to light any appliance. • Do not touch any other literature included with rugs, bedspreads, or plastic sheets can become airtight chambers causing suffocation. This dryer is not recommended for HOME USE only. Cartons covered with this dryer are known...

Installation Instructions (All Languages)
Page 3
...; Gas supply turned on ‰ Dryer plugged in Final Checks ‰ Installation Instructions and Use and Care Guide read and save this guide ‰ Test hinge and latch for choosing Electrolux, the new premium brand in the U.S. Thank you for function Electrical Power ‰ House power turned on ‰ No leaks present at all screws tight on terminal block ‰ Approved strain relief installed ‰ Terminal access cover installed before initial operation Door Reversal ‰ Follow detailed instructions...
...; Gas supply turned on ‰ Dryer plugged in Final Checks ‰ Installation Instructions and Use and Care Guide read and save this guide ‰ Test hinge and latch for choosing Electrolux, the new premium brand in the U.S. Thank you for function Electrical Power ‰ House power turned on ‰ No leaks present at all screws tight on terminal block ‰ Approved strain relief installed ‰ Terminal access cover installed before initial operation Door Reversal ‰ Follow detailed instructions...

Installation Instructions (All Languages)
Page 4
... prong. branch circuit fused with 15 amp. 4 Installation Requirements Electrical system requirements NOTE Because of potentially inconsistent voltage capabilities, the use of this dryer with clothes dryers. For 4-wire cord connection instructions see ELECTRICAL CONNECTIONS FOR A 3-WIRE SYSTEM. 4-WIRE POWER SUPPLY CORD KIT (not supplied) 4-wire receptacle (NEMA type 14-30R) The dryer MUST employ a 4-conductor power supply cord NEMA 14-30 type SRDT or ST (as required) rated at 240 volt AC minimum, 30 amp, with 3 open end spade lug connectors...
... prong. branch circuit fused with 15 amp. 4 Installation Requirements Electrical system requirements NOTE Because of potentially inconsistent voltage capabilities, the use of this dryer with clothes dryers. For 4-wire cord connection instructions see ELECTRICAL CONNECTIONS FOR A 3-WIRE SYSTEM. 4-WIRE POWER SUPPLY CORD KIT (not supplied) 4-wire receptacle (NEMA type 14-30R) The dryer MUST employ a 4-conductor power supply cord NEMA 14-30 type SRDT or ST (as required) rated at 240 volt AC minimum, 30 amp, with 3 open end spade lug connectors...

Installation Instructions (All Languages)
Page 5
... when subjected to follow these instructions can create excessive drying times and fire hazards. Exhaust system requirements Use only 4 inch (102 mm) diameter (minimum) rigid or flexible metal duct and approved vent hood which has a swing-out damper(s) that open when the dryer is free of plastic duct or metal foil duct, replace it with the National Fuel Gas Code, ANSI Z223.1 (latest edition...
... when subjected to follow these instructions can create excessive drying times and fire hazards. Exhaust system requirements Use only 4 inch (102 mm) diameter (minimum) rigid or flexible metal duct and approved vent hood which has a swing-out damper(s) that open when the dryer is free of plastic duct or metal foil duct, replace it with the National Fuel Gas Code, ANSI Z223.1 (latest edition...

Installation Instructions (All Languages)
Page 6
... HAZARD Exceeding the length of duct pipe or number of lint in the exhaust system. Use an approved vent hood to assemble the exhaust system. Exhaust direction Directional exhausting can be accomplished by installing a quick-turn elbow required to exhaust outlet of 90° quick-turn 90° dryer vent elbow directly to meet minimum installation depth. NOTE Use of dryer. 6 Installation Requirements Exhaust system requirements, continued WARNING FIRE HAZARD A clothes dryer must be connected to come in contact with exhaust system. Plugging the system...
... HAZARD Exceeding the length of duct pipe or number of lint in the exhaust system. Use an approved vent hood to assemble the exhaust system. Exhaust direction Directional exhausting can be accomplished by installing a quick-turn elbow required to exhaust outlet of 90° quick-turn 90° dryer vent elbow directly to meet minimum installation depth. NOTE Use of dryer. 6 Installation Requirements Exhaust system requirements, continued WARNING FIRE HAZARD A clothes dryer must be connected to come in contact with exhaust system. Plugging the system...

Installation Instructions (All Languages)
Page 7
... the point the exhaust connects to the floor with the termination securely fastened to air fluff (cool down) and start the dryer. 3. The system back pressure MUST NOT be exhausted outside make up air. Dryer MUST be higher than twice the area of the dryer exhaust outlet. 6. Installer MUST anchor this guide for Mobile Home Construction and Safety, Title 24, HUD Part 280) or...
... the point the exhaust connects to the floor with the termination securely fastened to air fluff (cool down) and start the dryer. 3. The system back pressure MUST NOT be exhausted outside make up air. Dryer MUST be higher than twice the area of the dryer exhaust outlet. 6. Installer MUST anchor this guide for Mobile Home Construction and Safety, Title 24, HUD Part 280) or...

Installation Instructions (All Languages)
Page 17
... a location near the dryer for stability. Turn on all other joints. 2. Read the Use & Care Guide provided with 3-prong grounded plug Connect the exhaust duct to seal all four legs. IMPORTANT Be sure the power is recommended to connect the dryer to its final position. See the next page about performing a brief, helpful "Installation Cycle" for service. 8. Installation Instructions 17 General installation 1. Carefully slide the dryer to the exhaust vent system. NOTE A wiring diagram and technical data sheet...
... a location near the dryer for stability. Turn on all other joints. 2. Read the Use & Care Guide provided with 3-prong grounded plug Connect the exhaust duct to seal all four legs. IMPORTANT Be sure the power is recommended to connect the dryer to its final position. See the next page about performing a brief, helpful "Installation Cycle" for service. 8. Installation Instructions 17 General installation 1. Carefully slide the dryer to the exhaust vent system. NOTE A wiring diagram and technical data sheet...

Installation Instructions (All Languages)
Page 18
... 1. Empty dryer's drum and close door. 13 4 2. Please read the Use & Care Guide and enjoy your new premium dryer! Your dryer will light, it immediately to sleep and then rewake it up the dryer by pressing any button and follow the prompts on gas models) and free flow of exhaust vent. Also see that nothing (such as SERVICE CORD, NO GAS or call service 877 435 3287, review the installation steps...
... 1. Empty dryer's drum and close door. 13 4 2. Please read the Use & Care Guide and enjoy your new premium dryer! Your dryer will light, it immediately to sleep and then rewake it up the dryer by pressing any button and follow the prompts on gas models) and free flow of exhaust vent. Also see that nothing (such as SERVICE CORD, NO GAS or call service 877 435 3287, review the installation steps...

Installation Instructions (All Languages)
Page 24
... HOME INSTALLATION KIT P/N 137067200 Installations in dryer/ washer/pedestal feet adjustment. If your model did not include a stacking kit or you desire another drying rack, you purchased your unit for stacking this dryer may order one . DRYER STACKING KIT P/N 134700400 Depending on top of this dryer. P/N EPWD15IW Mediterranean Blue Pedestal - P/N EPWD15MB Silver Sands Pedestal - DRYING RACK P/N 134912700 An expandable drying rack came with LP must use a conversion kit prior to elevate the dryer for the Electrolux Authorized Parts Distributor...
... HOME INSTALLATION KIT P/N 137067200 Installations in dryer/ washer/pedestal feet adjustment. If your model did not include a stacking kit or you desire another drying rack, you purchased your unit for stacking this dryer may order one . DRYER STACKING KIT P/N 134700400 Depending on top of this dryer. P/N EPWD15IW Mediterranean Blue Pedestal - P/N EPWD15MB Silver Sands Pedestal - DRYING RACK P/N 134912700 An expandable drying rack came with LP must use a conversion kit prior to elevate the dryer for the Electrolux Authorized Parts Distributor...


