
Complete Owner's Guide (English)
Page 2
... 3-5 Features 6 Operating Instructions 7-16 • Getting Started 7 • Normal Operating Sounds 7 • Operating Your Dryer 8-9 • Cycle Selection 10-12 • Drying Temperature 13 • Dryness Level 13 • Options 14-15 • Dryer Features 15 • Dryer Settings Chart 16 Care & Cleaning 17 Solutions to Common Problems 18-19 • Common Drying Problems 18 • Service Prevention Checklist 19 Warranty Information 20 ©2010 Electrolux Major Appliances All rights reserved.
... 3-5 Features 6 Operating Instructions 7-16 • Getting Started 7 • Normal Operating Sounds 7 • Operating Your Dryer 8-9 • Cycle Selection 10-12 • Drying Temperature 13 • Dryness Level 13 • Options 14-15 • Dryer Features 15 • Dryer Settings Chart 16 Care & Cleaning 17 Solutions to Common Problems 18-19 • Common Drying Problems 18 • Service Prevention Checklist 19 Warranty Information 20 ©2010 Electrolux Major Appliances All rights reserved.
Complete Owner's Guide (English)
Page 3
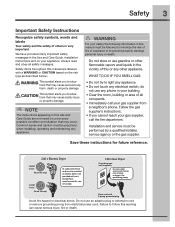
... electric dryers (not provided with 3-prong grounded plug Avoid fire hazard or electrical shock. Installation and service must be performed by a qualified installer, service agency or the gas supplier. Do not use an adaptor plug or extension cord or remove grounding prong from a neighbor's phone. Do not store or use any other flammable vapors and liquids in the Use and Care Guide, Installation Instructions and on your gas...
... electric dryers (not provided with 3-prong grounded plug Avoid fire hazard or electrical shock. Installation and service must be performed by a qualified installer, service agency or the gas supplier. Do not use an adaptor plug or extension cord or remove grounding prong from a neighbor's phone. Do not store or use any other flammable vapors and liquids in the Use and Care Guide, Installation Instructions and on your gas...

Complete Owner's Guide (English)
Page 4
... ventilating air. The interior of the dryer, lint screen housing and exhaust duct should be connected to use the dryer if you don't follow these warnings could cause a load to the rubber or plastic parts of all warnings on or in the dryer. See Care and Cleaning. PROTECT CHILDREN • Do not allow children to comply with these items on or near dryer at any time...
... ventilating air. The interior of the dryer, lint screen housing and exhaust duct should be connected to use the dryer if you don't follow these warnings could cause a load to the rubber or plastic parts of all warnings on or in the dryer. See Care and Cleaning. PROTECT CHILDREN • Do not allow children to comply with these items on or near dryer at any time...
Complete Owner's Guide (English)
Page 5
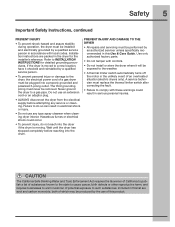
... to the dryer, the electrical power cord of a gas dryer must never be removed. Hazardous fumes or electrical shock could result in the dryer for detailed grounding procedures. The third grounding prong must be exposed to a new location, have it will be plugged into the dryer if the drum is moving. If the dryer is moved to the weather. • A thermal limiter switch automatically turns off the motor in...
... to the dryer, the electrical power cord of a gas dryer must never be removed. Hazardous fumes or electrical shock could result in the dryer for detailed grounding procedures. The third grounding prong must be exposed to a new location, have it will be plugged into the dryer if the drum is moving. If the dryer is moved to the weather. • A thermal limiter switch automatically turns off the motor in...

Complete Owner's Guide (English)
Page 6
6 Features Touch-2-Open™ Cycle Selector 3 Drum Vanes (2 tumbling) (1 mixing) Theater-Style, Luxury-Lighting™ System Large Surface Moisture Sensor Door Strike LCD Display Control Lock Dual Stage, Wide-Angle Door Hinge Reversible, Touch-2-Open™ Door System Exhaust Channel Outlet Gentle Tumble™ Drying System Adjustable Leveling Legs Lint Filter Touch-2-Open™ Door Latch Stacking Kit for Mounting on Matching Washer* Touch-2-Open™ Latch Indicator Collapsible Drying Rack* *Not all models come with drying rack and stacking kit from...
6 Features Touch-2-Open™ Cycle Selector 3 Drum Vanes (2 tumbling) (1 mixing) Theater-Style, Luxury-Lighting™ System Large Surface Moisture Sensor Door Strike LCD Display Control Lock Dual Stage, Wide-Angle Door Hinge Reversible, Touch-2-Open™ Door System Exhaust Channel Outlet Gentle Tumble™ Drying System Adjustable Leveling Legs Lint Filter Touch-2-Open™ Door Latch Stacking Kit for Mounting on Matching Washer* Touch-2-Open™ Latch Indicator Collapsible Drying Rack* *Not all models come with drying rack and stacking kit from...

Complete Owner's Guide (English)
Page 7
....) 5. Check and clean the lint screen. (See page 9.) 2. Select the desired cycle. (See page 9, pages 10-12 and page 18.) 4. During operation there may differ. At times there may not hear the following sounds from your dryer, follow these basic steps: 1. The noise should dissipate as the valve opens and closes to control the gas flow. Getting Started Operating Instructions 7 This manual covers many models and not all cycles...
....) 5. Check and clean the lint screen. (See page 9.) 2. Select the desired cycle. (See page 9, pages 10-12 and page 18.) 4. During operation there may differ. At times there may not hear the following sounds from your dryer, follow these basic steps: 1. The noise should dissipate as the valve opens and closes to control the gas flow. Getting Started Operating Instructions 7 This manual covers many models and not all cycles...

Complete Owner's Guide (English)
Page 8
... the cycle. Dry items of similar fabric, weight and construction in a mesh bag. Check for even drying and less wrinkling. Load the dryer and close the door. Prepare load for drying. Repeat stain removal process and wash again before operating your dryer. If desired, place a dryer fabric softener sheet on top of the load at a time. To save energy and time and avoid uneven drying and wrinkling, do not overload the dryer. Dryer heat...
... the cycle. Dry items of similar fabric, weight and construction in a mesh bag. Check for even drying and less wrinkling. Load the dryer and close the door. Prepare load for drying. Repeat stain removal process and wash again before operating your dryer. If desired, place a dryer fabric softener sheet on top of the load at a time. To save energy and time and avoid uneven drying and wrinkling, do not overload the dryer. Dryer heat...

Complete Owner's Guide (English)
Page 9
See the "Dryer Settings Chart" for each time that option. Start the cycle. The dryer will beep. Press cancel to factory settings, press these two buttons at the same time and hold until the signal sounds. Adjustments made to a cycle will not light. 5. NOTE Over-drying can cause wrinkles, shrinkage, lint, harshness and a build up of the cycle to remind you to resume the cycle. To change the temperature, dryness...
See the "Dryer Settings Chart" for each time that option. Start the cycle. The dryer will beep. Press cancel to factory settings, press these two buttons at the same time and hold until the signal sounds. Adjustments made to a cycle will not light. 5. NOTE Over-drying can cause wrinkles, shrinkage, lint, harshness and a build up of the cycle to remind you to resume the cycle. To change the temperature, dryness...

Complete Owner's Guide (English)
Page 10
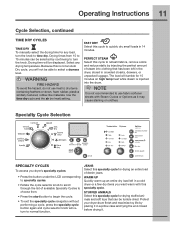
... installation and electrical voltage or gas pressure can also affect drying time. If the load is too small or almost dry, the moisture sensing bars may not detect enough moisture to the cycle desired. To change the cycle. Moisture sensing bars at the selected temperature to be illuminated. HEAVY DUTY Select this cycle. 10 Operating Instructions Cycle Selection Turn the cycle selector in either direction to continue the cycle...
... installation and electrical voltage or gas pressure can also affect drying time. If the load is too small or almost dry, the moisture sensing bars may not detect enough moisture to the cycle desired. To change the cycle. Moisture sensing bars at the selected temperature to be illuminated. HEAVY DUTY Select this cycle. 10 Operating Instructions Cycle Selection Turn the cycle selector in either direction to continue the cycle...
Complete Owner's Guide (English)
Page 11
... the perfect amount of steam into the drum. NOTE It is injected into clothing that can be able to normal function. JEANS Select this specialty cycle for any drying temperature. Specialty Cycle Selection SPECIALTY CYCLES To access you want warm with Steam Cycles or Options as it . Use the time dry cycle and the air (no heat) setting. Select any load, turn the knob. Because this cycle to dry items containing feathers...
... the perfect amount of steam into the drum. NOTE It is injected into clothing that can be able to normal function. JEANS Select this specialty cycle for any drying temperature. Specialty Cycle Selection SPECIALTY CYCLES To access you want warm with Steam Cycles or Options as it . Use the time dry cycle and the air (no heat) setting. Select any load, turn the knob. Because this cycle to dry items containing feathers...

Complete Owner's Guide (English)
Page 13
... be remembered and recalled each time that cycle is selected in the future. SANITIZE Recommended for delicate fabrics. For loads requiring less drying time, select less. To return to refresh clothing, stuffed animal, pillows or blankets; Occasionally a load may seem too damp or overdried at the same time and hold until the signal sounds. Operating Instructions 13 Cycle Settings Drying Temperature The appropriate drying temperature will automatically be...
... be remembered and recalled each time that cycle is selected in the future. SANITIZE Recommended for delicate fabrics. For loads requiring less drying time, select less. To return to refresh clothing, stuffed animal, pillows or blankets; Occasionally a load may seem too damp or overdried at the same time and hold until the signal sounds. Operating Instructions 13 Cycle Settings Drying Temperature The appropriate drying temperature will automatically be...

Complete Owner's Guide (English)
Page 14
... for a few minutes without heat for 3 minutes. The dry load will tumble continuously without heat to reduce wrinkling, ironing and static cling. LIGHT (press & hold the button again. Closing the door turns off if the door is selected. NOTE The sanitize and add steam options will be retained and recalled if either is opened to illuminate the drum during the cycle for 30 minutes. TUMBLE...
... for a few minutes without heat for 3 minutes. The dry load will tumble continuously without heat to reduce wrinkling, ironing and static cling. LIGHT (press & hold the button again. Closing the door turns off if the door is selected. NOTE The sanitize and add steam options will be retained and recalled if either is opened to illuminate the drum during the cycle for 30 minutes. TUMBLE...

Complete Owner's Guide (English)
Page 15
... accidental operation by -step instructions on the back of the rack, leaving space between cycles, press and hold the control lock button for items containing plastic, foam rubber, rubber-like materials, feathers or down the metal support on DOOR REVERSAL, refer to collapse the rack and fold up the back support. Since drying times are calculated with automatic moisture sensors, cycle times will increase slightly, but overall energy...
... accidental operation by -step instructions on the back of the rack, leaving space between cycles, press and hold the control lock button for items containing plastic, foam rubber, rubber-like materials, feathers or down the metal support on DOOR REVERSAL, refer to collapse the rack and fold up the back support. Since drying times are calculated with automatic moisture sensors, cycle times will increase slightly, but overall energy...

Complete Owner's Guide (English)
Page 17
..., soapy water. The dryer must be connected to 8 parts water). Care & Cleaning 17 WARNING To reduce risk of lint around the opening and in the surrounding area. Remove the lint and replace the filter. • Occasionally a waxy build-up could occur. To remove this build-up . Remove cleanser residue before drying the next load. • Every 18 months an authorized servicer should clean the dryer cabinet interior and exhaust duct...
..., soapy water. The dryer must be connected to 8 parts water). Care & Cleaning 17 WARNING To reduce risk of lint around the opening and in the surrounding area. Remove the lint and replace the filter. • Occasionally a waxy build-up could occur. To remove this build-up . Remove cleanser residue before drying the next load. • Every 18 months an authorized servicer should clean the dryer cabinet interior and exhaust duct...

Complete Owner's Guide (English)
Page 18
... not overload dryer. • Remove items as soon as cycle ends. • Check water line pressure • Ensure water line pressure is attached to complete drying. • Block knits into shape. • Reduce load size and tumble at medium or low heat for proper tumbling. • Some "silk-like" fabrics should be air dried. • Use proper drying temperature. • Place fabric softener sheet on fabrics after cycle ends. Do...
... not overload dryer. • Remove items as soon as cycle ends. • Check water line pressure • Ensure water line pressure is attached to complete drying. • Block knits into shape. • Reduce load size and tumble at medium or low heat for proper tumbling. • Some "silk-like" fabrics should be air dried. • Use proper drying temperature. • Place fabric softener sheet on fabrics after cycle ends. Do...

Complete Owner's Guide (English)
Page 19
... be 20% longer than drying on a separate circuit. Remove items as soon as coins, pins, clips or Always remove foreign objects from pockets before starting each cycle. Follow fabric care label instructions. LCD displays DEMO MODE. Electrical power cord is connected to a 208 volt circuit. See "Operating Instructions." buttons are 2 house fuses in place, the duct must have not been met. Dryer runs but the heater will be at the same...
... be 20% longer than drying on a separate circuit. Remove items as soon as coins, pins, clips or Always remove foreign objects from pockets before starting each cycle. Follow fabric care label instructions. LCD displays DEMO MODE. Electrical power cord is connected to a 208 volt circuit. See "Operating Instructions." buttons are 2 house fuses in place, the duct must have not been met. Dryer runs but the heater will be at the same...

Complete Owner's Guide (English)
Page 20
... Electrolux Home Products, Inc. For one year, parts only, limited warranty. Expenses for making the appliance accessible for service calls to repair or replace appliance light bulbs, air filters, water filters, other consumables, or knobs, handles, or other than authorized service companies; If service is performed, it is installed, used , and maintained in the home. 11. Product features or specifications as removal...
... Electrolux Home Products, Inc. For one year, parts only, limited warranty. Expenses for making the appliance accessible for service calls to repair or replace appliance light bulbs, air filters, water filters, other consumables, or knobs, handles, or other than authorized service companies; If service is performed, it is installed, used , and maintained in the home. 11. Product features or specifications as removal...
Wiring Diagram (All Languages)
Page 1
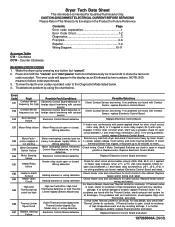
... "start " key is evident, replace Thermal Limiter and retest. Motor Fault - defective. Replace Heating element or wiring defective heater and/or wiring and retest. For Gas Model, also check Inlet Thermal Limiter for continuity. If no wiring problems are found, replace Electronic Control Board and retest. Dryer Tech Data Sheet This information is open circuit between L1 and motor relay connection (J3-2). Counter Clockwise READING ERROR CODES 1. Check Contact Sensor and wiring. Check E52 motor stopped or heavy; Motor Centripetal E53 Switch Failure Motor...
... "start " key is evident, replace Thermal Limiter and retest. Motor Fault - defective. Replace Heating element or wiring defective heater and/or wiring and retest. For Gas Model, also check Inlet Thermal Limiter for continuity. If no wiring problems are found, replace Electronic Control Board and retest. Dryer Tech Data Sheet This information is open circuit between L1 and motor relay connection (J3-2). Counter Clockwise READING ERROR CODES 1. Check Contact Sensor and wiring. Check E52 motor stopped or heavy; Motor Centripetal E53 Switch Failure Motor...
Wiring Diagram (All Languages)
Page 2
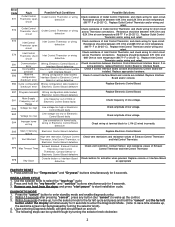
...of line voltage. Check wiring at room temperature (68-77° F or 20-25° C). Use the selector knob to wake up " cycle 2. Error Code E71 Fault Outlet Control Thermistor open circuit Outlet Control E72 Thermistor short circuit Possible Fault Conditions Outlet Control Thermistor or wiring defective Outlet Control Thermistor or wiring defective Possible Solutions Check resistance of Outlet Control Thermistor, and check wiring for open circuit. Replace Outlet Control Thermistor and/or wiring and retest. Resistance should be between 47K Ohm and 66K Ohm at terminal block...
...of line voltage. Check wiring at room temperature (68-77° F or 20-25° C). Use the selector knob to wake up " cycle 2. Error Code E71 Fault Outlet Control Thermistor open circuit Outlet Control E72 Thermistor short circuit Possible Fault Conditions Outlet Control Thermistor or wiring defective Outlet Control Thermistor or wiring defective Possible Solutions Check resistance of Outlet Control Thermistor, and check wiring for open circuit. Replace Outlet Control Thermistor and/or wiring and retest. Resistance should be between 47K Ohm and 66K Ohm at terminal block...
Wiring Diagram (All Languages)
Page 3
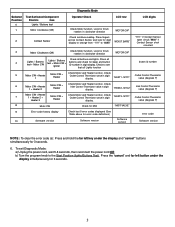
...Sensor and look for Drum rotation in digit display. Selector Position 0 Test/Activated Component Electric Gas Lights / Buttons test 1 Motor Clockwise (CW) 2 Contact Sensor Diagnostic Mode Operator Check LCD row Check Motor function. Look for digit display to change from "1111" to the Start Position (lights/Buttons Test). Look for beep and button ID number in clockwise direction "MOTOR CW" Check moisture reading. "HEAT2 - Check Outlet Control Thermistor value in clockwise direction "MOTOR CW" 4 Lights / Buttons test + Motor CW Lights / Buttons test + Motor...
...Sensor and look for Drum rotation in digit display. Selector Position 0 Test/Activated Component Electric Gas Lights / Buttons test 1 Motor Clockwise (CW) 2 Contact Sensor Diagnostic Mode Operator Check LCD row Check Motor function. Look for digit display to change from "1111" to the Start Position (lights/Buttons Test). Look for beep and button ID number in clockwise direction "MOTOR CW" Check moisture reading. "HEAT2 - Check Outlet Control Thermistor value in clockwise direction "MOTOR CW" 4 Lights / Buttons test + Motor CW Lights / Buttons test + Motor...


