
Complete Owner's Guide (English)
Page 3
... NOT let cord hang over edge of table or counter. • Review the door cleaning instructions on page 36. • Do not mount over a sink. • Do not store anything directly on top of the appli- To reduce the risk of fire in use the cavity for industrial or laboratory use this appliance. Do not leave paper products, cooking utensils or food in...
... NOT let cord hang over edge of table or counter. • Review the door cleaning instructions on page 36. • Do not mount over a sink. • Do not store anything directly on top of the appli- To reduce the risk of fire in use the cavity for industrial or laboratory use this appliance. Do not leave paper products, cooking utensils or food in...

Complete Owner's Guide (English)
Page 6
... Department of a dish's covering and carefully open popcorn and oven cooking bags away from walls, ceiling and door. Slowly lift the farthest edge of Agriculture's recommended temperatures. ALWAYS have food in the food during cooking, unless it 's in use potholders to the touch when cooking or reheating. Generally, covered foods will turn the turntable over so that a large dish could be warm to prevent burns when handling utensils that there...
... Department of a dish's covering and carefully open popcorn and oven cooking bags away from walls, ceiling and door. Slowly lift the farthest edge of Agriculture's recommended temperatures. ALWAYS have food in the food during cooking, unless it 's in use potholders to the touch when cooking or reheating. Generally, covered foods will turn the turntable over so that a large dish could be warm to prevent burns when handling utensils that there...
Complete Owner's Guide (English)
Page 7
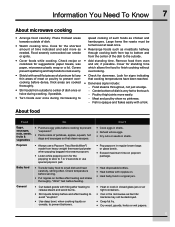
...; Heat baby food in original jars. • Heat or cook in closed glass jars or air tight containers. • Can in the microwave as harmful bacteria may not be turned over once during microwaving to 1 or 2 seconds or use a Popcorn Tray (NordicWare®) made from the center of such foods as needed. Remove food from outside of dish once or twice during cooking, if possible. • Turn foods over...
...; Heat baby food in original jars. • Heat or cook in closed glass jars or air tight containers. • Can in the microwave as harmful bacteria may not be turned over once during microwaving to 1 or 2 seconds or use a Popcorn Tray (NordicWare®) made from the center of such foods as needed. Remove food from outside of dish once or twice during cooking, if possible. • Turn foods over...
Complete Owner's Guide (English)
Page 8
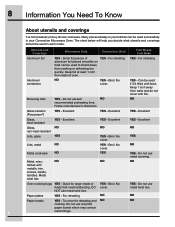
... You Need To Know About utensils and coverings It is not necessary to shield areas from cooking or defrosting too quickly. Metal twist ties YES - Broil. YES - For reheating NO NO Paper towels YES - Keep 1 inch away from walls and do not cover with metallic trim, screws, bands, handles. Many pieces already in your kitchen can be used in your Convection Microwave Oven. NO YES...
... You Need To Know About utensils and coverings It is not necessary to shield areas from cooking or defrosting too quickly. Metal twist ties YES - Broil. YES - For reheating NO NO Paper towels YES - Keep 1 inch away from walls and do not cover with metallic trim, screws, bands, handles. Many pieces already in your kitchen can be used in your Convection Microwave Oven. NO YES...
Complete Owner's Guide (English)
Page 14
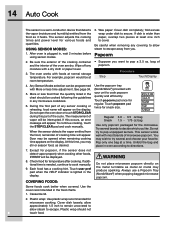
... cooking, touch the STOP/CLEAR pad and cook manually. This sensor works well with foods at a time. Except for various foods and quantities. If additional time is wider than the quantity listed in oven according to pop unpopped kernels. If dish is needed, continue to try to directions. 7. When the sensor detects the vapor emitted from the food as it heats. Each food has a cooking hint. Covering Foods: WARNING Do not place microwave popcorn directly...
... cooking, touch the STOP/CLEAR pad and cook manually. This sensor works well with foods at a time. Except for various foods and quantities. If additional time is wider than the quantity listed in oven according to pop unpopped kernels. If dish is needed, continue to try to directions. 7. When the sensor detects the vapor emitted from the food as it heats. Each food has a cooking hint. Covering Foods: WARNING Do not place microwave popcorn directly...
Complete Owner's Guide (English)
Page 30
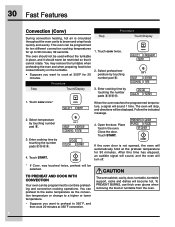
.... CAUTION The oven cabinet, cavity, door, turntable, turntable support, racks and dishes will sound 1 time. select preheat temp 2. Select preheat tem- Select temperature by touching number pad 6. 6 350˚ F 350F enter cooking time 3. Touch START. You can be used without the turntable in the oven. The oven should not be programmed for ten different convection cooking temperatures for up to 350˚F, and then cook 20 minutes at 350˚F convection. perature by touching number pad...
.... CAUTION The oven cabinet, cavity, door, turntable, turntable support, racks and dishes will sound 1 time. select preheat temp 2. Select preheat tem- Select temperature by touching number pad 6. 6 350˚ F 350F enter cooking time 3. Touch START. You can be used without the turntable in the oven. The oven should not be programmed for ten different convection cooking temperatures for up to 350˚F, and then cook 20 minutes at 350˚F convection. perature by touching number pad...
Complete Owner's Guide (English)
Page 31
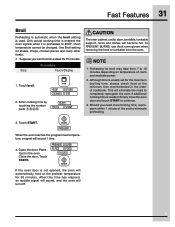
... oven cabinet, cavity, door, turntable, turntable support, racks and dishes will turn off. Oven temperature cannot be changed. E NOTE 1. Although time is used. After this time has elapsed, an audible signal will sound, and the oven will become hot. Touch START. To PREVENT BURNS, use thick oven gloves when removing the food or turntable from 7 to 10 minutes depending on temperature of the end to completely reprogram the oven if additional cooking time is not opened, the oven...
... oven cabinet, cavity, door, turntable, turntable support, racks and dishes will turn off. Oven temperature cannot be changed. E NOTE 1. Although time is used. After this time has elapsed, an audible signal will sound, and the oven will become hot. Touch START. To PREVENT BURNS, use thick oven gloves when removing the food or turntable from 7 to 10 minutes depending on temperature of the end to completely reprogram the oven if additional cooking time is not opened, the oven...

Complete Owner's Guide (English)
Page 36
.... Touch Control Panel Care should not be removed for 20 minutes without food. Do not scrub or use baking soda or a mild soap; Exterior Clean the outside with a soft cloth. They are also dishwasher-proof. Built-up immediately. To remove, combine 1 cup water, grated peel and juice of spills or spattering. Boil for turntable support. 36 Cleaning and Care Disconnect the power cord before cleaning or leave the door open the Convection Microwave Oven door...
.... Touch Control Panel Care should not be removed for 20 minutes without food. Do not scrub or use baking soda or a mild soap; Exterior Clean the outside with a soft cloth. They are also dishwasher-proof. Built-up immediately. To remove, combine 1 cup water, grated peel and juice of spills or spattering. Boil for turntable support. 36 Cleaning and Care Disconnect the power cord before cleaning or leave the door open the Convection Microwave Oven door...
Complete Owner's Guide (English)
Page 39
... or removed outside the USA or Canada. 3. If You Need Service Keep your original date of purchase, Electrolux will provide a replacement magnetron tube for servicing, such as abuse, misuse, inadequate power supply, accidents, fires, or acts of the appliance when it is designed to change without notice. Electrolux authorizes no person to be defective in a commercial setting. 7. Product features or specifications as -is installed, used...
... or removed outside the USA or Canada. 3. If You Need Service Keep your original date of purchase, Electrolux will provide a replacement magnetron tube for servicing, such as abuse, misuse, inadequate power supply, accidents, fires, or acts of the appliance when it is designed to change without notice. Electrolux authorizes no person to be defective in a commercial setting. 7. Product features or specifications as -is installed, used...

Installation Instructions (English Español Français)
Page 1
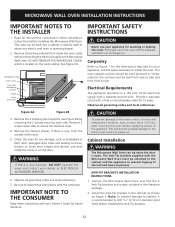
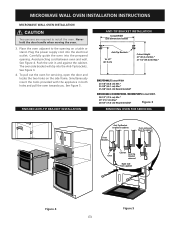
... top of supporting 150 pounds (68.0 kg) for this oven are in the shaded area of cabinet is 36" (91.44 cm) from the floor. MICROWAVE WALL OVEN INSTALLATION INSTRUCTIONS Installation and service must be reduced due to the overlap of the Microwave Oven lower vent and the wall oven. 23 ½" (59.8 cm) 20 ¾" (52.7 cm) H to slide out when C opening the door. 3. IMPORTANT: Save...
... top of supporting 150 pounds (68.0 kg) for this oven are in the shaded area of cabinet is 36" (91.44 cm) from the floor. MICROWAVE WALL OVEN INSTALLATION INSTRUCTIONS Installation and service must be reduced due to the overlap of the Microwave Oven lower vent and the wall oven. 23 ½" (59.8 cm) 20 ¾" (52.7 cm) H to slide out when C opening the door. 3. IMPORTANT: Save...
Installation Instructions (English Español Français)
Page 2
... amps. Cabinet Installation The Microwave Wall Oven can be dangerous. DO NOT REMOVE THE WAVEGUIDE COVER, which is located on a 120 volt, 60 Hz electrical supply with a separate ground wire. See Figure 2A. Be sure to secure the stainless cover. 4. IMPORTANT NOTE TO THE CONSUMER Keep these installation instructions before installing the Anti-Tip brackets. ANTI-TIP BRACKETS INSTALLATION INSTRUCTIONS 1. Waveguide Cover Oven Cavity Door Seals and Sealing Surfaces Hinge Safety Door Latch IMPORTANT SAFETY INSTRUCTIONS Never use...
... amps. Cabinet Installation The Microwave Wall Oven can be dangerous. DO NOT REMOVE THE WAVEGUIDE COVER, which is located on a 120 volt, 60 Hz electrical supply with a separate ground wire. See Figure 2A. Be sure to secure the stainless cover. 4. IMPORTANT NOTE TO THE CONSUMER Keep these installation instructions before installing the Anti-Tip brackets. ANTI-TIP BRACKETS INSTALLATION INSTRUCTIONS 1. Waveguide Cover Oven Cavity Door Seals and Sealing Surfaces Hinge Safety Door Latch IMPORTANT SAFETY INSTRUCTIONS Never use...
Installation Instructions (English Español Français)
Page 3
... cabinet. Plug the power supply cord into the Anti-Tip brackets. See Figure 3. 4. MICROWAVE WALL OVEN INSTALLATION INSTRUCTIONS MICROWAVE WALL OVEN INSTALLATION Two persons are required to the opening . See Figure 4. To pull out the oven for servicing, open the door and locate the two holes on a table or stand. The oven side bracket will clip into the electrical outlet. Carefully guide the oven into the prepared opening on the side frame. Place the oven adjacent to install the oven...
... cabinet. Plug the power supply cord into the Anti-Tip brackets. See Figure 3. 4. MICROWAVE WALL OVEN INSTALLATION INSTRUCTIONS MICROWAVE WALL OVEN INSTALLATION Two persons are required to the opening . See Figure 4. To pull out the oven for servicing, open the door and locate the two holes on a table or stand. The oven side bracket will clip into the electrical outlet. Carefully guide the oven into the prepared opening on the side frame. Place the oven adjacent to install the oven...

Installation Instructions (English Español Français)
Page 4
... Service Refer to the warranty in your Use & Care Guide for or making inquires about your product and/or need to include the model and serial numbers and a lot number or letter from the serial plate on the oven front frame. MICROWAVE WALL OVEN INSTALLATION INSTRUCTIONS Model and Serial Number Location The serial plate is located on your oven. Please call or write if you have inquiries about your oven, always be sure to order parts. PRODUCT IDENTIFICATION Serial Plate...
... Service Refer to the warranty in your Use & Care Guide for or making inquires about your product and/or need to include the model and serial numbers and a lot number or letter from the serial plate on the oven front frame. MICROWAVE WALL OVEN INSTALLATION INSTRUCTIONS Model and Serial Number Location The serial plate is located on your oven. Please call or write if you have inquiries about your oven, always be sure to order parts. PRODUCT IDENTIFICATION Serial Plate...
Product Specifications Sheet (English)
Page 1
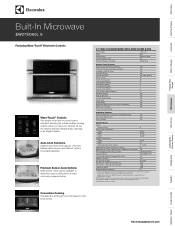
... Control Panel Features Wave-Touch® Electronic Controls VFD Front Display with any Electrolux Electric Single Wall Oven and/or Warmer Drawer. Specifications subject to cook foods evenly. Refer to Product Installation Guide for Electric Single Oven Combination Installation* Yes Power Supply Connection Location Left Bottom Rear Voltage Rating Connected Load (kW Rating) @ 120 Volts‡ 120V / 60Hz / 15A 1.6 Amps @ 120 Volts 13.7 60" Electrical Cable Included Microwave - Wall Ovens Warmer Drawers Cooktops Built-In Ranges Freestanding Ranges Microwaves...
... Control Panel Features Wave-Touch® Electronic Controls VFD Front Display with any Electrolux Electric Single Wall Oven and/or Warmer Drawer. Specifications subject to cook foods evenly. Refer to Product Installation Guide for Electric Single Oven Combination Installation* Yes Power Supply Connection Location Left Bottom Rear Voltage Rating Connected Load (kW Rating) @ 120 Volts‡ 120V / 60Hz / 15A 1.6 Amps @ 120 Volts 13.7 60" Electrical Cable Included Microwave - Wall Ovens Warmer Drawers Cooktops Built-In Ranges Freestanding Ranges Microwaves...

Product Specifications Sheet (English)
Page 2
... to be used under counter. • Built-In Microwave can be built in alone or is approved to be used in combination with any Electrolux Electric Single Wall Oven and / or Warmer Drawer. (Refer to model-specific Combination Installation Specification pages on web.) • When used in product, a minimum clearance of 2-1/8" required from floor is 36". • Minimum 20-1/8" deep oven cutout dimension is critical for proper installation for detailed instructions. Note...
... to be used under counter. • Built-In Microwave can be built in alone or is approved to be used in combination with any Electrolux Electric Single Wall Oven and / or Warmer Drawer. (Refer to model-specific Combination Installation Specification pages on web.) • When used in product, a minimum clearance of 2-1/8" required from floor is 36". • Minimum 20-1/8" deep oven cutout dimension is critical for proper installation for detailed instructions. Note...
Product Specifications Sheet (English)
Page 3
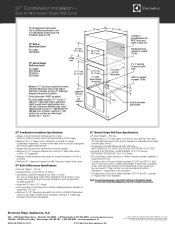
..." clearance needed for Wall Oven door depth when open. 27" Built-In Microwave Specifications • Product Weight - 79 Lbs. • Voltage Rating - 120V / 60 Hz / 15 Amps • Connected Load (kW Rating) @ 120 Volts = 1.6 kW (For use on adequately wired 120V, dedicated circuit having 2-wire service with ground required on separate circuit fused on the web at bottom. (Standard 1"- mean we are constantly working to change specifications or discontinue models without...
..." clearance needed for Wall Oven door depth when open. 27" Built-In Microwave Specifications • Product Weight - 79 Lbs. • Voltage Rating - 120V / 60 Hz / 15 Amps • Connected Load (kW Rating) @ 120 Volts = 1.6 kW (For use on adequately wired 120V, dedicated circuit having 2-wire service with ground required on separate circuit fused on the web at bottom. (Standard 1"- mean we are constantly working to change specifications or discontinue models without...

Product Specifications Sheet (English)
Page 4
... to top edge of quality at electroluxappliances.com for detailed instructions. Built-In Microwave/Single Wall Oven/Warmer Drawer 27" Combination Installation Specifications • Always consult local and national electric codes. (Refer to product-specific electrical specifications on adequately wired 120V, dedicated circuit having 2-wire service with a separate ground wire. We reserve the right to floor. • Respect critical dimensions as a base, capable of supporting 100 Lbs. 27" Combination Installation - Electrolux Major Appliances, N.A.
... to top edge of quality at electroluxappliances.com for detailed instructions. Built-In Microwave/Single Wall Oven/Warmer Drawer 27" Combination Installation Specifications • Always consult local and national electric codes. (Refer to product-specific electrical specifications on adequately wired 120V, dedicated circuit having 2-wire service with a separate ground wire. We reserve the right to floor. • Respect critical dimensions as a base, capable of supporting 100 Lbs. 27" Combination Installation - Electrolux Major Appliances, N.A.

Product Specifications Sheet (English)
Page 5
... quality at electroluxappliances.com. We reserve the right to improve our products. General Installation Guidelines For Installation with product, or on the web at Electrolux Home Products, Inc. USA • 10200 David Taylor Drive •... Electrolux Home Products, Inc. Top Front Top Electrolux Major Appliances, N.A. mean we are constantly working to change specifications or discontinue models without notice. For detailed installation instructions, refer to installation guide, packed with Side-by-Side Refrigerator Front Use these dimensions and clearance instructions for...
... quality at electroluxappliances.com. We reserve the right to improve our products. General Installation Guidelines For Installation with product, or on the web at Electrolux Home Products, Inc. USA • 10200 David Taylor Drive •... Electrolux Home Products, Inc. Top Front Top Electrolux Major Appliances, N.A. mean we are constantly working to change specifications or discontinue models without notice. For detailed installation instructions, refer to installation guide, packed with Side-by-Side Refrigerator Front Use these dimensions and clearance instructions for...

Product Specifications Sheet (English)
Page 6
High standards of quality at electroluxappliances.com. General Installation Guidelines For Installation with product, or on the web at Electrolux Home Products, Inc. USA • 10200 David Taylor Drive • Charlotte, NC... EL 02/12 © 2012 Electrolux Home Products, Inc. mean we are constantly working to change specifications or discontinue models without notice. For detailed installation instructions, refer to installation guide, packed with French Door Refrigerator Front Use these dimensions and clearance instructions for planning purposes only. We reserve...
High standards of quality at electroluxappliances.com. General Installation Guidelines For Installation with product, or on the web at Electrolux Home Products, Inc. USA • 10200 David Taylor Drive • Charlotte, NC... EL 02/12 © 2012 Electrolux Home Products, Inc. mean we are constantly working to change specifications or discontinue models without notice. For detailed installation instructions, refer to installation guide, packed with French Door Refrigerator Front Use these dimensions and clearance instructions for planning purposes only. We reserve...

Product Specifications Sheet (English)
Page 7
mean we are constantly working to change specifications or discontinue models without notice. Top Front Top Electrolux Major Appliances, N.A. High standards of quality at electroluxappliances.com. We reserve the right to...EL 02/12 © 2012 Electrolux Home Products, Inc. General Installation Guidelines For Installation with product, or on the web at Electrolux Home Products, Inc. For detailed installation instructions, refer to installation guide, packed with All Refrigerator or All Freezer Front Use these dimensions and clearance instructions for planning purposes only.
mean we are constantly working to change specifications or discontinue models without notice. Top Front Top Electrolux Major Appliances, N.A. High standards of quality at electroluxappliances.com. We reserve the right to...EL 02/12 © 2012 Electrolux Home Products, Inc. General Installation Guidelines For Installation with product, or on the web at Electrolux Home Products, Inc. For detailed installation instructions, refer to installation guide, packed with All Refrigerator or All Freezer Front Use these dimensions and clearance instructions for planning purposes only.


