
Complete Owner's Guide (English)
Page 3
...Information 2-3 Make a Record for Future use 2 Questions 2 Safety 4-7 Important Safety Instructions 4 Cooktop Features 8-9 Before Using the Cooktop 10-17 About the Ceramic Glass Cooktop 10 Locations of the Surface Elements 10 LED Messages or Light Indicators Displayed by Main Control 11 ... 29 Cooktop Zone Control Displays E and 2 Digits LED Main Control Displays 30 Cooking Zone LED Continuously Flashes F ......... 30 Scratches or Abrasions on Ceramic Glass Cooktop Surface 30 Metal Marks on Ceramic Glass Cooktop Surface 30 Brown Streaks and Specks on Ceramic Glass Cooktop Surface ...
...Information 2-3 Make a Record for Future use 2 Questions 2 Safety 4-7 Important Safety Instructions 4 Cooktop Features 8-9 Before Using the Cooktop 10-17 About the Ceramic Glass Cooktop 10 Locations of the Surface Elements 10 LED Messages or Light Indicators Displayed by Main Control 11 ... 29 Cooktop Zone Control Displays E and 2 Digits LED Main Control Displays 30 Cooking Zone LED Continuously Flashes F ......... 30 Scratches or Abrasions on Ceramic Glass Cooktop Surface 30 Metal Marks on Ceramic Glass Cooktop Surface 30 Brown Streaks and Specks on Ceramic Glass Cooktop Surface ...
Complete Owner's Guide (English)
Page 8
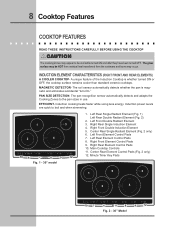
...Rear Single Induction Element 4. Left Front Element Control Pads 7. Main Cooktop Controls 11. lo ON OFF hi + 8 Fig. 2 - 36" Model - Induction cooking heats faster while using less energy. lo ON OFF hi + 6 - lo hi + 9 Fig. 1 - 30" model timer 12 1. lo ON OFF hi + 6 -... lo hi + 8 - Center Rear Single Radiant Element (Fig. 2 only) 6. Right Front Element Control Pads 9. 8 Cooktop Features COOKTOP FEATURES READ THESE INSTRUCTIONS CAREFULLY BEFORE USING THE COOKTOP ! The glass surface may be HOT...
...Rear Single Induction Element 4. Left Front Element Control Pads 7. Main Cooktop Controls 11. lo ON OFF hi + 8 Fig. 2 - 36" Model - Induction cooking heats faster while using less energy. lo ON OFF hi + 6 - lo hi + 9 Fig. 1 - 30" model timer 12 1. lo ON OFF hi + 6 -... lo hi + 8 - Center Rear Single Radiant Element (Fig. 2 only) 6. Right Front Element Control Pads 9. 8 Cooktop Features COOKTOP FEATURES READ THESE INSTRUCTIONS CAREFULLY BEFORE USING THE COOKTOP ! The glass surface may be HOT...
Complete Owner's Guide (English)
Page 10
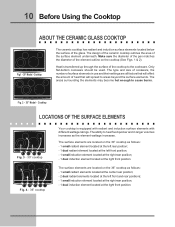
... OFF hi + - The areas surrounding the elements may become hot enough to the cookware. lo ON OFF hi + - lo hi + timer Fig. 3 - 30" cooktop POWER lock warm - lo ON OFF hi + - lo ON OFF hi + - The ability to heat food quicker and in use and their settings are all ...factors that will spread to areas beyond the surface elements. The surface elements are located on the 30" cooktop as follows: - 1 small radiant element located at the left rear position; - 1 dual radiant element located at the left front and rear positions; - 1 small ...
... OFF hi + - The areas surrounding the elements may become hot enough to the cookware. lo ON OFF hi + - lo hi + timer Fig. 3 - 30" cooktop POWER lock warm - lo ON OFF hi + - lo ON OFF hi + - The ability to heat food quicker and in use and their settings are all ...factors that will spread to areas beyond the surface elements. The surface elements are located on the 30" cooktop as follows: - 1 small radiant element located at the left rear position; - 1 dual radiant element located at the left front and rear positions; - 1 small ...

Complete Owner's Guide (English)
Page 19
...hi + Fig. 1 - Note: The power level may be showed and will continue to display until a beep ON OFF is used to Power ON the cooktop will clear. 3. Fig. 4 To Operate the Dual Surface Element: 1. Place correctly sized cookware on the element controls is heard. lo hi + - lo...used touch the key pad to power the element ON will clear. 4. Setting Surface Controls 19 OPERATING THE DUAL SURFACE RADIANT ELEMENT Both the 30" and 36" cooktops are touched within 20 seconds the request to select one of the 2 positions of the element. lo hi + timer POWER lock warm -...
...hi + Fig. 1 - Note: The power level may be showed and will continue to display until a beep ON OFF is used to Power ON the cooktop will clear. 3. Fig. 4 To Operate the Dual Surface Element: 1. Place correctly sized cookware on the element controls is heard. lo hi + - lo...used touch the key pad to power the element ON will clear. 4. Setting Surface Controls 19 OPERATING THE DUAL SURFACE RADIANT ELEMENT Both the 30" and 36" cooktops are touched within 20 seconds the request to select one of the 2 positions of the element. lo hi + timer POWER lock warm -...

Complete Owner's Guide (English)
Page 23
... that the element will showed "-". The element control display will be displayed on the Minute Timer Control display and "-" will start heating 15-30 seconds after the surface element control was turned ON. Note: The WARM feature doesn't work during Sabbath mode. The Timer feature is ON,... as usual but you turn ON a radiant surface element during Sabbath mode the electronic surface element control will adjust the temperature with a 15-30 seconds delay. Touch and hold for few seconds, "Sb" will be operated again as Sabbath mode. To turn OFF without any delay. The...
... that the element will showed "-". The element control display will be displayed on the Minute Timer Control display and "-" will start heating 15-30 seconds after the surface element control was turned ON. Note: The WARM feature doesn't work during Sabbath mode. The Timer feature is ON,... as usual but you turn ON a radiant surface element during Sabbath mode the electronic surface element control will adjust the temperature with a 15-30 seconds delay. Touch and hold for few seconds, "Sb" will be operated again as Sabbath mode. To turn OFF without any delay. The...

Complete Owner's Guide (English)
Page 26
...hi + - The special cooktop cleaning cream leaves a protective finish on a hot cooktop. lo hi + timer Cookware (cast iron, metal, ceramic or glass) with a metal razor blade scraper, holding scraper at a 30 degree angle to the cooktop. CLEANING RECOMMENDATIONS FOR THE CERAMIC GLASS COOKTOP ! Use a paper towel... to help prevent scratches and abrasions. lo hi + - Do not use the pad you use to future use a cooktop cleaner on the glass to clean...
...hi + - The special cooktop cleaning cream leaves a protective finish on a hot cooktop. lo hi + timer Cookware (cast iron, metal, ceramic or glass) with a metal razor blade scraper, holding scraper at a 30 degree angle to the cooktop. CLEANING RECOMMENDATIONS FOR THE CERAMIC GLASS COOKTOP ! Use a paper towel... to help prevent scratches and abrasions. lo hi + - Do not use the pad you use to future use a cooktop cleaner on the glass to clean...
Complete Owner's Guide (English)
Page 30
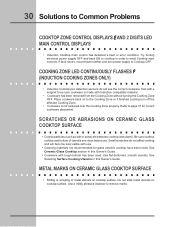
...do not see the correct cookware. METAL MARKS ON CERAMIC GLASS COOKTOP SURFACE • Sliding or scraping of utensils are between cooktop and utensil. See Ceramic-Glass Cooktop section in this Owner's Guide. Try turning electrical power supply OFF and back ON to cooktop in this Owner's Guide. • Cookware with Induction compatible ... centered over the Cooking Zone properly. See Selecting Surface Cooking Utensils in order to remove marks. Use a mildly abrasive cleanser to reset Cooktop main controls. Place cookware back on cooktop surface. 30 Solutions to Cooktop OFF.
...do not see the correct cookware. METAL MARKS ON CERAMIC GLASS COOKTOP SURFACE • Sliding or scraping of utensils are between cooktop and utensil. See Ceramic-Glass Cooktop section in this Owner's Guide. Try turning electrical power supply OFF and back ON to cooktop in this Owner's Guide. • Cookware with Induction compatible ... centered over the Cooking Zone properly. See Selecting Surface Cooking Utensils in order to remove marks. Use a mildly abrasive cleanser to reset Cooktop main controls. Place cookware back on cooktop surface. 30 Solutions to Cooktop OFF.

Installation Instructions (All Languages)
Page 1
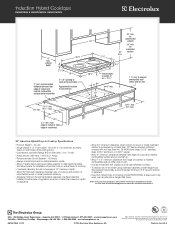
... unprotected cabinet 24" (61 cm) min. depth c. Français - Note: Remove the deflector if the cooktop is installed over a wall oven. Español - C Front Rear Countertop 3 1/8 (7,9) 6 ½ (16,5) Countertop G 4 ½ (11,4) 6 7/8 (17,5) Side view * 30" (76.2 cm) min. ELECTRIC COOKTOP INSTALLATION INSTRUCTIONS Canada INSTALLATION AND SERVICE MUST BE PERFORMED BY A QUALIFIED INSTALLER.
... unprotected cabinet 24" (61 cm) min. depth c. Français - Note: Remove the deflector if the cooktop is installed over a wall oven. Español - C Front Rear Countertop 3 1/8 (7,9) 6 ½ (16,5) Countertop G 4 ½ (11,4) 6 7/8 (17,5) Side view * 30" (76.2 cm) min. ELECTRIC COOKTOP INSTALLATION INSTRUCTIONS Canada INSTALLATION AND SERVICE MUST BE PERFORMED BY A QUALIFIED INSTALLER.

Installation Instructions (All Languages)
Page 2
....2 cm) 36'' (91.4 cm) J 7½'' (19.1 cm) 7½'' (19.1 cm) Figure 2 - K Min. Recommended Distance Between Rear Edge of 13" (33 cm) 30" (76.2 cm) Min. ELECTRIC COOKTOP INSTALLATION INSTRUCTIONS Overhead Cabinet Should Not Exceed a Maximum Depth of Cutout and Nearest Combustible Surface Above Countertop 18" (45.7 cm) G 10" ( 25.4 cm) I H 24" (61 ...
....2 cm) 36'' (91.4 cm) J 7½'' (19.1 cm) 7½'' (19.1 cm) Figure 2 - K Min. Recommended Distance Between Rear Edge of 13" (33 cm) 30" (76.2 cm) Min. ELECTRIC COOKTOP INSTALLATION INSTRUCTIONS Overhead Cabinet Should Not Exceed a Maximum Depth of Cutout and Nearest Combustible Surface Above Countertop 18" (45.7 cm) G 10" ( 25.4 cm) I H 24" (61 ...

Installation Instructions (All Languages)
Page 3
... will overlap cutout (minimum) edges by 1" (2.5cm) Use 3/4" (1.9 cm) plywood, installed on two runners, flush with an electric cooktop over the oven unit, 5" (12.7 cm) maximum is allowed above the floor. 27'' (68.6 cm) Wall Oven 30'' (76.2 cm) Wall Oven CUTOUT DIMENSIONS F. DEPTH 24 7/8'' (63.2 cm) Min. 25¼'' (64.1 cm) Max...
... will overlap cutout (minimum) edges by 1" (2.5cm) Use 3/4" (1.9 cm) plywood, installed on two runners, flush with an electric cooktop over the oven unit, 5" (12.7 cm) maximum is allowed above the floor. 27'' (68.6 cm) Wall Oven 30'' (76.2 cm) Wall Oven CUTOUT DIMENSIONS F. DEPTH 24 7/8'' (63.2 cm) Min. 25¼'' (64.1 cm) Max...
Product Specifications Sheet (English)
Page 1
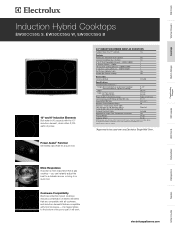
... Electrolux Single Wall Oven. Freestanding Ranges Microwaves Vent Hoods Dishwashers Refrigerators Freezers More Responsive Induction is more responsive than a gas cooktop - Required Armored Electrical Cable Approved for a quick boil. 30" INDUCTION HYBRID DROP-IN COOKTOPS ...of power. Wall Ovens Warmer Drawers Cooktops Built-In Ranges Induction Hybrid Cooktops EW30CC55G S, EW30CC55G W, EW30CC55G B 10" and 6" Induction Elements Boil water in 90 seconds with most cookware - Refer to 9" Dual Expandable Element - 1600W / 3000W 1 6" Electric Element - 1200W 1 10" ...
... Electrolux Single Wall Oven. Freestanding Ranges Microwaves Vent Hoods Dishwashers Refrigerators Freezers More Responsive Induction is more responsive than a gas cooktop - Required Armored Electrical Cable Approved for a quick boil. 30" INDUCTION HYBRID DROP-IN COOKTOPS ...of power. Wall Ovens Warmer Drawers Cooktops Built-In Ranges Induction Hybrid Cooktops EW30CC55G S, EW30CC55G W, EW30CC55G B 10" and 6" Induction Elements Boil water in 90 seconds with most cookware - Refer to 9" Dual Expandable Element - 1600W / 3000W 1 6" Electric Element - 1200W 1 10" ...
Product Specifications Sheet (English)
Page 2
... 5 1/4" 28 1/2" CL Overall depth at electroluxappliances.com for detailed instructions. from edge of cooktop to nearest combustible wall on wall at Electrolux Major Appliances mean we are constantly working to improve our products. Refer to route armoured cable ...Note: For planning purposes only. recommended distance between overhead cabinets installed to clear electrical cable and allow space for unprotected 30" cabinet 21 1/2" 24" min. Induction Hybrid Cooktops EW30CC55G S, EW30CC55G W, EW30CC55G B 13" max. to nearest combustible wall (either side of unit. ...
... 5 1/4" 28 1/2" CL Overall depth at electroluxappliances.com for detailed instructions. from edge of cooktop to nearest combustible wall on wall at Electrolux Major Appliances mean we are constantly working to improve our products. Refer to route armoured cable ...Note: For planning purposes only. recommended distance between overhead cabinets installed to clear electrical cable and allow space for unprotected 30" cabinet 21 1/2" 24" min. Induction Hybrid Cooktops EW30CC55G S, EW30CC55G W, EW30CC55G B 13" max. to nearest combustible wall (either side of unit. ...