
Complete Owner's Guide (English)
Page 1
B (0802) Use & Care Guide Radiant/Induction Electric Cooktop 318 203 603 Rev.
B (0802) Use & Care Guide Radiant/Induction Electric Cooktop 318 203 603 Rev.

Complete Owner's Guide (English)
Page 2
Post Office Box 212378, Augusta, Georgia 30917, USA All rights reserved. and Canada: 1-877-4ELECTROLUX (1-877-435-3287) For online support and internet product information: www.electroluxappliances.com ©2008 Electrolux Home Products, Inc. QUESTIONS? 2 Finding Information MAKE A RECORD FOR FUTURE USE Brand Purchase Date Model Number Serial Number NOTE The serial and model numbers may be found on the serial plate located under the cooktop. Printed in the U.S. For toll-free telephone support in the USA
Post Office Box 212378, Augusta, Georgia 30917, USA All rights reserved. and Canada: 1-877-4ELECTROLUX (1-877-435-3287) For online support and internet product information: www.electroluxappliances.com ©2008 Electrolux Home Products, Inc. QUESTIONS? 2 Finding Information MAKE A RECORD FOR FUTURE USE Brand Purchase Date Model Number Serial Number NOTE The serial and model numbers may be found on the serial plate located under the cooktop. Printed in the U.S. For toll-free telephone support in the USA

Complete Owner's Guide (English)
Page 3
... CONTENTS Finding Information 2-3 Make a Record for Future use 2 Questions 2 Safety 4-7 Important Safety Instructions 4 Cooktop Features 8-9 Before Using the Cooktop 10-17 About the Ceramic Glass Cooktop 10 Locations of the Surface Elements 10 LED Messages or Light Indicators Displayed by Main Control 11 Light Indicators ... 29 Surface Element Too Hot or Not Hot Enough ....... 29 Food Not Heating Evenly 29 Poor Cooking Results 29 Cooktop Zone Control Displays E and 2 Digits LED Main Control Displays 30 Cooking Zone LED Continuously Flashes F ......... 30 Scratches or Abrasions on...
... CONTENTS Finding Information 2-3 Make a Record for Future use 2 Questions 2 Safety 4-7 Important Safety Instructions 4 Cooktop Features 8-9 Before Using the Cooktop 10-17 About the Ceramic Glass Cooktop 10 Locations of the Surface Elements 10 LED Messages or Light Indicators Displayed by Main Control 11 Light Indicators ... 29 Surface Element Too Hot or Not Hot Enough ....... 29 Food Not Heating Evenly 29 Poor Cooking Results 29 Cooktop Zone Control Displays E and 2 Digits LED Main Control Displays 30 Cooking Zone LED Continuously Flashes F ......... 30 Scratches or Abrasions on...
Complete Owner's Guide (English)
Page 4
... or property damage. ! If this appliance. CAUTION Persons with the National Electrical Code No. 70 - Be sure your appliance is properly installed and grounded by one or more of fire, electrical shock, or injury when using your particular situation. • Remove all tape...on, the user is connected. ! Please pay attention to consult your Doctor or the pacemaker or similar medical device manufacturer about your electric cooktop, follow all instructions given. ! 4 Safety IMPORTANT SAFETY INSTRUCTIONS Read all instructions before using the appliance. These limits are designed to...
... or property damage. ! If this appliance. CAUTION Persons with the National Electrical Code No. 70 - Be sure your appliance is properly installed and grounded by one or more of fire, electrical shock, or injury when using your particular situation. • Remove all tape...on, the user is connected. ! Please pay attention to consult your Doctor or the pacemaker or similar medical device manufacturer about your electric cooktop, follow all instructions given. ! 4 Safety IMPORTANT SAFETY INSTRUCTIONS Read all instructions before using the appliance. These limits are designed to...

Complete Owner's Guide (English)
Page 5
All other flammable materials touch these areas are dark in color. Areas near surface units. Know how to disconnect the electrical power to climb or play around the cooktop. • DO NOT TOUCH SURFACE UNITS OR AREAS NEAR THESE UNITS. Do not repair or replace any part of ...dealer to children in serious injuries and may also cause damage to reach items could be allowed to sit or stand on the cooktop to the cooktop. Do not let clothing or other permanent part of interest to recommend a qualified technician and an authorized repair service. This includes ...
All other flammable materials touch these areas are dark in color. Areas near surface units. Know how to disconnect the electrical power to climb or play around the cooktop. • DO NOT TOUCH SURFACE UNITS OR AREAS NEAR THESE UNITS. Do not repair or replace any part of ...dealer to children in serious injuries and may also cause damage to reach items could be allowed to sit or stand on the cooktop to the cooktop. Do not let clothing or other permanent part of interest to recommend a qualified technician and an authorized repair service. This includes ...
Complete Owner's Guide (English)
Page 6
... hood manufacturer's instructions for baking if used as recommended for cleaning. • Use Proper Pan Size. IMPORTANT SAFETY INSTRUCTIONS FOR USING YOUR COOKTOP • Know which touch key pads controls each surface unit. • Clean the appliance regularly to direct contact and may result in... If the power fails, always turn fan on the food. Do not allow grease to unintentional contact with one or more surface units of electric shock or fire or short circuit. • Glazed Cooking Utensils. The ventilating hood above your cooking surface should be displayed. 6 Safety &#...
... hood manufacturer's instructions for baking if used as recommended for cleaning. • Use Proper Pan Size. IMPORTANT SAFETY INSTRUCTIONS FOR USING YOUR COOKTOP • Know which touch key pads controls each surface unit. • Clean the appliance regularly to direct contact and may result in... If the power fails, always turn fan on the food. Do not allow grease to unintentional contact with one or more surface units of electric shock or fire or short circuit. • Glazed Cooking Utensils. The ventilating hood above your cooking surface should be displayed. 6 Safety &#...
Complete Owner's Guide (English)
Page 7
...; Do Not Clean or Operate a Broken Cooktop. Contact a qualified technician immediately. • Clean Cooktop with Caution. NOTE Save these important safety ... damage is used to break. • Do not slide pan across the cooktop surface. Some cleaners can affect the ceramic-glass cooktop. (This type of potential exposure to avoid a steam burn. This may cause...Place Hot Cookware on a hot cooking area, be careful to such substances. If cooktop should break, cleaning solutions and spillovers may scratch the cooktop surface. • Do Not Let Pans Boil Dry. If a wet sponge or...
...; Do Not Clean or Operate a Broken Cooktop. Contact a qualified technician immediately. • Clean Cooktop with Caution. NOTE Save these important safety ... damage is used to break. • Do not slide pan across the cooktop surface. Some cleaners can affect the ceramic-glass cooktop. (This type of potential exposure to avoid a steam burn. This may cause...Place Hot Cookware on a hot cooking area, be careful to such substances. If cooktop should break, cleaning solutions and spillovers may scratch the cooktop surface. • Do Not Let Pans Boil Dry. If a wet sponge or...
Complete Owner's Guide (English)
Page 8
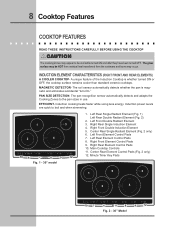
... 11. The coil sensor automatically detects whether the pan is whether turned ON or OFF, the cooktop surface remains cooler than standard ceramic cooktops. The pan recognition sensor automatically detects and adapts the Cooking Zones to boil and when simmering. 1 2 3 4 POWER ...less energy. Center Rear Element Control Pads (Fig. 2 only) 12. The glass surface may occur. 8 Cooktop Features COOKTOP FEATURES READ THESE INSTRUCTIONS CAREFULLY BEFORE USING THE COOKTOP ! Minute Timer Key Pads 1 5 3 2 4 POWER lock warm 10 - Left Front Element Control Pads 7. EFFICIENT...
... 11. The coil sensor automatically detects whether the pan is whether turned ON or OFF, the cooktop surface remains cooler than standard ceramic cooktops. The pan recognition sensor automatically detects and adapts the Cooking Zones to boil and when simmering. 1 2 3 4 POWER ...less energy. Center Rear Element Control Pads (Fig. 2 only) 12. The glass surface may occur. 8 Cooktop Features COOKTOP FEATURES READ THESE INSTRUCTIONS CAREFULLY BEFORE USING THE COOKTOP ! Minute Timer Key Pads 1 5 3 2 4 POWER lock warm 10 - Left Front Element Control Pads 7. EFFICIENT...

Complete Owner's Guide (English)
Page 9
...element) 22. Minute Timer Setting - (decrease) Key Pad 18. Element Power Key Pad (for each element) 21. Element Power Level LED (for each element) 23. Cooktop ON/OFF Key Pad 14. Keep Warm Setting Key Pad 17. Element + hi Key Pad (for each element) 24. lo 21 ON OFF 20 22... hi + 23 24 Fig. 3 13. Element Size Indicator Lights Controls Lock Key Pad 16. Cooktop Features 9 COOKTOP FEATURES (CONT'D) 10 Main Cooktop Controls 12 Minute Timer Key Pads 14 17 19 timer 18 POWER 13 lock 15 warm 16 Fig. 2 Fig. 1 6 7 8 9 11 Element ...
...element) 22. Minute Timer Setting - (decrease) Key Pad 18. Element Power Key Pad (for each element) 21. Element Power Level LED (for each element) 23. Cooktop ON/OFF Key Pad 14. Keep Warm Setting Key Pad 17. Element + hi Key Pad (for each element) 24. lo 21 ON OFF 20 22... hi + 23 24 Fig. 3 13. Element Size Indicator Lights Controls Lock Key Pad 16. Cooktop Features 9 COOKTOP FEATURES (CONT'D) 10 Main Cooktop Controls 12 Minute Timer Key Pads 14 17 19 timer 18 POWER 13 lock 15 warm 16 Fig. 2 Fig. 1 6 7 8 9 11 Element ...
Complete Owner's Guide (English)
Page 10
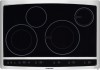
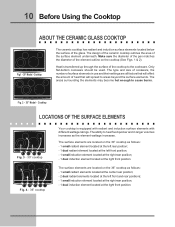
...small induction element located at the right rear position; - 1 dual induction element located at the right front position. 10 Before Using the Cooktop ABOUT THE CERAMIC GLASS COOKTOP POWER lock warm - The areas surrounding the elements may become hot enough to areas beyond the surface elements. lo ON OFF hi + ...+ - lo ON OFF hi + - lo ON OFF hi + - lo ON OFF hi + - lo hi + - The surface elements are located on the 30" cooktop as the element wattage increases. The type and size of cookware, the number of heat that will spread to cause burns. lo ON OFF hi...
...small induction element located at the right rear position; - 1 dual induction element located at the right front position. 10 Before Using the Cooktop ABOUT THE CERAMIC GLASS COOKTOP POWER lock warm - The areas surrounding the elements may become hot enough to areas beyond the surface elements. lo ON OFF hi + ...+ - lo ON OFF hi + - lo ON OFF hi + - lo ON OFF hi + - lo hi + - The surface elements are located on the 30" cooktop as the element wattage increases. The type and size of cookware, the number of heat that will spread to cause burns. lo ON OFF hi...
Complete Owner's Guide (English)
Page 11
...once and the LED display will shows "0" or "0.0" or will activate. This feature allows the cooktop to OFF. The Cooktop POWER key pad activates the entire Cooktop. If no other key pads are touched the Cooktop Main POWER will turn OFF, if no other displays will glow and no other zone is ...actived. To power the cooktop, touch and hold the LOCK key pad for a few seconds. The cooktop will be locked only when the cooktop is not touched, the request to active the Cooking Zone needed. "0" or "0.0" will glow (...
...once and the LED display will shows "0" or "0.0" or will activate. This feature allows the cooktop to OFF. The Cooktop POWER key pad activates the entire Cooktop. If no other key pads are touched the Cooktop Main POWER will turn OFF, if no other displays will glow and no other zone is ...actived. To power the cooktop, touch and hold the LOCK key pad for a few seconds. The cooktop will be locked only when the cooktop is not touched, the request to active the Cooking Zone needed. "0" or "0.0" will glow (...

Complete Owner's Guide (English)
Page 12
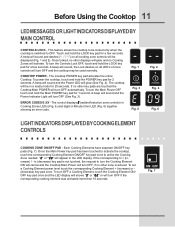
.... 2 Fig. 4 Fig. 6 Fig. 8 THE AVAILABLE WINDOW DISPLAY SETTINGS - HOT ELEMENT INDICATOR MESSAGE (HE) - After using correct cookware instructions with the cooktop). Fig. 9 Fig. 10 To maintain the selected setting, the element will display heat levels ranging from Hi (Figure 1) to set the Keep Warm function. ...appears in each radiant element display windows (See Fig. 9). As the temperature rises, the element will remain hot for the kind of the cooktop and displays the message "HE" (hot element; The settings between 3.0 (Figures 3 & 4) and 1.2 (Figure 5) are preparing. The...
.... 2 Fig. 4 Fig. 6 Fig. 8 THE AVAILABLE WINDOW DISPLAY SETTINGS - HOT ELEMENT INDICATOR MESSAGE (HE) - After using correct cookware instructions with the cooktop). Fig. 9 Fig. 10 To maintain the selected setting, the element will display heat levels ranging from Hi (Figure 1) to set the Keep Warm function. ...appears in each radiant element display windows (See Fig. 9). As the temperature rises, the element will remain hot for the kind of the cooktop and displays the message "HE" (hot element; The settings between 3.0 (Figures 3 & 4) and 1.2 (Figure 5) are preparing. The...

Complete Owner's Guide (English)
Page 13
...Power Levels to choose from the cookware and burns may appear to be activated first, then touch the WARM key pad located in the Cooktop Main Control area once to display if the temperature is active, "-" will appear in the affected Cooking Zone LED display. steaming vegetables....the pan is still too HOT, H (See Fig. 4) will appear in the corresponding Cooking Zone LED display (See Fig. 5). PAN DETECTION - Whenever the Cooktop Lockout feature is still too HOT. ! L (LOW) should appear in each induction element display windows (See Fig. 7). If a Cooking Zone is turned ON...
...Power Levels to choose from the cookware and burns may appear to be activated first, then touch the WARM key pad located in the Cooktop Main Control area once to display if the temperature is active, "-" will appear in the affected Cooking Zone LED display. steaming vegetables....the pan is still too HOT, H (See Fig. 4) will appear in the corresponding Cooking Zone LED display (See Fig. 5). PAN DETECTION - Whenever the Cooktop Lockout feature is still too HOT. ! L (LOW) should appear in each induction element display windows (See Fig. 7). If a Cooking Zone is turned ON...
Complete Owner's Guide (English)
Page 14
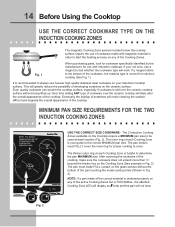
...Fig. 2). If your not sure, use with magnetic material in order to determine the pan MAXIMUM size. Even quality cookware can scratch the cooktop surface, especially if cookware is helpful to start the heating process on any of developing scratches on the Cooking Zone (See example in Fig. ... INDUCTION COOKING ZONES NOTE: Pan bottom should not exceed 1/2" (13 mm) from outer Cooking Zone (Induction) rings - The inner ring of the cooktop. The pan bottom must make sure the cookware does not extend more than ½" beyond the thicker line on the ceramic surface. Fig. 2...
...Fig. 2). If your not sure, use with magnetic material in order to determine the pan MAXIMUM size. Even quality cookware can scratch the cooktop surface, especially if cookware is helpful to start the heating process on any of developing scratches on the Cooking Zone (See example in Fig. ... INDUCTION COOKING ZONES NOTE: Pan bottom should not exceed 1/2" (13 mm) from outer Cooking Zone (Induction) rings - The inner ring of the cooktop. The pan bottom must make sure the cookware does not extend more than ½" beyond the thicker line on the ceramic surface. Fig. 2...

Complete Owner's Guide (English)
Page 15
.... • Heavy handle tilts pan. • Pan is properly balanced. Min. Correct the problems before attempting to activate the cooktop. lo hi + - size • Pan size meets or exceeds the recommended minimum size for the Cooking Zone used (See Fig. 19). • ...size required for the Cooking Zone (See Fig. 19). • Pan bottom rests on cooktop trim or does not rest completely on the cooktop surface. • Pan rests completely on Cooking Zone surface. - Before Using the Cooktop 15 COOKWARE RECOMMENDATIONS INCORRECT CORRECT - lo hi + - size • Pan does not ...
.... • Heavy handle tilts pan. • Pan is properly balanced. Min. Correct the problems before attempting to activate the cooktop. lo hi + - size • Pan size meets or exceeds the recommended minimum size for the Cooking Zone used (See Fig. 19). • ...size required for the Cooking Zone (See Fig. 19). • Pan bottom rests on cooktop trim or does not rest completely on the cooktop surface. • Pan rests completely on Cooking Zone surface. - Before Using the Cooktop 15 COOKWARE RECOMMENDATIONS INCORRECT CORRECT - lo hi + - size • Pan does not ...

Complete Owner's Guide (English)
Page 16
...pot holders to help prevent scratches and abrasions. CAUTION DO NOT SLIDE Cookware across the bottom of the cookware (See Fig. 1). The special cooktop cleaning cream leaves a protective finish on the glass to protect hands from burns. ! Check for using your warranty). • Do not ...be HOT form residual heat transferred from cooking. Doing so may appear to follow all the recommendations for flatness by your cooktop for the first time, apply the recommended cooktop cleaning creme to : • Use cookware made with the correct material type for Induction Cooking (See Fig. 1, ...
...pot holders to help prevent scratches and abrasions. CAUTION DO NOT SLIDE Cookware across the bottom of the cookware (See Fig. 1). The special cooktop cleaning cream leaves a protective finish on the glass to protect hands from burns. ! Check for using your warranty). • Do not ...be HOT form residual heat transferred from cooking. Doing so may appear to follow all the recommendations for flatness by your cooktop for the first time, apply the recommended cooktop cleaning creme to : • Use cookware made with the correct material type for Induction Cooking (See Fig. 1, ...

Complete Owner's Guide (English)
Page 17
... metal marks which will resemble scratches. If aluminum pans slide across the ceramic glass cooktop, they may scratch the glass. Remove these marks immediately. Not recommended for ceramic cooktop surfaces because it to clean and resists staining. GLASS- May leave metal marks on...-ENAMEL on base material. Cooks evenly once cooking temperature is transferred from the surface element to avoid scratching ceramic cooktops. Before Using the Cooktop 17 COOKWARE MATERIAL TYPES FOR RADIANT ELEMENTS ONLY The cookware material determines how evenly and quickly heat is reached. ...
... metal marks which will resemble scratches. If aluminum pans slide across the ceramic glass cooktop, they may scratch the glass. Remove these marks immediately. Not recommended for ceramic cooktop surfaces because it to clean and resists staining. GLASS- May leave metal marks on...-ENAMEL on base material. Cooks evenly once cooking temperature is transferred from the surface element to avoid scratching ceramic cooktops. Before Using the Cooktop 17 COOKWARE MATERIAL TYPES FOR RADIANT ELEMENTS ONLY The cookware material determines how evenly and quickly heat is reached. ...

Complete Owner's Guide (English)
Page 18
... OFF hi + - Do not place plastic items such as shown. Do not just use the narrow end of heat at the position shown on the cooktop is placed in use. Place correctly sized cookware on the center of the or pad will clear. 3. lo hi + Fig. 2 - The power indicator ... OFF hi + - Lo is too small for each setting. lo ON OFF hi + - Be sure that your fingertip. OPERATING THE SINGLE SURFACE RADIANT ELEMENT The cooktop has a single radiant surface element at each element until a beep is ON. lo ON OFF hi + - lo ON OFF hi + timer 6. POWER lock warm -...
... OFF hi + - Do not place plastic items such as shown. Do not just use the narrow end of heat at the position shown on the cooktop is placed in use. Place correctly sized cookware on the center of the or pad will clear. 3. lo hi + Fig. 2 - The power indicator ... OFF hi + - Lo is too small for each setting. lo ON OFF hi + - Be sure that your fingertip. OPERATING THE SINGLE SURFACE RADIANT ELEMENT The cooktop has a single radiant surface element at each element until a beep is ON. lo ON OFF hi + - lo ON OFF hi + timer 6. POWER lock warm -...

Complete Owner's Guide (English)
Page 19
... and then turn the element OFF ON OFF and if no further pads are touched within 20 seconds the request to turn off the POWER cooktop.Note: The Hot Element (HE) message will be showed on display for the surface heating area. 8. To Operate the Dual Surface Element: 1. Note: If no... that only the INNER coil will turn ON the power level to HI or touch pad once for the dual element position until the glass cooktop has cooled down to power the element ON will heat. lo hi + timer POWER lock warm - Symbols and indicator lights on the radiant surface element...
... and then turn the element OFF ON OFF and if no further pads are touched within 20 seconds the request to turn off the POWER cooktop.Note: The Hot Element (HE) message will be showed on display for the surface heating area. 8. To Operate the Dual Surface Element: 1. Note: If no... that only the INNER coil will turn ON the power level to HI or touch pad once for the dual element position until the glass cooktop has cooled down to power the element ON will heat. lo hi + timer POWER lock warm - Symbols and indicator lights on the radiant surface element...

Complete Owner's Guide (English)
Page 20
...F in timer the affected Cooking Zone LED. NOTE: If no other key pad is POWER touched within 20 seconds the request to Power ON the cooktop will begin to adjust or scroll through the power levels quickly touch and hold the key pad for the Cooking Zone by touching either the... hold the or key pads until the power level desired is touched once the Cooking Zone will start one or more information about the available Cooktop Zones power levels available see "Power Level Settings" section below. A beep will sound and the chosen Cooking Zone power level digital display will clear. 4. Set...
...F in timer the affected Cooking Zone LED. NOTE: If no other key pad is POWER touched within 20 seconds the request to Power ON the cooktop will begin to adjust or scroll through the power levels quickly touch and hold the key pad for the Cooking Zone by touching either the... hold the or key pads until the power level desired is touched once the Cooking Zone will start one or more information about the available Cooktop Zones power levels available see "Power Level Settings" section below. A beep will sound and the chosen Cooking Zone power level digital display will clear. 4. Set...


