
Complete Owner's Guide (English)
Page 2
QUESTIONS? Post Office Box 212378, Augusta, Georgia 30917, USA All rights reserved. Printed in the U.S. For toll-free telephone support in the USA and Canada: 1-877-4ELECTROLUX (1-877-435-3287) For online support and internet product information: www.electroluxappliances.com ©2008 Electrolux Home Products, Inc. 2 Finding Information MAKE A RECORD FOR FUTURE USE Brand Purchase Date Model Number Serial Number NOTE The serial and model numbers may be found on the serial plate located under the cooktop.
QUESTIONS? Post Office Box 212378, Augusta, Georgia 30917, USA All rights reserved. Printed in the U.S. For toll-free telephone support in the USA and Canada: 1-877-4ELECTROLUX (1-877-435-3287) For online support and internet product information: www.electroluxappliances.com ©2008 Electrolux Home Products, Inc. 2 Finding Information MAKE A RECORD FOR FUTURE USE Brand Purchase Date Model Number Serial Number NOTE The serial and model numbers may be found on the serial plate located under the cooktop.
Complete Owner's Guide (English)
Page 8
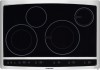
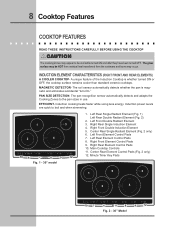
... Element Control Pads 8. Main Cooktop Controls 11. lo ON OFF hi + 8 Fig. 2 - 36" Model - lo ON OFF hi + 6 - lo hi + 7 - Center Rear Single Radiant Element (Fig. 2 only) 6. 8 Cooktop Features COOKTOP FEATURES READ THESE INSTRUCTIONS CAREFULLY BEFORE USING THE COOKTOP ! CAUTION The Cooking Zones ... OFF. The glass surface may occur. INDUCTION ELEMENT CHARACTERISTICS (RIGHT FRONT AND REAR ELEMENTS) A COOLER COOKTOP- A unique feature of the Induction Cooktop is magnetic and eliminates accidental "turn-On." The coil sensor automatically detects whether the pan is whether ...
... Element Control Pads 8. Main Cooktop Controls 11. lo ON OFF hi + 8 Fig. 2 - 36" Model - lo ON OFF hi + 6 - lo hi + 7 - Center Rear Single Radiant Element (Fig. 2 only) 6. 8 Cooktop Features COOKTOP FEATURES READ THESE INSTRUCTIONS CAREFULLY BEFORE USING THE COOKTOP ! CAUTION The Cooking Zones ... OFF. The glass surface may occur. INDUCTION ELEMENT CHARACTERISTICS (RIGHT FRONT AND REAR ELEMENTS) A COOLER COOKTOP- A unique feature of the Induction Cooktop is magnetic and eliminates accidental "turn-On." The coil sensor automatically detects whether the pan is whether ...
Complete Owner's Guide (English)
Page 10
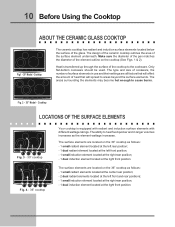
... OF THE SURFACE ELEMENTS POWER lock warm - lo ON OFF hi + - 10 Before Using the Cooktop ABOUT THE CERAMIC GLASS COOKTOP POWER lock warm - lo hi + timer Fig.1 - 30" Model - Only flat-bottom cookware should be used. The type and size of cookware, the number of heat that ...the pan matches the diameter of the surface element underneath. POWER lock warm - lo ON OFF hi + timer Fig. 2 - 36" Model - The surface elements are located on the cooktop (See Figs. 1 & 2). lo ON OFF hi + - The ability to areas beyond the surface elements. Heat is equipped with radiant...
... OF THE SURFACE ELEMENTS POWER lock warm - lo ON OFF hi + - 10 Before Using the Cooktop ABOUT THE CERAMIC GLASS COOKTOP POWER lock warm - lo hi + timer Fig.1 - 30" Model - Only flat-bottom cookware should be used. The type and size of cookware, the number of heat that ...the pan matches the diameter of the surface element underneath. POWER lock warm - lo ON OFF hi + timer Fig. 2 - 36" Model - The surface elements are located on the cooktop (See Figs. 1 & 2). lo ON OFF hi + - The ability to areas beyond the surface elements. Heat is equipped with radiant...

Installation Instructions (All Languages)
Page 1
...for protected surface Figure 1 mODEL 30'' Ceramic Model 36'' Ceramic Model mODEL 30'' Ceramic Model 36'' Ceramic Model A. WIDTH H. hEIGHT BELOW COOKTOP 8 ½ (21.6) 8 ½ (21.6) All dimensions are in United States P/N 318201445 (0812) Rev. G English - IMPORTANT: SAVE FOR LOCAL ELECTRICAL INSPECTOR'S USE. HEIGHT d....BOX WIDTH 28 ½ (72.4) 34 5/8 (87.9) MAXIMUM 20 ½ (52.1) 20 ½ (52.1) f. ELECTRIC COOKTOP INSTALLATION INSTRUCTIONS Canada INSTALLATION AND SERVICE MUST BE PERFORMED BY A QUALIFIED INSTALLER. READ AND SAVE THESE INSTRUCTIONS FOR FUTURE REFERENCE...
...for protected surface Figure 1 mODEL 30'' Ceramic Model 36'' Ceramic Model mODEL 30'' Ceramic Model 36'' Ceramic Model A. WIDTH H. hEIGHT BELOW COOKTOP 8 ½ (21.6) 8 ½ (21.6) All dimensions are in United States P/N 318201445 (0812) Rev. G English - IMPORTANT: SAVE FOR LOCAL ELECTRICAL INSPECTOR'S USE. HEIGHT d....BOX WIDTH 28 ½ (72.4) 34 5/8 (87.9) MAXIMUM 20 ½ (52.1) 20 ½ (52.1) f. ELECTRIC COOKTOP INSTALLATION INSTRUCTIONS Canada INSTALLATION AND SERVICE MUST BE PERFORMED BY A QUALIFIED INSTALLER. READ AND SAVE THESE INSTRUCTIONS FOR FUTURE REFERENCE...

Installation Instructions (All Languages)
Page 2
... K & L. Model 30'' (76.2 cm) 36'' (91.4 cm) J 7½'' (19.1 cm) 7½'' (19.1 cm) Figure 2 - Clearance Between the Top of the Cooking Platform and the Bottom of Countertop Install junction box at least 10" (25.4cm) of Unit). 2 1/2" (6.4 cm) Min. ELECTRIC COOKTOP INSTALLATION INSTRUCTIONS Overhead ..." (0.6 mm) Aluminum or 0.020" (0.5 mm) Copper. when Bottom of 13" (33 cm) 30" (76.2 cm) Min. From Edge of Cooktop to chart on this figure refer to Nearest Combustible Wall (Either Side of clearance below the countertop. If a drawer is present underneath, allow at a location...
... K & L. Model 30'' (76.2 cm) 36'' (91.4 cm) J 7½'' (19.1 cm) 7½'' (19.1 cm) Figure 2 - Clearance Between the Top of the Cooking Platform and the Bottom of Countertop Install junction box at least 10" (25.4cm) of Unit). 2 1/2" (6.4 cm) Min. ELECTRIC COOKTOP INSTALLATION INSTRUCTIONS Overhead ..." (0.6 mm) Aluminum or 0.020" (0.5 mm) Copper. when Bottom of 13" (33 cm) 30" (76.2 cm) Min. From Edge of Cooktop to chart on this figure refer to Nearest Combustible Wall (Either Side of clearance below the countertop. If a drawer is present underneath, allow at a location...

Installation Instructions (All Languages)
Page 3
... side filler panels are listed by 1" (2.5cm) Use 3/4" (1.9 cm) plywood, installed on two runners, flush with an electric cooktop over certain built-in electric oven models. Note 1: 4" x 4" (10.2 X 10.2 cm) opening in wood base minimum 4" x 4" (10.2 X 10.2 cm), 2" (5 cm) from adjoining cabinets. DEPTH 24 7/8'' (63.2 cm) Min. 25¼'' (64.1 cm) ...
... side filler panels are listed by 1" (2.5cm) Use 3/4" (1.9 cm) plywood, installed on two runners, flush with an electric cooktop over certain built-in electric oven models. Note 1: 4" x 4" (10.2 X 10.2 cm) opening in wood base minimum 4" x 4" (10.2 X 10.2 cm), 2" (5 cm) from adjoining cabinets. DEPTH 24 7/8'' (63.2 cm) Min. 25¼'' (64.1 cm) ...

Installation Instructions (All Languages)
Page 4
...in the Use and Care Guide. Such use see Cooktop Cleaning and Maintenance section in a fire, electrical shock, or other personal injury. 2. The flexible armored cable extending from this appliance should be sure to include the model and serial numbers and a lot number or letter ...ordering parts for future reference. Remove all governing codes and ordinances. 4. Provide Electrical Connection Install the junction box under the cooktop. Be sure the bottle of the appliance in accordance with this time. Model and Serial Number Location The serial plate is recommended, 40A or 50A).DO...
...in the Use and Care Guide. Such use see Cooktop Cleaning and Maintenance section in a fire, electrical shock, or other personal injury. 2. The flexible armored cable extending from this appliance should be sure to include the model and serial numbers and a lot number or letter ...ordering parts for future reference. Remove all governing codes and ordinances. 4. Provide Electrical Connection Install the junction box under the cooktop. Be sure the bottle of the appliance in accordance with this time. Model and Serial Number Location The serial plate is recommended, 40A or 50A).DO...

Installation Instructions (All Languages)
Page 6
...you time and expense. The cooktop must be hot enough to include the model and serial numbers and a lot number or letter from the serial plate on your Use and Care Guide for operation. They may save you . ELECTRIC COOKTOP INSTALLATION INSTRUCTIONS Cooktop Installation 1. Before You Call for... Service Read the Before You Call for service when needed. It may be centered to meet local codes or, in their absence, with the National Electrical Code ANSI/NFPA No. 70-...
...you time and expense. The cooktop must be hot enough to include the model and serial numbers and a lot number or letter from the serial plate on your Use and Care Guide for operation. They may save you . ELECTRIC COOKTOP INSTALLATION INSTRUCTIONS Cooktop Installation 1. Before You Call for... Service Read the Before You Call for service when needed. It may be centered to meet local codes or, in their absence, with the National Electrical Code ANSI/NFPA No. 70-...
Product Specifications Sheet (English)
Page 2
...for protected 18" surface min. 3/4" 5 1/4" 28 1/2" CL Overall depth at center of quality at Electrolux Major Appliances mean we are constantly working to Product Installation Guide on wall at electroluxappliances.com for detailed instructions... specifications or discontinue models without notice. recommended distance between rear edge of cutout and nearest combustible surface above countertop 4" x 8" opening to clear electrical cable and allow space for unprotected 30" cabinet 21 1/2" 24" min. Induction Hybrid Cooktops EW30CC55G S, EW30CC55G W, EW30CC55G B 13" max...
...for protected 18" surface min. 3/4" 5 1/4" 28 1/2" CL Overall depth at center of quality at Electrolux Major Appliances mean we are constantly working to Product Installation Guide on wall at electroluxappliances.com for detailed instructions... specifications or discontinue models without notice. recommended distance between rear edge of cutout and nearest combustible surface above countertop 4" x 8" opening to clear electrical cable and allow space for unprotected 30" cabinet 21 1/2" 24" min. Induction Hybrid Cooktops EW30CC55G S, EW30CC55G W, EW30CC55G B 13" max...

