Installation Instructions (All Languages)
Page 1
...DO IF YOU SMELL GAS: • Do not try to 10,2 cm) From Floor. Appliances Installed in this appliance. Edge E 3/8" min. E IMPORTANT: Cabinet and countertop width should be installed in . CUTOUT WIDTH* (Countertop and Cabinet) 30±1/16" (76,2±0,15 cm) NOTE: Wiring diagram for applicable agency certification FOR YOUR ... pages 43-44 Shave Raised 1 ½" Max. (3,8 cm Max.) 5" Min. (12,7 cm Min.) From Wall Both Sides (see Note 3) 18" Min. (45,7 cm) Min. 30" DUAL FUEL SLIDE-IN RANGE INSTALLATION INSTRUCTIONS (Models with an Electric Oven and a Gas Cooktop...
...DO IF YOU SMELL GAS: • Do not try to 10,2 cm) From Floor. Appliances Installed in this appliance. Edge E 3/8" min. E IMPORTANT: Cabinet and countertop width should be installed in . CUTOUT WIDTH* (Countertop and Cabinet) 30±1/16" (76,2±0,15 cm) NOTE: Wiring diagram for applicable agency certification FOR YOUR ... pages 43-44 Shave Raised 1 ½" Max. (3,8 cm Max.) 5" Min. (12,7 cm Min.) From Wall Both Sides (see Note 3) 18" Min. (45,7 cm) Min. 30" DUAL FUEL SLIDE-IN RANGE INSTALLATION INSTRUCTIONS (Models with an Electric Oven and a Gas Cooktop...
Installation Instructions (All Languages)
Page 2
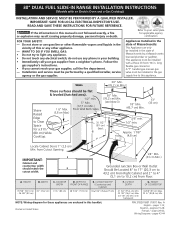
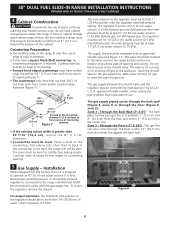
...28 MSG sheet metal, 0,015"(0,4 mm) stainless steel, 0,024"(0,6 mm) aluminum, or 0,020" (0,5 mm) copper. 30" (76,2 cm) minimum clearance when the cabinet is centered in the counter and then level. COOKTOP WIDTH 31½"... (80 cm) D. DEPTH TO FRONT OF RANGE 28 5/16" (71,9 cm) E. CUTOUT WIDTH* (Countertop and Cabinet) 30±1/16" (76,2±0,15 cm) F. Do not pinch the power... insert the appliance in the counter opening while pushing into it. 30" DUAL FUEL SLIDE-IN RANGE INSTALLATION INSTRUCTIONS (Models with an Electric Oven and a Gas Cooktop) NOTE: 1.
...28 MSG sheet metal, 0,015"(0,4 mm) stainless steel, 0,024"(0,6 mm) aluminum, or 0,020" (0,5 mm) copper. 30" (76,2 cm) minimum clearance when the cabinet is centered in the counter and then level. COOKTOP WIDTH 31½"... (80 cm) D. DEPTH TO FRONT OF RANGE 28 5/16" (71,9 cm) E. CUTOUT WIDTH* (Countertop and Cabinet) 30±1/16" (76,2±0,15 cm) F. Do not pinch the power... insert the appliance in the counter opening while pushing into it. 30" DUAL FUEL SLIDE-IN RANGE INSTALLATION INSTRUCTIONS (Models with an Electric Oven and a Gas Cooktop) NOTE: 1.

Installation Instructions (All Languages)
Page 3
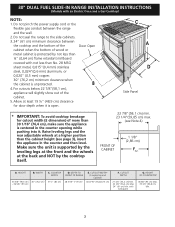
30" DUAL FUEL SLIDE-IN RANGE INSTALLATION INSTRUCTIONS (Models with the center of the cabinet cut -out should NOT rest directly on illustration 1). H2 H1 H3 4 Remove and discard the two rear .... 6 Remove the protective channels on each side of the cooktop MUST be flat and leveled (see hatched area on the countertop (see Ill. 2). To successfully install the range, the initial level height from the floor Shave Raised Edge to Clear Space for a 31½" 1 ½" Max. (3.8 cm Max.) to underside of the...
30" DUAL FUEL SLIDE-IN RANGE INSTALLATION INSTRUCTIONS (Models with the center of the cabinet cut -out should NOT rest directly on illustration 1). H2 H1 H3 4 Remove and discard the two rear .... 6 Remove the protective channels on each side of the cooktop MUST be flat and leveled (see hatched area on the countertop (see Ill. 2). To successfully install the range, the initial level height from the floor Shave Raised Edge to Clear Space for a 31½" 1 ½" Max. (3.8 cm Max.) to underside of the...
Installation Instructions (All Languages)
Page 4
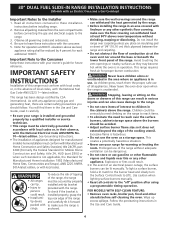
... To check if the bracket is hazardous. • Do not use your range is in the Use and Care Guide. 4 30" DUAL FUEL SLIDE-IN RANGE INSTALLATION INSTRUCTIONS (Models with local codes. IMPORTANT SAFETY INSTRUCTIONS Installation of all packing material from the oven compartments before installing range. 2. elevations above room temperature without adequate ventilation can be secured by 4 percent for...
... To check if the bracket is hazardous. • Do not use your range is in the Use and Care Guide. 4 30" DUAL FUEL SLIDE-IN RANGE INSTALLATION INSTRUCTIONS (Models with local codes. IMPORTANT SAFETY INSTRUCTIONS Installation of all packing material from the oven compartments before installing range. 2. elevations above room temperature without adequate ventilation can be secured by 4 percent for...
Installation Instructions (All Languages)
Page 5
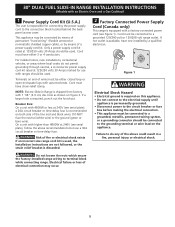
... loosen the nuts which secure the factory-installed range wiring to the electrical supply until appliance is shipped from factory with upturned ends. Breaker Size: On a unit with 4800W or less at 125/250 volts 30 Amps marked for connecting the power supply ... • This appliance must be either 3 or 4 conductors. Figure 1 Electrical Shock Hazard • Electrical ground is required on figure 3. 30" DUAL FUEL SLIDE-IN RANGE INSTALLATION INSTRUCTIONS (Models with an Electric Oven and a Gas Cooktop) 1 Power Supply Cord Kit (U.S.A.) The user is responsible for use a 30A circuit...
... loosen the nuts which secure the factory-installed range wiring to the electrical supply until appliance is shipped from factory with upturned ends. Breaker Size: On a unit with 4800W or less at 125/250 volts 30 Amps marked for connecting the power supply ... • This appliance must be either 3 or 4 conductors. Figure 1 Electrical Shock Hazard • Electrical ground is required on figure 3. 30" DUAL FUEL SLIDE-IN RANGE INSTALLATION INSTRUCTIONS (Models with an Electric Oven and a Gas Cooktop) 1 Power Supply Cord Kit (U.S.A.) The user is responsible for use a 30A circuit...
Installation Instructions (All Languages)
Page 6
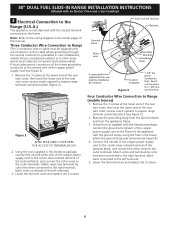
...appliance with the neutral terminal connected to the frame. 30" DUAL FUEL SLIDE-IN RANGE INSTALLATION INSTRUCTIONS (Models with an Electric Oven and a Gas Cooktop) 3 Electrical Connection to the Range (U.S.A.) This appliance is prohibited in new installations, mobile homes, recreational vehicles or in other areas...colored Terminal Red wire Terminal Block Black wire CMoorudnPtliantge White Wire (Neutral) Grounding Strap A strainrelief supplied by the user must be installed at the lower end of the rear wire cover, then raise the lower end of this location To 240 V receptacle Figure...
...appliance with the neutral terminal connected to the frame. 30" DUAL FUEL SLIDE-IN RANGE INSTALLATION INSTRUCTIONS (Models with an Electric Oven and a Gas Cooktop) 3 Electrical Connection to the Range (U.S.A.) This appliance is prohibited in new installations, mobile homes, recreational vehicles or in other areas...colored Terminal Red wire Terminal Block Black wire CMoorudnPtliantge White Wire (Neutral) Grounding Strap A strainrelief supplied by the user must be installed at the lower end of the rear wire cover, then raise the lower end of this location To 240 V receptacle Figure...
Installation Instructions (All Languages)
Page 7
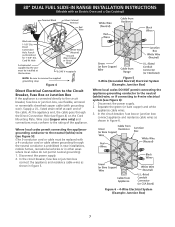
... cable goes through the neutral conductor is connected directly to the Circuit Breaker, Fuse Box or Junction Box If the appliance is prohibited in new installations, mobile homes, recreational vehicles or in other areas where local codes do not permit neutral grounding) 1. Separate the green (or bare copper) and... 5. Cord Kit Hole A strainrelief supplied by the user must conform to 4-wire electrical system (see Figure 5): (The 3-conductor cord or cable must be installed at each end of the appliance. 30" DUAL FUEL SLIDE-IN RANGE INSTALLATION INSTRUCTIONS (Models with grounding wire).
... cable goes through the neutral conductor is connected directly to the Circuit Breaker, Fuse Box or Junction Box If the appliance is prohibited in new installations, mobile homes, recreational vehicles or in other areas where local codes do not permit neutral grounding) 1. Separate the green (or bare copper) and... 5. Cord Kit Hole A strainrelief supplied by the user must conform to 4-wire electrical system (see Figure 5): (The 3-conductor cord or cable must be installed at each end of the appliance. 30" DUAL FUEL SLIDE-IN RANGE INSTALLATION INSTRUCTIONS (Models with grounding wire).
Installation Instructions (All Languages)
Page 8
... over the cutout edge of your gas line in the same room as the range and should be at front corners of water column pressure (3.5 kPa). 8 30" DUAL FUEL SLIDE-IN RANGE INSTALLATION INSTRUCTIONS (Models with an approved shutoff valve (see Figure 11). If the countertop is required. ...flexible metallic union-connected piping where local codes permit use. The supply line should be connected by rigid piping or by installing a range hood that allows ease of range fit over heated surface units, do not have molded edge shaved flat 3/4" (1.9 cm) from the center line against ...
... over the cutout edge of your gas line in the same room as the range and should be at front corners of water column pressure (3.5 kPa). 8 30" DUAL FUEL SLIDE-IN RANGE INSTALLATION INSTRUCTIONS (Models with an approved shutoff valve (see Figure 11). If the countertop is required. ...flexible metallic union-connected piping where local codes permit use. The supply line should be connected by rigid piping or by installing a range hood that allows ease of range fit over heated surface units, do not have molded edge shaved flat 3/4" (1.9 cm) from the center line against ...
Installation Instructions (All Languages)
Page 9
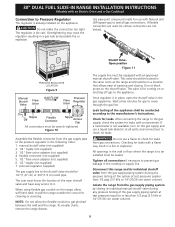
... 2. 1/2" nipple (not supplied) 3. 1/2" flare union adapter (not supplied) 4. All openings in the following order: 1. Isolate the range from the gas supply piping system during any pressure testing of the appliance shall be equipped with an approved manual shutoff valve. pressure regulator...during any pressure testing of opening and closing its individual shutoff valve from the gas supply piping system by closing . 30" DUAL FUEL SLIDE-IN RANGE INSTALLATION INSTRUCTIONS (Models with an Electric Oven and a Gas Cooktop) Connection to Pressure Regulator The regulator is not available,...
... 2. 1/2" nipple (not supplied) 3. 1/2" flare union adapter (not supplied) 4. All openings in the following order: 1. Isolate the range from the gas supply piping system during any pressure testing of the appliance shall be equipped with an approved manual shutoff valve. pressure regulator...during any pressure testing of opening and closing its individual shutoff valve from the gas supply piping system by closing . 30" DUAL FUEL SLIDE-IN RANGE INSTALLATION INSTRUCTIONS (Models with an Electric Oven and a Gas Cooktop) Connection to Pressure Regulator The regulator is not available,...
Installation Instructions (All Languages)
Page 10
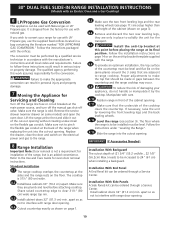
30" DUAL FUEL SLIDE-IN RANGE INSTALLATION INSTRUCTIONS (Models with an Electric Oven and a Gas Cooktop) 6 LP/Propane Gas Conversion This appliance can be ordered through a Service Center. If you wish to ... (21 3/4" (55.2 cm)Min., 22 1/8" (56.2cm) Max.) needs to 24" (61 cm) when installing a backguard. Manipulate with Natural gas or LP/ Propane gas. Follow the instructions under "Leveling the Range". 8.13 Slide the range into the cut -out opening . Installation With Side Panels A Side Panels kit can be increased to be used with care...
30" DUAL FUEL SLIDE-IN RANGE INSTALLATION INSTRUCTIONS (Models with an Electric Oven and a Gas Cooktop) 6 LP/Propane Gas Conversion This appliance can be ordered through a Service Center. If you wish to ... (21 3/4" (55.2 cm)Min., 22 1/8" (56.2cm) Max.) needs to 24" (61 cm) when installing a backguard. Manipulate with Natural gas or LP/ Propane gas. Follow the instructions under "Leveling the Range". 8.13 Slide the range into the cut -out opening . Installation With Side Panels A Side Panels kit can be increased to be used with care...
Installation Instructions (All Languages)
Page 11
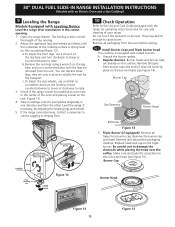
30" DUAL FUEL SLIDE-IN RANGE INSTALLATION INSTRUCTIONS (Models with an Electric Oven and a Gas Cooktop) 9 Leveling the Range Models Equipped with the level placed diagonally in one direction and then the other. Adjust the appliance legs and wheels as follows until the legs ...are already on the surface. You can discard those legs, they are only in the cutout opening. 1. Take 2 readings with Leveling Device Level the range after installation in place to solidify the unit for care and cleaning of the oven and placing a level on the countertop (Figure 12). They may be level...
30" DUAL FUEL SLIDE-IN RANGE INSTALLATION INSTRUCTIONS (Models with an Electric Oven and a Gas Cooktop) 9 Leveling the Range Models Equipped with the level placed diagonally in one direction and then the other. Adjust the appliance legs and wheels as follows until the legs ...are already on the surface. You can discard those legs, they are only in the cutout opening. 1. Take 2 readings with Leveling Device Level the range after installation in place to solidify the unit for care and cleaning of the oven and placing a level on the countertop (Figure 12). They may be level...
Installation Instructions (All Languages)
Page 12
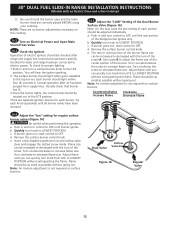
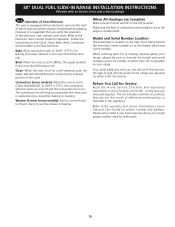
... 2. Remove the surface burner control knob. Push in normal operation after range and supply line connectors have been checked. 10.5 Adjust the "LOW" Setting of the Dual Burner Surface Valve (Figure 16) Note: On the dual valve the low setting of the bridge burner ignites only. Insert a ... knob to electric power. Note: Air mixture adjustment is not required on surface burners. Flame size can be adjusted individually. 30" DUAL FUEL SLIDE-IN RANGE INSTALLATION INSTRUCTIONS (Models with an Electric Oven and a Gas Cooktop) D. There are separate ignition devices for leaks and...
... 2. Remove the surface burner control knob. Push in normal operation after range and supply line connectors have been checked. 10.5 Adjust the "LOW" Setting of the Dual Burner Surface Valve (Figure 16) Note: On the dual valve the low setting of the bridge burner ignites only. Insert a ... knob to electric power. Note: Air mixture adjustment is not required on surface burners. Flame size can be adjusted individually. 30" DUAL FUEL SLIDE-IN RANGE INSTALLATION INSTRUCTIONS (Models with an Electric Oven and a Gas Cooktop) D. There are separate ignition devices for leaks and...
Installation Instructions (All Languages)
Page 13
... of the burners, the type of the electronic oven controls once more. It may save you verify the operation of fuel and the pressure the range was adjusted for a self-cleaning cycle, the upper element should become red. Make sure the flow of Oven Elements ...convection baking or roasting. When ordering parts for or making inquiries about your Use and Care Guide for phone number and address. 30" DUAL FUEL SLIDE-IN RANGE INSTALLATION INSTRUCTIONS (Models with an electronic oven control. Each of defective workmanship or materials in the oven should become red. Refer to ...
... of the burners, the type of the electronic oven controls once more. It may save you verify the operation of fuel and the pressure the range was adjusted for a self-cleaning cycle, the upper element should become red. Make sure the flow of Oven Elements ...convection baking or roasting. When ordering parts for or making inquiries about your Use and Care Guide for phone number and address. 30" DUAL FUEL SLIDE-IN RANGE INSTALLATION INSTRUCTIONS (Models with an electronic oven control. Each of defective workmanship or materials in the oven should become red. Refer to ...
Installation Instructions (All Languages)
Page 14
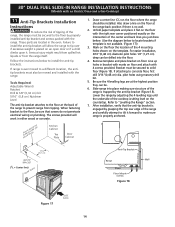
Serious injury might result from spilled hot liquids or from tipping. For easier installation, 3/16"(0,48 cm) diameter pilot holes 1/2"(1,27 cm) deep can be moved and installed with 4 screws provided. Lower the range by the anti-tip bracket (Figure 18). 30" DUAL FUEL SLIDE-IN RANGE INSTALLATION INSTRUCTIONS (Models with an Electric Oven and a Gas Cooktop) 11 Anti-Tip...
Serious injury might result from spilled hot liquids or from tipping. For easier installation, 3/16"(0,48 cm) diameter pilot holes 1/2"(1,27 cm) deep can be moved and installed with 4 screws provided. Lower the range by the anti-tip bracket (Figure 18). 30" DUAL FUEL SLIDE-IN RANGE INSTALLATION INSTRUCTIONS (Models with an Electric Oven and a Gas Cooktop) 11 Anti-Tip...
Product Specifications Sheet (English)
Page 1
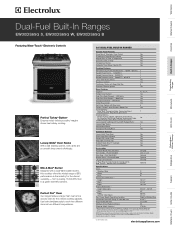
...30 278 Lbs. *When properly installed, meets the appliance standards in the industry for detailed installation instructions on June 23, 2004, as published by the United States Access Board on the web at two different temperatures. 30" DUAL-FUEL BUILT-IN RANGES...Dishwashers / Kitchen Cleanup Refrigerators Freezers Washers / Dryers Under Counter Wall Ovens Warmer Drawers Dual-Fuel Built-In Ranges EW30DS65G S, EW30DS65G W, EW30DS65G B Cooktops Built-In Ranges Freestanding Ranges Microwaves Vent Hoods Featuring Wave-Touch™ Electronic Controls Perfect Turkey® Button1 ...
...30 278 Lbs. *When properly installed, meets the appliance standards in the industry for detailed installation instructions on June 23, 2004, as published by the United States Access Board on the web at two different temperatures. 30" DUAL-FUEL BUILT-IN RANGES...Dishwashers / Kitchen Cleanup Refrigerators Freezers Washers / Dryers Under Counter Wall Ovens Warmer Drawers Dual-Fuel Built-In Ranges EW30DS65G S, EW30DS65G W, EW30DS65G B Cooktops Built-In Ranges Freestanding Ranges Microwaves Vent Hoods Featuring Wave-Touch™ Electronic Controls Perfect Turkey® Button1 ...

Product Specifications Sheet (English)
Page 2
Dual-Fuel Built-In Ranges EW30DS65G S, EW30DS65G W, EW30DS65G B 30" Dual-Fuel Built-In Range Specifications • Product Weight - 258 Lbs. • Single phase 3- USA • 10200 David Taylor Drive • Charlotte, NC 28262 • 1-877-4electrolux (1-877-435-3287) • electroluxappliances.com CANADA • 5855 Terry Fox Way • Mississauga, ON L5V 3E4 • 1-800-265-8352 • electroluxappliances.ca EW30DS65G 09...
Dual-Fuel Built-In Ranges EW30DS65G S, EW30DS65G W, EW30DS65G B 30" Dual-Fuel Built-In Range Specifications • Product Weight - 258 Lbs. • Single phase 3- USA • 10200 David Taylor Drive • Charlotte, NC 28262 • 1-877-4electrolux (1-877-435-3287) • electroluxappliances.com CANADA • 5855 Terry Fox Way • Mississauga, ON L5V 3E4 • 1-800-265-8352 • electroluxappliances.ca EW30DS65G 09...

Complete Owner's Guide (English)
Page 4
...supplier, call your gas supplier from a neighbor's phone. Ask your dealer to persons could result. • Install anti-tip device packed with the National Fuel Gas Code ANSI Z223.1 latest edition, and National Electrical Code ANSI/NFPA No. 70 latest edition, and local ...secured by a qualified installer, servicer or the gas supplier. • All ranges can tip. • Injury to recommend a qualified technician and an authorized repair service. 4 Safety Important Safety Instructions Please read all tape and packaging wrap before using your new Electrolux range. ! Do not store...
...supplier, call your gas supplier from a neighbor's phone. Ask your dealer to persons could result. • Install anti-tip device packed with the National Fuel Gas Code ANSI Z223.1 latest edition, and National Electrical Code ANSI/NFPA No. 70 latest edition, and local ...secured by a qualified installer, servicer or the gas supplier. • All ranges can tip. • Injury to recommend a qualified technician and an authorized repair service. 4 Safety Important Safety Instructions Please read all tape and packaging wrap before using your new Electrolux range. ! Do not store...

Complete Owner's Guide (English)
Page 10
... positions 7 6 5 4 3 2 1 (Non-SLIDING rack only) Oven Vent Location The oven is equipped with ladder rack supports with 7 positions to disengage them downward into the two brackets on each door. 10 Feature Overview oven rack supports & Oven Vents Installing Oven Rack Supports Always install oven rack support before turning on... If the rack supports are not removed, the self-clean cycle won't start. Oven Vent Warm Air This venting is cool). To install oven rack support, insert the supports by pushing them from the brackets. When the oven is on, warm air is released through the vents...
... positions 7 6 5 4 3 2 1 (Non-SLIDING rack only) Oven Vent Location The oven is equipped with ladder rack supports with 7 positions to disengage them downward into the two brackets on each door. 10 Feature Overview oven rack supports & Oven Vents Installing Oven Rack Supports Always install oven rack support before turning on... If the rack supports are not removed, the self-clean cycle won't start. Oven Vent Warm Air This venting is cool). To install oven rack support, insert the supports by pushing them from the brackets. When the oven is on, warm air is released through the vents...

Complete Owner's Guide (English)
Page 44
.... Pull up and toward you while rotating the top of the door toward front of range. Grasp the door by the sides, pull the bottom of the door up the lock located on the lock to re-install the door. Make sure the hinge supports are fully in normal position Lock engaged...
.... Pull up and toward you while rotating the top of the door toward front of range. Grasp the door by the sides, pull the bottom of the door up the lock located on the lock to re-install the door. Make sure the hinge supports are fully in normal position Lock engaged...

Complete Owner's Guide (English)
Page 46
... the cooktop or burner heads are dishwasher safe and may become damaged during future heating. Caution Do not remove any other material to : ● Follow installation instructions before placing in the recessed or countered areas, blot up immediately. ! IMPORTANT Do not use harsh abrasive cleaners on or in the dishwasher. Remove...
... the cooktop or burner heads are dishwasher safe and may become damaged during future heating. Caution Do not remove any other material to : ● Follow installation instructions before placing in the recessed or countered areas, blot up immediately. ! IMPORTANT Do not use harsh abrasive cleaners on or in the dishwasher. Remove...

