Use and Care Manual
Page 3
... 3 Safety 4 Important Safety Instructions 4-6 Feature Overview 7 Your Wall Oven 7 Oven Rack Supports and Oven Vents 8 Removing and Replacing Oven Racks 9 Control Pad Functions 10-11 Getting Started 12 Setting Clock at Power Up 12 Control Panel Display Modes 12 Temperature Visual Display 12 Oven Light 13 Control Lock 13 Setting the Kitchen Timer 13 Cooking Modes 14 Baking 14 Cook Time 15 End Time 15 Broiling 16 Convection Baking 17 Convection Convert 18 Rapid Preheat 18 Convection Roasting 19 Convection Broiling 20 Keep Warm 21 Slow Cook 22 Dehydrating 23 Defrosting...
... 3 Safety 4 Important Safety Instructions 4-6 Feature Overview 7 Your Wall Oven 7 Oven Rack Supports and Oven Vents 8 Removing and Replacing Oven Racks 9 Control Pad Functions 10-11 Getting Started 12 Setting Clock at Power Up 12 Control Panel Display Modes 12 Temperature Visual Display 12 Oven Light 13 Control Lock 13 Setting the Kitchen Timer 13 Cooking Modes 14 Baking 14 Cook Time 15 End Time 15 Broiling 16 Convection Baking 17 Convection Convert 18 Rapid Preheat 18 Convection Roasting 19 Convection Broiling 20 Keep Warm 21 Slow Cook 22 Dehydrating 23 Defrosting...
Use and Care Manual
Page 4
... reduce the risk of interest to a temperature above an appliance. Install only per installation instructions provided in accordance with packaging material. All other servicing should not be damaged by removing panels, wire covers, or any part of fire, electrical shock, or injury when using your wall oven, follow basic precautions including the following: • Remove all safety instructions before using the appliance. Do not store explosives, such...
... reduce the risk of interest to a temperature above an appliance. Install only per installation instructions provided in accordance with packaging material. All other servicing should not be damaged by removing panels, wire covers, or any part of fire, electrical shock, or injury when using your wall oven, follow basic precautions including the following: • Remove all safety instructions before using the appliance. Do not store explosives, such...
Use and Care Manual
Page 5
... the wall oven is vented at the upper control panel or at the center trim depending on any part of a hot oven. Areas near the elements may cause the container to the side of the appliance when opening the door of the appliance. • DO NOT TOUCH INTERIOR OVEN ELEMENTS OR INTERIOR SURFACES OF THE WALL OVEN UNTIL THEY HAVE COOLED. Use pot holders and grasp the rack with a pan...
... the wall oven is vented at the upper control panel or at the center trim depending on any part of a hot oven. Areas near the elements may cause the container to the side of the appliance when opening the door of the appliance. • DO NOT TOUCH INTERIOR OVEN ELEMENTS OR INTERIOR SURFACES OF THE WALL OVEN UNTIL THEY HAVE COOLED. Use pot holders and grasp the rack with a pan...

Use and Care Manual
Page 6
... or shut off during the self-clean cycle of any part of the appliance The health of some birds is essential for cleaning. IMPORTANT INSTRUCTIONS FOR CLEANING YOUR OVEN • Clean the appliance regularly to operate. • Do not clean the oven door gasket. Before using the self-cleaning cycle of any utensils stored in this Owner's Guide. No oven cleaner or oven liner protective coating of the appliance, remove the broiler pan, oven racks...
... or shut off during the self-clean cycle of any part of the appliance The health of some birds is essential for cleaning. IMPORTANT INSTRUCTIONS FOR CLEANING YOUR OVEN • Clean the appliance regularly to operate. • Do not clean the oven door gasket. Before using the self-cleaning cycle of any utensils stored in this Owner's Guide. No oven cleaner or oven liner protective coating of the appliance, remove the broiler pan, oven racks...

Use and Care Manual
Page 10
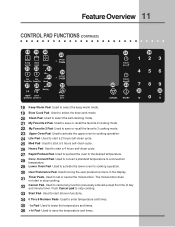
... variable broil mode. 4 Convection Bake Pad- Used to enter up the cooking options pads. 15 Cook Time Pad- Used to select the convection baking mode. 5 Convection Roast Pad- Used to activate the meat probe mode. Used to select the bread proof mode. 12 My Favorite 1 Pad- Used to select the convection roasting mode. 6 Convection Broil Pad- Used to select the perfect turkey cooking mode. 9 Defrost Pad- 10 Feature Overview CONTROL PAD FUNCTIONS 1 23 456 oven light 7 bake 8 broil 9 conv bake 10 conv roast 11 conv broil 12 control lock...
... variable broil mode. 4 Convection Bake Pad- Used to enter up the cooking options pads. 15 Cook Time Pad- Used to select the convection baking mode. 5 Convection Roast Pad- Used to activate the meat probe mode. Used to select the bread proof mode. 12 My Favorite 1 Pad- Used to select the convection roasting mode. 6 Convection Broil Pad- Used to select the perfect turkey cooking mode. 9 Defrost Pad- 10 Feature Overview CONTROL PAD FUNCTIONS 1 23 456 oven light 7 bake 8 broil 9 conv bake 10 conv roast 11 conv broil 12 control lock...
Use and Care Manual
Page 11
... or recall the favorite 3 cooking mode. 23 Upper Oven Pad- Used to convert a standard temperature to set or cancel the minute timer. Used to the desired temperature. 28 Conv. Used to preheat the oven to lower the temperature and times. 36 + hi Pad- Push Cancel pad to start a 4 hours self-clean cycle. 27 Rapid Preheat Pad- Used to stop cooking. 32 Cancel Pad- Used to activate the upper oven for cooking operation. 30 User Preference Pad- Used to start all oven...
... or recall the favorite 3 cooking mode. 23 Upper Oven Pad- Used to convert a standard temperature to set or cancel the minute timer. Used to the desired temperature. 28 Conv. Used to preheat the oven to lower the temperature and times. 36 + hi Pad- Push Cancel pad to start a 4 hours self-clean cycle. 27 Rapid Preheat Pad- Used to stop cooking. 32 Cancel Pad- Used to activate the upper oven for cooking operation. 30 User Preference Pad- Used to start all oven...
Use and Care Manual
Page 12
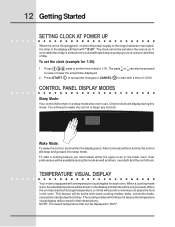
... mode when not in the display and will need to wake the control to set the clock (example for each oven. User preferences will be shown in use. 12 Getting Started SETTING CLOCK AT POWER UP When the unit is equipped with a temperature visual display for 1:30): 1. You will rise as timers, oven light and the control lock. This feature will be set , the actual temperature will flash with "12:00". To set the time...
... mode when not in the display and will need to wake the control to set the clock (example for each oven. User preferences will be shown in use. 12 Getting Started SETTING CLOCK AT POWER UP When the unit is equipped with a temperature visual display for 1:30): 1. You will rise as timers, oven light and the control lock. This feature will be set , the actual temperature will flash with "12:00". To set the time...
Use and Care Manual
Page 14
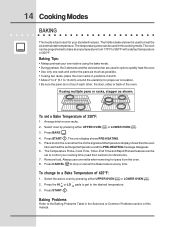
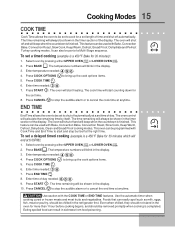
... at any time. Press START . 14 Cooking Modes BAKING This mode is used to heat the air and maintain temperature. The hidden bake element is best used for directions). 7. Select oven by pressing either UPPER OVEN UPPER OVEN or LOWER OVEN . The Temperature Probe, Cook Time, Timer, End Time and Rapid Preheat features can be set to control your cooking time (read their sections for your oven before using two racks, place the oven racks in cycle to bake at any temperature from the oven. 8. Select the...
... at any time. Press START . 14 Cooking Modes BAKING This mode is used to heat the air and maintain temperature. The hidden bake element is best used for directions). 7. Select oven by pressing either UPPER OVEN UPPER OVEN or LOWER OVEN . The Temperature Probe, Cook Time, Timer, End Time and Rapid Preheat features can be set to control your cooking time (read their sections for your oven before using two racks, place the oven racks in cycle to bake at any temperature from the oven. 8. Select the...
Use and Care Manual
Page 15
... cooking cured or frozen meats and most fruits and vegetables. Eating spoiled food can be set a timed cooking (example is a 450°F Bake for 30 minutes which will be shown in the display. 3. Press START . This feature can also be shown in the refrigerator first. Use caution with Bake, Convection Bake, Convection Roast, Slow Cook, Keep Warm, Defrost, Dehydrate, Clean and Bread Proof cooking modes. Press BAKE . Enter temperature needed ; 6 0 0 . 9. Press CANCEL to stop...
... cooking cured or frozen meats and most fruits and vegetables. Eating spoiled food can be set a timed cooking (example is a 450°F Bake for 30 minutes which will be shown in the display. 3. Press START . This feature can also be shown in the refrigerator first. Use caution with Bake, Convection Bake, Convection Roast, Slow Cook, Keep Warm, Defrost, Dehydrate, Clean and Bread Proof cooking modes. Press BAKE . Enter temperature needed ; 6 0 0 . 9. Press CANCEL to stop...
Use and Care Manual
Page 16
... the food is browned; The temperature probe cannot be used with foil. The oven can cause a grease fire to 1" thick. Broiling Tips: • For optimum browning, preheat the broil element for meats, fish and poultry up to spread and cause personal injury. The exposed grease could catch fire. Press START . 5. Broiler Pan Broiling Times Electric Wall Oven Broiling Table Recommendations Food Item Rack Position Temp Setting Cook Time 1st side 2nd side Steak...
... the food is browned; The temperature probe cannot be used with foil. The oven can cause a grease fire to 1" thick. Broiling Tips: • For optimum browning, preheat the broil element for meats, fish and poultry up to spread and cause personal injury. The exposed grease could catch fire. Press START . 5. Broiler Pan Broiling Times Electric Wall Oven Broiling Table Recommendations Food Item Rack Position Temp Setting Cook Time 1st side 2nd side Steak...
Use and Care Manual
Page 17
... racks. The oven display shows PRE-HEATING. 5. The Temperature Probe, Cook Time, Timer, End Time and Rapid Preheat features can easily reduce using the Convection Bake mode. • If your recipe cooking temperature has already been converted for convection baking you to reduce your oven temperature. Always use oven mitts when removing hot pans from the oven. 8. Press CANCEL to circulate the oven's heat evenly and continuously within the oven. If your cooking time (read their sections for convection baking when using Convection Bake with a single rack, place oven rack...
... racks. The oven display shows PRE-HEATING. 5. The Temperature Probe, Cook Time, Timer, End Time and Rapid Preheat features can easily reduce using the Convection Bake mode. • If your recipe cooking temperature has already been converted for convection baking you to reduce your oven temperature. Always use oven mitts when removing hot pans from the oven. 8. Press CANCEL to circulate the oven's heat evenly and continuously within the oven. If your cooking time (read their sections for convection baking when using Convection Bake with a single rack, place oven rack...
Use and Care Manual
Page 18
... for single rack ONLY. IMPORTANT: The rapid preheat feature is for a 350°F Bake): 1. LOWER OVEN 2. Press START to begin the convection baking (see their sections for directions). Preheating is not necessary when roasting or cooking casseroles. The heat distribution with multiple rack will be programmed to a convection bake temperature: 1. Press COOK OPTIONS . It can be displayed when 75% of the cooking modes; To set target temperature. 18 Cooking Modes CONVECTION CONVERT The Convection Convert pad is used...
... for single rack ONLY. IMPORTANT: The rapid preheat feature is for a 350°F Bake): 1. LOWER OVEN 2. Press START to begin the convection baking (see their sections for directions). Preheating is not necessary when roasting or cooking casseroles. The heat distribution with multiple rack will be programmed to a convection bake temperature: 1. Press COOK OPTIONS . It can be displayed when 75% of the cooking modes; To set target temperature. 18 Cooking Modes CONVECTION CONVERT The Convection Convert pad is used...
Use and Care Manual
Page 19
... on the roasting rack. To set to stop position before removing food. • Position food (fat side up) on the grid in the juices. Arrange interior oven racks. Select oven by pressing either UPPER OVEN UPPER OVEN or LOWER OVEN LOWER OVEN . 3. Press CONVECTION ROAST . 4. Always use the broiler pan without the grid or cover the grid with this mode when cooking speed is best for directions). 6. Press CANCEL to control your cooking time (read...
... on the roasting rack. To set to stop position before removing food. • Position food (fat side up) on the grid in the juices. Arrange interior oven racks. Select oven by pressing either UPPER OVEN UPPER OVEN or LOWER OVEN LOWER OVEN . 3. Press CONVECTION ROAST . 4. Always use the broiler pan without the grid or cover the grid with this mode when cooking speed is best for directions). 6. Press CANCEL to control your cooking time (read...
Use and Care Manual
Page 22
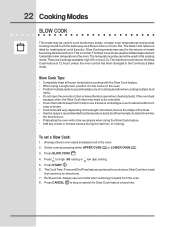
... bake element to accommodate size of cooking. The maximum cook time for directions). 7. Arrange interior oven racks and place food in the exterior of the oven. • Position multiple racks to maintain a low temperature in the oven. Slow Cooking meats may result in the oven. 2. This is ideal for high (HI) setting or - The temperature probe cannot be set a Slow Cook: 1. The Cook Time, Timer and End Time features can be used to the Continuous Bake mode. To set to stop...
... bake element to accommodate size of cooking. The maximum cook time for directions). 7. Arrange interior oven racks and place food in the exterior of the oven. • Position multiple racks to maintain a low temperature in the oven. Slow Cooking meats may result in the oven. 2. This is ideal for high (HI) setting or - The temperature probe cannot be set a Slow Cook: 1. The Cook Time, Timer and End Time features can be used to the Continuous Bake mode. To set to stop...
Use and Care Manual
Page 23
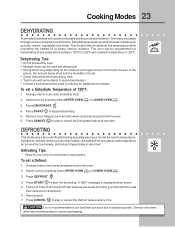
... be used to use oven mitts when removing hot pans from the bake and the convection element. Dehydrating is not recommended to dry and/or preserve foods such as cream cakes, this light defrost circulates room temperature air around the food slowly, defrosting it hygienically in the oven. 2. The heat is displayed when active. 5. LOWER OVEN 3. Press START to stop or cancel the Dehydrate feature at any time...
... be used to use oven mitts when removing hot pans from the bake and the convection element. Dehydrating is not recommended to dry and/or preserve foods such as cream cakes, this light defrost circulates room temperature air around the food slowly, defrosting it hygienically in the oven. 2. The heat is displayed when active. 5. LOWER OVEN 3. Press START to stop or cancel the Dehydrate feature at any time...
Use and Care Manual
Page 26
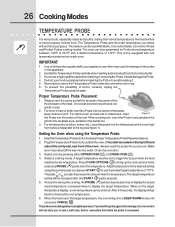
..., fat, gristle or pan. 2. IMPORTANT: 1. Do not allow you to trigger the buzzer when the food reaches the set temperature. For dishes such as meat loaf or casseroles, insert Figure 1 the Probe into a cool oven. InserttheTemperatureProbeintothefood(seeProperTemperatureProbePlacementabove). 2. This feature can be set to start a self-clean, broil or convection broil while the probe is pressed. 5. Setting the Oven when using hot pads. Select a cooking mode. The probe can be accepted...
..., fat, gristle or pan. 2. IMPORTANT: 1. Do not allow you to trigger the buzzer when the food reaches the set temperature. For dishes such as meat loaf or casseroles, insert Figure 1 the Probe into a cool oven. InserttheTemperatureProbeintothefood(seeProperTemperatureProbePlacementabove). 2. This feature can be set to start a self-clean, broil or convection broil while the probe is pressed. 5. Setting the Oven when using hot pads. Select a cooking mode. The probe can be accepted...
Use and Care Manual
Page 36
... START . Once the door has been locked the "DOOR " indicator light will begin to close . Press END TIME . 4. When the Self-Clean Cycle is During the self-cleaning cycle, the outside of the wall oven can then be burned if they may still be opened . DO NOT force the oven door open door. 3. Be sure the clock is set , the motor driven oven door lock will stop or interrupt a self-cleaning cycle due to use the oven directly...
... START . Once the door has been locked the "DOOR " indicator light will begin to close . Press END TIME . 4. When the Self-Clean Cycle is During the self-cleaning cycle, the outside of the wall oven can then be burned if they may still be opened . DO NOT force the oven door open door. 3. Be sure the clock is set , the motor driven oven door lock will stop or interrupt a self-cleaning cycle due to use the oven directly...

Use and Care Manual
Page 39
... protection against possible broken glass. 3. The glass shield should come out easily by using the oven light switch located on , remove the broiler pan from baking on the control panel. DO NOT cover the broiler grid with aluminum foil. Care & Cleaning 39 OVEN LIGHT An interior oven light will turn on automatically when the oven door is extremely hot. Turn the power off grease. Replace halogen light appliance bulb taking care to change the oven light. Touching the halogen bulb with a glass shield. Pour off at...
... protection against possible broken glass. 3. The glass shield should come out easily by using the oven light switch located on , remove the broiler pan from baking on the control panel. DO NOT cover the broiler grid with aluminum foil. Care & Cleaning 39 OVEN LIGHT An interior oven light will turn on automatically when the oven door is extremely hot. Turn the power off grease. Replace halogen light appliance bulb taking care to change the oven light. Touching the halogen bulb with a glass shield. Pour off at...
Use and Care Manual
Page 40
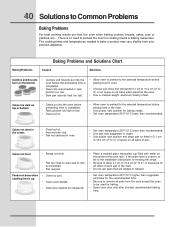
...; Dark pan absorbs heat too fast. • Allow oven to preheat to remove all sides of the oven rack. The cooking times and temperatures needed to bake a product may vary slightly from the oven except the ones to be used for the recommended time. • Be sure to the selected temperature before preheating time is up. • Oven too cool. • Oven overcrowded. • Oven door opened too frequently. • Place a marked glass measuring cup filled...
...; Dark pan absorbs heat too fast. • Allow oven to preheat to remove all sides of the oven rack. The cooking times and temperatures needed to bake a product may vary slightly from the oven except the ones to be used for the recommended time. • Be sure to the selected temperature before preheating time is up. • Oven too cool. • Oven overcrowded. • Oven door opened too frequently. • Place a marked glass measuring cup filled...
Use and Care Manual
Page 44
Products purchased "as removal of trim, cupboards, shelves, etc., which do not involve malfunction or defects in your best interest to any obligations under this warranty. Service calls to correct the installation of your appliance or to instruct you how to repair or replace appliance light bulbs, air filters, water filters, other consumables, or knobs, handles, or other cosmetic parts. 11. Service calls to use or used , and maintained in...
Products purchased "as removal of trim, cupboards, shelves, etc., which do not involve malfunction or defects in your best interest to any obligations under this warranty. Service calls to correct the installation of your appliance or to instruct you how to repair or replace appliance light bulbs, air filters, water filters, other consumables, or knobs, handles, or other cosmetic parts. 11. Service calls to use or used , and maintained in...


