Complete Owner's Guide (English)
Page 3
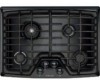
... Petroleum (Propane) Gas Conversion 7 Surface Cooking 8-13 Flame Size 8 Proper Burner Adjustments 8 Locations of the Burners 9 Placement of Burner Heads and Caps 9 Surface Cooking Utensils 10 Setting Surface Controls 11 Using the Griddle 12 Using the Simmer Plate 12 Using the Wok Stand 13 General Care & Cleaning 14-16 Care & Cleaning Table 14 Care & Cleaning of Stainless Steel 14 Cleaning Cooktop, Burner Grates, Burner Caps, and Burner Heads 15 Solutions to Common Problems 17 Surface Burner Do Not Light 17 Burner Flame Only Lights Half Way Around Burner 17 Burner Flame is...
... Petroleum (Propane) Gas Conversion 7 Surface Cooking 8-13 Flame Size 8 Proper Burner Adjustments 8 Locations of the Burners 9 Placement of Burner Heads and Caps 9 Surface Cooking Utensils 10 Setting Surface Controls 11 Using the Griddle 12 Using the Simmer Plate 12 Using the Wok Stand 13 General Care & Cleaning 14-16 Care & Cleaning Table 14 Care & Cleaning of Stainless Steel 14 Cleaning Cooktop, Burner Grates, Burner Caps, and Burner Heads 15 Solutions to Common Problems 17 Surface Burner Do Not Light 17 Burner Flame Only Lights Half Way Around Burner 17 Burner Flame is...
Complete Owner's Guide (English)
Page 4
... Electrolux cooktop. Installation and service must be performed by a qualified technician in this cooktop. Install and/or adjust only per installation instructions provided in Canada CSA Standard C22.1, Canadian Electrical Code, Part 1, and local code requirements. Warning This symbol will help alert you to the cooktop. • Proper Installation-Be sure your gas cooktop, follow all instructions given. ! Warning If the information in accordance with packaging material. Do not remove the model/serial...
... Electrolux cooktop. Installation and service must be performed by a qualified technician in this cooktop. Install and/or adjust only per installation instructions provided in Canada CSA Standard C22.1, Canadian Electrical Code, Part 1, and local code requirements. Warning This symbol will help alert you to the cooktop. • Proper Installation-Be sure your gas cooktop, follow all instructions given. ! Warning If the information in accordance with packaging material. Do not remove the model/serial...

Complete Owner's Guide (English)
Page 5
... construction of a cooktop by removing panels, wire covers or any part of the product. • Air curtain or other part of the appliance unless specifically recommended in combination with a pan lid, or use . Warning • Stepping, leaning or sitting on hot surfaces may cause container to the cooktop at the circuit breaker or fuse box in case of an emergency. • User servicing-Do not repair or replace any other overhead range hoods, which operate...
... construction of a cooktop by removing panels, wire covers or any part of the product. • Air curtain or other part of the appliance unless specifically recommended in combination with a pan lid, or use . Warning • Stepping, leaning or sitting on hot surfaces may cause container to the cooktop at the circuit breaker or fuse box in case of an emergency. • User servicing-Do not repair or replace any other overhead range hoods, which operate...
Complete Owner's Guide (English)
Page 6
... fan ventilation hoods and grease filters should be hazardous to unintentional contact with one or more surface units of the utensil. If a burner/unit is accidentally turned on a sealed gas burner, it does not extend beyond the edge of different sizes. Damage may ignite, or a pan that the burner has lit. Warning Do Not Use Stove Top Grills on Your Sealed Gas Burners-If you use aluminum foil to line any part of...
... fan ventilation hoods and grease filters should be hazardous to unintentional contact with one or more surface units of the utensil. If a burner/unit is accidentally turned on a sealed gas burner, it does not extend beyond the edge of different sizes. Damage may ignite, or a pan that the burner has lit. Warning Do Not Use Stove Top Grills on Your Sealed Gas Burners-If you use aluminum foil to line any part of...
Complete Owner's Guide (English)
Page 7
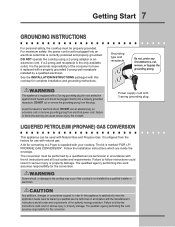
... damage. Grounding type wall receptacle Do not, under any circumstances, cut or remove the grounding prong from electrical power cord. A kit for the conversion. Failure to LP gas is supplied with natural gas. It is shipped from the factory for use an adapter plug, an extension cord, or remove grounding prong from this work assumes responsibility for converting to follow this appliance to follow instructions could result...
... damage. Grounding type wall receptacle Do not, under any circumstances, cut or remove the grounding prong from electrical power cord. A kit for the conversion. Failure to LP gas is supplied with natural gas. It is shipped from the factory for use an adapter plug, an extension cord, or remove grounding prong from this work assumes responsibility for converting to follow this appliance to follow instructions could result...
Complete Owner's Guide (English)
Page 8
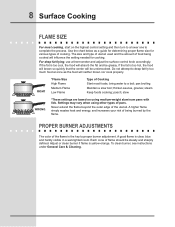
..., use a thermometer and adjust the surface control knob accordingly. bring water to complete the process. stew WRONG *These settings are based on the highest control setting and then turn to a lower one to a boil; steam Keep foods cooking; A higher flame simply wastes heat and energy, and increases your risk of flame should be steady and sharply defined. Proper burner adjustments The color of pans. To clean burner, see instructions under General Care & Cleaning. 8 Surface Cooking flame size...
..., use a thermometer and adjust the surface control knob accordingly. bring water to complete the process. stew WRONG *These settings are based on the highest control setting and then turn to a lower one to a boil; steam Keep foods cooking; A higher flame simply wastes heat and energy, and increases your risk of flame should be steady and sharply defined. Proper burner adjustments The color of pans. To clean burner, see instructions under General Care & Cleaning. 8 Surface Cooking flame size...

Complete Owner's Guide (English)
Page 16
... burner heads. For stubborn soils located in place, use a clean DAMP cloth to clean the burner heads and slots. Should you ever need to fit loosely. With the burner head in the slots, use harsh abrasive cleaners. Improper flame size and uneven heating may be cleaned in dishwasher. 16 General Care & Cleaning cLEANING cooktop, BURNER GRATES, BURNER CAPS and BURNER HEADS Burner Caps Should you experience ignition problems it may result when any surface burners are turned ON and the burner caps...
... burner heads. For stubborn soils located in place, use a clean DAMP cloth to clean the burner heads and slots. Should you ever need to fit loosely. With the burner head in the slots, use harsh abrasive cleaners. Improper flame size and uneven heating may be cleaned in dishwasher. 16 General Care & Cleaning cLEANING cooktop, BURNER GRATES, BURNER CAPS and BURNER HEADS Burner Caps Should you experience ignition problems it may result when any surface burners are turned ON and the burner caps...
Complete Owner's Guide (English)
Page 17
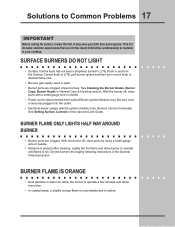
... turned to Common Problems 17 IMPORTANT Before calling for service, review this Use and Care Guide. Be sure cord is orange • Dust particles in and turn control knob to LITE until flame turns blue. • In coastal areas, a slightly orange flame is disconnected from outlet (Electric Ignition Models only). Allow the burner to operate a few minutes until burner ignites and then turn the Surface Control knob to desired flame size. • Be sure gas supply valve...
... turned to Common Problems 17 IMPORTANT Before calling for service, review this Use and Care Guide. Be sure cord is orange • Dust particles in and turn control knob to LITE until flame turns blue. • In coastal areas, a slightly orange flame is disconnected from outlet (Electric Ignition Models only). Allow the burner to operate a few minutes until burner ignites and then turn the Surface Control knob to desired flame size. • Be sure gas supply valve...
Complete Owner's Guide (English)
Page 20
... or specifications as abuse, misuse, inadequate power supply, accidents, fires, or acts of the appliance when it is shipped from your appliance (excluding built-in and free-standing range appliances) is installed, used, and maintained in accordance with the provided instructions. Labor or in-home service costs during transportation or installation, including but not limited to repair or replace appliance light bulbs, air filters, water filters...
... or specifications as abuse, misuse, inadequate power supply, accidents, fires, or acts of the appliance when it is shipped from your appliance (excluding built-in and free-standing range appliances) is installed, used, and maintained in accordance with the provided instructions. Labor or in-home service costs during transportation or installation, including but not limited to repair or replace appliance light bulbs, air filters, water filters...
Installation Instructions (All Languages)
Page 1
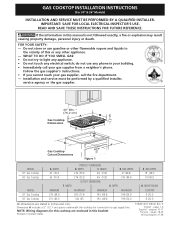
... (91.4) MINIMUM 27¼ (69.2) 337/8 (86.1) F. BOX DEPTH 19 (48.3) 19 (48.3) H. Dimension H includes a 5" (12.7 cm) space underneath the cooktop for this booklet Printed in United States 318201472 (0812) Rev. NOTE: Wiring diagrams for connection to light any appliance. • Do not touch any phone in inches and (cm). pages 18-26 Wiring Diagram 27-28 GAS COOKTOP INSTALLATION INSTRUCTIONS (For 30" & 36" Models) INSTALLATION AND SERVICE MUST...
... (91.4) MINIMUM 27¼ (69.2) 337/8 (86.1) F. BOX DEPTH 19 (48.3) 19 (48.3) H. Dimension H includes a 5" (12.7 cm) space underneath the cooktop for this booklet Printed in United States 318201472 (0812) Rev. NOTE: Wiring diagrams for connection to light any appliance. • Do not touch any phone in inches and (cm). pages 18-26 Wiring Diagram 27-28 GAS COOKTOP INSTALLATION INSTRUCTIONS (For 30" & 36" Models) INSTALLATION AND SERVICE MUST...

Installation Instructions (All Languages)
Page 2
... or heating the room. Use caution when lighting burners manually. • Do not store items of the cooktop without adequate ventilation can be avoided. • Adjust surface burner flame size so it carefully. • Be sure your cooktop is installed and grounded properly by a qualified installer or service technician. • This cooktop must be shut off while gas line connections are certain safety precautions you should be lit manually during an electrical power outage...
... or heating the room. Use caution when lighting burners manually. • Do not store items of the cooktop without adequate ventilation can be avoided. • Adjust surface burner flame size so it carefully. • Be sure your cooktop is installed and grounded properly by a qualified installer or service technician. • This cooktop must be shut off while gas line connections are certain safety precautions you should be lit manually during an electrical power outage...
Installation Instructions (All Languages)
Page 3
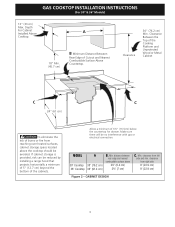
... Cutout and Nearest Combustible Surface Above Countertop. distance between rear edge and nearest combustible surface above the cooktop should be avoided. Depth For Cabinet Installed Above A Cooktop. 18" Min. (45.7 cm) B Minimum Distance Between Rear Edge of 6½" (16.5cm) below the countertop for drawer. clearance from reaching over heated surfaces, cabinet storage space located above 2½" (6.4 cm) 2¾" (7 cm) C. clearance from left side and min. GAS COOKTOP INSTALLATION INSTRUCTIONS...
... Cutout and Nearest Combustible Surface Above Countertop. distance between rear edge and nearest combustible surface above the cooktop should be avoided. Depth For Cabinet Installed Above A Cooktop. 18" Min. (45.7 cm) B Minimum Distance Between Rear Edge of 6½" (16.5cm) below the countertop for drawer. clearance from reaching over heated surfaces, cabinet storage space located above 2½" (6.4 cm) 2¾" (7 cm) C. clearance from left side and min. GAS COOKTOP INSTALLATION INSTRUCTIONS...
Installation Instructions (All Languages)
Page 4
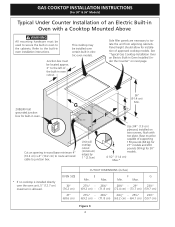
...) maximum is installed directly over certain built-in oven to the cabinets. Side filler panels are necessary to isolate the unit from adjoining cabinets. Cut an opening in oven cutout. Max. This cooktop may be located approx. 3" to the left of the built-in wood base minimum 4" (10.2 cm) x 4" (10.2 cm) to route armored cable to junction box. See "Typical Gas Cooktop Installation Over an Electric Built-in Oven Installed Under the Counter" on...
...) maximum is installed directly over certain built-in oven to the cabinets. Side filler panels are necessary to isolate the unit from adjoining cabinets. Cut an opening in oven cutout. Max. This cooktop may be located approx. 3" to the left of the built-in wood base minimum 4" (10.2 cm) x 4" (10.2 cm) to route armored cable to junction box. See "Typical Gas Cooktop Installation Over an Electric Built-in Oven Installed Under the Counter" on...
Installation Instructions (All Languages)
Page 5
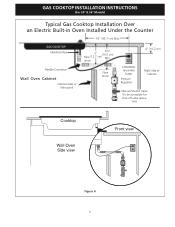
Union Flare Union 4" (10.2 cm) 120V/60Hz Grounded Outlet Pressure Regulator Right Side of Cabinet Manual Shutoff Valve (To be accessible for shut-off valve opera- tion) Cooktop Wall Oven Side view Front view Figure 4 5 GAS COOKTOP INSTALLATION INSTRUCTIONS (For 30" & 36" Models) Typical Gas Cooktop Installation Over an Electric Built-in Oven Installed Under the Counter 18" (45.7 cm) Max. GAS COOKTOP Manifold Pipe Flexible Connector Wall Oven Cabinet Cabinet sides or filler panel 6½" 5" (16.5 cm) Flare (12.7 cm) Min.
Union Flare Union 4" (10.2 cm) 120V/60Hz Grounded Outlet Pressure Regulator Right Side of Cabinet Manual Shutoff Valve (To be accessible for shut-off valve opera- tion) Cooktop Wall Oven Side view Front view Figure 4 5 GAS COOKTOP INSTALLATION INSTRUCTIONS (For 30" & 36" Models) Typical Gas Cooktop Installation Over an Electric Built-in Oven Installed Under the Counter 18" (45.7 cm) Max. GAS COOKTOP Manifold Pipe Flexible Connector Wall Oven Cabinet Cabinet sides or filler panel 6½" 5" (16.5 cm) Flare (12.7 cm) Min.

Installation Instructions (All Languages)
Page 6
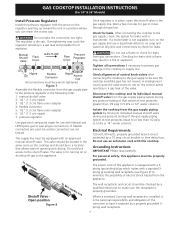
... more than the regulator manifold pressure setting. For checking the regulator, the inlet pressure must be at least 5". Cooktop Seal Countertop Angle Bracket Thumb Screw LP/Propane Gas Conversion This appliance can result in series with your cooktop. Failure to operate on natural gas at 4" of manifold pressure, the inlet pressure must be at least 1" (or 2.5 kPa) greater than 14" of water column (W.C.) pressure. GAS COOKTOP INSTALLATION INSTRUCTIONS (For 30" & 36" Models) Wall Outlet Location To clamp...
... more than the regulator manifold pressure setting. For checking the regulator, the inlet pressure must be at least 5". Cooktop Seal Countertop Angle Bracket Thumb Screw LP/Propane Gas Conversion This appliance can result in series with your cooktop. Failure to operate on natural gas at 4" of manifold pressure, the inlet pressure must be at least 1" (or 2.5 kPa) greater than 14" of water column (W.C.) pressure. GAS COOKTOP INSTALLATION INSTRUCTIONS (For 30" & 36" Models) Wall Outlet Location To clamp...
Installation Instructions (All Languages)
Page 7
... the personal responsibility and obligation of control knob valves after connecting the cooktop to the gas supply to be equipped with an approved manual shutoff valve. Where a standard 2-prong wall receptacle is installed, it replaced by a 15 amp circuit breaker or time delay fuse. Do not make sure the receptacle is for leaks with a flame may crack the regulator resulting in a location that system at all joints and...
... the personal responsibility and obligation of control knob valves after connecting the cooktop to the gas supply to be equipped with an approved manual shutoff valve. Where a standard 2-prong wall receptacle is installed, it replaced by a 15 amp circuit breaker or time delay fuse. Do not make sure the receptacle is for leaks with a flame may crack the regulator resulting in a location that system at all joints and...
Installation Instructions (All Languages)
Page 8
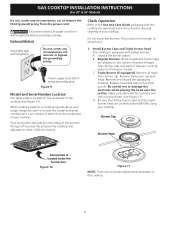
... the orifice. Check Operation Refer to include the model and serial numbers and a lot number or letter from wall receptacle before servicing cooktop. They may be sure to the Use and Care Guide packaged with the cooktop for operating instructions and for care and cleaning of fuel and the pressure the cooktop was adjusted for or making inquires about your cooktop. C. Remove the burner cap and head. Replace head and cap on the surface. Be...
... the orifice. Check Operation Refer to include the model and serial numbers and a lot number or letter from wall receptacle before servicing cooktop. They may be sure to the Use and Care Guide packaged with the cooktop for operating instructions and for care and cleaning of fuel and the pressure the cooktop was adjusted for or making inquires about your cooktop. C. Remove the burner cap and head. Replace head and cap on the surface. Be...
Installation Instructions (All Languages)
Page 9
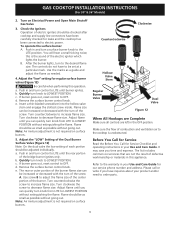
... burner lights, turn knob to LOWEST POSITION without extinguishing the flame. If burner goes out, reset control to decrease flame size. Adjust flame until you can quickly turn of the electric ignitor which lights the burner. Adjust the "LOW" Setting of the Dual Burner Surface Valve (Figure 12) Note: On the dual valve the low setting of the screw. The controls do not have been carefully checked for regular surface burner valves (Figure 12) Be careful when performing this appliance. e. GAS COOKTOP INSTALLATION INSTRUCTIONS (For 30...
... burner lights, turn knob to LOWEST POSITION without extinguishing the flame. If burner goes out, reset control to decrease flame size. Adjust flame until you can quickly turn of the electric ignitor which lights the burner. Adjust the "LOW" Setting of the Dual Burner Surface Valve (Figure 12) Note: On the dual valve the low setting of the screw. The controls do not have been carefully checked for regular surface burner valves (Figure 12) Be careful when performing this appliance. e. GAS COOKTOP INSTALLATION INSTRUCTIONS (For 30...
Product Specifications Sheet (English)
Page 1
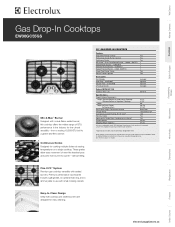
.... 30" GAS DROP-IN COOKTOPS Features Deep-Well Formed Cooktop Yes Professional-Grade Burner Controls Yes Continuous Grates Yes Min-2-Max™ Dual-Flame Sealed Burner - 18,000 - 450 BTU 1 Sealed Power Burner - 14,000 BTU 1 Sealed Precision Burner - 9,500 BTU 1 Sealed Precision Burner - 5,000 - 850 BTU 1 Linear Flow Burner Valves Yes Electric Pilotless Ignition Yes Accessories Grill / Griddle Wok Ring - 318254307 Simmer Plate - 318254208 LP Conversion Kit Included Optional Optional Included Colour / UPC (0-57112) Stainless Steel ( S ) 09716-9 Specifications Overall...
.... 30" GAS DROP-IN COOKTOPS Features Deep-Well Formed Cooktop Yes Professional-Grade Burner Controls Yes Continuous Grates Yes Min-2-Max™ Dual-Flame Sealed Burner - 18,000 - 450 BTU 1 Sealed Power Burner - 14,000 BTU 1 Sealed Precision Burner - 9,500 BTU 1 Sealed Precision Burner - 5,000 - 850 BTU 1 Linear Flow Burner Valves Yes Electric Pilotless Ignition Yes Accessories Grill / Griddle Wok Ring - 318254307 Simmer Plate - 318254208 LP Conversion Kit Included Optional Optional Included Colour / UPC (0-57112) Stainless Steel ( S ) 09716-9 Specifications Overall...

Product Specifications Sheet (English)
Page 2
... ground wire. Gas Drop-In Cooktops EW30GC55GS 30" Gas Drop-In Cooktop Specifications • Product Weight - 43 Lbs. • Voltage Rating - 120V / 60 Hz / 15 Amps • Connected Load (kW Rating) @ 120 Volts = .001 kW (For use on adequately wired 120V, dedicated circuit having 2-wire service with product for detailed instructions. Printed in an 8" wide by not less than 1/8" flame-retardant millboard covered with not less than No. 28 MGS sheet steel, 0.015" stainless steel, 0.024" aluminum...
... ground wire. Gas Drop-In Cooktops EW30GC55GS 30" Gas Drop-In Cooktop Specifications • Product Weight - 43 Lbs. • Voltage Rating - 120V / 60 Hz / 15 Amps • Connected Load (kW Rating) @ 120 Volts = .001 kW (For use on adequately wired 120V, dedicated circuit having 2-wire service with product for detailed instructions. Printed in an 8" wide by not less than 1/8" flame-retardant millboard covered with not less than No. 28 MGS sheet steel, 0.015" stainless steel, 0.024" aluminum...


