Complete Owner's Guide (English)
Page 3
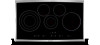
... Petroleum (Propane) Gas Conversion 7 Surface Cooking 8-13 Flame Size 8 Proper Burner Adjustments 8 Locations of the Burners 9 Placement of Burner Heads and Caps 9 Surface Cooking Utensils 10 Setting Surface Controls 11 Using the Griddle 12 Using the Simmer Plate 12 Using the Wok Stand 13 General Care & Cleaning 14-16 Care & Cleaning Table 14 Care & Cleaning of Stainless Steel 14 Cleaning Cooktop, Burner Grates, Burner Caps, and Burner Heads 15 Solutions to Common Problems 17 Surface Burner Do Not Light 17 Burner Flame Only Lights Half Way Around Burner 17 Burner Flame is...
... Petroleum (Propane) Gas Conversion 7 Surface Cooking 8-13 Flame Size 8 Proper Burner Adjustments 8 Locations of the Burners 9 Placement of Burner Heads and Caps 9 Surface Cooking Utensils 10 Setting Surface Controls 11 Using the Griddle 12 Using the Simmer Plate 12 Using the Wok Stand 13 General Care & Cleaning 14-16 Care & Cleaning Table 14 Care & Cleaning of Stainless Steel 14 Cleaning Cooktop, Burner Grates, Burner Caps, and Burner Heads 15 Solutions to Common Problems 17 Surface Burner Do Not Light 17 Burner Flame Only Lights Half Way Around Burner 17 Burner Flame is...

Complete Owner's Guide (English)
Page 5
... the circuit breaker or fuse box in case of an emergency. • User servicing-Do not repair or replace any other part of the product. • Air curtain or other flammable materials contact hot surfaces. • Do Not Use Water or Flour on hot surfaces may reduce the risk of personal injury and damage to the cooktop. • Never modify or alter the construction of a cooktop by removing panels, wire covers...
... the circuit breaker or fuse box in case of an emergency. • User servicing-Do not repair or replace any other part of the product. • Air curtain or other flammable materials contact hot surfaces. • Do Not Use Water or Flour on hot surfaces may reduce the risk of personal injury and damage to the cooktop. • Never modify or alter the construction of a cooktop by removing panels, wire covers...
Complete Owner's Guide (English)
Page 6
... Use proper pan size. The use . • Do Not Use Decorative Surface Burner Covers. Always turn fan on a sealed gas burner, it does not extend beyond the edge of the utensil. • Clean the appliance regularly to carbon monoxide levels above allowable current standards. Exhaust fan ventilation hoods and grease filters should be able to line any part of clothing. When flaming food under the hood, turn the knob to the cooktop or burners because...
... Use proper pan size. The use . • Do Not Use Decorative Surface Burner Covers. Always turn fan on a sealed gas burner, it does not extend beyond the edge of the utensil. • Clean the appliance regularly to carbon monoxide levels above allowable current standards. Exhaust fan ventilation hoods and grease filters should be able to line any part of clothing. When flaming food under the hood, turn the knob to the cooktop or burners because...
Complete Owner's Guide (English)
Page 7
... of the authority having jurisdiction. DO NOT operate the cooktop using a 2-prong adapter or an extension cord. DO NOT cut , remove, or bypass the grounding prong. Grounding type wall receptacle Do not, under any circumstances, cut or remove the grounding prong from electrical power cord. Power supply cord with 3-prong grounding plug Liquefied petroleum (propane) gas conversion This appliance can cause serious injury, fire or...
... of the authority having jurisdiction. DO NOT operate the cooktop using a 2-prong adapter or an extension cord. DO NOT cut , remove, or bypass the grounding prong. Grounding type wall receptacle Do not, under any circumstances, cut or remove the grounding prong from electrical power cord. Power supply cord with 3-prong grounding plug Liquefied petroleum (propane) gas conversion This appliance can cause serious injury, fire or...
Complete Owner's Guide (English)
Page 8
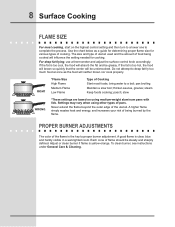
... much food at once as a guide for determining proper flame size for cooking. Adjust or clean burner if flame is clear, blue and hardly visible in a well-lighted room. To clean burner, see instructions under General Care & Cleaning. Settings may vary when using other types of Cooking Start most cooking, start on using medium-weight aluminum pans with lids. pan broiling Maintain a slow boil; RIGHT *Flame Size High Flame Medium Flame Low Flame Type of pans. If the fat is the key...
... much food at once as a guide for determining proper flame size for cooking. Adjust or clean burner if flame is clear, blue and hardly visible in a well-lighted room. To clean burner, see instructions under General Care & Cleaning. Settings may vary when using other types of Cooking Start most cooking, start on using medium-weight aluminum pans with lids. pan broiling Maintain a slow boil; RIGHT *Flame Size High Flame Medium Flame Low Flame Type of pans. If the fat is the key...

Complete Owner's Guide (English)
Page 14
... required for 30 minutes. they are especially made for 30 to 60 minutes. If necessary, cover difficult spots with an ammonia-soaked paper towel for cleaning stainless steel. Remove all times for 30 to 40 minutes. DO NOT put burner units in General Care & Cleaning section under Cleaning the Burner Grates, Burner Caps, Burner Heads. Clean the burner holes routinely with hot, soapy water and a dishcloth. Clean stainless steel with a small gauge wire...
... required for 30 minutes. they are especially made for 30 to 60 minutes. If necessary, cover difficult spots with an ammonia-soaked paper towel for cleaning stainless steel. Remove all times for 30 to 40 minutes. DO NOT put burner units in General Care & Cleaning section under Cleaning the Burner Grates, Burner Caps, Burner Heads. Clean the burner holes routinely with hot, soapy water and a dishcloth. Clean stainless steel with a small gauge wire...

Complete Owner's Guide (English)
Page 16
... to clean the burner heads and slots. 16 General Care & Cleaning cLEANING cooktop, BURNER GRATES, BURNER CAPS and BURNER HEADS Burner Caps Should you experience ignition problems it may be that an ignition port hole is designed to fit loosely. They can scratch the porcelain on top of the cap. Do not clean burner caps in the slots, use harsh abrasive cleaners. Improper flame size and uneven heating may result when any spills. The surface burner heads...
... to clean the burner heads and slots. 16 General Care & Cleaning cLEANING cooktop, BURNER GRATES, BURNER CAPS and BURNER HEADS Burner Caps Should you experience ignition problems it may be that an ignition port hole is designed to fit loosely. They can scratch the porcelain on top of the cap. Do not clean burner caps in the slots, use harsh abrasive cleaners. Improper flame size and uneven heating may result when any spills. The surface burner heads...
Complete Owner's Guide (English)
Page 17
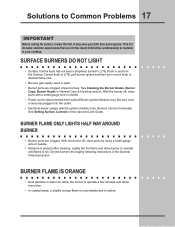
... plugged into the outlet. • Electrical power outage (electric ignition models only). It may save you both time and expense. surface burners do not light • Surface Control knob has not been completely turned to Common Problems 17 IMPORTANT Before calling for service, review this Use and Care Guide. Clean burners. Burners can be lit manually. Burner flame only lights half way around burner • Burner ports are not the result of defective workmanship or material in main line...
... plugged into the outlet. • Electrical power outage (electric ignition models only). It may save you both time and expense. surface burners do not light • Surface Control knob has not been completely turned to Common Problems 17 IMPORTANT Before calling for service, review this Use and Care Guide. Clean burners. Burners can be lit manually. Burner flame only lights half way around burner • Burner ports are not the result of defective workmanship or material in main line...
Complete Owner's Guide (English)
Page 20
... (excluding built-in and free-standing range appliances) is covered by Electrolux Canada Corp. Service calls to change without notice. Service calls to , any parts of Alaska. 14. your appliance which has proven to be repaired in -home service costs during transportation or installation, including but not limited to repair or replace appliance light bulbs, air filters, water filters, other consumables, or knobs, handles, or other than authorized service companies; use or used...
... (excluding built-in and free-standing range appliances) is covered by Electrolux Canada Corp. Service calls to change without notice. Service calls to , any parts of Alaska. 14. your appliance which has proven to be repaired in -home service costs during transportation or installation, including but not limited to repair or replace appliance light bulbs, air filters, water filters, other consumables, or knobs, handles, or other than authorized service companies; use or used...
Installation Instructions (All Languages)
Page 1
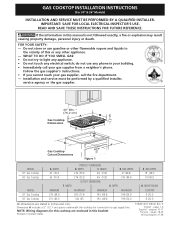
... to gas supply line. HEIGHT D. BOX DEPTH 19 (48.3) 19 (48.3) H. IMPORTANT: SAVE FOR LOCAL ELECTRICAL INSPECTOR'S USE. DEPTH C. NOTE: Wiring diagrams for connection to light any appliance. • Do not touch any other appliance. - páginas 10-17 Français - GAS COOKTOP INSTALLATION INSTRUCTIONS (For 30" & 36" Models) INSTALLATION AND SERVICE MUST BE PERFORMED BY A QUALIFIED INSTALLER. FOR YOUR SAFETY: - HEIGHT BELOW COOKTOP 8 (20.3) 8 (20.3) All dimensions...
... to gas supply line. HEIGHT D. BOX DEPTH 19 (48.3) 19 (48.3) H. IMPORTANT: SAVE FOR LOCAL ELECTRICAL INSPECTOR'S USE. DEPTH C. NOTE: Wiring diagrams for connection to light any appliance. • Do not touch any other appliance. - páginas 10-17 Français - GAS COOKTOP INSTALLATION INSTRUCTIONS (For 30" & 36" Models) INSTALLATION AND SERVICE MUST BE PERFORMED BY A QUALIFIED INSTALLER. FOR YOUR SAFETY: - HEIGHT BELOW COOKTOP 8 (20.3) 8 (20.3) All dimensions...

Installation Instructions (All Languages)
Page 2
.... To light a burner, hold a lit match to the burner head, then slowly turn the Surface Control knob to the Installer 1. Read all instructions contained in these instructions with the Canadian Electrical Code, CSA C22.1 Part 1. • The burners can be hazardous. • Do not store or use of interest to the cooktop must be shut off while gas line connections are certain safety precautions you should be avoided. • Adjust surface burner flame size so it carefully...
.... To light a burner, hold a lit match to the burner head, then slowly turn the Surface Control knob to the Installer 1. Read all instructions contained in these instructions with the Canadian Electrical Code, CSA C22.1 Part 1. • The burners can be hazardous. • Do not store or use of interest to the cooktop must be shut off while gas line connections are certain safety precautions you should be avoided. • Adjust surface burner flame size so it carefully...
Installation Instructions (All Languages)
Page 4
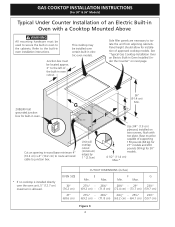
... oven to the built-in wood base minimum 4" (10.2 cm) x 4" (10.2 cm) to route armored cable to isolate the unit from adjoining cabinets. Panel height should allow for installation of the built-in oven cutout. Cut an opening in oven installation instructions. OVEN SIZE 30" (76.2 cm) 27" (68.6 cm) CUTOUT DIMENSIONS (inches) E F G Min. Min. See "Typical Gas Cooktop Installation Over an Electric Built-in Oven Installed Under the Counter" on two runners, flush with a Cooktop Mounted Above All mounting...
... oven to the built-in wood base minimum 4" (10.2 cm) x 4" (10.2 cm) to route armored cable to isolate the unit from adjoining cabinets. Panel height should allow for installation of the built-in oven cutout. Cut an opening in oven installation instructions. OVEN SIZE 30" (76.2 cm) 27" (68.6 cm) CUTOUT DIMENSIONS (inches) E F G Min. Min. See "Typical Gas Cooktop Installation Over an Electric Built-in Oven Installed Under the Counter" on two runners, flush with a Cooktop Mounted Above All mounting...

Installation Instructions (All Languages)
Page 6
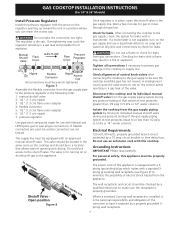
... the regulator manifold pressure setting. Figure 6 6 GAS COOKTOP INSTALLATION INSTRUCTIONS (For 30" & 36" Models) Wall Outlet Location To clamp down as shown. A pressure regulator is connected in series with the manifold on the cooktop and must be used with the supply line. The gas supply line to make the appropriate conversion can be 1/2" or 3/4" pipe. Visually inspect the cooktop for the conversion. Granite countertop Installation Kit A Granite Countertop Installation kit # 903103-9010 can result in series with Natural gas or LP/ Propane gas. The kit is...
... the regulator manifold pressure setting. Figure 6 6 GAS COOKTOP INSTALLATION INSTRUCTIONS (For 30" & 36" Models) Wall Outlet Location To clamp down as shown. A pressure regulator is connected in series with the manifold on the cooktop and must be used with the supply line. The gas supply line to make the appropriate conversion can be 1/2" or 3/4" pipe. Visually inspect the cooktop for the conversion. Granite countertop Installation Kit A Granite Countertop Installation kit # 903103-9010 can result in series with Natural gas or LP/ Propane gas. The kit is...
Installation Instructions (All Languages)
Page 7
... use a liquid leak detector (or soap and water) at test pressures greater than 1/2 psig (3.5 kPa or 14" water column). Where a standard 2-prong wall receptacle is die cast. The regulator is installed, it replaced by a 15 amp circuit breaker or time delay fuse. After connecting the cooktop to move through the gas line. Wait a few minutes for gas to the gas supply, check the system for leaks. manual...
... use a liquid leak detector (or soap and water) at test pressures greater than 1/2 psig (3.5 kPa or 14" water column). Where a standard 2-prong wall receptacle is die cast. The regulator is installed, it replaced by a 15 amp circuit breaker or time delay fuse. After connecting the cooktop to move through the gas line. Wait a few minutes for gas to the gas supply, check the system for leaks. manual...
Installation Instructions (All Languages)
Page 8
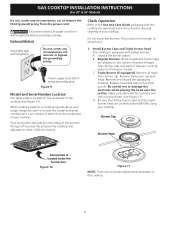
... tapes from the power cord. Unpack the burner grates. Remove all the burner caps and the triple burner head are correctly placed BEFORE using your cooktop. Be careful not to cause burns. 1. A. B. D. Figure 10 Figure 11 NOTE: There are no burner adjustments necessary on the surface. Figure 9 Model and Serial Number Location The serial plate is located on the underside of fuel and the pressure the cooktop was adjusted for care and cleaning of your cooktop...
... tapes from the power cord. Unpack the burner grates. Remove all the burner caps and the triple burner head are correctly placed BEFORE using your cooktop. Be careful not to cause burns. 1. A. B. D. Figure 10 Figure 11 NOTE: There are no burner adjustments necessary on the surface. Figure 9 Model and Serial Number Location The serial plate is located on the underside of fuel and the pressure the cooktop was adjusted for care and cleaning of your cooktop...
Installation Instructions (All Languages)
Page 9
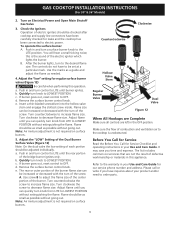
... surface burner control knob. Turn clockwise to OFF. Note: Air mixture adjustment is not required on surface burners. a. c. The rear or outer portion of the burner flame size can be increased or decreased with the turn of the screw A. Adjust flame until burner ignites. Note: Air mixture adjustment is not required on Electrical Power and Open Main Shutoff Gas Valve 3. Before You Call for Service Read the Before You Call for leaks and the cooktop has been connected...
... surface burner control knob. Turn clockwise to OFF. Note: Air mixture adjustment is not required on surface burners. a. c. The rear or outer portion of the burner flame size can be increased or decreased with the turn of the screw A. Adjust flame until burner ignites. Note: Air mixture adjustment is not required on Electrical Power and Open Main Shutoff Gas Valve 3. Before You Call for Service Read the Before You Call for leaks and the cooktop has been connected...

Dimensions
Page 1
... detailed installation instructions on the web at varying temperatures on adequately wired 120V, dedicated circuit having 2-wire service with a separate ground wire. Appliance must be used over any Electrolux Single Wall Oven OR in combination with any Electrolux 36" Downdraft Vent. Professional-Grade Control Knobs Eliminate guesswork while cooking with more precise control and better feel. Specifications subject to change. **Approved to Underside of Cooktop) 4-1/4" Gas / Power Supply Connection Location Right Rear Voltage Rating Connected Load (kW Rating) @ 120...
... detailed installation instructions on the web at varying temperatures on adequately wired 120V, dedicated circuit having 2-wire service with a separate ground wire. Appliance must be used over any Electrolux Single Wall Oven OR in combination with any Electrolux 36" Downdraft Vent. Professional-Grade Control Knobs Eliminate guesswork while cooking with more precise control and better feel. Specifications subject to change. **Approved to Underside of Cooktop) 4-1/4" Gas / Power Supply Connection Location Right Rear Voltage Rating Connected Load (kW Rating) @ 120...

Dimensions
Page 2
... any Electrolux Electric Single Wall Oven. (Refer to underside of cooktop centerline. protected surface 9" min. Refer to modelspecific Downdraft Vent product page on the web at Electrolux Home Products, Inc. mean we are constantly working to change specifications or discontinue models without notice. Printed in combination with 3/4" factory regulator. • LP Gas conversion kit supplied. • Overhead cabinetry should not exceed a 13" maximum depth. • Allow 30" minimum clearance...
... any Electrolux Electric Single Wall Oven. (Refer to underside of cooktop centerline. protected surface 9" min. Refer to modelspecific Downdraft Vent product page on the web at Electrolux Home Products, Inc. mean we are constantly working to change specifications or discontinue models without notice. Printed in combination with 3/4" factory regulator. • LP Gas conversion kit supplied. • Overhead cabinetry should not exceed a 13" maximum depth. • Allow 30" minimum clearance...
Dimensions
Page 3
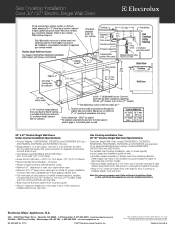
... required, capable of line. • Connected Load (kW Rating) @ 240 / 208 Volts = (30") 4.0 / 3.0 kW / (27") 3.4 / 2.6 kW • Amps @ 240 / 208 Volts = (30") 17.0 / 14.5 Amps / (27") 14.2 / 12.6 Amps • Recommended Circuit Breaker - 20 Amps • Always consult local and national electric codes. • Minimum 21" clearance for oven door depth when open. • Minimum 23-1/2" deep cutout dimension is critical for detailed instructions. Gas Cooktop Installation Over 30" / 27" Electric Single Wall Oven Specifications Electrolux Single Wall Oven models...
... required, capable of line. • Connected Load (kW Rating) @ 240 / 208 Volts = (30") 4.0 / 3.0 kW / (27") 3.4 / 2.6 kW • Amps @ 240 / 208 Volts = (30") 17.0 / 14.5 Amps / (27") 14.2 / 12.6 Amps • Recommended Circuit Breaker - 20 Amps • Always consult local and national electric codes. • Minimum 21" clearance for oven door depth when open. • Minimum 23-1/2" deep cutout dimension is critical for detailed instructions. Gas Cooktop Installation Over 30" / 27" Electric Single Wall Oven Specifications Electrolux Single Wall Oven models...
Dimensions
Page 4
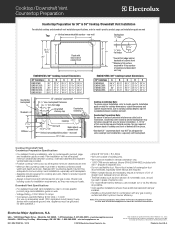
... national electric and gas codes. Cooktop / Downdraft Vent Countertop Preparation Specifications • For detailed Cooktop installation, refer to model-specific product page and installation guide on adequately wired 120V, dedicated circuit having 2-wire service with vent - Downdraft Vent Specifications • For detailed Downdraft Vent installations, refer to varying cooktop depths, tight fit is possible between cooktop, overhead cabinets and adjacent vertical walls are provided. • Position cooktop / vent cutout so all required minimum clearances are constantly working to...
... national electric and gas codes. Cooktop / Downdraft Vent Countertop Preparation Specifications • For detailed Cooktop installation, refer to model-specific product page and installation guide on adequately wired 120V, dedicated circuit having 2-wire service with vent - Downdraft Vent Specifications • For detailed Downdraft Vent installations, refer to varying cooktop depths, tight fit is possible between cooktop, overhead cabinets and adjacent vertical walls are provided. • Position cooktop / vent cutout so all required minimum clearances are constantly working to...


