
Complete Owner's Guide (English)
Page 1
B (1202) Use & Care Guide 30"/36" Induction Cooktop 318205606 Rev.
B (1202) Use & Care Guide 30"/36" Induction Cooktop 318205606 Rev.

Complete Owner's Guide (English)
Page 2
... 17 Scratches or Abrasions on Ceramic Cooktop Glass 17 Brown Streaks or Specks on Ceramic Cooktop Surface 17 Area of Discoloration with Electrolux enhances our ability to serve you , please use this guide 2 Keep a record for quick reference 2 Serial plate location 2 Questions 2 Important Safety Instructions 3-4 Features 5-6 Getting Started 7-8 Induction cooktop characteristics 7 Use the correct cookware...
... 17 Scratches or Abrasions on Ceramic Cooktop Glass 17 Brown Streaks or Specks on Ceramic Cooktop Surface 17 Area of Discoloration with Electrolux enhances our ability to serve you , please use this guide 2 Keep a record for quick reference 2 Serial plate location 2 Questions 2 Important Safety Instructions 3-4 Features 5-6 Getting Started 7-8 Induction cooktop characteristics 7 Use the correct cookware...

Complete Owner's Guide (English)
Page 3
...plasticware and towels, as well as removal of panels, wire covers or any other flammable materials contact hot surfaces. Children climbing on the cooktop to reach items could be allowed to sit or stand on the cooking surface. Persons with the National Electrical Code ANSI/NFPA No. 70 - ...Do not repair or replace any part of the following safety instructions before using or standing near an induction unit while it is encouraged to try to radio or television reception, which the receiver is no guarantee that interference will not occur in ...
...plasticware and towels, as well as removal of panels, wire covers or any other flammable materials contact hot surfaces. Children climbing on the cooktop to reach items could be allowed to sit or stand on the cooking surface. Persons with the National Electrical Code ANSI/NFPA No. 70 - ...Do not repair or replace any part of the following safety instructions before using or standing near an induction unit while it is encouraged to try to radio or television reception, which the receiver is no guarantee that interference will not occur in ...

Complete Owner's Guide (English)
Page 6
...for each Cooking Zone). 26. Controls Lock Key Pad. 15. " Pad (for each Cooking Zone). 22. Minute Timer ON/OFF Key Pad. 16. Cooktop Power Indicator Light. 20. Cooktop Power Key Pad. 14. Minute Timer Setting " + " Pad. 18. Cooking Zone " - Controls Lockout Indicator Light. 21. Cooking Zone Power Level ... 16 17 18 Cooking Zone Controls 26 25 24 21 22 23 Minute Timer Display (displays up to 99 minutes). 19. 6 Features Induction Cooktop features Main Cooktop Controls 19 20 13 14 15 13. " Pad. 17. Keep Warm Setting Key Pad (for each Cooking Zone). 25.
...for each Cooking Zone). 26. Controls Lock Key Pad. 15. " Pad (for each Cooking Zone). 22. Minute Timer ON/OFF Key Pad. 16. Cooktop Power Indicator Light. 20. Cooktop Power Key Pad. 14. Minute Timer Setting " + " Pad. 18. Cooking Zone " - Controls Lockout Indicator Light. 21. Cooking Zone Power Level ... 16 17 18 Cooking Zone Controls 26 25 24 21 22 23 Minute Timer Display (displays up to 99 minutes). 19. 6 Features Induction Cooktop features Main Cooktop Controls 19 20 13 14 15 13. " Pad. 17. Keep Warm Setting Key Pad (for each Cooking Zone). 25.

Complete Owner's Guide (English)
Page 7
... Zones may appear to follow all the recommendations for using your Induction Cooktop surface. This will work. The special cooktop cleaning cream leaves a protective finish on any of the cooktop. A unique feature of the Cooking Zone. The coil sensor ...cookware type The magnetic Cooking Zone sensors located below the cooktop surface require the use a magnet to : • Use cookware made with induction cooktops. Getting Started 7 Induction cooktop characteristics Selecting surface cookware A COOLER COOKTOP - The pan recognition sensor automatically detects and adapts the...
... Zones may appear to follow all the recommendations for using your Induction Cooktop surface. This will work. The special cooktop cleaning cream leaves a protective finish on any of the cooktop. A unique feature of the Cooking Zone. The coil sensor ...cookware type The magnetic Cooking Zone sensors located below the cooktop surface require the use a magnet to : • Use cookware made with induction cooktops. Getting Started 7 Induction cooktop characteristics Selecting surface cookware A COOLER COOKTOP - The pan recognition sensor automatically detects and adapts the...

Complete Owner's Guide (English)
Page 8
... pan size. Fig. 3 NOTE If a pan made of the correct material is centered properly on the Cooking Zone. Cookware centered correctly on the Induction Cooktop require a MINIMUM pan size to be detected by a flashing power level in Fig. 1 may be used . The cross (+) of the... 1/2" beyond these dots on any of these conditions, one of each location. 8 Getting Started Cookware recommendations Be sure to reactivate the cooktop. NOTE ANY one or more than the other cooking zones to occur. Correct the problems before attempting to follow the following recommendations for...
... pan size. Fig. 3 NOTE If a pan made of the correct material is centered properly on the Cooking Zone. Cookware centered correctly on the Induction Cooktop require a MINIMUM pan size to be detected by a flashing power level in Fig. 1 may be used . The cross (+) of the... 1/2" beyond these dots on any of these conditions, one of each location. 8 Getting Started Cookware recommendations Be sure to reactivate the cooktop. NOTE ANY one or more than the other cooking zones to occur. Correct the problems before attempting to follow the following recommendations for...

Complete Owner's Guide (English)
Page 9
... ready mode for 3 seconds. If no other displays will glow and no other key pads are touched the Cooktop Main POWER will not Fig. 6 operate if the cooktop is reached. The Induction Cooktop may not respond to count down by 1 minute with your entire fingertip. Once locked, no Cooking Zones... to the selection made. A beep will Fig. 1 Fig. 2 sound and the Power LED will turn OFF (See Fig. 1). To power the cooktop, touch and hold the POWER key pad for keeping track of your finger placed in order to 99 minutes. A beep will sound, the Lock indicator...
... ready mode for 3 seconds. If no other displays will glow and no other key pads are touched the Cooktop Main POWER will not Fig. 6 operate if the cooktop is reached. The Induction Cooktop may not respond to count down by 1 minute with your entire fingertip. Once locked, no Cooking Zones... to the selection made. A beep will Fig. 1 Fig. 2 sound and the Power LED will turn OFF (See Fig. 1). To power the cooktop, touch and hold the POWER key pad for keeping track of your finger placed in order to 99 minutes. A beep will sound, the Lock indicator...
Complete Owner's Guide (English)
Page 11
... NOTE: If no longer heat. NOTE: Once the Cooking Zone power level has been set yet. Be sure to display hot surface even if the Cooktop is best for the Zone has been set the food will clear. 3. Place the cookware with hands. For more of the Cooking Zones: 1. When... be corrected before the Cooking Zone will start one or more seconds. 3. Setting Surface Controls 11 Operating the cooking zones The Induction cooktop has four or five Cooking Zones designed for the Cooking Zone by using the correct type and size cookware on the desired Cooking ...
... NOTE: If no longer heat. NOTE: Once the Cooking Zone power level has been set yet. Be sure to display hot surface even if the Cooktop is best for the Zone has been set the food will clear. 3. Place the cookware with hands. For more of the Cooking Zones: 1. When... be corrected before the Cooking Zone will start one or more seconds. 3. Setting Surface Controls 11 Operating the cooking zones The Induction cooktop has four or five Cooking Zones designed for the Cooking Zone by using the correct type and size cookware on the desired Cooking ...

Complete Owner's Guide (English)
Page 12
12 Setting Surface Controls Setting "power boost" feature Your induction cooktop is equipped with a Power Boost feature on the cooktop always watch carefully. The Power Boost feature is used and the cooktop surface temperature on the cooking zone you up to 139% power output for a maximum of magnetic material, the affected ... will give you want to set to Power Boost then press the "+" key pad and the Power Boost will appear in mind that induction may decrease the amount of water or food to cooking temperature at the fastest speed possible. If a Cooking Zone is turned ON and...
12 Setting Surface Controls Setting "power boost" feature Your induction cooktop is equipped with a Power Boost feature on the cooktop always watch carefully. The Power Boost feature is used and the cooktop surface temperature on the cooking zone you up to 139% power output for a maximum of magnetic material, the affected ... will give you want to set to Power Boost then press the "+" key pad and the Power Boost will appear in mind that induction may decrease the amount of water or food to cooking temperature at the fastest speed possible. If a Cooking Zone is turned ON and...

Complete Owner's Guide (English)
Page 13
... cookware are using heavy weight quality cookware. • Cookware with five cooking zones within the heating section and then add your induction cooktop is then transferred to the highest power ratings, the generator will experience a slight decrease from the vibrations. • Solid cast iron and...at once or when a cooking zone is set will cook at once, start your induction cooktop is not coming from the electronics but they do produce heat at the higher power level settings. The induction field will need to where you selected. Note that on the size of ...
... cookware are using heavy weight quality cookware. • Cookware with five cooking zones within the heating section and then add your induction cooktop is then transferred to the highest power ratings, the generator will experience a slight decrease from the vibrations. • Solid cast iron and...at once or when a cooking zone is set will cook at once, start your induction cooktop is not coming from the electronics but they do produce heat at the higher power level settings. The induction field will need to where you selected. Note that on the size of ...

Complete Owner's Guide (English)
Page 16
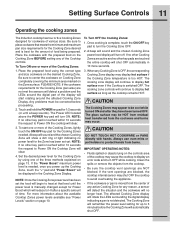
...zone does not heat food Cooking zone heats food too hot or not hot enough Poor cooking results Solution • Cooktop controls are locked. Set the cooktop controls to unlock the Cooktop (See p. 9 for Cooking Zone. • Cookware is warped or in poor condition. • Cookware is ...not centered on Cooking Zone. • Cookware resting on cooktop trim or does not rest completely on the Cooking Zone or the cookware material type is incorrect for Induction Cooking. • Cookware bottom not large enough for further instructions). • Make sure ...
...zone does not heat food Cooking zone heats food too hot or not hot enough Poor cooking results Solution • Cooktop controls are locked. Set the cooktop controls to unlock the Cooktop (See p. 9 for Cooking Zone. • Cookware is warped or in poor condition. • Cookware is ...not centered on Cooking Zone. • Cookware resting on cooktop trim or does not rest completely on the Cooking Zone or the cookware material type is incorrect for Induction Cooking. • Cookware bottom not large enough for further instructions). • Make sure ...
Complete Owner's Guide (English)
Page 17
Before you call Electrolux 1-877-4ELECTROLUX (1-877-435-3287). • Induction Cooktop pan detection sensors do not affect cooking and will become less visible with time. • Cleaning materials not recommended for ceramic-glass cooktop have been used . If the error persists then call Problem Cooktop zone controls display error code Cooking zones inner LEDs continuously...
Before you call Electrolux 1-877-4ELECTROLUX (1-877-435-3287). • Induction Cooktop pan detection sensors do not affect cooking and will become less visible with time. • Cleaning materials not recommended for ceramic-glass cooktop have been used . If the error persists then call Problem Cooktop zone controls display error code Cooking zones inner LEDs continuously...
Installation Instructions (English Español Français)
Page 1
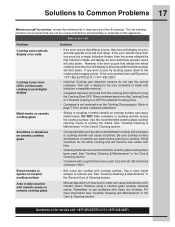
...(52.1) 4½ (11.4) 357/8 (91.1) 36 (91.4) 203/8 (51.8) 20½ (52.1) 4½ (11.4) All dimensions are stated in Canada 1 Cooktop Dimensions Cooktop Cutout Dimensions 4" X 8" (10.2 cm x 20.3 cm) opening to route armored cable if a panel is 30" (76.2 cm). * 30" (76.2 cm)...WIDTH 21¾ (55.2) 21¾ (55.2) 3¾ (9.5) 3¾ (9.5) 287/8 (73.3) 35¼ (89.5) E. DEPTH H. INDUCTION COOKTOP INSTALLATION INSTRUCTIONS United States INSTALLATION AND SERVICE MUST BE PERFORMED BY A QUALIFIED INSTALLER. pages 1-8 allow space for installation of the junction box on the ...
...(52.1) 4½ (11.4) 357/8 (91.1) 36 (91.4) 203/8 (51.8) 20½ (52.1) 4½ (11.4) All dimensions are stated in Canada 1 Cooktop Dimensions Cooktop Cutout Dimensions 4" X 8" (10.2 cm x 20.3 cm) opening to route armored cable if a panel is 30" (76.2 cm). * 30" (76.2 cm)...WIDTH 21¾ (55.2) 21¾ (55.2) 3¾ (9.5) 3¾ (9.5) 287/8 (73.3) 35¼ (89.5) E. DEPTH H. INDUCTION COOKTOP INSTALLATION INSTRUCTIONS United States INSTALLATION AND SERVICE MUST BE PERFORMED BY A QUALIFIED INSTALLER. pages 1-8 allow space for installation of the junction box on the ...

Installation Instructions (English Español Français)
Page 2
... 1/2" (3.8cm) 2" (5.1cm) L 30" (76.2cm) 36" (91.4cm) Model and Serial Number Location The serial plate is needed for installation purpose. INDUCTION COOKTOP INSTALLATION INSTRUCTIONS Overhead Cabinet Should Not Exceed a Maximum Depth of Cutout and Nearest Combustible 10" Surface Above ( 25.4 cm) Countertop 18" F (45.7 cm) ...H G 24" (61 cm) 12" (30.5 cm) J Min. when Bottom of cooktop. 2 COUNTERTOP CUTOUT OPENING CAUTION To eliminate the risk of Junction Box 2½" (6.4 cm) Min. Serial plate is Protected by reaching over...
... 1/2" (3.8cm) 2" (5.1cm) L 30" (76.2cm) 36" (91.4cm) Model and Serial Number Location The serial plate is needed for installation purpose. INDUCTION COOKTOP INSTALLATION INSTRUCTIONS Overhead Cabinet Should Not Exceed a Maximum Depth of Cutout and Nearest Combustible 10" Surface Above ( 25.4 cm) Countertop 18" F (45.7 cm) ...H G 24" (61 cm) 12" (30.5 cm) J Min. when Bottom of cooktop. 2 COUNTERTOP CUTOUT OPENING CAUTION To eliminate the risk of Junction Box 2½" (6.4 cm) Min. Serial plate is Protected by reaching over...
Installation Instructions (English Español Français)
Page 3
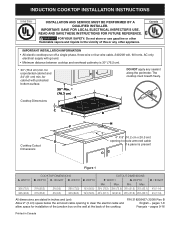
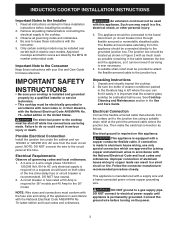
... size and rating of the line (time-delay fuse or circuit breaker is permanently grounded. Unpack and visually inspect the cooktop. 2. See Cooktop Cleaning and Maintenance section in a fire, electrical shock, or other personal injury. 3. Electrical ground is important ...built-in electric oven models. Follow the connector manufacturer recommended procedure closely. INDUCTION COOKTOP INSTALLATION INSTRUCTIONS Important Notes to do so could result in serious injury or death. Approved cooktops and built-in ovens are being made to electrical power supply until appliance...
... size and rating of the line (time-delay fuse or circuit breaker is permanently grounded. Unpack and visually inspect the cooktop. 2. See Cooktop Cleaning and Maintenance section in a fire, electrical shock, or other personal injury. 3. Electrical ground is important ...built-in electric oven models. Follow the connector manufacturer recommended procedure closely. INDUCTION COOKTOP INSTALLATION INSTRUCTIONS Important Notes to do so could result in serious injury or death. Approved cooktops and built-in ovens are being made to electrical power supply until appliance...

Installation Instructions (English Español Français)
Page 4
... or where local codes do not permit grounding to the neutral (white) wire (see figure 3): 1. Cable from Power Supply If cooktop is used in a new branch circuit installation (1996 NEC), mobile home, recreational vehicle, or where local codes DO NOT permit grounding to the...cable electrical system, the appliance frame connected ground wire MUST NOT be connected to the neutral (white) wire (see figure 4): 1. INDUCTION COOKTOP INSTALLATION INSTRUCTIONS If the cable from appliance is prohibited, you must use a 4-wire power supply cable. Cable from Power Supply Ground Wire Red...
... or where local codes do not permit grounding to the neutral (white) wire (see figure 3): 1. Cable from Power Supply If cooktop is used in a new branch circuit installation (1996 NEC), mobile home, recreational vehicle, or where local codes DO NOT permit grounding to the...cable electrical system, the appliance frame connected ground wire MUST NOT be connected to the neutral (white) wire (see figure 4): 1. INDUCTION COOKTOP INSTALLATION INSTRUCTIONS If the cable from appliance is prohibited, you must use a 4-wire power supply cable. Cable from Power Supply Ground Wire Red...

Installation Instructions (English Español Français)
Page 5
... (white) wire (see figure 6): 1. If your appliance is to be connected to the neutral (white) see Figure 6. If cooktop is used in USA, in a new branch circuit installation (1996 NEC), mobile home, recreational vehicles, where local code do not permit grounding... unit in accordance with local codes, connect neutral lead to neutral lead at temperatures much higher than the wire gauge alone. 5 INDUCTION COOKTOP INSTALLATION INSTRUCTIONS If the cable from appliance Figure 5 3-WIRE GROUNDED JUNCTION BOX This appliance is manufactured with a white neutral power supply...
... (white) wire (see figure 6): 1. If your appliance is to be connected to the neutral (white) see Figure 6. If cooktop is used in USA, in a new branch circuit installation (1996 NEC), mobile home, recreational vehicles, where local code do not permit grounding... unit in accordance with local codes, connect neutral lead to neutral lead at temperatures much higher than the wire gauge alone. 5 INDUCTION COOKTOP INSTALLATION INSTRUCTIONS If the cable from appliance Figure 5 3-WIRE GROUNDED JUNCTION BOX This appliance is manufactured with a white neutral power supply...

Installation Instructions (English Español Français)
Page 6
... the retainer brackets. It may be installed, to burn you time and expense. NOTE: Do not use caulking compound; Visually inspect the cooktop for service when needed. 6 Spring Spacer (8) Screws Figure 7 2. The retainer brackets MUST be hot enough to meet local codes or,... the National Electrical Code ANSI/NFPA No. 70-latest edition (see Figure 9). 4. These spacers center the cooktop in your Use and Care Guide for service phone numbers. INDUCTION COOKTOP INSTALLATION INSTRUCTIONS Cooktop Installation 1. Hole located under the burner box to fix the retainer bracket.
... the retainer brackets. It may be installed, to burn you time and expense. NOTE: Do not use caulking compound; Visually inspect the cooktop for service when needed. 6 Spring Spacer (8) Screws Figure 7 2. The retainer brackets MUST be hot enough to meet local codes or,... the National Electrical Code ANSI/NFPA No. 70-latest edition (see Figure 9). 4. These spacers center the cooktop in your Use and Care Guide for service phone numbers. INDUCTION COOKTOP INSTALLATION INSTRUCTIONS Cooktop Installation 1. Hole located under the burner box to fix the retainer bracket.

Installation Instructions (English Español Français)
Page 7
....2 cm) Min. 28¼" (71.8 cm) Max. Approx. 3" (7.5 cm) 208/240Volt junction box for Cooktop Cabinet side filler panels are listed by 1" (2.5cm) Use 3/4" (1.9 cm) plywood, installed on two runners, flush with toe plate. INDUCTION COOKTOP INSTALLATION INSTRUCTIONS For typical under counter installation of an electric built-in oven see the...
....2 cm) Min. 28¼" (71.8 cm) Max. Approx. 3" (7.5 cm) 208/240Volt junction box for Cooktop Cabinet side filler panels are listed by 1" (2.5cm) Use 3/4" (1.9 cm) plywood, installed on two runners, flush with toe plate. INDUCTION COOKTOP INSTALLATION INSTRUCTIONS For typical under counter installation of an electric built-in oven see the...

Installation Instructions (English Español Français)
Page 8
INDUCTION COOKTOP INOSTAELSLATION INSTRUCTIONS 8
INDUCTION COOKTOP INOSTAELSLATION INSTRUCTIONS 8


