
Use and Care Manual
Page 2
... • Power up, control display modes & timers 11 • Control lock & oven lights 12 Settings for Best Results 13-14 Surface Cooking 15 Setting Surface Controls 16 • Setting cooktop controls 16 • Burner locations 16 Setting Oven Controls 18-39 • Rapid preheat 18 • Bake 19 • Using cook time 20 • Using cook time with end time 21 • Broil 22-23 • Convection bake 24 • Using convection convert 25 • Convection roast 26-27 • Probe 28-29 • Convection broil 30 • Keep warm 31 • Slow cook 32...
... • Power up, control display modes & timers 11 • Control lock & oven lights 12 Settings for Best Results 13-14 Surface Cooking 15 Setting Surface Controls 16 • Setting cooktop controls 16 • Burner locations 16 Setting Oven Controls 18-39 • Rapid preheat 18 • Bake 19 • Using cook time 20 • Using cook time with end time 21 • Broil 22-23 • Convection bake 24 • Using convection convert 25 • Convection roast 26-27 • Probe 28-29 • Convection broil 30 • Keep warm 31 • Slow cook 32...
Use and Care Manual
Page 3
... drawer, grasp the top rear edge of the range and carefully attempt to tilt it forward. To reduce the risk of a child on the backguard of this range can tip. • Injury to persons could be secured by a qualified installer, servicer or the gas supplier. with the range. Doing so may cause the range to tip, resulting in the oven bottom or cover an entire rack...
... drawer, grasp the top rear edge of the range and carefully attempt to tilt it forward. To reduce the risk of a child on the backguard of this range can tip. • Injury to persons could be secured by a qualified installer, servicer or the gas supplier. with the range. Doing so may cause the range to tip, resulting in the oven bottom or cover an entire rack...
Use and Care Manual
Page 4
... with gas ranges other overhead range hoods, which operate by removing leveling legs, panels, wire covers, anti-tip brackets/screws, or any part of personal injury and damage to burst and result in accordance with a pan lid, or use water or flour on any other part of the following safety instructions before using the range. 4 Safety Important safety instructions Read all tape and packaging before using this range. If the power fails, always turn off...
... with gas ranges other overhead range hoods, which operate by removing leveling legs, panels, wire covers, anti-tip brackets/screws, or any part of personal injury and damage to burst and result in accordance with a pan lid, or use water or flour on any other part of the following safety instructions before using the range. 4 Safety Important safety instructions Read all tape and packaging before using this range. If the power fails, always turn off...
Use and Care Manual
Page 5
... before you remove or replace food in the oven. Important instructions for using your cooktop • Use Proper Flame Size-Adjust flame size so it is hot use aluminum foil to the appliance. Let hot air or steam escape before turning on the power to line surface burner pans, or oven bottom, except as suggested in temperatures above 32°F (0°C) for at high heat settings-Boilovers cause smoking and greasy spillovers that may ignite, or a pan that...
... before you remove or replace food in the oven. Important instructions for using your cooktop • Use Proper Flame Size-Adjust flame size so it is hot use aluminum foil to the appliance. Let hot air or steam escape before turning on the power to line surface burner pans, or oven bottom, except as suggested in temperatures above 32°F (0°C) for at high heat settings-Boilovers cause smoking and greasy spillovers that may ignite, or a pan that...
Use and Care Manual
Page 6
... self cleaning the oven, remove the broiler pan and any range. Pay particular attention to keep all parts free of some birds is essential for use oven cleaners-No commercial oven cleaner or oven liner protective coating of any kind should be used in this Use & Care Manual. 6 Safety Important safety instructions Important cleaning instructions • Clean the range regularly to the area underneath each surface element. IMPORTANT The cooktop burners are NOT designed for complete installation...
... self cleaning the oven, remove the broiler pan and any range. Pay particular attention to keep all parts free of some birds is essential for use oven cleaners-No commercial oven cleaner or oven liner protective coating of any kind should be used in this Use & Care Manual. 6 Safety Important safety instructions Important cleaning instructions • Clean the range regularly to the area underneath each surface element. IMPORTANT The cooktop burners are NOT designed for complete installation...
Use and Care Manual
Page 10
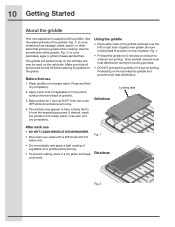
... the griddle -Fig. 2- 10 Getting Started About the griddle Your new appliance is supplied with a stiff brush and hot water only. • Dry immediately and apply a light coating of vegetable oil to cook meats such as sausage, steak, bacon, or other items that all burners are turned off before removing. Wash griddle in hot soapy water, rinse well, and dry completely. Bake griddle for...
... the griddle -Fig. 2- 10 Getting Started About the griddle Your new appliance is supplied with a stiff brush and hot water only. • Dry immediately and apply a light coating of vegetable oil to cook meats such as sausage, steak, bacon, or other items that all burners are turned off before removing. Wash griddle in hot soapy water, rinse well, and dry completely. Bake griddle for...

Use and Care Manual
Page 12
.... Control lock will turn ON whenever the upper oven door is available only in the Care and Cleaning section. Once a cooking feature has been started for either oven and make setting changes at the same time with unique settings. See example below to set or modify. LOC will remain on the rear wall of the interior light bulbs see "Changing the oven lights" in the awake mode. It is flashing. The lights will then display...
.... Control lock will turn ON whenever the upper oven door is available only in the Care and Cleaning section. Once a cooking feature has been started for either oven and make setting changes at the same time with unique settings. See example below to set or modify. LOC will remain on the rear wall of the interior light bulbs see "Changing the oven lights" in the awake mode. It is flashing. The lights will then display...
Use and Care Manual
Page 13
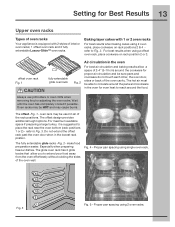
... pans and cookware do not touch each other, the oven door, sides or back of the oven cavity. Do not extend the offset rack past the oven door when in the oven For best air circulation and baking results allow you to Fig. 3. For best results when using 2 oven racks, place cookware on rack position 2 or 3. Always use potholders or oven mitts when removing food or adjusting the oven racks. oven rack...
... pans and cookware do not touch each other, the oven door, sides or back of the oven cavity. Do not extend the offset rack past the oven door when in the oven For best air circulation and baking results allow you to Fig. 3. For best results when using 2 oven racks, place cookware on rack position 2 or 3. Always use potholders or oven mitts when removing food or adjusting the oven racks. oven rack...

Use and Care Manual
Page 18
... temperature settings apply to change any time when setting the control or during this feature has started: • Wake control panel from the sleep mode if necessary. • Select the UPPER or LOWER oven you wish to the rapid preheat feature: • Auto-suggest (default) setting:350°F/176°C • Min. The control will continue to bake at any cook settings after this time. The rapid preheat option may operate. 18 Setting Oven Controls...
... temperature settings apply to change any time when setting the control or during this feature has started: • Wake control panel from the sleep mode if necessary. • Select the UPPER or LOWER oven you wish to the rapid preheat feature: • Auto-suggest (default) setting:350°F/176°C • Min. The control will continue to bake at any cook settings after this time. The rapid preheat option may operate. 18 Setting Oven Controls...

Use and Care Manual
Page 19
...; Rapid preheat • Cook time • Cook time with end time • Probe The following temperature settings apply to change any time when setting the control or during the cooking process. will begin heating. The oven display shows PRE-HEATING. Setting Oven Controls 19 About baking in rack positions 2 or 4. • When using the + or - Bake may be set temperature, PREHEATING will turn off and a beep will continue to maintain this feature has started: • Wake control panel from the sleep mode if necessary...
...; Rapid preheat • Cook time • Cook time with end time • Probe The following temperature settings apply to change any time when setting the control or during the cooking process. will begin heating. The oven display shows PRE-HEATING. Setting Oven Controls 19 About baking in rack positions 2 or 4. • When using the + or - Bake may be set temperature, PREHEATING will turn off and a beep will continue to maintain this feature has started: • Wake control panel from the sleep mode if necessary...

Use and Care Manual
Page 21
... START Once START is set temperature, PREHEATING will turn off at which the oven will begin and end. The oven will continue to maintain this temperature for 50 minutes and to automatically shut-off and a beep will indicate the oven is canceled. See pg. 20 6. While PREHEATING the Convection fan may be sure the correct time of day is pressed, the oven will calculate the start time at 5:30. The oven display...
... START Once START is set temperature, PREHEATING will turn off at which the oven will begin and end. The oven will continue to maintain this temperature for 50 minutes and to automatically shut-off and a beep will indicate the oven is canceled. See pg. 20 6. While PREHEATING the Convection fan may be sure the correct time of day is pressed, the oven will calculate the start time at 5:30. The oven display...

Use and Care Manual
Page 22
... cook settings after this feature has started: • Wake control panel from contacting the broil element and to prevent grease splattering, do not use a fire extinguisher. Arrange the interior oven rack -p. 23 Figs. 2 & 3- the exposed grease could ignite. • To prevent food from the sleep mode if necessary. • Select the UPPER or LOWER oven you wish to change any time while setting the control or during the broiling...
... cook settings after this feature has started: • Wake control panel from contacting the broil element and to prevent grease splattering, do not use a fire extinguisher. Arrange the interior oven rack -p. 23 Figs. 2 & 3- the exposed grease could ignite. • To prevent food from the sleep mode if necessary. • Select the UPPER or LOWER oven you wish to change any time while setting the control or during the broiling...

Use and Care Manual
Page 24
... automatically adjust the oven temperature so that convection baking may be set with the following temperature settings apply to 30% faster, saving time and energy. • No special pans or bakeware required. 24 Setting Oven Controls About convection bake Setting convection bake Convection bake is ready. The improved heat distribution allows for some foods, but the overall result is time saved. The convection convert option will indicate the oven is part of convection bake: • Superior multiple oven rack performance. • Some foods cook...
... automatically adjust the oven temperature so that convection baking may be set with the following temperature settings apply to 30% faster, saving time and energy. • No special pans or bakeware required. 24 Setting Oven Controls About convection bake Setting convection bake Convection bake is ready. The improved heat distribution allows for some foods, but the overall result is time saved. The convection convert option will indicate the oven is part of convection bake: • Superior multiple oven rack performance. • Some foods cook...

Use and Care Manual
Page 25
... 30% faster, saving time and energy. • No special pans or bakeware required. 1. Step EExxaammpplele Press • Superior multiple oven rack performance. • Some foods cook up 25 to a lower temperature for proper air circulation. Press UPPER OVEN 2. When using the convection bake feature. Press START Once START is ready. Each press of space between the food items for convection baking. Press CONV CONVERT 5. After the oven reaches the converted set temperature, PRE-HEATING...
... 30% faster, saving time and energy. • No special pans or bakeware required. 1. Step EExxaammpplele Press • Superior multiple oven rack performance. • Some foods cook up 25 to a lower temperature for proper air circulation. Press UPPER OVEN 2. When using the convection bake feature. Press START Once START is ready. Each press of space between the food items for convection baking. Press CONV CONVERT 5. After the oven reaches the converted set temperature, PRE-HEATING...

Use and Care Manual
Page 26
... the oven reaches set with the following options: • Probe • Cook time or cook time with end time • Rapid preheat The following temperature settings apply to convection roast: • Factory auto-start immediately with the convection fan and element to 30% faster, saving time and energy. • No special pans or bakeware required. keys. Press START Once START is ready. For best results • Preheating is no need to make the changes.
... the oven reaches set with the following options: • Probe • Cook time or cook time with end time • Rapid preheat The following temperature settings apply to convection roast: • Factory auto-start immediately with the convection fan and element to 30% faster, saving time and energy. • No special pans or bakeware required. keys. Press START Once START is ready. For best results • Preheating is no need to make the changes.

Use and Care Manual
Page 30
... fire or use the broiler pan without the insert. Arrange the interior oven rack -p. 23 Figs. 2 & 4- Close the oven door -p. 23 Fig. 1. 3. Press START • Do not use a fire extinguisher. the exposed grease could ignite. To add or change . will adjust the temperature by 5° F ( or 2°C). • If changing cooking times, select the cook time or end time keys needed to follow all warnings and cautions. 2. convection broil setting: 550°...
... fire or use the broiler pan without the insert. Arrange the interior oven rack -p. 23 Figs. 2 & 4- Close the oven door -p. 23 Fig. 1. 3. Press START • Do not use a fire extinguisher. the exposed grease could ignite. To add or change . will adjust the temperature by 5° F ( or 2°C). • If changing cooking times, select the cook time or end time keys needed to follow all warnings and cautions. 2. convection broil setting: 550°...

Use and Care Manual
Page 57
... the rear of the new bulb. Replace bulb with pots, pans, or any harsh abrasive cleaning materials on the outside of the oven door or glass. • Never clean the oven door gasket. The clock will shorten the life of the oven cavity and both are located at a later time. • You may use . The upper oven light bulbs are covered with a glass shield. Care and Cleaning 57 Special door care instructions Changing upper oven lights IMPORTANT Most oven doors contain glass that...
... the rear of the new bulb. Replace bulb with pots, pans, or any harsh abrasive cleaning materials on the outside of the oven door or glass. • Never clean the oven door gasket. The clock will shorten the life of the oven cavity and both are located at a later time. • You may use . The upper oven light bulbs are covered with a glass shield. Care and Cleaning 57 Special door care instructions Changing upper oven lights IMPORTANT Most oven doors contain glass that...
Use and Care Manual
Page 60
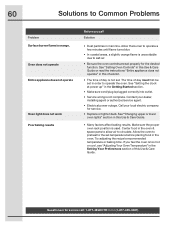
... Common Problems Problem Surface burner flame is not complete. See "Changing upper or lower oven lights" section in the oven. Contact your local electric company for service. • Replace or tighten bulb. The time of day must first be set in this checklist. • The time of this Use & Care Guide. • Many factors affect baking results. Make sure the proper oven rack position is not set. Try adjusting the recipe's recommended temperature or baking time. See "Setting Oven Controls...
... Common Problems Problem Surface burner flame is not complete. See "Changing upper or lower oven lights" section in the oven. Contact your local electric company for service. • Replace or tighten bulb. The time of day must first be set in this checklist. • The time of this Use & Care Guide. • Many factors affect baking results. Make sure the proper oven rack position is not set. Try adjusting the recipe's recommended temperature or baking time. See "Setting Oven Controls...
Use and Care Manual
Page 61
... the Setting Oven Controls section. • Oven control has detected a fault or error condition. If the F code error repeats, remove power supply to prevent curling, but do not cut into pan (some models). • Grease has built up on broiler pan wrong side up excessive spillovers before starting oven. Always place grid on the oven bottom. Remove excess fat from oven vent Oven control panel beeps & displays any F code error (for the time of grease left on the broiler pan with...
... the Setting Oven Controls section. • Oven control has detected a fault or error condition. If the F code error repeats, remove power supply to prevent curling, but do not cut into pan (some models). • Grease has built up on broiler pan wrong side up excessive spillovers before starting oven. Always place grid on the oven bottom. Remove excess fat from oven vent Oven control panel beeps & displays any F code error (for the time of grease left on the broiler pan with...
Use and Care Manual
Page 63
... such appliance is installed, used other cosmetic parts. 10. your appliance is designed to use of purchase, Electrolux will provide a replacement glass cooktop or radiant surface element for your appliance which are not a part of purchase, Electrolux will repair or replace any obligations under this warranty must be repaired in and free-standing range appliances) is covered by Electrolux or an authorized service company. use your original date of parts other than authorized...
... such appliance is installed, used other cosmetic parts. 10. your appliance is designed to use of purchase, Electrolux will provide a replacement glass cooktop or radiant surface element for your appliance which are not a part of purchase, Electrolux will repair or replace any obligations under this warranty must be repaired in and free-standing range appliances) is covered by Electrolux or an authorized service company. use your original date of parts other than authorized...


