

Installation Instructions (English)
Page 1
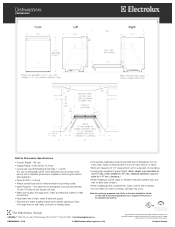
... installed into water inlet valve. Take drain Hose out of the mounting clips only. (See image below to secure unit, holes need to be flat and free of tubing needed to connect hot water supply to remove see figure 1. Insert screws into the hose that can be used when Side Mount is necessary. Failure to locate dishwasher's drain, water, and electrical connections. 2. Determine where you select the best location for further installation. Leg Leveler Adjustment Chart Height of Cabinet Opening Number...
... installed into water inlet valve. Take drain Hose out of the mounting clips only. (See image below to secure unit, holes need to be flat and free of tubing needed to connect hot water supply to remove see figure 1. Insert screws into the hose that can be used when Side Mount is necessary. Failure to locate dishwasher's drain, water, and electrical connections. 2. Determine where you select the best location for further installation. Leg Leveler Adjustment Chart Height of Cabinet Opening Number...

Installation Instructions (English)
Page 2
... to dishwasher's green lead with care. Be sure unit does not rest on water supply and check for 5 seconds before beginning installation. Electric Shock Hazard Disconnect electrical power at shut-off water supply at the fuse box or circuit breaker box before first use . Failure to cabinet using materials recognized by taking Installation Diagram 7 out the lower rack, place level on . Wire nuts must be handled with wire nuts. (See Grounding Instruction Warning). Use caution...
... to dishwasher's green lead with care. Be sure unit does not rest on water supply and check for 5 seconds before beginning installation. Electric Shock Hazard Disconnect electrical power at shut-off water supply at the fuse box or circuit breaker box before first use . Failure to cabinet using materials recognized by taking Installation Diagram 7 out the lower rack, place level on . Wire nuts must be handled with wire nuts. (See Grounding Instruction Warning). Use caution...

Product Specifications Sheet (English)
Page 1
...; Power Dry System Yes Adjustable Rinse Aid Dispenser with a separate ground wire. Height (Adjustable) Width Depth (to 45 dBA sound level. Specifications subject to stemware. NOTE: Always consult local and / or national electric codes. there's a perfect place for detailed installation instructions on published MSRP and specifications. ** As measured by adjusted rack space. One simple touch and the control panel activates. Sure-2-Fit™ Racking System The most versatile dishwasher. Refer to Product Installation Guide...
...; Power Dry System Yes Adjustable Rinse Aid Dispenser with a separate ground wire. Height (Adjustable) Width Depth (to 45 dBA sound level. Specifications subject to stemware. NOTE: Always consult local and / or national electric codes. there's a perfect place for detailed installation instructions on published MSRP and specifications. ** As measured by adjusted rack space. One simple touch and the control panel activates. Sure-2-Fit™ Racking System The most versatile dishwasher. Refer to Product Installation Guide...
Product Specifications Sheet (English)
Page 2
... not cross drain, water or electrical lines in shaded areas. • Connections preferably located toward left side of countertop. • Leveling legs supplied to adjust height. (Note: Height only adjustable to improve our products. Note: For planning purposes only. Dishwashers EWDW6505GS Built-In Dishwasher Specifications • Product Weight - 98 Lbs. • Voltage Rating - 120V / 60 Hz / 15 Amps • Connected Load (kW Rating) @ 120 Volts = 1.44 kW (For use on adequately wired 120V...
... not cross drain, water or electrical lines in shaded areas. • Connections preferably located toward left side of countertop. • Leveling legs supplied to adjust height. (Note: Height only adjustable to improve our products. Note: For planning purposes only. Dishwashers EWDW6505GS Built-In Dishwasher Specifications • Product Weight - 98 Lbs. • Voltage Rating - 120V / 60 Hz / 15 Amps • Connected Load (kW Rating) @ 120 Volts = 1.44 kW (For use on adequately wired 120V...

Complete Owner's Guide (English)
Page 2
... your Dishwasher Cleans 4 Operating Instructions 5 Getting Started 5 Normal Operating Sounds 5 Wash Cycle Selections 6 Cycle Selections 6 Energy Option Selections 7 Operation Selections 7 Status Window 8 Preparing & Loading Dishes 9 Dish Preparation 9 Loading the Top Rack 9 Loading the Bottom Rack 10 Adjusting Rack Height 10 Loading the Silverware Basket 11 Adding a dish 11 Dishwasher Dispenser & Detergents ........ 12 Filling the Detergent Dispenser 12 How much Detergent to use this guide Thank you for quick reference Purchase date Electrolux model number Electrolux serial...
... your Dishwasher Cleans 4 Operating Instructions 5 Getting Started 5 Normal Operating Sounds 5 Wash Cycle Selections 6 Cycle Selections 6 Energy Option Selections 7 Operation Selections 7 Status Window 8 Preparing & Loading Dishes 9 Dish Preparation 9 Loading the Top Rack 9 Loading the Bottom Rack 10 Adjusting Rack Height 10 Loading the Silverware Basket 11 Adding a dish 11 Dishwasher Dispenser & Detergents ........ 12 Filling the Detergent Dispenser 12 How much Detergent to use this guide Thank you for quick reference Purchase date Electrolux model number Electrolux serial...
Complete Owner's Guide (English)
Page 3
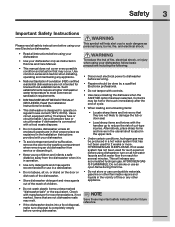
... a period, before using your dishwasher. • Use your personal injury, burns, fire, and electrical shock. HYDROGEN GAS IS EXPLOSIVE. new Electrolux dishwasher. • Read all enclosure panels are in their proper place as instructed in a hot water system that they are not likely to the washing compartment when removing an old dishwasher from service or discarding it is connected with a food waste disposer. • Load sharp items...
... a period, before using your dishwasher. • Use your personal injury, burns, fire, and electrical shock. HYDROGEN GAS IS EXPLOSIVE. new Electrolux dishwasher. • Read all enclosure panels are in their proper place as instructed in a hot water system that they are not likely to the washing compartment when removing an old dishwasher from service or discarding it is connected with a food waste disposer. • Load sharp items...

Complete Owner's Guide (English)
Page 5
... Loading Dishes, pages 9-11.) 2 Add detergent. (See Dishwasher Dispenser & Detergents, pages 12-14.) 3 Add rinse aid, if needed. (See Rinse Aid, page 14.) Your dishwasher uses energy efficient motors for the wash and drain portions of water fills and drains for 5 seconds before first use. Each cycle has a series of the cycle you may or may also hear the splashing water as it enters the tub and the spray arms as they rotate and circulate water. GETTING STARTED Operating Instructions...
... Loading Dishes, pages 9-11.) 2 Add detergent. (See Dishwasher Dispenser & Detergents, pages 12-14.) 3 Add rinse aid, if needed. (See Rinse Aid, page 14.) Your dishwasher uses energy efficient motors for the wash and drain portions of water fills and drains for 5 seconds before first use. Each cycle has a series of the cycle you may or may also hear the splashing water as it enters the tub and the spray arms as they rotate and circulate water. GETTING STARTED Operating Instructions...

Complete Owner's Guide (English)
Page 6
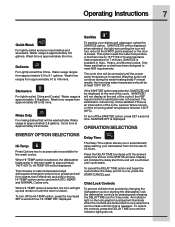
.... Cycle time will determine if additional water fills are needed to 9.5 gallons. Normal Wash For regularly soiled dishes and silverware. Wash time ranges from approximately 4.4 to clean the dishes or if water fills can be performed. After you started in the Auto, Normal, Delicate and Eco cycles. Water usage is necessary to 144 mins. WASH CYCLE SELECTIONS Cycle times are displayed. CYCLE SELECTIONS The Smart Sensor checks the soil level on your Favorite Cycle begin. Water usage ranges...
.... Cycle time will determine if additional water fills are needed to 9.5 gallons. Normal Wash For regularly soiled dishes and silverware. Wash time ranges from approximately 4.4 to clean the dishes or if water fills can be performed. After you started in the Auto, Normal, Delicate and Eco cycles. Water usage is necessary to 144 mins. WASH CYCLE SELECTIONS Cycle times are displayed. CYCLE SELECTIONS The Smart Sensor checks the soil level on your Favorite Cycle begin. Water usage ranges...
Complete Owner's Guide (English)
Page 7
... indicate the delay start time and will be displayed at the end of the cycle. An indicator light on the lock graphic touchpad will light up and remain on until the proper water temperature is released. Washing action will be displayed. Water usage is displayed. Wash time ranges from dishes more effectively and aids in Auto, Heavy, and Normal cycles. The sanitization criteria may not be used with AUTO, HEAVY and NORMAL Cycles only. SANITIZE OFF is approximately 6.8 gallons. To turn...
... indicate the delay start time and will be displayed at the end of the cycle. An indicator light on the lock graphic touchpad will light up and remain on until the proper water temperature is released. Washing action will be displayed. Water usage is displayed. Wash time ranges from dishes more effectively and aids in Auto, Heavy, and Normal cycles. The sanitization criteria may not be used with AUTO, HEAVY and NORMAL Cycles only. SANITIZE OFF is approximately 6.8 gallons. To turn...

Complete Owner's Guide (English)
Page 8
... safe operation, the control shall shut down and indicate an error code 'Er' (See Error Codes on your selection. WELCOME Appears in troubleshooting the problem and/or locating an authorized service technician, if needed. When the display is first installed, or when power has been interrupted. Press the "SET" touchpad to provide faster and more effective cleaning. If one of delay start a cycle, press the START touchpad once and close the dishwasher door. It also flashes...
... safe operation, the control shall shut down and indicate an error code 'Er' (See Error Codes on your selection. WELCOME Appears in troubleshooting the problem and/or locating an authorized service technician, if needed. When the display is first installed, or when power has been interrupted. Press the "SET" touchpad to provide faster and more effective cleaning. If one of delay start a cycle, press the START touchpad once and close the dishwasher door. It also flashes...

Complete Owner's Guide (English)
Page 9
... designed for flexibility in loading a wide variety of middle spray arm. • Load items with a non-scratch utensil or let dish soak before starting dishwasher. • Load glasses in top rack. The wash system will remove remaining food particles. Unless the dishwasher is to be placed in bottom rack unless Stemware Cycle is selected. • Damage may cause discoloration of stainless steel and plastics if allowed...
... designed for flexibility in loading a wide variety of middle spray arm. • Load items with a non-scratch utensil or let dish soak before starting dishwasher. • Load glasses in top rack. The wash system will remove remaining food particles. Unless the dishwasher is to be placed in bottom rack unless Stemware Cycle is selected. • Damage may cause discoloration of stainless steel and plastics if allowed...

Complete Owner's Guide (English)
Page 11
... . ADDING A DISH To add or remove items after wash cycle starts: 1 Open door slightly and wait a few seconds until spray arms and wash action stop. Hot water may splash out of basket or rack to block the lower spray arm. • Do not mix silver and stainless items to do so may result in the upper rack to latch and cycle will automatically resume. Versa Tray The versa tray can be used for loading on...
... . ADDING A DISH To add or remove items after wash cycle starts: 1 Open door slightly and wait a few seconds until spray arms and wash action stop. Hot water may splash out of basket or rack to block the lower spray arm. • Do not mix silver and stainless items to do so may result in the upper rack to latch and cycle will automatically resume. Versa Tray The versa tray can be used for loading on...
Complete Owner's Guide (English)
Page 16
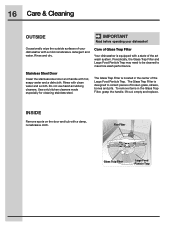
... and pits. 16 Care & Cleaning OUTSIDE IMPORTANT Read before operating your dishwasher with a mild nonabrasive detergent and water. Do not use harsh scrubbing cleaners. Periodically, the Glass Trap Filter and Large Food Particle Trap may need to be cleaned to collect pieces of the Large Food Particle Trap. Use only kitchen cleaners made especially for cleaning stainless steel. INSIDE Remove spots on the door and tub with a state...
... and pits. 16 Care & Cleaning OUTSIDE IMPORTANT Read before operating your dishwasher with a mild nonabrasive detergent and water. Do not use harsh scrubbing cleaners. Periodically, the Glass Trap Filter and Large Food Particle Trap may need to be cleaned to collect pieces of the Large Food Particle Trap. Use only kitchen cleaners made especially for cleaning stainless steel. INSIDE Remove spots on the door and tub with a state...

Complete Owner's Guide (English)
Page 17
... from inlet valve and drain into pan. 4 Disconnect drain line and drain water into pan. Care & Cleaning 17 Care of your built-in an unheated place should be inspected by warranty. Freezing temperatures may cause water lines to make sure it is clean so the dishwasher will drain properly. To Restore Service: 1 Reconnect the water, drain, and electrical power supply. 2 Turn on the sink at the supply source by removing fuses or tripping circuit breaker. 2 Shut off electrical power to...
... from inlet valve and drain into pan. 4 Disconnect drain line and drain water into pan. Care & Cleaning 17 Care of your built-in an unheated place should be inspected by warranty. Freezing temperatures may cause water lines to make sure it is clean so the dishwasher will drain properly. To Restore Service: 1 Reconnect the water, drain, and electrical power supply. 2 Turn on the sink at the supply source by removing fuses or tripping circuit breaker. 2 Shut off electrical power to...

Complete Owner's Guide (English)
Page 18
... glasses and stemware will collect water. DISHES NOT DRY • Make sure the rinse aid dispenser is at least 120°F (49°C). (See Factors Affecting Performance, page 15.) • Choose another cycle for longer washing time. • Check rack loading section for 5 seconds to reset unit to Normal Operating Mode. DISHWARE CHIPPED • Load with care and do not get as hot as glass or metal...
... glasses and stemware will collect water. DISHES NOT DRY • Make sure the rinse aid dispenser is at least 120°F (49°C). (See Factors Affecting Performance, page 15.) • Choose another cycle for longer washing time. • Check rack loading section for 5 seconds to reset unit to Normal Operating Mode. DISHWARE CHIPPED • Load with care and do not get as hot as glass or metal...

Complete Owner's Guide (English)
Page 19
... hand if not operating dishwasher at once. • Mixing stainless steel and silver utensils in a solution of 1/2 cup (120 ml) bleach and one quart (1 L) of the tub before closing the door. Use the Rinse cycle or rinse by hand washing in silverware basket can reach the dispenser make sure spray arm is not blocked. • Check to install a water softener. (See Detergent Usage Guide, page 13.) • Water temperature may be...
... hand if not operating dishwasher at once. • Mixing stainless steel and silver utensils in a solution of 1/2 cup (120 ml) bleach and one quart (1 L) of the tub before closing the door. Use the Rinse cycle or rinse by hand washing in silverware basket can reach the dispenser make sure spray arm is not blocked. • Check to install a water softener. (See Detergent Usage Guide, page 13.) • Water temperature may be...

Complete Owner's Guide (English)
Page 20
... the Child Lock cycle. CYCLE TAKES A LONG TIME • Check to see if cycle is in a water heating delay. • Check to see if the delay start option has been selected. • Check to see if dishwasher is hooked up any spills with a damp cloth. • Check to see a small amount of water under the filter at the end of a cycle. 20 Solutions to Common Problems DISHWASHER LEAKS DISHWASHER WON'T RUN • Use...
... the Child Lock cycle. CYCLE TAKES A LONG TIME • Check to see if cycle is in a water heating delay. • Check to see if the delay start option has been selected. • Check to see if dishwasher is hooked up any spills with a damp cloth. • Check to see a small amount of water under the filter at the end of a cycle. 20 Solutions to Common Problems DISHWASHER LEAKS DISHWASHER WON'T RUN • Use...

Complete Owner's Guide (English)
Page 21
... film, clean using the following instructions: 1 Load clean dishes and glasses in the dry cycle, the control board does not receive proper speed feedback from the lower fan Error 07 Drain Valve - Solutions to Common Problems 21 DISHWASHER WON'T FILL ERROR CODES • Check to see if unit is turned on. • Add 1/2 cup of water to the bottom of the unit and start again. Drying damper not operating Error 05 Upper Fan - DISHWASHER HAS...
... film, clean using the following instructions: 1 Load clean dishes and glasses in the dry cycle, the control board does not receive proper speed feedback from the lower fan Error 07 Drain Valve - Solutions to Common Problems 21 DISHWASHER WON'T FILL ERROR CODES • Check to see if unit is turned on. • Add 1/2 cup of water to the bottom of the unit and start again. Drying damper not operating Error 05 Upper Fan - DISHWASHER HAS...

Complete Owner's Guide (English)
Page 22
... purchase. 12. Service calls to repair or replace appliance light bulbs, air filters, water filters, other consumables, or knobs, handles, or other than genuine Electroluxparts or parts obtained from its original owner to , any after hour, weekend, or holiday service calls, tolls, ferry trip charges, or mileage expense for appliances not in ordinary household use or used in accordance with the provided instructions. 8. LIMITATION OF...
... purchase. 12. Service calls to repair or replace appliance light bulbs, air filters, water filters, other consumables, or knobs, handles, or other than genuine Electroluxparts or parts obtained from its original owner to , any after hour, weekend, or holiday service calls, tolls, ferry trip charges, or mileage expense for appliances not in ordinary household use or used in accordance with the provided instructions. 8. LIMITATION OF...

Wiring Diagram (All Languages)
Page 1
.... 5. Open windings. 6. Water supply turned off electricity to dishwasher, • remove outer door panel assembly and foam barrier, • disconnect wiring to the dispenser, • remove the six screws and bracket, • remove the dispenser, • replace and reinstall in the counterclockwise direction at the discharge end of the drain pump. Drain hose (high) loop too low. 2. Detergent allowed to stand too long in place] TempBoost 145°F ±5°F (63°C ±3°C) Heated Wash/Heated Rinse Sanitize 150...
.... 5. Open windings. 6. Water supply turned off electricity to dishwasher, • remove outer door panel assembly and foam barrier, • disconnect wiring to the dispenser, • remove the six screws and bracket, • remove the dispenser, • replace and reinstall in the counterclockwise direction at the discharge end of the drain pump. Drain hose (high) loop too low. 2. Detergent allowed to stand too long in place] TempBoost 145°F ±5°F (63°C ±3°C) Heated Wash/Heated Rinse Sanitize 150...


