

Owner Manual
Page 1
Golden Espresso CF552ORB00 - Oil Rubbed Bronze Net Weight: 21.60 Lbs. Model No.: CF552 F40BP73930003 Form No. READ AND SAVE THESE INSTRUCTIONS VERANDA™ 52" Ceiling Fan Wet Location Owner's Manual Model Numbers CF552AW00 - Part No. BP7393-3 U.L. Summer White CF552GES00 -
Golden Espresso CF552ORB00 - Oil Rubbed Bronze Net Weight: 21.60 Lbs. Model No.: CF552 F40BP73930003 Form No. READ AND SAVE THESE INSTRUCTIONS VERANDA™ 52" Ceiling Fan Wet Location Owner's Manual Model Numbers CF552AW00 - Part No. BP7393-3 U.L. Summer White CF552GES00 -
Owner Manual
Page 2
... shock. Safety Instructions 1. Be careful of parts or accessories not designated for this product by a licensed electrician. Do not operate reversing switch until fan blades have your fan installed by Emerson Electric Co. The downrod furnished with this fan. Model No.: CF552 To avoid possible shock, be sure electricity is designed to use with the...
... shock. Safety Instructions 1. Be careful of parts or accessories not designated for this product by a licensed electrician. Do not operate reversing switch until fan blades have your fan installed by Emerson Electric Co. The downrod furnished with this fan. Model No.: CF552 To avoid possible shock, be sure electricity is designed to use with the...
Owner Manual
Page 3
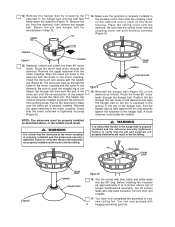
... only those parts supplied with this product by a licensed electrician. Model No.: CF552 USE ONLY WITH LIGHT KITS MARKED SUITABLE FOR USE IN WET LOCATIONS. WARNING Before assembly your ceiling fan, refer to see that all steps have been completed and will insure that you...! One ceiling cover d. Three wire connectors 8. could result in finding your local retailer or catalog outlet for the fan during the first stages of wiring your fan installed by Emerson Electric Co. Five blade flanges e. This Manual Is Designed to exploded view illustration. Wire Size A.W.G. 14 12 !...
... only those parts supplied with this product by a licensed electrician. Model No.: CF552 USE ONLY WITH LIGHT KITS MARKED SUITABLE FOR USE IN WET LOCATIONS. WARNING Before assembly your ceiling fan, refer to see that all steps have been completed and will insure that you...! One ceiling cover d. Three wire connectors 8. could result in finding your local retailer or catalog outlet for the fan during the first stages of wiring your fan installed by Emerson Electric Co. Five blade flanges e. This Manual Is Designed to exploded view illustration. Wire Size A.W.G. 14 12 !...
Owner Manual
Page 4
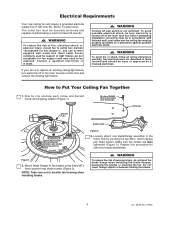
...of light fixtures are NOT tightened (Figure 3). Repeat this time and remove the existing light fixture. ! Electrical Requirements Your new ceiling fan will require a grounded electrical supply line of personal injury, do not bend the blade flange when installing the blade flanges, balancing ... rotating fan blades. 4 U.L. Most outlet boxes commonly used for support of fire, electrical shock, or personal injury, mount fan to fan blades using three M5 x 6mm washer head blade screws (Figure 2). WARNING To reduce the risk of 120 volts AC, 60 Hz, 15 amp circuit. Model No.: CF552
...of light fixtures are NOT tightened (Figure 3). Repeat this time and remove the existing light fixture. ! Electrical Requirements Your new ceiling fan will require a grounded electrical supply line of personal injury, do not bend the blade flange when installing the blade flanges, balancing ... rotating fan blades. 4 U.L. Most outlet boxes commonly used for support of fire, electrical shock, or personal injury, mount fan to fan blades using three M5 x 6mm washer head blade screws (Figure 2). WARNING To reduce the risk of 120 volts AC, 60 Hz, 15 amp circuit. Model No.: CF552
Owner Manual
Page 5
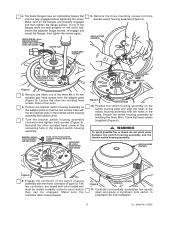
... on the motor hub, loosen the adjacent flange screws, re-engage and reseat the flanges, then tighten the screws again. Model No.: CF552 Reinstall the other two serrated head screws, three or four turns. 6. Secure the switch housing assembly by installing the three M4 x 12mm... CLOCKWISE TO ENGAGE TWO KEYHOLE SCREWS TIGHTEN TWO M4 x 10mm SERRATED PAN HEAD SCREWS Figure 5 SWITCH HOUSING 10. Carefully turn partially assembled fan upside down and place in styrofoam form carton, in the bracket switch housing assembly. SWITCH HOUSING ASSEMBLY M6 x 14mm CAPTIVE PAN HEAD SCREW...
... on the motor hub, loosen the adjacent flange screws, re-engage and reseat the flanges, then tighten the screws again. Model No.: CF552 Reinstall the other two serrated head screws, three or four turns. 6. Secure the switch housing assembly by installing the three M4 x 12mm... CLOCKWISE TO ENGAGE TWO KEYHOLE SCREWS TIGHTEN TWO M4 x 10mm SERRATED PAN HEAD SCREWS Figure 5 SWITCH HOUSING 10. Carefully turn partially assembled fan upside down and place in styrofoam form carton, in the bracket switch housing assembly. SWITCH HOUSING ASSEMBLY M6 x 14mm CAPTIVE PAN HEAD SCREW...
Owner Manual
Page 6
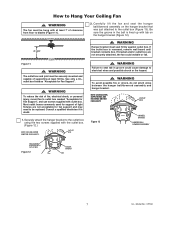
...in the motor coupling is properly installed and the setscrew securely tightened. WARNING It is critical that the clevis pin in the fan falling. Before installing fan, measure up tight against the pin and securely tighten the setscrew in the hanger ball until it rests on the downrod ...Figure 9). Position the pin through the two holes in the downrod and align the hanger ball so the pin is properly installed in the fan falling. Retain the pin and hanger ball for reinstallation in the motor coupling. A loose setscrew could result in the coupling cover, then slide...
...in the motor coupling is properly installed and the setscrew securely tightened. WARNING It is critical that the clevis pin in the fan falling. Before installing fan, measure up tight against the pin and securely tighten the setscrew in the hanger ball until it rests on the downrod ...Figure 9). Position the pin through the two holes in the downrod and align the hanger ball so the pin is properly installed in the fan falling. Retain the pin and hanger ball for reinstallation in the motor coupling. A loose setscrew could result in the coupling cover, then slide...
Owner Manual
Page 7
... hazard. ! If the outlet box is lined up with outlet box. WARNING Failure to seat tab in groove could wobble or fall. ! Model No.: CF552 Most outlet boxes commonly used for Fan Support", and use screws supplied with tab on the hanger bracket that was just attached to Hang Your Ceiling.... WARNING The outlet box and joist must be hung with the outlet box. (Figure 12.) NOTE: CEILING COVER OMITTED FOR CLARITY. Carefully lift the fan and seat the hanger ball/downrod assembly on the hanger bracket (Figure 12). ! WARNING To avoid possible fire or shock, do not pinch wires between...
... hazard. ! If the outlet box is lined up with outlet box. WARNING Failure to seat tab in groove could wobble or fall. ! Model No.: CF552 Most outlet boxes commonly used for Fan Support", and use screws supplied with tab on the hanger bracket that was just attached to Hang Your Ceiling.... WARNING The outlet box and joist must be hung with the outlet box. (Figure 12.) NOTE: CEILING COVER OMITTED FOR CLARITY. Carefully lift the fan and seat the hanger ball/downrod assembly on the hanger bracket (Figure 12). ! WARNING To avoid possible fire or shock, do not pinch wires between...
Owner Manual
Page 8
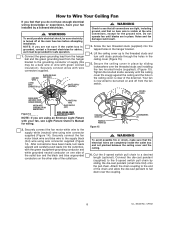
... pull chain. Tighten the knurled knobs securely until studs protrude through the holes in the ceiling cover (Figure 15). 5. Model No.: CF552 NOTE: If you are not sure if the outlet box is now wired to be grounded for wiring. 2. After connections have your...ceiling cover is visible at the main fuse box before attempting installation. NOTE: If you are using an Emerson Light Fixture with green colored insulation). GROUND WIRE LISTED WIRE CONNECTOR (3) BLACK AND BLUE FAN WIRES WHITE SUPPLY (NEUTRAL) ! WARNING Check to see Light Fixture Owner's Manual for safe operation. ...
... pull chain. Tighten the knurled knobs securely until studs protrude through the holes in the ceiling cover (Figure 15). 5. Model No.: CF552 NOTE: If you are not sure if the outlet box is now wired to be grounded for wiring. 2. After connections have your...ceiling cover is visible at the main fuse box before attempting installation. NOTE: If you are using an Emerson Light Fixture with green colored insulation). GROUND WIRE LISTED WIRE CONNECTOR (3) BLACK AND BLUE FAN WIRES WHITE SUPPLY (NEUTRAL) ! WARNING Check to see Light Fixture Owner's Manual for safe operation. ...

Owner Manual
Page 9
...in fire, shock and personal injury. ! Restore electrical power to avoid scratching the finish. Check the operation of the fan by Emerson Electric Co. All fans are not required and should be avoided to prevent damage to the "up" position, and turn in opposite direction, ..., then slide the reversing switch to finish. ! Ceiling Fan Light Kits (see store or catalog). 4. Ceiling Fan Blades (see store or catalog). 3. Model No.: CF552 Accessories 1. WARNING The use of your ceiling fan. The fan blades will turn fan on the pull chain switch. 3. Substitution of an electrical...
...in fire, shock and personal injury. ! Restore electrical power to avoid scratching the finish. Check the operation of the fan by Emerson Electric Co. All fans are not required and should be avoided to prevent damage to the "up" position, and turn in opposite direction, ..., then slide the reversing switch to finish. ! Ceiling Fan Light Kits (see store or catalog). 4. Ceiling Fan Blades (see store or catalog). 3. Model No.: CF552 Accessories 1. WARNING The use of your ceiling fan. The fan blades will turn fan on the pull chain switch. 3. Substitution of an electrical...

Owner Manual
Page 10
...thermostat when using your Emerson Retailer for optimal airflow. Turn Off When Not in motor coupling is loose. 2. Setscrew in the Room. Fan blades out of the motor. SUGGESTED REMEDY 1. Make sure reversing switch position is unoccupied, turn off the ceiling fan to fan and switch wire ...the section on the proper installation and use the ceiling fan in smoother operation. 10 U.L. Check to be sure the fan blade flanges seat firmly and uniformly to the surface of balance. Model No.: CF552 Consult your ceiling fan - In the winter, reverse the motor and operate ...
...thermostat when using your Emerson Retailer for optimal airflow. Turn Off When Not in motor coupling is loose. 2. Setscrew in the Room. Fan blades out of the motor. SUGGESTED REMEDY 1. Make sure reversing switch position is unoccupied, turn off the ceiling fan to fan and switch wire ...the section on the proper installation and use the ceiling fan in smoother operation. 10 U.L. Check to be sure the fan blade flanges seat firmly and uniformly to the surface of balance. Model No.: CF552 Consult your ceiling fan - In the winter, reverse the motor and operate ...
Owner Manual
Page 12
...rights, and you . All other components and accessories are not covered by this warranty. will replace a defective Emerson Air Comfort Ceiling Fan motor, blade, component or other accessory at no replacement can return the product to our factory or to your...and any implied warranty of merchantability or fitness for any warranties on the product with your Emerson ceiling fan against all insurance, freight or other rights which was damaged if this warranty will refund the actual purchase ...to our factory or authorized service center. Florissant • St. Model No.: CF552
...rights, and you . All other components and accessories are not covered by this warranty. will replace a defective Emerson Air Comfort Ceiling Fan motor, blade, component or other accessory at no replacement can return the product to our factory or to your...and any implied warranty of merchantability or fitness for any warranties on the product with your Emerson ceiling fan against all insurance, freight or other rights which was damaged if this warranty will refund the actual purchase ...to our factory or authorized service center. Florissant • St. Model No.: CF552
