

Owners Manual
Page 1
SmartSet ® CD Clock Radio with Automatic Time Setting System Digital Tuning Stereo Receiver and Touchless Snooze Control OWNER'S MANUAL CKD5809 (U.S. Patent No. 6,567,344) Visit our web site at www.emersonradio.com CKD5809_030706.p65 40 7/3/2006, 14:57
SmartSet ® CD Clock Radio with Automatic Time Setting System Digital Tuning Stereo Receiver and Touchless Snooze Control OWNER'S MANUAL CKD5809 (U.S. Patent No. 6,567,344) Visit our web site at www.emersonradio.com CKD5809_030706.p65 40 7/3/2006, 14:57

Owners Manual
Page 2
...- Keep these instructions. Install in any service or repairs to this apparatus during lightning storms or when unused for replacement of electric shock to the presence of the apparatus. A polarized plug has two blades with one wider than the other apparatus (including amplifiers) that may be mounted to a wall only if recommended by the manufacturer. 15.) The product may...
...- Keep these instructions. Install in any service or repairs to this apparatus during lightning storms or when unused for replacement of electric shock to the presence of the apparatus. A polarized plug has two blades with one wider than the other apparatus (including amplifiers) that may be mounted to a wall only if recommended by the manufacturer. 15.) The product may...

Owners Manual
Page 3
... this Emerson Research Stereo CD Clock Radio with the patented SmartSet® automatic time setting system. The time, radio frequency, and CD track number all Daylight Saving Time changes, through the year 2099. There are dual alarms that you want to 20 stations (10 AM and 10 FM) in your room. This model also includes a dual battery back up to reduce the display brightness for immediate recall. Thank You For purchasing this Owner's Manual...
... this Emerson Research Stereo CD Clock Radio with the patented SmartSet® automatic time setting system. The time, radio frequency, and CD track number all Daylight Saving Time changes, through the year 2099. There are dual alarms that you want to 20 stations (10 AM and 10 FM) in your room. This model also includes a dual battery back up to reduce the display brightness for immediate recall. Thank You For purchasing this Owner's Manual...

Owners Manual
Page 4
... phone you . One of our customer service representatives will be instructed how to diagnose and correct the problem for your purchase. Please call the Emerson Consumer Products Customer Service Hotline, toll-free at Emerson Radio thank you have taken great care to the dealer. If you for you will try to receive a replacement unit. We have any problems with the set-up or operation of this model...
... phone you . One of our customer service representatives will be instructed how to diagnose and correct the problem for your purchase. Please call the Emerson Consumer Products Customer Service Hotline, toll-free at Emerson Radio thank you have taken great care to the dealer. If you for you will try to receive a replacement unit. We have any problems with the set-up or operation of this model...

Owners Manual
Page 5
... B digital device, pursuant to radio communications. However, there is properly installed. • Store your CDs in a cool area to avoid damage from that to which can radiate radio frequency energy and, if not installed and used in accordance with Part 15 of other stereo equipment that interference will not occur in the manual. • Before turning 'On' the power, make certain that power cord...
... B digital device, pursuant to radio communications. However, there is properly installed. • Store your CDs in a cool area to avoid damage from that to which can radiate radio frequency energy and, if not installed and used in accordance with Part 15 of other stereo equipment that interference will not occur in the manual. • Before turning 'On' the power, make certain that power cord...

Owners Manual
Page 6
...the power interruptions that you install a 9-Volt battery, the buzzer alarm will continue to power the clock. If you experience in the area marked OPEN/CLOSE to protect your home. Using the original carton and packing materials is interrupted the display will go off at the selected wake-up time. If AC power is...• Unwind the AC power cord and extend it . • Place the unit on a stable, level surface such as a table, desk, shelf, stand, etc, out of direct sunlight and away from damage in BUZZER or RADIO mode, even if the power is restored the display comes on the CD door ...
...the power interruptions that you install a 9-Volt battery, the buzzer alarm will continue to power the clock. If you experience in the area marked OPEN/CLOSE to protect your home. Using the original carton and packing materials is interrupted the display will go off at the selected wake-up time. If AC power is...• Unwind the AC power cord and extend it . • Place the unit on a stable, level surface such as a table, desk, shelf, stand, etc, out of direct sunlight and away from damage in BUZZER or RADIO mode, even if the power is restored the display comes on the CD door ...
Owners Manual
Page 11
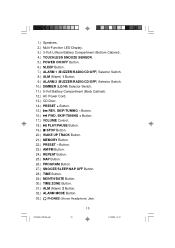
....) VOLUME Control. 18.) PLAY/PAUSE Button. 19.) STOP Button. 20.) WAKE UP TRACK Button. 21.) MEMORY Button. 22.) PRESET - Button. 23.) AM/FM Button. 24.) REPEAT Button. 25.) NAP Button. 26.) PROGRAM Button. 27.) SNOOZE/SLEEP/NAP OFF Button. 28.) TIME Button. 29.) MONTH/DATE Button. 30.) TIME ZONE Button. 31.) ALM (Alarm) 2 Button. 32.) ALARM MODE Button. 33.) PHONES (Stereo Headphone) Jack. 1.) Speakers. 2.) Multi-Function LED Display. 3.) 3-Volt Lithium Battery Compartment (Bottom Cabinet). 4.) TOUCHLESS SNOOZE SENSOR. 5.) POWER ON/OFF Button. 6.) SLEEP Button. 7.) ALARM 1 (BUZZER/RADIO...
....) VOLUME Control. 18.) PLAY/PAUSE Button. 19.) STOP Button. 20.) WAKE UP TRACK Button. 21.) MEMORY Button. 22.) PRESET - Button. 23.) AM/FM Button. 24.) REPEAT Button. 25.) NAP Button. 26.) PROGRAM Button. 27.) SNOOZE/SLEEP/NAP OFF Button. 28.) TIME Button. 29.) MONTH/DATE Button. 30.) TIME ZONE Button. 31.) ALM (Alarm) 2 Button. 32.) ALARM MODE Button. 33.) PHONES (Stereo Headphone) Jack. 1.) Speakers. 2.) Multi-Function LED Display. 3.) 3-Volt Lithium Battery Compartment (Bottom Cabinet). 4.) TOUCHLESS SNOOZE SENSOR. 5.) POWER ON/OFF Button. 6.) SLEEP Button. 7.) ALARM 1 (BUZZER/RADIO...

Owners Manual
Page 12
... any other functions or operation of Sleep Time or Nap Time display down or up. • In Tuner mode (AM/FM) pressing the and buttons moves the tuner display down or up circuit to locate a specific musical passage. A Word About The And Controls In order to its full length. The FM antenna is built into the power cord. • Make sure that you have installed a fresh 9-Volt battery in...
... any other functions or operation of Sleep Time or Nap Time display down or up. • In Tuner mode (AM/FM) pressing the and buttons moves the tuner display down or up circuit to locate a specific musical passage. A Word About The And Controls In order to its full length. The FM antenna is built into the power cord. • Make sure that you have installed a fresh 9-Volt battery in...
Owners Manual
Page 13
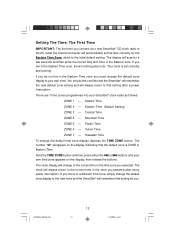
... clock radio to do. Hawaiian Time To change the default zone display to the correct time in the zone you selected after a power interruption There are 7 time zones programmed into your own time zone appears on the display indicating that setting for a few seconds and then show the correct Day and Time in the time zone you selected. Hold the TIME ZONE button and then press either the or buttons until your SmartSet® clock radio...
... clock radio to do. Hawaiian Time To change the default zone display to the correct time in the zone you selected after a power interruption There are 7 time zones programmed into your own time zone appears on the display indicating that setting for a few seconds and then show the correct Day and Time in the time zone you selected. Hold the TIME ZONE button and then press either the or buttons until your SmartSet® clock radio...
Owners Manual
Page 14
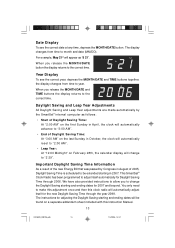
... the MONTH/DATE and TIME buttons together, the display changes from time to the correct time. This SmartSet® Clock Radio has been programmed to make this adjustment once and then this Instruction Manual. 13 CKD5809_030706.p65 13 7/3/2006, 14:57 For example, May 21st will appear as follows: • Start of Daylight Saving Time: At "2:00 AM" on the first Sunday in April, the clock will automatically advance...
... the MONTH/DATE and TIME buttons together, the display changes from time to the correct time. This SmartSet® Clock Radio has been programmed to make this adjustment once and then this Instruction Manual. 13 CKD5809_030706.p65 13 7/3/2006, 14:57 For example, May 21st will appear as follows: • Start of Daylight Saving Time: At "2:00 AM" on the first Sunday in April, the clock will automatically advance...
Owners Manual
Page 15
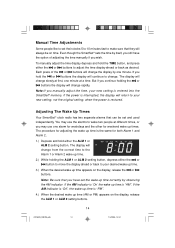
... 1 or ALM 2 setting button, depress either the or buttons to adjust the time display ahead or back as desired. Adjusting The Wake Up Times Your SmartSet® clock radio has two separate alarms that can be set their clocks 5 to 10 minutes fast to make sure that you may use the alarms to wake two people at a time. The display will change from the correct time to the Alarm 1 or Alarm 2 wake up time. 2.) While holding...
... 1 or ALM 2 setting button, depress either the or buttons to adjust the time display ahead or back as desired. Adjusting The Wake Up Times Your SmartSet® clock radio has two separate alarms that can be set their clocks 5 to 10 minutes fast to make sure that you may use the alarms to wake two people at a time. The display will change from the correct time to the Alarm 1 or Alarm 2 wake up time. 2.) While holding...
Owners Manual
Page 16
... 2 setting buttons to return to select from correct time to the correct time. To check the Alarm Mode setting for Alarm 1, hold the ALM 1 setting button and press the ALARM MODE button until the day indicators show the desired mode setting, Weekdays only, Weekends only, or Everyday operation. The display will change the Alarm Mode setting for Alarm 1, depress the ALM 1 setting button. Selecting The Alarm Mode Your SmartSet® clock radio allows you to correct time. the alarm will turn on...
... 2 setting buttons to return to select from correct time to the correct time. To check the Alarm Mode setting for Alarm 1, hold the ALM 1 setting button and press the ALARM MODE button until the day indicators show the desired mode setting, Weekdays only, Weekends only, or Everyday operation. The display will change the Alarm Mode setting for Alarm 1, depress the ALM 1 setting button. Selecting The Alarm Mode Your SmartSet® clock radio allows you to correct time. the alarm will turn on...
Owners Manual
Page 17
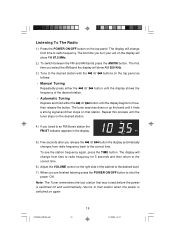
... first time you select the AM band the display will change from time to radio frequency for 5 seconds and then return to the correct time 6.) Adjust the VOLUME control on the desired station. 4.) If you tuned to an FM Stereo station the FM ST indicator appears in the display. 5.) Five seconds after you are finished listening press the POWER ON/OFF button to shut the power 'Off'. button until...
... first time you select the AM band the display will change from time to radio frequency for 5 seconds and then return to the correct time 6.) Adjust the VOLUME control on the desired station. 4.) If you tuned to an FM Stereo station the FM ST indicator appears in the display. 5.) Five seconds after you are finished listening press the POWER ON/OFF button to shut the power 'Off'. button until...

Owners Manual
Page 18
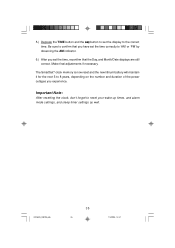
... the display indicating that you have stored up to 10 FM stations in the memory. 7.) Press the AM/FM button to switch to the AM band and repeat the above , tune to the first station you can now store your desired station in Preset Memory number 2. 6.) Repeat steps 4 and 5, using the PRESET - ... Preset Memory #1. 4.) Tune to the next station that you wish to store in the tuner memory. Presetting Stations In The Tuner Memory You can store a total of 20 stations, 10 FM and 10AM, in the tuner memory for easy recall at any time. 1.) Using either the Automatic or Manual ...
... the display indicating that you have stored up to 10 FM stations in the memory. 7.) Press the AM/FM button to switch to the AM band and repeat the above , tune to the first station you can now store your desired station in Preset Memory number 2. 6.) Repeat steps 4 and 5, using the PRESET - ... Preset Memory #1. 4.) Tune to the next station that you wish to store in the tuner memory. Presetting Stations In The Tuner Memory You can store a total of 20 stations, 10 FM and 10AM, in the tuner memory for easy recall at any time. 1.) Using either the Automatic or Manual ...

Owners Manual
Page 27
... turn on pages 14, 15. Alarm Operation The dual alarms in the main display to confirm that you want to wake you the option of the alarms for weekdays only, weekends only, or everyday operation. Refer to "Adjusting The Wake Up Times" and "Selecting The Alarm Mode" on to the "RADIO" position. Wake To Radio 1.) Tune to the station that the alarms are 'On'. 3.) At the selected wake-up , adjust the VOLUME control...
... turn on pages 14, 15. Alarm Operation The dual alarms in the main display to confirm that you want to wake you the option of the alarms for weekdays only, weekends only, or everyday operation. Refer to "Adjusting The Wake Up Times" and "Selecting The Alarm Mode" on to the "RADIO" position. Wake To Radio 1.) Tune to the station that the alarms are 'On'. 3.) At the selected wake-up , adjust the VOLUME control...
Owners Manual
Page 32
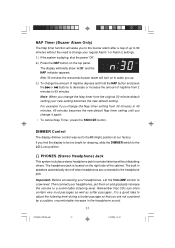
... minutes without disturbing others. DIMMER Control The display dimmer control was set the VOLUME control to a low level. The display will turn on the right side of naptime from 2 minutes to 99 minutes. NAP Timer (Buzzer Alarm Only) The Nap timer function will wake you to the buzzer alarm after a nap of up . 3.) To change the amount of naptime depress and hold the NAP button and press the or buttons to decrease or increase the...
... minutes without disturbing others. DIMMER Control The display dimmer control was set the VOLUME control to a low level. The display will turn on the right side of naptime from 2 minutes to 99 minutes. NAP Timer (Buzzer Alarm Only) The Nap timer function will wake you to the buzzer alarm after a nap of up . 3.) To change the amount of naptime depress and hold the NAP button and press the or buttons to decrease or increase the...
Owners Manual
Page 33
... be replaced. IMPORTANT: Leave the radio power cord connected to the cabinet. Changing The Lithium Battery Like all batteries, eventually the built in , your household outlet supplies the power, and the battery is not being used. A fresh lithium battery can supply power to the SmartSet® computer for the first time determine the amount of time between the date the radio was manufactured and the date you should change the battery proceed...
... be replaced. IMPORTANT: Leave the radio power cord connected to the cabinet. Changing The Lithium Battery Like all batteries, eventually the built in , your household outlet supplies the power, and the battery is not being used. A fresh lithium battery can supply power to the SmartSet® computer for the first time determine the amount of time between the date the radio was manufactured and the date you should change the battery proceed...
Owners Manual
Page 35
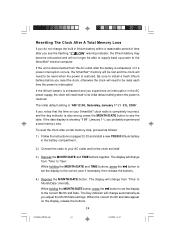
... interruption in the AC power supply, the clock will change automatically as follows: 1.) Follow the instructions on pages 32-33 and install a new CR2430 lithium battery in lithium battery within a reasonable period of time after you notice that the time on the display, release the buttons. 34 CKD5809_030706.p65 34 7/3/2006, 14:57 The display will reset itself . 3.) Depress the MONTH/DATE and TIME buttons together. If the...
... interruption in the AC power supply, the clock will change automatically as follows: 1.) Follow the instructions on pages 32-33 and install a new CR2430 lithium battery in lithium battery within a reasonable period of time after you notice that the time on the display, release the buttons. 34 CKD5809_030706.p65 34 7/3/2006, 14:57 The display will reset itself . 3.) Depress the MONTH/DATE and TIME buttons together. If the...
Owners Manual
Page 36
Be sure to confirm that you have set the time correctly to 8 years, depending on the number and duration of the power outages you set the display to reset your wake up times, and alarm mode settings, and sleep timer settings as well. Make final adjustments if necessary. The SmartSet® clock memory is now reset and the new lithium battery will maintain it for the next 5 to 'AM'or 'PM...
Be sure to confirm that you have set the time correctly to 8 years, depending on the number and duration of the power outages you set the display to reset your wake up times, and alarm mode settings, and sleep timer settings as well. Make final adjustments if necessary. The SmartSet® clock memory is now reset and the new lithium battery will maintain it for the next 5 to 'AM'or 'PM...
Owners Manual
Page 39
... workmanship, under normal use , rental, repairs by California residents) to request customer service. With your unit is located on a label on the bottom cabinet. This warranty does not cover damage from the date of ninety (90) days from negligence, misuse, abuse, accident, failure to : Emerson Radio Corp., 5101 Statesman Drive, Irving, TX 75063. Model Number: CKD5809 Serial Number: CKD5809_030706.p65 38 38...
... workmanship, under normal use , rental, repairs by California residents) to request customer service. With your unit is located on a label on the bottom cabinet. This warranty does not cover damage from the date of ninety (90) days from negligence, misuse, abuse, accident, failure to : Emerson Radio Corp., 5101 Statesman Drive, Irving, TX 75063. Model Number: CKD5809 Serial Number: CKD5809_030706.p65 38 38...


