

Owners Manual
Page 1
AM/FM CLOCK RADIO with SURE-ALARM™ BATTERY BACK-UP and NIGHT LIGHT OWNER'S MANUAL GP808 Visit our web site at www.emersonradio.com GP808_ib072502.p65 15 25/7/2002, 16:15
AM/FM CLOCK RADIO with SURE-ALARM™ BATTERY BACK-UP and NIGHT LIGHT OWNER'S MANUAL GP808 Visit our web site at www.emersonradio.com GP808_ib072502.p65 15 25/7/2002, 16:15

Owners Manual
Page 2
...long periods of time. 13.) Refer all instructions. 5.) Do not use this apparatus near water. 6.) Clean only with the manufacturer's instructions. 8.) Do not install near any heat sources such as vases shall be placed on or pinched particularly at plugs, convenience receptacles,...ELECTRIC SHOCK DO NOT OPEN ! Use only power source as indicated. 16.) Use replacement parts as power-supply cord or plug is required when the apparatus has been damaged in accordance with dry cloth. 7.) Do not block any service or repairs to this product, ask the service technician to perform safety checks....
...long periods of time. 13.) Refer all instructions. 5.) Do not use this apparatus near water. 6.) Clean only with the manufacturer's instructions. 8.) Do not install near any heat sources such as vases shall be placed on or pinched particularly at plugs, convenience receptacles,...ELECTRIC SHOCK DO NOT OPEN ! Use only power source as indicated. 16.) Use replacement parts as power-supply cord or plug is required when the apparatus has been damaged in accordance with dry cloth. 7.) Do not block any service or repairs to this product, ask the service technician to perform safety checks....
Owners Manual
Page 3
... Emerson Radio Corporation Customer Service Hotline, toll free at: 1-800-898-9020. If you experience any problems with the auto shut-off timer and use the Snooze Alarm when you need a few more minutes sleep before you can get up and face a new day. Model No: GP808 Serial Number: GP808_ib072502.p65 2 2 25/7/2002, 16:15 Listen to your favorite AM/FM radio stations, wake up to the radio or an electronic buzzer alarm, sleep to music...
... Emerson Radio Corporation Customer Service Hotline, toll free at: 1-800-898-9020. If you experience any problems with the auto shut-off timer and use the Snooze Alarm when you need a few more minutes sleep before you can get up and face a new day. Model No: GP808 Serial Number: GP808_ib072502.p65 2 2 25/7/2002, 16:15 Listen to your favorite AM/FM radio stations, wake up to the radio or an electronic buzzer alarm, sleep to music...
Owners Manual
Page 4
... areas. • Operate controls and switches as this might damage the finish. If this unit with the limits for help. FCC INFORMATION This equipment has been tested and found to comply with chemical solvents as described in the manual. • Before turning on the power, make certain that the power cord is properly installed. • When moving the clock, be determined...
... areas. • Operate controls and switches as this might damage the finish. If this unit with the limits for help. FCC INFORMATION This equipment has been tested and found to comply with chemical solvents as described in the manual. • Before turning on the power, make certain that the power cord is properly installed. • When moving the clock, be determined...

Owners Manual
Page 5
... radio. • Place the radio on again and the time and alarm settings will maintain the time and alarm settings. POWER FAILURE INDICATION If you must reset both the time and alarm settings. Do not remove any descriptive labels from the unit. Push the battery back into the power cord so be connected one way. This flashing display is your indication that the clock is incorrect and you do not install a battery...
... radio. • Place the radio on again and the time and alarm settings will maintain the time and alarm settings. POWER FAILURE INDICATION If you must reset both the time and alarm settings. Do not remove any descriptive labels from the unit. Push the battery back into the power cord so be connected one way. This flashing display is your indication that the clock is incorrect and you do not install a battery...
Owners Manual
Page 6
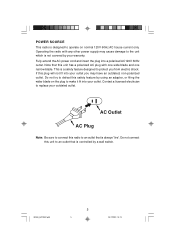
... the AC power cord and insert the plug into a polarized AC120V 60Hz outlet. Do not try to defeat this plug will not fit into your outlet you from electric shock. Contact a licensed electrician to replace your outdated outlet. Operating the radio with one wide blade and one narrow blade. If this safety feature by using an adapter, or filing...
... the AC power cord and insert the plug into a polarized AC120V 60Hz outlet. Do not try to defeat this plug will not fit into your outlet you from electric shock. Contact a licensed electrician to replace your outdated outlet. Operating the radio with one wide blade and one narrow blade. If this safety feature by using an adapter, or filing...
Owners Manual
Page 7
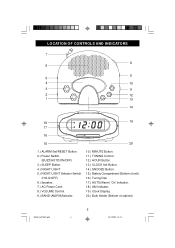
... 14 18 19 17 16 15 20 1.) ALARM Set/RESET Button. 2.) Power Switch. (BUZZ/AUTO/ON/OFF) 3.) SLEEP Button. 4.) NIGHT LIGHT 5.) NIGHT LIGHT Selector Switch. (HI/LO/OFF) 6.) Speaker. 7.) AC Power Cord. 8.) VOLUME Control. 9.) BAND (AM/FM)Selector. 10.) MINUTE Button. 11.) TUNING Control. 12.) HOUR Button. 13.) CLOCK Set Button. 14.) SNOOZE Button. 15.) Battery Compartment (Bottom of unit). 16.) Tuning Dial. 17.) AUTO(Alarm) 'On'Indicator. 18.) AM Indicator. 19.) Clock Display. 20.) Bulb Holder (Bottom of cabinet...
... 14 18 19 17 16 15 20 1.) ALARM Set/RESET Button. 2.) Power Switch. (BUZZ/AUTO/ON/OFF) 3.) SLEEP Button. 4.) NIGHT LIGHT 5.) NIGHT LIGHT Selector Switch. (HI/LO/OFF) 6.) Speaker. 7.) AC Power Cord. 8.) VOLUME Control. 9.) BAND (AM/FM)Selector. 10.) MINUTE Button. 11.) TUNING Control. 12.) HOUR Button. 13.) CLOCK Set Button. 14.) SNOOZE Button. 15.) Battery Compartment (Bottom of unit). 16.) Tuning Dial. 17.) AUTO(Alarm) 'On'Indicator. 18.) AM Indicator. 19.) Clock Display. 20.) Bulb Holder (Bottom of cabinet...
Owners Manual
Page 8
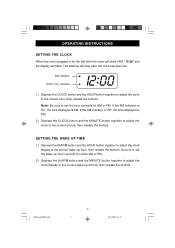
... or PM. 2.) Depress the ALARM button and the MINUTE button together to adjust the clock display to the correct wake-up hour, then release the buttons. If the AM Indicator is On', the time displayed is AM. The flashing will flash. OPERATING INSTRUCTIONS SETTING THE CLOCK When the unit is plugged in for the first time the clock will show (AM) "12:00" and the display will stop after the clock has been...
... or PM. 2.) Depress the ALARM button and the MINUTE button together to adjust the clock display to the correct wake-up hour, then release the buttons. If the AM Indicator is On', the time displayed is AM. The flashing will flash. OPERATING INSTRUCTIONS SETTING THE CLOCK When the unit is plugged in for the first time the clock will show (AM) "12:00" and the display will stop after the clock has been...
Owners Manual
Page 9
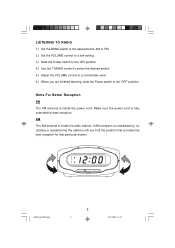
LISTENING TO RADIO 1.) Set the BAND switch to the desired band, AM or FM. 2.) Set the VOLUME control to a low setting. 3.) Slide the Power switch to the 'ON' position. 4.) Use the TUNING control to select the desired station. 5.) Adjust the VOLUME control to the 'OFF' position. Hints For Better Reception FM The FM antenna is inside the power cord. Make sure the power cord is unsatisfactory, tr y rotating or repositioning the cabinet until...
LISTENING TO RADIO 1.) Set the BAND switch to the desired band, AM or FM. 2.) Set the VOLUME control to a low setting. 3.) Slide the Power switch to the 'ON' position. 4.) Use the TUNING control to select the desired station. 5.) Adjust the VOLUME control to the 'OFF' position. Hints For Better Reception FM The FM antenna is inside the power cord. Make sure the power cord is unsatisfactory, tr y rotating or repositioning the cabinet until...

Owners Manual
Page 10
... the station and the volume level that you want to hear when you wake up. 3.) Slide the Power switch to wake up time. It will turn 'On' automatically. The radio will continue for the following day. The AUTO indicator goes off. The AUTO indicator comes on . 4.) At the selected wake up time an electronic buzzer alarm will turn off automatically and reset itself for 1 hour and 59 minutes and then shut...
... the station and the volume level that you want to hear when you wake up. 3.) Slide the Power switch to wake up time. It will turn 'On' automatically. The radio will continue for the following day. The AUTO indicator goes off. The AUTO indicator comes on . 4.) At the selected wake up time an electronic buzzer alarm will turn off automatically and reset itself for 1 hour and 59 minutes and then shut...

Owners Manual
Page 11
... sleep to music timer allows you will stop for 'WAKE TO RADIO'. The display starts counting down to start the sleep timer. The display indicates "0:59" and the radio turns 'On'. 2.) To adjust the amount of sleep time appears on the display, release all the buttons. The radio will continue to play until the sleep timer counts down to "0:00", and then the radio shuts off automatically. 4.) To shut off automatically. I M P O R TAN T: Remember that the station and volume setting...
... sleep to music timer allows you will stop for 'WAKE TO RADIO'. The display starts counting down to start the sleep timer. The display indicates "0:59" and the radio turns 'On'. 2.) To adjust the amount of sleep time appears on the display, release all the buttons. The radio will continue to play until the sleep timer counts down to "0:00", and then the radio shuts off automatically. 4.) To shut off automatically. I M P O R TAN T: Remember that the station and volume setting...
Owners Manual
Page 12
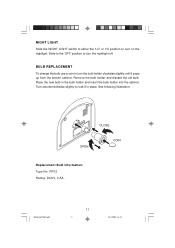
... NIGHT LIGHT switch to either the 'LO'or 'HI'position to turn the bulb holder clockwise slightly until it in the bulb holder and insert the bulb holder into the cabinet. CLOSE OPEN COIN Replacement Bulb Information: Type No: PR12 Rating: DC6V, 0.5A. See following illustration. BULB REPLACEMENT To change the bulb use a coin to turn on...
... NIGHT LIGHT switch to either the 'LO'or 'HI'position to turn the bulb holder clockwise slightly until it in the bulb holder and insert the bulb holder into the cabinet. CLOSE OPEN COIN Replacement Bulb Information: Type No: PR12 Rating: DC6V, 0.5A. See following illustration. BULB REPLACEMENT To change the bulb use a coin to turn on...
Owners Manual
Page 13
... are no battery in the back-up times after reconnecting the power cord. Never use dusting sprays or polishes on the cabinet. Reset the clock and wake up battery compartment, the Time and Alarm settings will be wiped with a soft cloth that has been slightly dampened with a mild soap and water solution. SERVICE TO FIND THE LOCATION AND PHONE NUMBER OF YOUR NEAREST SERVICE CENTER PERMITTED...
... are no battery in the back-up times after reconnecting the power cord. Never use dusting sprays or polishes on the cabinet. Reset the clock and wake up battery compartment, the Time and Alarm settings will be wiped with a soft cloth that has been slightly dampened with a mild soap and water solution. SERVICE TO FIND THE LOCATION AND PHONE NUMBER OF YOUR NEAREST SERVICE CENTER PERMITTED...
Owners Manual
Page 14
... provide repair service at no charge for labor and parts (excluding bulbs) at an authorized Depot Repair Facility, or replace the product in the U.S. warrants manufacturing defects in original material, including original parts and workmanship, under normal use , rental, repairs by California residents) to Emerson Radio Corp. Send your dated proof of original purchase in our discretion. With your unit to follow operating instructions, commercial use...
... provide repair service at no charge for labor and parts (excluding bulbs) at an authorized Depot Repair Facility, or replace the product in the U.S. warrants manufacturing defects in original material, including original parts and workmanship, under normal use , rental, repairs by California residents) to Emerson Radio Corp. Send your dated proof of original purchase in our discretion. With your unit to follow operating instructions, commercial use...

Owners Manual
Page 15
BY EMERSON Part No. : 21-2032 207-01 GP808_ib072502.p65 14 Printed in China 25/7/2002, 16:15
BY EMERSON Part No. : 21-2032 207-01 GP808_ib072502.p65 14 Printed in China 25/7/2002, 16:15


