
Owners Manual
Page 2
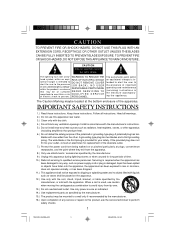
...apparatus. Use only power source as indicated. 14.) Use replacement parts as vases shall be placed on or pinched particularly at the bottom enclosure of any ventilation openings. WARNING: TO REDUCE THE head symbol, within an equilateral triangle is intended to alert the user to qualified service personnel.... THIS APPLIANCE TO RAIN OR MOISTURE. When a cart is used, use this apparatus near water. 3.) Clean only with the manufacturer's instructions. 5.) Do not install near any way, such as power-supply cord or plug is required when the apparatus has been damaged in the literature...
...apparatus. Use only power source as indicated. 14.) Use replacement parts as vases shall be placed on or pinched particularly at the bottom enclosure of any ventilation openings. WARNING: TO REDUCE THE head symbol, within an equilateral triangle is intended to alert the user to qualified service personnel.... THIS APPLIANCE TO RAIN OR MOISTURE. When a cart is used, use this apparatus near water. 3.) Clean only with the manufacturer's instructions. 5.) Do not install near any way, such as power-supply cord or plug is required when the apparatus has been damaged in the literature...

Owners Manual
Page 3
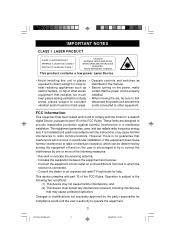
..., Central Time, Monday through Friday. You may be advised of this manual. The Customer Service Hotline hours are getting the maximum benefit from Emerson. Please call the Emerson Customer Service Hotline, toll free, at: 1-800-898-9020. This system includes an AM/FM digital tuner with 20 preset station memories, a digital clock, a full-function remote control, and a pair of this Home Audio System with the set-up or operation of matching speakers...
..., Central Time, Monday through Friday. You may be advised of this manual. The Customer Service Hotline hours are getting the maximum benefit from Emerson. Please call the Emerson Customer Service Hotline, toll free, at: 1-800-898-9020. This system includes an AM/FM digital tuner with 20 preset station memories, a digital clock, a full-function remote control, and a pair of this Home Audio System with the set-up or operation of matching speakers...
Owners Manual
Page 4
... the power cord and remove cords connected to other stereo equipment that radiates too much heat, places lacking ventilation or dusty areas, places subject to constant vibration and/or humid or moist areas. • Operate controls and switches as described in the manual. • Before turning on the power, make certain that to which can radiate radio frequency energy and, if not installed and used in...
... the power cord and remove cords connected to other stereo equipment that radiates too much heat, places lacking ventilation or dusty areas, places subject to constant vibration and/or humid or moist areas. • Operate controls and switches as described in the manual. • Before turning on the power, make certain that to which can radiate radio frequency energy and, if not installed and used in...
Owners Manual
Page 5
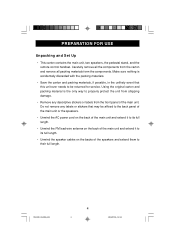
...; Remove any labels or stickers that this unit ever needs to be affixed to the back panel of the main unit or the speakers. • Unwind the AC power cord on the back of the main unit and extend it to its full length. • Unwind the FM lead wire antenna on...carton and remove all the components from the front panel of the speakers and extend them to its full length. • Unwind the speaker cables on the backs of the main unit. PREPARATION FOR USE Unpacking and Set Up • This carton contains the main unit, two speakers, the pedestal stand, and the remote control handset.
...; Remove any labels or stickers that this unit ever needs to be affixed to the back panel of the main unit or the speakers. • Unwind the AC power cord on the back of the main unit and extend it to its full length. • Unwind the FM lead wire antenna on...carton and remove all the components from the front panel of the speakers and extend them to its full length. • Unwind the speaker cables on the backs of the main unit. PREPARATION FOR USE Unpacking and Set Up • This carton contains the main unit, two speakers, the pedestal stand, and the remote control handset.
Owners Manual
Page 10
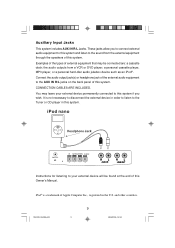
... U.S. These jacks allow you wish. CONNECTION CABLES ARE INCLUDED. iPod® is not necessary to disconnect the external device in this system. a personal cassette player, MP3 player, or a personal hard-disc audio jukebox device such as an iPod® . It is a trademark of this system and listen to the Tuner or CD player in order to listen to the sound from a VCR or DVD player; Auxiliary Input Jacks This system includes AUX IN R/L Jacks. MS3108_062806...
... U.S. These jacks allow you wish. CONNECTION CABLES ARE INCLUDED. iPod® is not necessary to disconnect the external device in this system. a personal cassette player, MP3 player, or a personal hard-disc audio jukebox device such as an iPod® . It is a trademark of this system and listen to the Tuner or CD player in order to listen to the sound from a VCR or DVD player; Auxiliary Input Jacks This system includes AUX IN R/L Jacks. MS3108_062806...
Owners Manual
Page 12
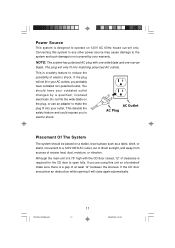
... should be placed on the plug, or use an adapter to a 120V 60Hz AC outlet, out of direct sunlight, and away from sources of excess heat, dust, moisture, or vibration. This defeats the safety feature and could expose you to open fully. MS3108_062806.p65 11 11 28/6/2006, 16:54 Power Source This system is designed to reduce the...
... should be placed on the plug, or use an adapter to a 120V 60Hz AC outlet, out of direct sunlight, and away from sources of excess heat, dust, moisture, or vibration. This defeats the safety feature and could expose you to open fully. MS3108_062806.p65 11 11 28/6/2006, 16:54 Power Source This system is designed to reduce the...

Owners Manual
Page 13
...Adjust the volume to a comfortable level using a louder passage, so that you purchase small self-adhesive felt pads, available at hardware stores and home improvement centers everywhere, and apply these pads to the bottom of the rubber 'feet' before you may connect a set the volume control to a comfortable listening level. Protect Your Furniture This model is not fully inserted the sound...loud passages. Stereo Headphone Jack This system includes a stereo PHONES jack on the top panel of the headphones. If the plug is equipped with non-skid rubber 'feet' to prevent the product from non...
...Adjust the volume to a comfortable level using a louder passage, so that you purchase small self-adhesive felt pads, available at hardware stores and home improvement centers everywhere, and apply these pads to the bottom of the rubber 'feet' before you may connect a set the volume control to a comfortable listening level. Protect Your Furniture This model is not fully inserted the sound...loud passages. Stereo Headphone Jack This system includes a stereo PHONES jack on the top panel of the headphones. If the plug is equipped with non-skid rubber 'feet' to prevent the product from non...
Owners Manual
Page 15
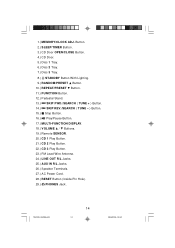
...Door OPEN/CLOSE Button. 4.) CD Door. 5.) Disc 1 Tray. 6.) Disc 2 Tray. 7.) Disc 3 Tray. 8.) STANDBY Button With Lighting. 9.) RANDOM/PRESET Button. 10.) REPEAT/PRESET Button. 11.) FUNCTION Button. 12.) Pedestal Stand. 13.) SKIP FWD./SEARCH ( TUNE + ) Button. 14.) SKIP REV./SEARCH ( TUNE - ) Button. 15.) Stop Button. 16.) Play/Pause Button. 17.) MULTI-FUNCTION DISPLAY. 18.) VOLUME / Buttons. 19.) Remote SENSOR. 20.) CD 1 Play Button. 21.) CD 2 Play Button. 22.) CD 3 Play Button. 23.) FM Lead Wire Antenna. 24.) LINE OUT R/L Jacks. 25.) AUX IN R/L Jacks. 26.) Speaker Terminals. 27.) AC Power Cord...
...Door OPEN/CLOSE Button. 4.) CD Door. 5.) Disc 1 Tray. 6.) Disc 2 Tray. 7.) Disc 3 Tray. 8.) STANDBY Button With Lighting. 9.) RANDOM/PRESET Button. 10.) REPEAT/PRESET Button. 11.) FUNCTION Button. 12.) Pedestal Stand. 13.) SKIP FWD./SEARCH ( TUNE + ) Button. 14.) SKIP REV./SEARCH ( TUNE - ) Button. 15.) Stop Button. 16.) Play/Pause Button. 17.) MULTI-FUNCTION DISPLAY. 18.) VOLUME / Buttons. 19.) Remote SENSOR. 20.) CD 1 Play Button. 21.) CD 2 Play Button. 22.) CD 3 Play Button. 23.) FM Lead Wire Antenna. 24.) LINE OUT R/L Jacks. 25.) AUX IN R/L Jacks. 26.) Speaker Terminals. 27.) AC Power Cord...
Owners Manual
Page 17
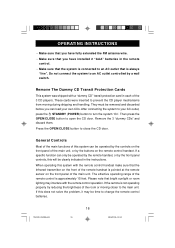
... of the 3 CD players. OPERATING INSTRUCTIONS • Make sure that you have installed 2 "AAA" batteries in the remote control. • Make sure that the system is connected to change the remote control batteries. Do not connect the system to the main unit. Remove The Dummy CD Transit Protection Cards This system was shipped with the remote control operation. Remove the 3 "dummy CDs" and discard them. Press the OPEN/CLOSE button to turn the system 'On'. If this system can be clearly...
... of the 3 CD players. OPERATING INSTRUCTIONS • Make sure that you have installed 2 "AAA" batteries in the remote control. • Make sure that the system is connected to change the remote control batteries. Do not connect the system to the main unit. Remove The Dummy CD Transit Protection Cards This system was shipped with the remote control operation. Remove the 3 "dummy CDs" and discard them. Press the OPEN/CLOSE button to turn the system 'On'. If this system can be clearly...

Owners Manual
Page 18
... the VOLUME or buttons. The MUTE indicator disappears. Electronic Preset Equalizer "EQ" (On Remote Control Only) The preset equalizer allows you change the volume level. The system remembers the EQ setting when the power is switched 'On'again. The Mute function will appear on the the remote control to cancel the Mute function and restore the sound. The sound stops and the MUTE indicator flashes in the display...
... the VOLUME or buttons. The MUTE indicator disappears. Electronic Preset Equalizer "EQ" (On Remote Control Only) The preset equalizer allows you change the volume level. The system remembers the EQ setting when the power is switched 'On'again. The Mute function will appear on the the remote control to cancel the Mute function and restore the sound. The sound stops and the MUTE indicator flashes in the display...
Owners Manual
Page 19
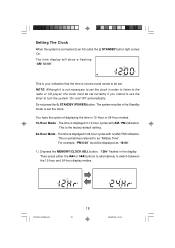
... displayed as "Military Time". The time is the factory default setting. 24-Hour Mode - Then press either the or buttons to alternatively to as "18:00". 1.) Depress the MEMORY/CLOCK ADJ. Setting The Clock When the system is connected to the radio or CD player, the clock must be set. Do not press the STANDBY (POWER) button. For example, "PM 6:00" would be set correctly if you intend to use the timer to set...
... displayed as "Military Time". The time is the factory default setting. 24-Hour Mode - Then press either the or buttons to alternatively to as "18:00". 1.) Depress the MEMORY/CLOCK ADJ. Setting The Clock When the system is connected to the radio or CD player, the clock must be set. Do not press the STANDBY (POWER) button. For example, "PM 6:00" would be set correctly if you intend to use the timer to set...

Owners Manual
Page 21
... move, then release the buttons. The display lighting comes 'On'and the STANDBY light goes 'Off'. 2.) Press the FUNCTION button on front panel or TUNER button on your desired station. 4.) If you tuned to an FM Stereo station the STEREO indicator will appear on that are finished listening press the STANDBY (POWER) button to return the system to the Standby (Off) mode. Listening To The Radio 1.) Press the STANDBY (POWER) button to select the...
... move, then release the buttons. The display lighting comes 'On'and the STANDBY light goes 'Off'. 2.) Press the FUNCTION button on front panel or TUNER button on your desired station. 4.) If you tuned to an FM Stereo station the STEREO indicator will appear on that are finished listening press the STANDBY (POWER) button to return the system to the Standby (Off) mode. Listening To The Radio 1.) Press the STANDBY (POWER) button to select the...
Owners Manual
Page 24
... MEMORY/CLOCK ADJ. button once to change. 3.) Press the MEMORY/CLOCK ADJ. NOTE: After you must press PRESET or , and MEMORY/CLOCK ADJ. Changing Preset Stations 1.) Tune to the new station you wish to start the MEMORY indicator flashing. 2.) Repeatedly press the PRESET or button until the desired preset number and frequency appears on the display. • You may also use the number buttons on the remote control to directly select the desired preset memory number...
... MEMORY/CLOCK ADJ. button once to change. 3.) Press the MEMORY/CLOCK ADJ. NOTE: After you must press PRESET or , and MEMORY/CLOCK ADJ. Changing Preset Stations 1.) Tune to the new station you wish to start the MEMORY indicator flashing. 2.) Repeatedly press the PRESET or button until the desired preset number and frequency appears on the display. • You may also use the number buttons on the remote control to directly select the desired preset memory number...
Owners Manual
Page 25
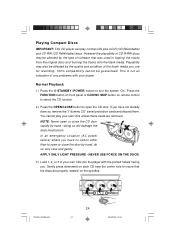
... Playing Compact Discs IMPORTANT: This CD player can play your player. Playability may be guaranteed. Press the FUNCTION button on front panel or CD/DISC SKIP button on remote control to select the CD function. 2.) Press the OPEN/CLOSE button to turn the system 'On'. You cannot play normal CDs plus CD-R (CD Recordable) and CD-RW (CD ReWritable) discs. However the playability of software that the discs are removed. This is not an indication of the blank media...
... Playing Compact Discs IMPORTANT: This CD player can play your player. Playability may be guaranteed. Press the FUNCTION button on front panel or CD/DISC SKIP button on remote control to select the CD function. 2.) Press the OPEN/CLOSE button to turn the system 'On'. You cannot play normal CDs plus CD-R (CD Recordable) and CD-RW (CD ReWritable) discs. However the playability of software that the discs are removed. This is not an indication of the blank media...
Owners Manual
Page 30
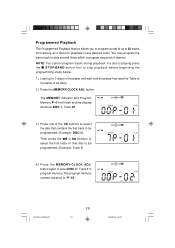
... among all discs. 2.) Press the MEMORY/CLOCK ADJ. Programmed Playback The Programmed Playback feature allows you to program a total of all 3 discs for playback in any desired order. NOTE: You cannot program tracks during playback. The program memory number advance to play several times within a program sequence if desired. You may program the same track to "P- 02". Then press the or buttons to select...
... among all discs. 2.) Press the MEMORY/CLOCK ADJ. Programmed Playback The Programmed Playback feature allows you to program a total of all 3 discs for playback in any desired order. NOTE: You cannot program tracks during playback. The program memory number advance to play several times within a program sequence if desired. You may program the same track to "P- 02". Then press the or buttons to select...

Owners Manual
Page 33
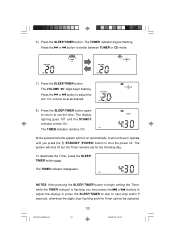
... Standby (Power Off) mode. 1.) Press the SLEEP/TIMER button once, the display lighting turns 'On'. MS3108_062806.p65 32 32 28/6/2006, 16:54 You can only be programmed while the system is still flashing, press the SLEEP/TIMER button once more, the Hour digits will begin flashing. 5.) Press the or button to set the display to your favorite CD. NOTE: The timer can use the timer to wake you up to the Radio...
... Standby (Power Off) mode. 1.) Press the SLEEP/TIMER button once, the display lighting turns 'On'. MS3108_062806.p65 32 32 28/6/2006, 16:54 You can only be programmed while the system is still flashing, press the SLEEP/TIMER button once more, the Hour digits will begin flashing. 5.) Press the or button to set the display to your favorite CD. NOTE: The timer can use the timer to wake you up to the Radio...
Owners Manual
Page 34
... the Timer remains set for the following day. The TUNER indicator begins flashing. The VOLUME "20" digits begin setting the Timer, while the TIMER indicator is flashing, you press the STANDBY (POWER) button to next step within 5 seconds, otherwise the digits stop flashing and the Timer cannot be adjusted. Press the or button to begin flashing. NOTES: After pressing the SLEEP/TIMER button to switch between TUNER or CD mode. 7.) Press the SLEEP/TIMER button. The display lighting goes...
... the Timer remains set for the following day. The TUNER indicator begins flashing. The VOLUME "20" digits begin setting the Timer, while the TIMER indicator is flashing, you press the STANDBY (POWER) button to next step within 5 seconds, otherwise the digits stop flashing and the Timer cannot be adjusted. Press the or button to begin flashing. NOTES: After pressing the SLEEP/TIMER button to switch between TUNER or CD mode. 7.) Press the SLEEP/TIMER button. The display lighting goes...
Owners Manual
Page 36
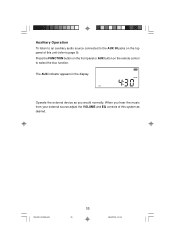
Operate the external device as desired. Auxiliary Operation To listen to an auxiliary audio source connected to the AUX IN jacks on the remote control to page 9). When you would normally. The AUX indicator appears in the display. MS3108_062806.p65 35 35 28/6/2006, 16:54 Press the FUNCTION button on the front panel or AUX button on the top panel of this system as you hear the music from your external source adjust the VOLUME and EQ controls of this unit (refer to select the Aux function.
Operate the external device as desired. Auxiliary Operation To listen to an auxiliary audio source connected to the AUX IN jacks on the remote control to page 9). When you would normally. The AUX indicator appears in the display. MS3108_062806.p65 35 35 28/6/2006, 16:54 Press the FUNCTION button on the front panel or AUX button on the top panel of this system as you hear the music from your external source adjust the VOLUME and EQ controls of this unit (refer to select the Aux function.
Owners Manual
Page 37
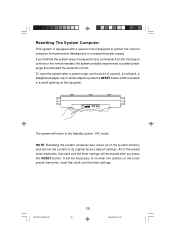
... factory default settings. All of the preset tuner memories, the clock and the timer settings will be erased after a power surge use the point of the system memory and returns the system to the Standby (power 'Off') mode. It will be necessary to press the RESET button which is equipped with a special circuit designed to protect the internal computer from the front panel controls or the remote handset, the system...
... factory default settings. All of the preset tuner memories, the clock and the timer settings will be erased after a power surge use the point of the system memory and returns the system to the Standby (power 'Off') mode. It will be necessary to press the RESET button which is equipped with a special circuit designed to protect the internal computer from the front panel controls or the remote handset, the system...

Owners Manual
Page 40
... WARRANTY Emerson Radio Corp. Model No: MS3108 Serial Number: MS3108_062806.p65 39 39 28/6/2006, 16:54 in a padded box, enclose your dated proof of purchase, we will provide repair service at no charge for a period of ninety (90) days from negligence, misuse, abuse, accident, failure to follow operating instructions, commercial use, rental, repairs by California residents) to locate the Serial Number of your...
... WARRANTY Emerson Radio Corp. Model No: MS3108 Serial Number: MS3108_062806.p65 39 39 28/6/2006, 16:54 in a padded box, enclose your dated proof of purchase, we will provide repair service at no charge for a period of ninety (90) days from negligence, misuse, abuse, accident, failure to follow operating instructions, commercial use, rental, repairs by California residents) to locate the Serial Number of your...

