

Owners Manual
Page 2
... as power-supply cord or plug is intended to alert the user to a wall only if recommended by the manufacturer. 12.) Unplug this apparatus during lightning storms or when unused for replacement of important operating and maintenance (servicing) instructions in any ventilation openings. Servicing is intented to DO NOT REMOVE COVER alert the user to the presence of uninsulated 'dangerous voltage' within the product...
... as power-supply cord or plug is intended to alert the user to a wall only if recommended by the manufacturer. 12.) Unplug this apparatus during lightning storms or when unused for replacement of important operating and maintenance (servicing) instructions in any ventilation openings. Servicing is intented to DO NOT REMOVE COVER alert the user to the presence of uninsulated 'dangerous voltage' within the product...
Owners Manual
Page 3
... this Emerson product. For future reference, record the serial number in perfect working order before it left our factory. This product was tested by Emerson inspectors and found to be sure to read this Owner's Manual completely to the final consumer. BEFORE WE BEGIN Thank you for purchasing this Emerson audio product. If, after reading this Manual, you are committed to the instructions for obtaining service...
... this Emerson product. For future reference, record the serial number in perfect working order before it left our factory. This product was tested by Emerson inspectors and found to be sure to read this Owner's Manual completely to the final consumer. BEFORE WE BEGIN Thank you for purchasing this Emerson audio product. If, after reading this Manual, you are committed to the instructions for obtaining service...
Owners Manual
Page 4
... or close • Oper ate cont rols and switches as to heat radiating appliances such as this might damage cords connected to other stereo • Before turning 'On'the power, make certain equipment that radiates too much heat, that to which can radiate radio frequency energy and, if not installed and used in accordance with the limits for help. or humid or...
... or close • Oper ate cont rols and switches as to heat radiating appliances such as this might damage cords connected to other stereo • Before turning 'On'the power, make certain equipment that radiates too much heat, that to which can radiate radio frequency energy and, if not installed and used in accordance with the limits for help. or humid or...

Owners Manual
Page 5
... the cords will allow for maximum stereo separation. These 'feet' are made from moving when you operate the controls. PREPARATION FOR USE UNPACKING • Remove the main unit and the speakers from the carton and remove all packing materials from the components. • Remove any descriptive labels from the fronts of the main unit and speakers. • Remove any small strips of tape...
... the cords will allow for maximum stereo separation. These 'feet' are made from moving when you operate the controls. PREPARATION FOR USE UNPACKING • Remove the main unit and the speakers from the carton and remove all packing materials from the components. • Remove any descriptive labels from the fronts of the main unit and speakers. • Remove any small strips of tape...

Owners Manual
Page 6
... Red cables to the Red terminals and the Black cables to the "RIGHT"terminals. To connect the speaker cable to the terminal depress the plastic tab below the terminal, insert the bare wire at the end of the main unit are connected incorrectly the sound may be "muddy" and distorted. If the speakers are color coded for your convenience. SPEAKER CONNECTION The speaker cables and the speaker...
... Red cables to the Red terminals and the Black cables to the "RIGHT"terminals. To connect the speaker cable to the terminal depress the plastic tab below the terminal, insert the bare wire at the end of the main unit are connected incorrectly the sound may be "muddy" and distorted. If the speakers are color coded for your convenience. SPEAKER CONNECTION The speaker cables and the speaker...
Owners Manual
Page 7
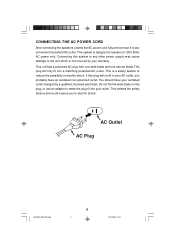
Connecting this plug will only fit into your outlet. You should have an outdated non-polarized outlet. AC Outlet AC Plug MS9700_ib021903.p65 6 6 19/2/2003, 9:23 This system is designed to operate on the plug, or use an adapter to make the plug fit into a matching polarized AC outlet. Do not file the wide blade on 120V 60Hz AC power... changed by your AC outlet, you to electric shock. If this system to any convenient household AC outlet. CONNECTING THE AC POWER CORD After connecting the speakers unwind the AC power cord fully and connect it to any other power supply ...
Connecting this plug will only fit into your outlet. You should have an outdated non-polarized outlet. AC Outlet AC Plug MS9700_ib021903.p65 6 6 19/2/2003, 9:23 This system is designed to operate on the plug, or use an adapter to make the plug fit into a matching polarized AC outlet. Do not file the wide blade on 120V 60Hz AC power... changed by your AC outlet, you to electric shock. If this system to any convenient household AC outlet. CONNECTING THE AC POWER CORD After connecting the speakers unwind the AC power cord fully and connect it to any other power supply ...

Owners Manual
Page 8
... the best reception, and then use a small piece of tape to vary the direction of this antenna until you find the position that position. You may have to vary the position and direction of this antenna wire, extend it to its full length, and allow it to the back of the main cabinet. FM WIRE ANTENNA RIGHT LEFT AM This system...
... the best reception, and then use a small piece of tape to vary the direction of this antenna until you find the position that position. You may have to vary the position and direction of this antenna wire, extend it to its full length, and allow it to the back of the main cabinet. FM WIRE ANTENNA RIGHT LEFT AM This system...
Owners Manual
Page 9
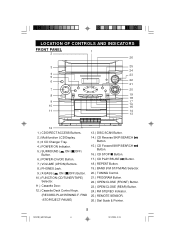
....) TUNING Control. 21.) PROGRAM Button. 22.) OPEN/CLOSE (FRONT) Button. 23.) OPEN/CLOSE (REAR) Button. 24.) FM STEREO Indicator. 25.) REMOTE SENSOR. 26.) Dial Scale & Pointer. LOCATION OF CONTROLS AND INDICATORS FRONT PANEL 1 2 26 3 25 24 4 23 5 6 22 21 7 20 8 19 18 9 17 10 16 15 11 14 13 12 1.) CD DIRECT ACCESS Buttons. 2.) Multifunction LCD Display. 3.) 6 CD Changer Tray. 4.) POWER ON Indicator. 5.) SURROUND ( ON / OFF) Button. 6.) POWER (On/Off) Button. 7.) VOLUME (UP/DN) Buttons. 8.) PHONES Jack. 9.) X-BASS ( ON / OFF) Button...
....) TUNING Control. 21.) PROGRAM Button. 22.) OPEN/CLOSE (FRONT) Button. 23.) OPEN/CLOSE (REAR) Button. 24.) FM STEREO Indicator. 25.) REMOTE SENSOR. 26.) Dial Scale & Pointer. LOCATION OF CONTROLS AND INDICATORS FRONT PANEL 1 2 26 3 25 24 4 23 5 6 22 21 7 20 8 19 18 9 17 10 16 15 11 14 13 12 1.) CD DIRECT ACCESS Buttons. 2.) Multifunction LCD Display. 3.) 6 CD Changer Tray. 4.) POWER ON Indicator. 5.) SURROUND ( ON / OFF) Button. 6.) POWER (On/Off) Button. 7.) VOLUME (UP/DN) Buttons. 8.) PHONES Jack. 9.) X-BASS ( ON / OFF) Button...
Owners Manual
Page 13
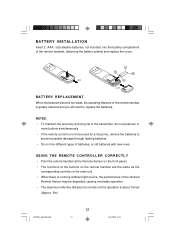
... remote control operation is not to replace the batteries. USING THE REMOTE CONTROLLER CORRECTLY • Point the remote handset at the Remote Sensor on the front panel. • The functions of the buttons on the remote handset are the same as the corresponding controls on the main unit. • When there is a strong ambient light source, the performance of the infrared Remote Sensor may be used for a long time, remove...
... remote control operation is not to replace the batteries. USING THE REMOTE CONTROLLER CORRECTLY • Point the remote handset at the Remote Sensor on the front panel. • The functions of the buttons on the remote handset are the same as the corresponding controls on the main unit. • When there is a strong ambient light source, the performance of the infrared Remote Sensor may be used for a long time, remove...

Owners Manual
Page 14
... works with heavy bass at high volume and the X-BASS ON, you are listening to music with stereo sound sources. SURROUND (STEREO WIDE) BUTTON Set the SURROUND button to the same level when the power is shut off and automatically returns to the 'On'position ( ON) for an expanded stereo/ surround effect. MS9700_ib021903.p65 13 13 19/2/2003, 9:23 The system memory remembers the volume level when the power is switched...
... works with heavy bass at high volume and the X-BASS ON, you are listening to music with stereo sound sources. SURROUND (STEREO WIDE) BUTTON Set the SURROUND button to the same level when the power is shut off and automatically returns to the 'On'position ( ON) for an expanded stereo/ surround effect. MS9700_ib021903.p65 13 13 19/2/2003, 9:23 The system memory remembers the volume level when the power is switched...
Owners Manual
Page 15
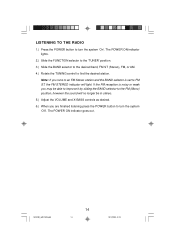
... stereo. 5.) Adjust the VOLUME and X-BASS controls as desired. 6.) When you tune to an FM Stereo station and the BAND selector is set to FM ST, the FM STEREO indicator will light. MS9700_ib021903.p65 14 14 19/2/2003, 9:23 The POWER ON indicator goes out. Note: If you are finished listening press the POWER button to turn the system 'On'. LISTENING TO THE RADIO 1.) Press the POWER button to turn...
... stereo. 5.) Adjust the VOLUME and X-BASS controls as desired. 6.) When you tune to an FM Stereo station and the BAND selector is set to FM ST, the FM STEREO indicator will light. MS9700_ib021903.p65 14 14 19/2/2003, 9:23 The POWER ON indicator goes out. Note: If you are finished listening press the POWER button to turn the system 'On'. LISTENING TO THE RADIO 1.) Press the POWER button to turn...
Owners Manual
Page 16
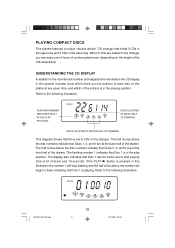
... flashing number 1 indicates that Disc 1 has 22 tracks and a total playing time of the individual discs). This diagram shows that Discs 1, 2, and 6 are loaded in the changer you the position of each disc on the length of 61 minutes and 14 seconds. PLAYING COMPACT DISCS This system features a unique "double decker" CD changer that Discs 3, 4, and 5 are 6 CDs in the changer. The half circles below the disc numbers indicate that holds 3 CDs...
... flashing number 1 indicates that Disc 1 has 22 tracks and a total playing time of the individual discs). This diagram shows that Discs 1, 2, and 6 are loaded in the changer you the position of each disc on the length of 61 minutes and 14 seconds. PLAYING COMPACT DISCS This system features a unique "double decker" CD changer that Discs 3, 4, and 5 are 6 CDs in the changer. The half circles below the disc numbers indicate that holds 3 CDs...
Owners Manual
Page 17
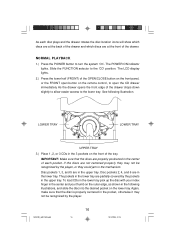
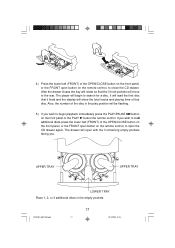
... in the 3 pockets on the remote control, to open button on the front of the drawer drops down slightly to allow easier access to the lower tray. IMPORTANT: Make sure that the disc is properly centered in the mechanism. The POWER ON indicator lights. Slide the FUNCTION selector to turn the system 'On'. LOWER TRAY LOWER TRAY UPPER TRAY 3.) Place 1, 2, or 3 CDs in the following illustration.
... in the 3 pockets on the remote control, to open button on the front of the drawer drops down slightly to allow easier access to the lower tray. IMPORTANT: Make sure that the disc is properly centered in the mechanism. The POWER ON indicator lights. Slide the FUNCTION selector to turn the system 'On'. LOWER TRAY LOWER TRAY UPPER TRAY 3.) Place 1, 2, or 3 CDs in the following illustration.
Owners Manual
Page 18
... the OPEN/CLOSE button on the front panel, or the FRONT open button on the remote control, to begin to close the CD drawer. The drawer will be flashing. 5.) If you wish to open the CD drawer again. Also, the number of the disc in the empty pockets. The player will begin playback immediately press the PLAY/PAUSE button on the front panel or the PLAY button the remote control. 4.) Press...
... the OPEN/CLOSE button on the front panel, or the FRONT open button on the remote control, to begin to close the CD drawer. The drawer will be flashing. 5.) If you wish to open the CD drawer again. Also, the number of the disc in the empty pockets. The player will begin playback immediately press the PLAY/PAUSE button on the front panel or the PLAY button the remote control. 4.) Press...
Owners Manual
Page 19
... icon flashes above the number of the disc being played, and the DIRECT ACCESS button of the playing disc remains 'On'. 9.) Adjust the VOLUME, X-BASS controls as desired. 10.)Playback will be flashing to spin. To begin playback of the disc in the play position. 6.) Press the lower half (FRONT) of the OPEN/CLOSE button on the front panel, or the FRONT open the CD drawer. One of that played. The sound...
... icon flashes above the number of the disc being played, and the DIRECT ACCESS button of the playing disc remains 'On'. 9.) Adjust the VOLUME, X-BASS controls as desired. 10.)Playback will be flashing to spin. To begin playback of the disc in the play position. 6.) Press the lower half (FRONT) of the OPEN/CLOSE button on the front panel, or the FRONT open the CD drawer. One of that played. The sound...

Owners Manual
Page 20
... the display shows the total tracks and playing time of a song. Repeat Playback can repeat a single track, one , two, or three times to search through a track at any disc in the play position. During CD playback depress and hold the (Forward) or (Reverse) buttons to select 1 Track, 1 Disc, or All Discs Repeat. To stop playback at high speed to flash. The player...
... the display shows the total tracks and playing time of a song. Repeat Playback can repeat a single track, one , two, or three times to search through a track at any disc in the play position. During CD playback depress and hold the (Forward) or (Reverse) buttons to select 1 Track, 1 Disc, or All Discs Repeat. To stop playback at high speed to flash. The player...
Owners Manual
Page 22
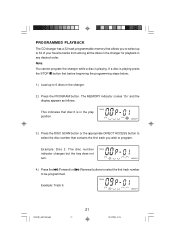
... changes but the tray does not turn. MEMORY 4.) Press the (Forward) or to select the first track number TRACK MEMORY MS9700_ib021903.p65 21 21 19/2/2003, 9:23 The MEMORY indicator comes 'On'and the display appears as follows: TRACK This indicates that disc 6 is in the changer. 2.) Press the PROGRAM button. Exam ple: Disc 2. Note: You cannot program the changer while a disc is playing...
... changes but the tray does not turn. MEMORY 4.) Press the (Forward) or to select the first track number TRACK MEMORY MS9700_ib021903.p65 21 21 19/2/2003, 9:23 The MEMORY indicator comes 'On'and the display appears as follows: TRACK This indicates that disc 6 is in the changer. 2.) Press the PROGRAM button. Exam ple: Disc 2. Note: You cannot program the changer while a disc is playing...
Owners Manual
Page 24
... at any time. FWD (Fast Forward) and REWIND CONTROLS Press F. CASSETTE OPERATION PLAYING CASSETTE TAPES 1.) Press the POWER button to advance or rewind the tape rapidly. Press the STOP/EJECT key to cancel pause mode and resume normal playback. Note: the Automatic Stop System does not function in the fast forward or rewind modes. Press the PAUSE key again to open the...
... at any time. FWD (Fast Forward) and REWIND CONTROLS Press F. CASSETTE OPERATION PLAYING CASSETTE TAPES 1.) Press the POWER button to advance or rewind the tape rapidly. Press the STOP/EJECT key to cancel pause mode and resume normal playback. Note: the Automatic Stop System does not function in the fast forward or rewind modes. Press the PAUSE key again to open the...

Owners Manual
Page 25
... RECORD key on to record - MAKING A TAPE RECORDING This cassette recorder features an Automatic Recording Volume Level Control System that source as you like during the recording process. Before putting the headphones on the left side. You can change the volume level as often as you wish to begin recording. STEREO HEADPHONE JACK Connect an optional set of the recording itself. 1.) Insert...
... RECORD key on to record - MAKING A TAPE RECORDING This cassette recorder features an Automatic Recording Volume Level Control System that source as you like during the recording process. Before putting the headphones on the left side. You can change the volume level as often as you wish to begin recording. STEREO HEADPHONE JACK Connect an optional set of the recording itself. 1.) Insert...
Owners Manual
Page 30
... follow operating instructions, commercial use and conditions, for labor and parts at an authorized Depot Repair Facility, or replace the product in the amount of $9.00 (not required by an unauthorized facility, or products purchased, used, serviced or damaged outside of ninety (90) days from negligence, misuse, abuse, accident, failure to Emerson Radio Corp. Farmers Branch, TX 75234. THIS WARRANTY GIVES YOU SPECIFIC...
... follow operating instructions, commercial use and conditions, for labor and parts at an authorized Depot Repair Facility, or replace the product in the amount of $9.00 (not required by an unauthorized facility, or products purchased, used, serviced or damaged outside of ninety (90) days from negligence, misuse, abuse, accident, failure to Emerson Radio Corp. Farmers Branch, TX 75234. THIS WARRANTY GIVES YOU SPECIFIC...

