
Owners Manual
Page 2
...service or repairs to dripping or splashing water and no object filled with liquids such as specified by the manufacturer. 17.) The product may be exposed to this apparatus near water. 6.) Clean only with the manufacturer's instructions. 8.) Do not install near any heat sources such as power-supply cord or plug...of important operating and maintenance (servicing) instructions in the literature accompanying the appliance. The lightning flash with one wider than the other apparatus (including amplifiers) that may be placed on or pinched particularly at plugs, convenience ...
...service or repairs to dripping or splashing water and no object filled with liquids such as specified by the manufacturer. 17.) The product may be exposed to this apparatus near water. 6.) Clean only with the manufacturer's instructions. 8.) Do not install near any heat sources such as power-supply cord or plug...of important operating and maintenance (servicing) instructions in the literature accompanying the appliance. The lightning flash with one wider than the other apparatus (including amplifiers) that may be placed on or pinched particularly at plugs, convenience ...
Owners Manual
Page 3
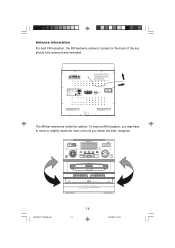
... purchasing this number when requesting service. The serial number of care and maintenance. If you experience any problems with an absolute minimum of your set up or operation of this Emerson complete home audio system including a stereo radio, 5 disc changer, dual cassette deck, stereo phonograph, matching speakers, and remote control. Once again, thanks for you many years of trouble free operation with the set is located on a label on the back panel. Please take...
... purchasing this number when requesting service. The serial number of care and maintenance. If you experience any problems with an absolute minimum of your set up or operation of this Emerson complete home audio system including a stereo radio, 5 disc changer, dual cassette deck, stereo phonograph, matching speakers, and remote control. Once again, thanks for you many years of trouble free operation with the set is located on a label on the back panel. Please take...
Owners Manual
Page 4
... help. If this equipment does cause harmful interference to radio or television reception, which the receiver is properly installed. • Store your CDs, cassettes in a particular installation. Use a clean dry cloth. • Operate controls and switches as described in the manual. • Before turning 'On' the power, make certain that power cord is connected. • Consult the dealer or an experienced radio/TV technician for a Class B digital device, pursuant to Part...
... help. If this equipment does cause harmful interference to radio or television reception, which the receiver is properly installed. • Store your CDs, cassettes in a particular installation. Use a clean dry cloth. • Operate controls and switches as described in the manual. • Before turning 'On' the power, make certain that power cord is connected. • Consult the dealer or an experienced radio/TV technician for a Class B digital device, pursuant to Part...
Owners Manual
Page 8
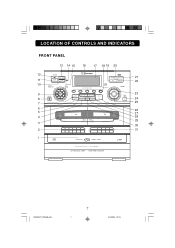
MONO / HI-SPEED DUBBING BASS BOOST BBS PRESET EQUALIZER REMOTE SENSOR PHONES POP FLAT EQ ROCK AUX/PHONO CD/DISC SKIP TAPE TUNER/BAND 1 D I S C MULTI-FUNCTION LCD DISPLAY 2 D I S C 3 D I S C 4 D I S C MODEL MS9933TT 5 D I S C RANDOM INTRO TUNING / SKIP / SEARCH PLAY/PAUSE REPEAT/MEM . FWD STOP/EJECT PAUSE PLAY REWIND F.FWD STOP/EJECT PAUSE 5 COMPACT DISC AUTOMATIC CHANGER DIGITAL FILTER PROCESSING SYSTEM 40 TRACK PROGRAM MEMORY AM / FM DIGITAL TUNING 4 BAND PRESET EQUALIZER 21 22 23 24 25 26...
MONO / HI-SPEED DUBBING BASS BOOST BBS PRESET EQUALIZER REMOTE SENSOR PHONES POP FLAT EQ ROCK AUX/PHONO CD/DISC SKIP TAPE TUNER/BAND 1 D I S C MULTI-FUNCTION LCD DISPLAY 2 D I S C 3 D I S C 4 D I S C MODEL MS9933TT 5 D I S C RANDOM INTRO TUNING / SKIP / SEARCH PLAY/PAUSE REPEAT/MEM . FWD STOP/EJECT PAUSE PLAY REWIND F.FWD STOP/EJECT PAUSE 5 COMPACT DISC AUTOMATIC CHANGER DIGITAL FILTER PROCESSING SYSTEM 40 TRACK PROGRAM MEMORY AM / FM DIGITAL TUNING 4 BAND PRESET EQUALIZER 21 22 23 24 25 26...
Owners Manual
Page 9
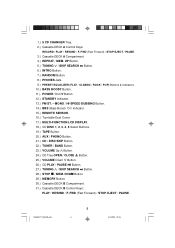
...-SPEED DUBBING Button. 14.) BBS (Bass Boost) 'On'Indicator. 15.) REMOTE SENSOR. 16.) Turntable Dust Cover. 17.) MULTI-FUNCTION LCD DISPLAY. 18.) CD DISC 1, 2, 3, 4, 5 Select Buttons. 19.) TAPE Button. 20.) AUX / PHONO Button. 21.) CD / DISC SKIP Button. 22.) TUNER / BAND Button. 23.) VOLUME Up Button. 24.) CD Tray OPEN / CLOSE Button. 25.) VOLUME Down Button. 26.) CD PLAY / PAUSE Button. 27.) TUNING / SKIP SEARCH Button. 28.) STOP / MEM. MS9933TT_050304.p65 8 8 3/5/2004, 10:25 1.) 5 CD CHANGER Tray. 2.) Cassette DECK A Control Keys: RECORD / PLAY / REWIND...
...-SPEED DUBBING Button. 14.) BBS (Bass Boost) 'On'Indicator. 15.) REMOTE SENSOR. 16.) Turntable Dust Cover. 17.) MULTI-FUNCTION LCD DISPLAY. 18.) CD DISC 1, 2, 3, 4, 5 Select Buttons. 19.) TAPE Button. 20.) AUX / PHONO Button. 21.) CD / DISC SKIP Button. 22.) TUNER / BAND Button. 23.) VOLUME Up Button. 24.) CD Tray OPEN / CLOSE Button. 25.) VOLUME Down Button. 26.) CD PLAY / PAUSE Button. 27.) TUNING / SKIP SEARCH Button. 28.) STOP / MEM. MS9933TT_050304.p65 8 8 3/5/2004, 10:25 1.) 5 CD CHANGER Tray. 2.) Cassette DECK A Control Keys: RECORD / PLAY / REWIND...
Owners Manual
Page 11
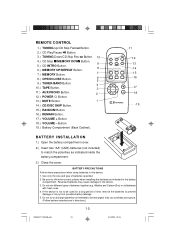
... the cover. REMOTE CONTROL 1.) TUNING Up/CD Skip Fwd Button. 2.) CD Play/Pause Button. 3.) TUNING Down/CD Skip Rev Button. 10 4.) CD Stop /MEMORY DOWN Button. 9 5.) CD INTRO Button. 8 6.) MEMORY UP/REPEAT Button. 7.) MEMORY Button. 7 8.) OPEN/CLOSE Button. 6 5 9.) TUNER/BAND Button. 4 10.) TAPE Button. 3 11.) AUX/PHONO Button. 2 12.) POWER Button. 13.) MUTE Button. 1 14.) CD/DISC SKIP Button. 15.) RANDOM Button. 16.) REMAIN Button. 17.) VOLUME + Button. 18.) VOLUME - they can overheat and rupture. (Follow battery manufacturer's directions.) 10 MS9933TT_050304...
... the cover. REMOTE CONTROL 1.) TUNING Up/CD Skip Fwd Button. 2.) CD Play/Pause Button. 3.) TUNING Down/CD Skip Rev Button. 10 4.) CD Stop /MEMORY DOWN Button. 9 5.) CD INTRO Button. 8 6.) MEMORY UP/REPEAT Button. 7.) MEMORY Button. 7 8.) OPEN/CLOSE Button. 6 5 9.) TUNER/BAND Button. 4 10.) TAPE Button. 3 11.) AUX/PHONO Button. 2 12.) POWER Button. 13.) MUTE Button. 1 14.) CD/DISC SKIP Button. 15.) RANDOM Button. 16.) REMAIN Button. 17.) VOLUME + Button. 18.) VOLUME - they can overheat and rupture. (Follow battery manufacturer's directions.) 10 MS9933TT_050304...
Owners Manual
Page 12
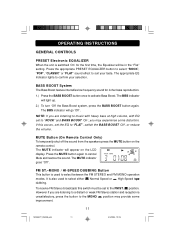
... receive FM Stereo broadcasts this occurs, set to the FM ST. BASS BOOST System The Bass Boost feature intensifies low frequency sound for the first time, the Equalizer will go 'Off'. OPERATING INSTRUCTIONS GENERAL CONTROLS PRESET Electronic EQUALIZER When the unit is also used to select between the FM STEREO and FM MONO operation modes. FM ST.- It is switched 'On'for richer bass reproduction. 1.) Press the BASS BOOST button...
... receive FM Stereo broadcasts this occurs, set to the FM ST. BASS BOOST System The Bass Boost feature intensifies low frequency sound for the first time, the Equalizer will go 'Off'. OPERATING INSTRUCTIONS GENERAL CONTROLS PRESET Electronic EQUALIZER When the unit is also used to select between the FM STEREO and FM MONO operation modes. FM ST.- It is switched 'On'for richer bass reproduction. 1.) Press the BASS BOOST button...
Owners Manual
Page 13
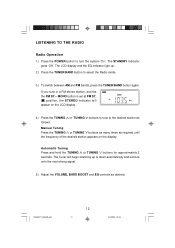
... signal. 5.) Adjust the VOLUME, BASS BOOST and EQ controls as follows. If you tune in a FM stereo station, and the the FM ST.- Manual Tuning Press the TUNING or TUNING buttons as many times as required until the frequency of the desired station appears on the LCD display. 4.) Press the TUNING or TUNING buttons to tune to the desired station as desired. MONO button is set at FM ST. The Tuner will begin...
... signal. 5.) Adjust the VOLUME, BASS BOOST and EQ controls as follows. If you tune in a FM stereo station, and the the FM ST.- Manual Tuning Press the TUNING or TUNING buttons as many times as required until the frequency of the desired station appears on the LCD display. 4.) Press the TUNING or TUNING buttons to tune to the desired station as desired. MONO button is set at FM ST. The Tuner will begin...
Owners Manual
Page 15
... F. STANDBY POWER FM ST. - UP MEMORY STOP/MEM. FWD STOP/EJECT PAUSE PLAY REWIND F.FWD STOP/EJECT PAUSE 5 COMPACT DISC AUTOMATIC CHANGER DIGITAL FILTER PROCESSING SYSTEM 40 TRACK PROGRAM MEMORY AM / FM DIGITAL TUNING 4 BAND PRESET EQUALIZER MS9933TT_050304.p65 14 14 3/5/2004, 10:25 MONO / HI-SPEED DUBBING BASS BOOST BBS PRESET EQUALIZER REMOTE SENSOR PHONES POP FLAT EQ ROCK AUX/PHONO CD/DISC SKIP TAPE TUNER/BAND 1 DISC MULTI-FUNCTION LCD DISPLAY 2 DISC 3 D I S C 4 D I S C MODEL...
... F. STANDBY POWER FM ST. - UP MEMORY STOP/MEM. FWD STOP/EJECT PAUSE PLAY REWIND F.FWD STOP/EJECT PAUSE 5 COMPACT DISC AUTOMATIC CHANGER DIGITAL FILTER PROCESSING SYSTEM 40 TRACK PROGRAM MEMORY AM / FM DIGITAL TUNING 4 BAND PRESET EQUALIZER MS9933TT_050304.p65 14 14 3/5/2004, 10:25 MONO / HI-SPEED DUBBING BASS BOOST BBS PRESET EQUALIZER REMOTE SENSOR PHONES POP FLAT EQ ROCK AUX/PHONO CD/DISC SKIP TAPE TUNER/BAND 1 DISC MULTI-FUNCTION LCD DISPLAY 2 DISC 3 D I S C 4 D I S C MODEL...
Owners Manual
Page 16
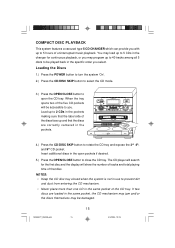
When the tray opens two of the five CD pockets will show the number of tracks and total playing time of that the discs are loaded in the same pocket, the CD mechanism may jam and/or the discs themselves may program up to 40 tracks among all 5 discs to be played back in the changer for the first disc and the display will be damaged...
When the tray opens two of the five CD pockets will show the number of tracks and total playing time of that the discs are loaded in the same pocket, the CD mechanism may jam and/or the discs themselves may program up to 40 tracks among all 5 discs to be played back in the changer for the first disc and the display will be damaged...
Owners Manual
Page 17
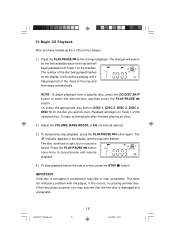
... this occurs, try playing another disc. The changer will begin playback. Or, press the appropriate disc button (DISC 1, DISC 2, DISC 3, DISC 4, DISC 5) for the first available disc in the display, and the play time flashes. IMPORTANT If the disc is smudged or scratched it has played all discs. 2.) Adjust the VOLUME, BASS BOOST, or EQ controls as desired. 3.) To temporarily stop playback, press the PLAY/PAUSE button again. If that disc plays properly, you may skip...
... this occurs, try playing another disc. The changer will begin playback. Or, press the appropriate disc button (DISC 1, DISC 2, DISC 3, DISC 4, DISC 5) for the first available disc in the display, and the play time flashes. IMPORTANT If the disc is smudged or scratched it has played all discs. 2.) Adjust the VOLUME, BASS BOOST, or EQ controls as desired. 3.) To temporarily stop playback, press the PLAY/PAUSE button again. If that disc plays properly, you may skip...
Owners Manual
Page 19
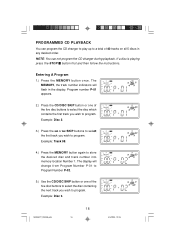
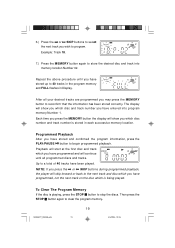
The display will flash in any desired order. PROGRAMMED CD PLAYBACK You can not program the CD changer during playback. The MEMORY, the track number indicators will change from Program Number P-01 to Program Number P-02. 5.) Use the CD/DISC SKIP button or one of the five disc buttons to select the disc which contains the first track you wish to program. Example: Disc 2. 3.) Press the or SKIP buttons to select the first track...
The display will flash in any desired order. PROGRAMMED CD PLAYBACK You can not program the CD changer during playback. The MEMORY, the track number indicators will change from Program Number P-01 to Program Number P-02. 5.) Use the CD/DISC SKIP button or one of the five disc buttons to select the disc which contains the first track you wish to program. Example: Disc 2. 3.) Press the or SKIP buttons to select the first track...
Owners Manual
Page 20
... stop the discs. The display will continue until you have stored and confirmed the program information, press the PLAY/PAUSE button to begin programmed playback. Playback will start at the first disc and track which you have programmed and will show you have entered into memory location Number 02. NOTE: If you press the or SKIP buttons during programmed playback, the player will...
... stop the discs. The display will continue until you have stored and confirmed the program information, press the PLAY/PAUSE button to begin programmed playback. Playback will start at the first disc and track which you have programmed and will show you have entered into memory location Number 02. NOTE: If you press the or SKIP buttons during programmed playback, the player will...
Owners Manual
Page 22
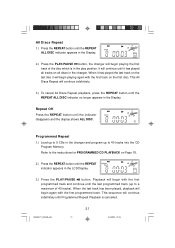
... until the indicator disappears and the display shows ALL DISC. Repeat Off Press the REPEAT button until Programmed Repeat Playback is in the changer. When it has played the last track on the last disc it has played all tracks on all discs in the play position. Refer to the instructions for PROGRAMMED CD PLAYBACK on the first disc. Playback will begin with the...
... until the indicator disappears and the display shows ALL DISC. Repeat Off Press the REPEAT button until Programmed Repeat Playback is in the changer. When it has played the last track on the last disc it has played all tracks on all discs in the play position. Refer to the instructions for PROGRAMMED CD PLAYBACK on the first disc. Playback will begin with the...
Owners Manual
Page 24
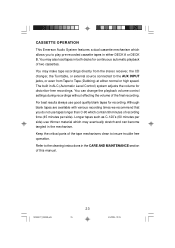
... time (45 minutes per side). You may make tape recordings directly from the stereo receiver, the CD changer, the Turntable, or external source connected to the AUX INPUT jacks, or even from Tape to insure trouble free operation. MS9933TT_050304.p65 23 23 3/5/2004, 10:25 CASSETTE OPERATION This Emerson Audio System features a dual cassette mechanism which allows you do not use tapes longer than C-90 which may eventually stretch and can change the playback volume control settings...
... time (45 minutes per side). You may make tape recordings directly from the stereo receiver, the CD changer, the Turntable, or external source connected to the AUX INPUT jacks, or even from Tape to insure trouble free operation. MS9933TT_050304.p65 23 23 3/5/2004, 10:25 CASSETTE OPERATION This Emerson Audio System features a dual cassette mechanism which allows you do not use tapes longer than C-90 which may eventually stretch and can change the playback volume control settings...
Owners Manual
Page 28
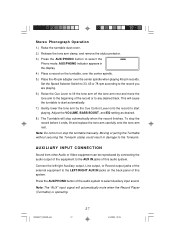
...:25 Adjust the VOLUME, BASS BOOST, and EQ setting as desired. 8.) The Turntable will stop the record before it ends, lift and replace the tone arm carefully onto the tone arm rest. AUXILIARY INPUT CONNECTION Sound from other Audio or Video equipment can be reproduced by the Cue Control Lever onto the record to start automatically. 7.) Gently lower the tone arm by connecting the audio output...
...:25 Adjust the VOLUME, BASS BOOST, and EQ setting as desired. 8.) The Turntable will stop the record before it ends, lift and replace the tone arm carefully onto the tone arm rest. AUXILIARY INPUT CONNECTION Sound from other Audio or Video equipment can be reproduced by the Cue Control Lever onto the record to start automatically. 7.) Gently lower the tone arm by connecting the audio output...
Owners Manual
Page 29
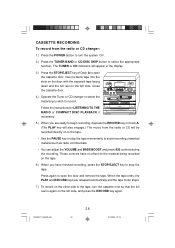
..., press the STOP/EJECT key to stop the tape momentarily to avoid recording unwanted material such as radio commercials. • You can adjust the VOLUME and BASS BOOST and preset EQ controls during the recording. MS9933TT_050304.p65 28 28 3/5/2004, 10:25 Close the cassette door. 4.) Operate the Tuner or CD changer to select the material you have no effect on...
..., press the STOP/EJECT key to stop the tape momentarily to avoid recording unwanted material such as radio commercials. • You can adjust the VOLUME and BASS BOOST and preset EQ controls during the recording. MS9933TT_050304.p65 28 28 3/5/2004, 10:25 Close the cassette door. 4.) Operate the Tuner or CD changer to select the material you have no effect on...
Owners Manual
Page 30
... POWER button to force the RECORD key. The TAPE Indicator appears in Deck A with exposed tape facing down to start simultaneously. Insert the pre-recorded tape in Deck B and the blank tape in the display. 3.) Press the STOP/EJECT key on Tape Deck A to avoid unpleasant high speed sound. Recording Hint: Try to open the doors. IMPORTANT NOTES: Never try to turn system...
... POWER button to force the RECORD key. The TAPE Indicator appears in Deck A with exposed tape facing down to start simultaneously. Insert the pre-recorded tape in Deck B and the blank tape in the display. 3.) Press the STOP/EJECT key on Tape Deck A to avoid unpleasant high speed sound. Recording Hint: Try to open the doors. IMPORTANT NOTES: Never try to turn system...
Owners Manual
Page 31
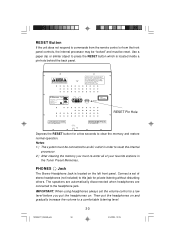
... the RESET button for private listening without disturbing others. The speakers are automatically disconnected when headphones are connected to clear the memory and restore normal operation. Connect a set the volume control to a low level before you must be reset. MS9933TT_050304.p65 30 30 3/5/2004, 10:25 Notes: 1.) The system must be connected to an AC outlet in the Tuner Preset Memories. PHONES Jack The Stereo Headphone Jack is...
... the RESET button for private listening without disturbing others. The speakers are automatically disconnected when headphones are connected to clear the memory and restore normal operation. Connect a set the volume control to a low level before you must be reset. MS9933TT_050304.p65 30 30 3/5/2004, 10:25 Notes: 1.) The system must be connected to an AC outlet in the Tuner Preset Memories. PHONES Jack The Stereo Headphone Jack is...
Owners Manual
Page 35
... by California residents) to follow operating instructions, commercial use and conditions, for labor and parts at an authorized Depot Repair Facility, or replace the product in original material, including original parts and workmanship, under normal use , rental, repairs by an unauthorized facility, or products purchased, used, serviced or damaged outside of your unit to Emerson Radio Corp. THIS WARRANTY GIVES YOU SPECIFIC LEGAL RIGHTS, AND YOU...
... by California residents) to follow operating instructions, commercial use and conditions, for labor and parts at an authorized Depot Repair Facility, or replace the product in original material, including original parts and workmanship, under normal use , rental, repairs by an unauthorized facility, or products purchased, used, serviced or damaged outside of your unit to Emerson Radio Corp. THIS WARRANTY GIVES YOU SPECIFIC LEGAL RIGHTS, AND YOU...

