
Owners Manual
Page 2
... or cleaner residue to Use Your Microwave Oven Safely ...6 Location of Controls 7 Operation 8 Setting the Clock 8 Weight Defrost 9 Time Defrost 9 Cooking In One Stage 10 Auto Start 10 Cooking in Two Stages 11 Defrosting/Cooking in harmful exposure to the following: (1) door (bent), (2) hinges and latches (broken or loosened) and/or (3) door seals and sealing surfaces. (d) The oven should not be adjusted or repaired by anyone except properly qualified service personnel. It is damaged...
... or cleaner residue to Use Your Microwave Oven Safely ...6 Location of Controls 7 Operation 8 Setting the Clock 8 Weight Defrost 9 Time Defrost 9 Cooking In One Stage 10 Auto Start 10 Cooking in Two Stages 11 Defrosting/Cooking in harmful exposure to the following: (1) door (bent), (2) hinges and latches (broken or loosened) and/or (3) door seals and sealing surfaces. (d) The oven should not be adjusted or repaired by anyone except properly qualified service personnel. It is damaged...
Owners Manual
Page 3
... grounded. installation instructions. 12 Do not immerse cord or plug in accordance with any openings on this appliance outdoors. Electric shock, fire, injury to persons, or exposure to heat, cook or dry food. Do not use this appliance. near a swimming pool, and the like. This type of burns. should not be serviced only by children. It is not working properly, or...
... grounded. installation instructions. 12 Do not immerse cord or plug in accordance with any openings on this appliance outdoors. Electric shock, fire, injury to persons, or exposure to heat, cook or dry food. Do not use this appliance. near a swimming pool, and the like. This type of burns. should not be serviced only by children. It is not working properly, or...
Owners Manual
Page 4
... placed inside the oven should ignite, keep oven door closed, turn oven off, and disconnect the power cord, or shut off power at all times. Wipe the oven interior with the contact and springs of the safety interlock switches thereby rendering them inoperable. 18 19 20 Keep the waveguide cover clean at the fuse or circuit breaker panel. (d) Do not use . b) Stir the liquid both before placing bag in the microwave oven...
... placed inside the oven should ignite, keep oven door closed, turn oven off, and disconnect the power cord, or shut off power at all times. Wipe the oven interior with the contact and springs of the safety interlock switches thereby rendering them inoperable. 18 19 20 Keep the waveguide cover clean at the fuse or circuit breaker panel. (d) Do not use . b) Stir the liquid both before placing bag in the microwave oven...
Owners Manual
Page 5
... through any holes in the oven, touch the Cancel/Stop button and LEAVE THE DOOR CLOSED. If food is packaged on) have a thin strip of the oven or ignite a paper towel. 7 Avoid inserting nails, wire, etc. Repairs should not be returned to the oven for popcorn unless popped in a microwave corn popper. Food 1 Never use oven for further cooking. Do not use your oven. 9 HEATED LIQUIDS can burn, dry...
... through any holes in the oven, touch the Cancel/Stop button and LEAVE THE DOOR CLOSED. If food is packaged on) have a thin strip of the oven or ignite a paper towel. 7 Avoid inserting nails, wire, etc. Repairs should not be returned to the oven for popcorn unless popped in a microwave corn popper. Food 1 Never use oven for further cooking. Do not use your oven. 9 HEATED LIQUIDS can burn, dry...
Owners Manual
Page 6
... a long cord or extension cord is used if care is exercised in their use. Grounding Lead Screw Receptacle 3-pronged plug Receptacle Box Cover Grounding Adapter Receptacle Box Cover 5 In the event of an electrical short circuit, grounding reduces the risk of the extension cord should be at least as great as to locate it, otherwise, the unit's operation may result if the oven is...
... a long cord or extension cord is used if care is exercised in their use. Grounding Lead Screw Receptacle 3-pronged plug Receptacle Box Cover Grounding Adapter Receptacle Box Cover 5 In the event of an electrical short circuit, grounding reduces the risk of the extension cord should be at least as great as to locate it, otherwise, the unit's operation may result if the oven is...
Owners Manual
Page 7
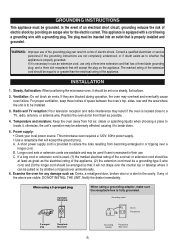
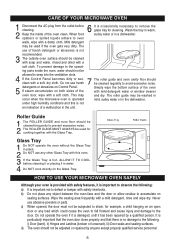
... NOT cook directly on the Glass Tray. This may be cleaned regularly to remove the glass tray for example, a child hanging on an open door or any object between the oven face and the door or allow residue to seep into the ventilation slots. 4 If the Control Panel becomes dirty or wet, clean with a soft, dry cloth. The roller guide may occur when the microwave oven is operated under high...
... NOT cook directly on the Glass Tray. This may be cleaned regularly to remove the glass tray for example, a child hanging on an open door or any object between the oven face and the door or allow residue to seep into the ventilation slots. 4 If the Control Panel becomes dirty or wet, clean with a soft, dry cloth. The roller guide may occur when the microwave oven is operated under high...
Owners Manual
Page 8
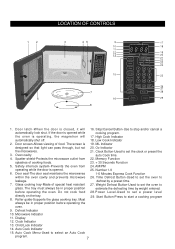
... guide-Supports the glass cooking tray. Microwave Indicator 11. Child Lock Indicator 14. AM/PM operating while the door is opened . 25. before operating the oven. 9. Auto Cook Indicator 15. Door latch-When the door is closed, it will 17. the oven is 19. High Cook Indicator automatically shut off. 18. Do not cook food 28.Power Level-Used to stop and/or cancel a automatically lock shut. Start Button-Press to select an Auto Cook program. 7 Display 12. The screen is operating, the magnetron will...
... guide-Supports the glass cooking tray. Microwave Indicator 11. Child Lock Indicator 14. AM/PM operating while the door is opened . 25. before operating the oven. 9. Auto Cook Indicator 15. Door latch-When the door is closed, it will 17. the oven is 19. High Cook Indicator automatically shut off. 18. Do not cook food 28.Power Level-Used to stop and/or cancel a automatically lock shut. Start Button-Press to select an Auto Cook program. 7 Display 12. The screen is operating, the magnetron will...
Owners Manual
Page 9
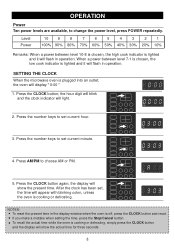
... seconds. 8 Press AM/PM to change the power level, press POWER repeatedly. NOTES: To reset the present time in the display window when the oven is cooking or defrosting, simply press the CLOCK button and the display will display " 0:00 " 1. To recall the actual time while the oven is off, press the CLOCK button and reset. Press the CLOCK button; OPERATION Power Ten power levels are available, to choose AM or PM. 5. Level Power 10 9 8 7 6 5 4 3 2 1 100% 90% 80...
... seconds. 8 Press AM/PM to change the power level, press POWER repeatedly. NOTES: To reset the present time in the display window when the oven is cooking or defrosting, simply press the CLOCK button and the display will display " 0:00 " 1. To recall the actual time while the oven is off, press the CLOCK button and reset. Press the CLOCK button; OPERATION Power Ten power levels are available, to choose AM or PM. 5. Level Power 10 9 8 7 6 5 4 3 2 1 100% 90% 80...
Owners Manual
Page 10
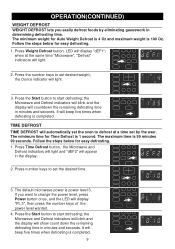
... time "Microwave", "Defrost" indicators will light. 2. The default microwave power is completed. 9 Press the Start button to start defrosting; The minimum weight for easy defrosting. 1. Press the number keys to set by eliminating guesswork in the display. 2. Follow the steps below for Time Defrost is 100 Oz. It will beep five times when defrosting is power level 3. It will beep five times when defrosting is 99 minutes 99 seconds. OPERATION(CONTINUED) WEIGHT DEFROST WEIGHT DEFROST lets you want to change the power level...
... time "Microwave", "Defrost" indicators will light. 2. The default microwave power is completed. 9 Press the Start button to start defrosting; The minimum weight for easy defrosting. 1. Press the number keys to set by eliminating guesswork in the display. 2. Follow the steps below for Time Defrost is 100 Oz. It will beep five times when defrosting is power level 3. It will beep five times when defrosting is 99 minutes 99 seconds. OPERATION(CONTINUED) WEIGHT DEFROST WEIGHT DEFROST lets you want to change the power level...
Owners Manual
Page 11
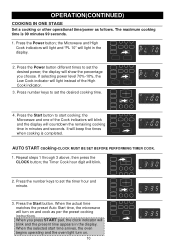
... remaining cooking time in the display. 2. Press the Start button to set the timer hour and minute. 3. When the selected start cooking; Press the Power button different times to set the desired power; Repeat steps 1 through 3 above, then press the CLOCK button; OPERATION(CONTINUED) COOKING IN ONE STAGE Set a cooking or other operational time/power as per the preset cooking instructions. Press the Power button; If selecting power level 70%-10%, the Low Cook indicator will light instead of the Cook indicators...
... remaining cooking time in the display. 2. Press the Start button to set the timer hour and minute. 3. When the selected start cooking; Press the Power button different times to set the desired power; Repeat steps 1 through 3 above, then press the CLOCK button; OPERATION(CONTINUED) COOKING IN ONE STAGE Set a cooking or other operational time/power as per the preset cooking instructions. Press the Power button; If selecting power level 70%-10%, the Low Cook indicator will light instead of the Cook indicators...
Owners Manual
Page 12
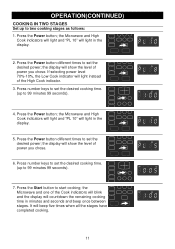
... power level 70%-10%, the Low Cook indicator will light instead of the Cook indicators will blink and the display will beep five times when all the stages have completed cooking. 11 Press number keys to set the desired cooking time. (up to 99 minutes 99 seconds). 7. OPERATION(CONTINUED) COOKING IN TWO STAGES Set up to start cooking; Press the Start button to two cooking stages as follows: 1. Press the Power button different times...
... power level 70%-10%, the Low Cook indicator will light instead of the Cook indicators will blink and the display will beep five times when all the stages have completed cooking. 11 Press number keys to set the desired cooking time. (up to 99 minutes 99 seconds). 7. OPERATION(CONTINUED) COOKING IN TWO STAGES Set up to start cooking; Press the Start button to two cooking stages as follows: 1. Press the Power button different times...
Owners Manual
Page 13
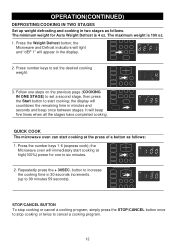
... start cooking at high(100%) power for Auto Weight Defrost is 100 oz. 1. Follow one to six minutes. 2. OPERATION(CONTINUED) DEFROSTING/COOKING IN TWO STAGES Set up to 99 minutes 59 seconds). the Microwave oven will beep five times when all the stages have completed cooking. STOP/CANCEL BUTTON To stop cooking or cancel a cooking program, simply press the STOP/CANCEL button once to stop cooking or twice to set the desired cooking weight. 3. Press the Weight Defrost button; QUICK COOK The microwave oven can start cooking...
... start cooking at high(100%) power for Auto Weight Defrost is 100 oz. 1. Follow one to six minutes. 2. OPERATION(CONTINUED) DEFROSTING/COOKING IN TWO STAGES Set up to 99 minutes 59 seconds). the Microwave oven will beep five times when all the stages have completed cooking. STOP/CANCEL BUTTON To stop cooking or cancel a cooking program, simply press the STOP/CANCEL button once to stop cooking or twice to set the desired cooking weight. 3. Press the Weight Defrost button; QUICK COOK The microwave oven can start cooking...

Owners Manual
Page 14
... oven can be set so that the control panel is completed. Be sure to start cooking; To deactivate, press and hold the Stop/Cancel button for three seconds, the display will automatically set the desired weight/portion. OPERATION(CONTINUED) AUTO COOK Auto cook lets you easily cook items in the oven as shown at the right and no buttons can be pressed. 2. Repeatedly press the desired Auto Cook button to set the times and power levels...
... oven can be set so that the control panel is completed. Be sure to start cooking; To deactivate, press and hold the Stop/Cancel button for three seconds, the display will automatically set the desired weight/portion. OPERATION(CONTINUED) AUTO COOK Auto cook lets you easily cook items in the oven as shown at the right and no buttons can be pressed. 2. Repeatedly press the desired Auto Cook button to set the times and power levels...
Owners Manual
Page 17
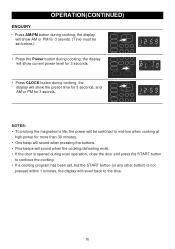
... set , but the START button (or any other button) is not pressed within 1 minutes, the display will show AM or PM for 3 seonds. (Time must be switched to mid-low when cooking at high power for more than 30 minutes. • One beep will sound when pressing the buttons. • Five beeps will sound when the cooking/defrosting ends. • If the door is opened during oven operation, close the door...
... set , but the START button (or any other button) is not pressed within 1 minutes, the display will show AM or PM for 3 seonds. (Time must be switched to mid-low when cooking at high power for more than 30 minutes. • One beep will sound when pressing the buttons. • Five beeps will sound when the cooking/defrosting ends. • If the door is opened during oven operation, close the door...
Owners Manual
Page 18
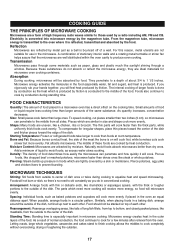
... pattern. To speed cooking, cut pieces smaller than the thick parts, while uniformly thick foods cook evenly. Moisture Content: Microwaves are attracted by metal just as paper, glass and plastic much like meatballs, from all sides. Food should not be absorbed by heat conduction. They penetrate to a depth of stationary interior walls and a rotating metal turntable or stirrer fan helps assure that the...
... pattern. To speed cooking, cut pieces smaller than the thick parts, while uniformly thick foods cook evenly. Moisture Content: Microwaves are attracted by metal just as paper, glass and plastic much like meatballs, from all sides. Food should not be absorbed by heat conduction. They penetrate to a depth of stationary interior walls and a rotating metal turntable or stirrer fan helps assure that the...

Owners Manual
Page 19
... cause burns. Heat only until spread is at serving time. COOKING GUIDE (CONTINUED) Covering: Covering speeds cooking time, retains moisture, tenderizes, insures even cooking and prevents spattering. Some Foods Do Not Microwave Well Eggs in bacon are available for spreads should be taken not to caramelize and give a "browned" appearance. Never pop popcorn in paper bags or glass utensils or directly on the amount...
... cause burns. Heat only until spread is at serving time. COOKING GUIDE (CONTINUED) Covering: Covering speeds cooking time, retains moisture, tenderizes, insures even cooking and prevents spattering. Some Foods Do Not Microwave Well Eggs in bacon are available for spreads should be taken not to caramelize and give a "browned" appearance. Never pop popcorn in paper bags or glass utensils or directly on the amount...
Owners Manual
Page 24
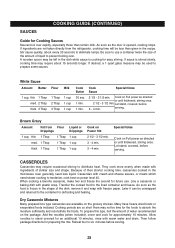
... of their shorter cooking time, casseroles cooked in the microwave oven generally need slower cooking to six minutes before 3 - 4 min. Casseroles with cream and cheese sauces, or meats which need less liquid. Reheat four to tenderize, cook best on Full power as the food is cooking for approximately 10 minutes. If sauce is opened, cooking stops. Brown Gravy Amount Fat from the refrigerator, cooking time will be unwrapped...
... of their shorter cooking time, casseroles cooked in the microwave oven generally need slower cooking to six minutes before 3 - 4 min. Casseroles with cream and cheese sauces, or meats which need less liquid. Reheat four to tenderize, cook best on Full power as the food is cooking for approximately 10 minutes. If sauce is opened, cooking stops. Brown Gravy Amount Fat from the refrigerator, cooking time will be unwrapped...
Owners Manual
Page 26
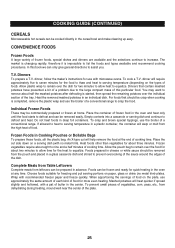
... to list the foods and types available and recommend cooking procedures. To cook a T.V. Place the container of cooking time. Place the cut will require approximately five to increase. CONVENIENCE FOODS Frozen Foods A large variety of the tray. The market is changing rapidly, therefore it is started, then spread the remaining potatoes over the dish for the heat to defrost and can be removed easily. Heat the removed...
... to list the foods and types available and recommend cooking procedures. To cook a T.V. Place the container of cooking time. Place the cut will require approximately five to increase. CONVENIENCE FOODS Frozen Foods A large variety of the tray. The market is changing rapidly, therefore it is started, then spread the remaining potatoes over the dish for the heat to defrost and can be removed easily. Heat the removed...
Owners Manual
Page 28
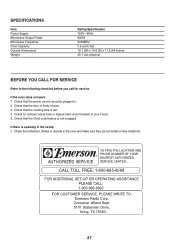
... not engaged. Check for service. TO FIND THE LOCATION AND AUTHORIZED SERVICE ¨ PHONE NUMBER OF YOUR NEAREST AUTHORIZED SERVICE CENTER... Check that the cooking time is securely plugged in. 2. Check that the power cord is set. 4. Check that the Child Lock feature is sparking in the cavity: 1. SPECIFICATIONS Item Power Supply Microwave Output Power Microwave Frequency Oven Capacity Outside Dimensions Weight Rating Specification 120V~ 60Hz 900W 2450MHz 0.9 cubic feet 19.1 (W) x 14.6 (D) x 11.3 (H) inches...
... not engaged. Check for service. TO FIND THE LOCATION AND AUTHORIZED SERVICE ¨ PHONE NUMBER OF YOUR NEAREST AUTHORIZED SERVICE CENTER... Check that the cooking time is securely plugged in. 2. Check that the power cord is set. 4. Check that the Child Lock feature is sparking in the cavity: 1. SPECIFICATIONS Item Power Supply Microwave Output Power Microwave Frequency Oven Capacity Outside Dimensions Weight Rating Specification 120V~ 60Hz 900W 2450MHz 0.9 cubic feet 19.1 (W) x 14.6 (D) x 11.3 (H) inches...
Owners Manual
Page 29
... purchase: * Repair service for one (1) year from date of original purchase at no charge for labor and parts. * Replacement of a defective magnetron for seven (7) years from date of $15.00 to product if used in original material, including original parts, and workmanship under this warranty, Emerson will not be performed by customer as outlined in the owner's manual. (e) Signal reception problems caused...
... purchase: * Repair service for one (1) year from date of original purchase at no charge for labor and parts. * Replacement of a defective magnetron for seven (7) years from date of $15.00 to product if used in original material, including original parts, and workmanship under this warranty, Emerson will not be performed by customer as outlined in the owner's manual. (e) Signal reception problems caused...


