
Owners Manual
Page 1
COMPLETE STEREO SYSTEM with AM/FM STEREO RADIO, CD and CASSETTE PLAYER, and FULL SIZE STEREO PHONOGRAPH OWNER'S MANUAL NR305TT Visit our web site at www.emersonradio.com NR305TT_050704.p65 19 7/5/2004, 10:31
COMPLETE STEREO SYSTEM with AM/FM STEREO RADIO, CD and CASSETTE PLAYER, and FULL SIZE STEREO PHONOGRAPH OWNER'S MANUAL NR305TT Visit our web site at www.emersonradio.com NR305TT_050704.p65 19 7/5/2004, 10:31
Owners Manual
Page 2
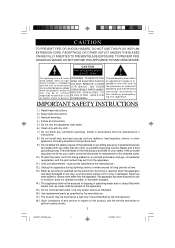
... with liquids such as vases shall be exposed to the presence of important operating and maintenance (servicing) instructions in any way, such as power-supply cord or plug is intended to DO NOT REMOVE COVER alert the user to the presence of uninsulated 'dangerous voltage' within an equi- Use only power source as indicated. 16.) Use replacement parts as radiators, heat registers, stoves, or other .
... with liquids such as vases shall be exposed to the presence of important operating and maintenance (servicing) instructions in any way, such as power-supply cord or plug is intended to DO NOT REMOVE COVER alert the user to the presence of uninsulated 'dangerous voltage' within an equi- Use only power source as indicated. 16.) Use replacement parts as radiators, heat registers, stoves, or other .
Owners Manual
Page 3
... includes a stereo radio, CD and Cassette players, a full-size, 3-speed stereo phonograph, and matching wide range stereo speakers. Every component in this Emerson Heritage Series Complete Stereo System. If the problem cannot be instructed on the back panel. Inside this number when calling for product service. Please read all of the instructions in this manual to provide this beautiful real wood veneer cabinet you will be resolved by phone you will...
... includes a stereo radio, CD and Cassette players, a full-size, 3-speed stereo phonograph, and matching wide range stereo speakers. Every component in this Emerson Heritage Series Complete Stereo System. If the problem cannot be instructed on the back panel. Inside this number when calling for product service. Please read all of the instructions in this manual to provide this beautiful real wood veneer cabinet you will be resolved by phone you will...
Owners Manual
Page 4
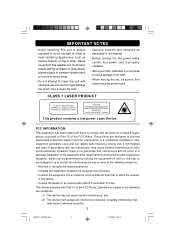
... experienced radio/TV technician for a Class B digital device, pursuant to Part 15 of other stereo equipment that power cord is no guarantee that may cause undesired operation. 3 NR305TT_050704.p65 3 7/5/2004, 10:31 CLASS 1 LASER PRODUCT CLASS 1 LASER PRODUCT APPAREIL Á LASER DE CLASSE 1 PRODUCTO LASER DE CLASE 1 CAUTION INVISIBLE LASER RADIATION WHEN OPEN AND INTERLOCKS DEFEATED. Use a clean dry cloth. • Operate controls and switches...
... experienced radio/TV technician for a Class B digital device, pursuant to Part 15 of other stereo equipment that power cord is no guarantee that may cause undesired operation. 3 NR305TT_050704.p65 3 7/5/2004, 10:31 CLASS 1 LASER PRODUCT CLASS 1 LASER PRODUCT APPAREIL Á LASER DE CLASSE 1 PRODUCTO LASER DE CLASE 1 CAUTION INVISIBLE LASER RADIATION WHEN OPEN AND INTERLOCKS DEFEATED. Use a clean dry cloth. • Operate controls and switches...
Owners Manual
Page 5
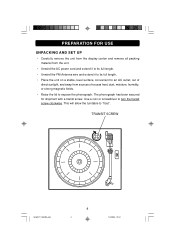
... turn the transit screw clockwise. TRANSIT SCREW NR305TT_050704.p65 4 4 7/5/2004, 10:31 Use a coin or screwdriver to "float". PREPARATION FOR USE UNPACKING AND SET UP • Carefully remove the unit from the display carton and remove all packing material from the unit. • Unwind the AC power cord and extend it to its full length. • Unwind the FM Antenna wire...
... turn the transit screw clockwise. TRANSIT SCREW NR305TT_050704.p65 4 4 7/5/2004, 10:31 Use a coin or screwdriver to "float". PREPARATION FOR USE UNPACKING AND SET UP • Carefully remove the unit from the display carton and remove all packing material from the unit. • Unwind the AC power cord and extend it to its full length. • Unwind the FM Antenna wire...
Owners Manual
Page 6
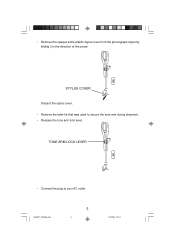
NR305TT_050704.p65 5 5 7/5/2004, 10:31 TONE ARM LOCK LEVER • Connect the plug to secure the tone arm during shipment. • Release the tone arm lock lever. STYLUS COVER Discard the stylus cover. • Remove the twist-tie that was used to your AC outlet. • Remove the opaque white plastic stylus cover from the phonograph stylus by sliding it in the direction of the arrow.
NR305TT_050704.p65 5 5 7/5/2004, 10:31 TONE ARM LOCK LEVER • Connect the plug to secure the tone arm during shipment. • Release the tone arm lock lever. STYLUS COVER Discard the stylus cover. • Remove the twist-tie that was used to your AC outlet. • Remove the opaque white plastic stylus cover from the phonograph stylus by sliding it in the direction of the arrow.
Owners Manual
Page 7
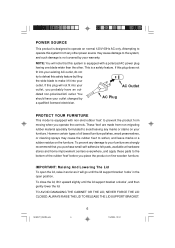
... AC outlet, do not try to defeat this plug does not fit into your outlet, you place the product on your warranty. If this safety feature by AC Plug a qualified licensed electrician. These 'feet' are made from moving when you operate the controls. POWER SOURCE This product is designed to operate on the furniture. You should have an out...
... AC outlet, do not try to defeat this plug does not fit into your outlet, you place the product on your warranty. If this safety feature by AC Plug a qualified licensed electrician. These 'feet' are made from moving when you operate the controls. POWER SOURCE This product is designed to operate on the furniture. You should have an out...
Owners Manual
Page 8
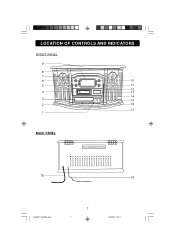
LOCATION OF CONTROLS AND INDICATORS FRONT PANEL 9 8 7 6 10 5 11 12 4 13 14 3 15 2 16 17 1 BACK PANEL 18 19 NR305TT_050704.p65 7 7 7/5/2004, 10:31
LOCATION OF CONTROLS AND INDICATORS FRONT PANEL 9 8 7 6 10 5 11 12 4 13 14 3 15 2 16 17 1 BACK PANEL 18 19 NR305TT_050704.p65 7 7 7/5/2004, 10:31
Owners Manual
Page 9
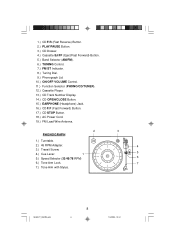
1.) CD F.R (Fast Reverse) Button. 2.) PLAY/PAUSE Button. 3.) CD Drawer. 4.) Cassette EJ/FF (Eject/Fast Forward) Button. 5.) Band Selector (AM/FM). 6.) TUNING Control. 7.) FM ST Indicator. 8.) Tuning Dial. 9.) Phonograph Lid. 10.) ON/OFF-VOLUME Control. 11.) Function Selector (PHONO/CD/TUNER). 12.) Cassette Player. 13.) CD Track Number Display. 14.) CD OPEN/CLOSE Button. 15.) EARPHONE (Headphone) Jack. 16.) CD F.F (Fast Forward) Button. 17.) CD STOP Button. 18.) AC Power Cord. 19.) FM Lead Wire Antenna. 2 PHONOGRAPH 1.) Turntable. 2.) 45 RPM Adapter. 3.) Transit...
1.) CD F.R (Fast Reverse) Button. 2.) PLAY/PAUSE Button. 3.) CD Drawer. 4.) Cassette EJ/FF (Eject/Fast Forward) Button. 5.) Band Selector (AM/FM). 6.) TUNING Control. 7.) FM ST Indicator. 8.) Tuning Dial. 9.) Phonograph Lid. 10.) ON/OFF-VOLUME Control. 11.) Function Selector (PHONO/CD/TUNER). 12.) Cassette Player. 13.) CD Track Number Display. 14.) CD OPEN/CLOSE Button. 15.) EARPHONE (Headphone) Jack. 16.) CD F.F (Fast Forward) Button. 17.) CD STOP Button. 18.) AC Power Cord. 19.) FM Lead Wire Antenna. 2 PHONOGRAPH 1.) Turntable. 2.) 45 RPM Adapter. 3.) Transit...
Owners Manual
Page 10
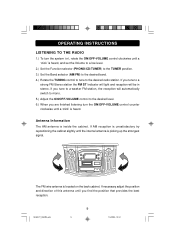
... TUNING control to tune to the desired level. 6.) When you tune to a weaker FM station, the reception will be in stereo. NR305TT_050704.p65 9 9 7/5/2004, 10:31 If you are finished listening turn the system 'on the back cabinet. OPERATING INSTRUCTIONS LISTENING TO THE RADIO 1.) To turn the ON/OFF-VOLUME control counter clockwise until a 'click'is heard. If necessary adjust the position and direction of this antenna...
... TUNING control to tune to the desired level. 6.) When you tune to a weaker FM station, the reception will be in stereo. NR305TT_050704.p65 9 9 7/5/2004, 10:31 If you are finished listening turn the system 'on the back cabinet. OPERATING INSTRUCTIONS LISTENING TO THE RADIO 1.) To turn the ON/OFF-VOLUME control counter clockwise until a 'click'is heard. If necessary adjust the position and direction of this antenna...
Owners Manual
Page 11
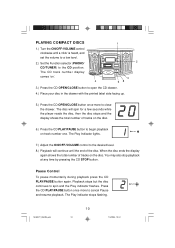
.... 2.) Set the Function selector (PHONO/ CD/TUNER) to spin and the Play indicator flashes. You may also stop playback at any time by pressing the CD STOP button. The Play indicator stops flashing. The CD track number display comes 'on track number one. Pause Control To pause momentarily during playback press the CD PLAY/PAUSE button again. Press the CD PLAY/PAUSE button once more to cancel Pause and resume playback. PLAYING COMPACT DISCS 1.) Turn...
.... 2.) Set the Function selector (PHONO/ CD/TUNER) to spin and the Play indicator flashes. You may also stop playback at any time by pressing the CD STOP button. The Play indicator stops flashing. The CD track number display comes 'on track number one. Pause Control To pause momentarily during playback press the CD PLAY/PAUSE button again. Press the CD PLAY/PAUSE button once more to cancel Pause and resume playback. PLAYING COMPACT DISCS 1.) Turn...
Owners Manual
Page 12
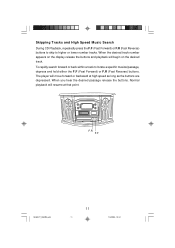
Skipping Tracks and High Speed Music Search During CD Playback, repeatedly press the F.F (Fast Forward) or F.R (Fast Reverse) buttons to skip to locate a specific musical passage, depress and hold either the F.F (Fast Forward) or F.R (Fast Reverse) buttons. The player will move forward or backward at that point. When you hear the desired passage release the buttons. To rapidly search...
Skipping Tracks and High Speed Music Search During CD Playback, repeatedly press the F.F (Fast Forward) or F.R (Fast Reverse) buttons to skip to locate a specific musical passage, depress and hold either the F.F (Fast Forward) or F.R (Fast Reverse) buttons. The player will move forward or backward at that point. When you hear the desired passage release the buttons. To rapidly search...
Owners Manual
Page 13
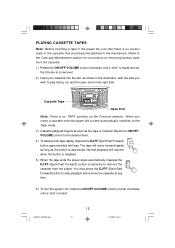
.../FF (Eject/Fast Forward) button to stop playback and remove the cassette at any time. 6.) To turn the system 'off, rotate the ON/OFF-VOLUME control counter clockwise until a 'click'is inserted. When you insert a cassette onto the player the system automatically switches to the Tape mode. 3.) Cassette playback begins as soon as the tape is heard and set the Volume to a low level. 2.) Insert...
.../FF (Eject/Fast Forward) button to stop playback and remove the cassette at any time. 6.) To turn the system 'off, rotate the ON/OFF-VOLUME control counter clockwise until a 'click'is inserted. When you insert a cassette onto the player the system automatically switches to the Tape mode. 3.) Cassette playback begins as soon as the tape is heard and set the Volume to a low level. 2.) Insert...
Owners Manual
Page 14
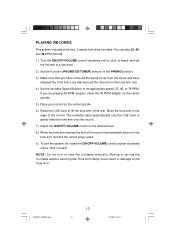
PLAYING RECORDS This system includes a full-size, 3-speed, belt-drive turntable. You can play 33, 45, and 78 RPM records. 1.) Turn the ON/OFF-VOLUME control clockwise until a 'click'is heard, and set the Volume to a low level. 2.) Set the Function (PHONO/CD/TUNER) selector to the PHONO position. 3.) Make sure that you have removed the stylus cover from the stylus and have released...
PLAYING RECORDS This system includes a full-size, 3-speed, belt-drive turntable. You can play 33, 45, and 78 RPM records. 1.) Turn the ON/OFF-VOLUME control clockwise until a 'click'is heard, and set the Volume to a low level. 2.) Set the Function (PHONO/CD/TUNER) selector to the PHONO position. 3.) Make sure that you have removed the stylus cover from the stylus and have released...

Owners Manual
Page 15
..., PLEASE TURN THE SCREW IN COUNTER-CLOCKWISE DIRECTION. The built-in speakers automatically shut off when headphones are connected to a comfortable listening level. Before putting on the headphones always set of stereo headphones with a 3.5mm mini-plug to a low level. USING STEREO HEADPHONES (NOT INCLUDED) Connect a set the ON/OFFVOLUME control to the EARPHONE jack on and gradually increase the Volume to the EARPHONE jack. NR305TT_050704...
..., PLEASE TURN THE SCREW IN COUNTER-CLOCKWISE DIRECTION. The built-in speakers automatically shut off when headphones are connected to a comfortable listening level. Before putting on the headphones always set of stereo headphones with a 3.5mm mini-plug to a low level. USING STEREO HEADPHONES (NOT INCLUDED) Connect a set the ON/OFFVOLUME control to the EARPHONE jack on and gradually increase the Volume to the EARPHONE jack. NR305TT_050704...

Owners Manual
Page 16
...tape (visible through the cassette center window (see Fig. 2), the tape may be removed, in most cases, by fast winding of the cassette from one end to the other and back again. • Use only well-known brands of tape. To reduce the likelihood of these problems ...using cassettes are no loose layers of tape visible through the center window). Furthermore, do not expose cassettes to "ridges"formed in playback, and 2.) Tape tangling - Where the tape wraps itself around vital parts of C-120 cassettes. NR305TT_050704.p65 15 15 7/5/2004, 10:31 These may be jamming due to direct...
...tape (visible through the cassette center window (see Fig. 2), the tape may be removed, in most cases, by fast winding of the cassette from one end to the other and back again. • Use only well-known brands of tape. To reduce the likelihood of these problems ...using cassettes are no loose layers of tape visible through the center window). Furthermore, do not expose cassettes to "ridges"formed in playback, and 2.) Tape tangling - Where the tape wraps itself around vital parts of C-120 cassettes. NR305TT_050704.p65 15 15 7/5/2004, 10:31 These may be jamming due to direct...
Owners Manual
Page 17
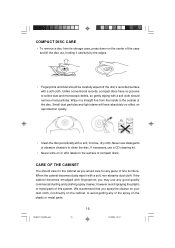
... and lift the disc out, holding it with a soft, non-abrasive dust cloth. We recommend that you would care for any good quality commercial dusting and polishing spray cleaner, however avoid spraying the plastic or metal parts of this system. COMPACT DISC CARE • To remove a disc from the inside to the surface of compact discs. Never use any piece...
... and lift the disc out, holding it with a soft, non-abrasive dust cloth. We recommend that you would care for any good quality commercial dusting and polishing spray cleaner, however avoid spraying the plastic or metal parts of this system. COMPACT DISC CARE • To remove a disc from the inside to the surface of compact discs. Never use any piece...

Owners Manual
Page 18
... during the warranty period due to a manufacturing defect, do not return the system to follow operating instructions, commercial use and conditions, for labor and parts at 1-800-898-9020. We will provide repair service at our discretion. AU898R TO FIND THE LOCATION AND PHONE NUMBER OF YOUR NEAREST SERVICE CENTER PERMITTED TO PERFORM WARRANTY... Consumer Affairs Dept. 1901 Diplomat Drive, Farmers...
... during the warranty period due to a manufacturing defect, do not return the system to follow operating instructions, commercial use and conditions, for labor and parts at 1-800-898-9020. We will provide repair service at our discretion. AU898R TO FIND THE LOCATION AND PHONE NUMBER OF YOUR NEAREST SERVICE CENTER PERMITTED TO PERFORM WARRANTY... Consumer Affairs Dept. 1901 Diplomat Drive, Farmers...

Owners Manual
Page 19
EMERSON PART NO. : 16-2922 405-02 NR305TT_050704.p65 18 PRINTED IN CHINA 7/5/2004, 10:31
EMERSON PART NO. : 16-2922 405-02 NR305TT_050704.p65 18 PRINTED IN CHINA 7/5/2004, 10:31

