

Owners Manual
Page 1
Created by Stephen Hillenburg. All Rights Reserved. Nickelodeon, SpongeBob SquarePants and all related titles, logos and characters are trademarks of Viacom International Inc. PORTABLE CD-R/CD-RW STEREO SYSTEM OWNER'S MANUAL SB230/SB231 Copyright 2003 Viacom International Inc.
Created by Stephen Hillenburg. All Rights Reserved. Nickelodeon, SpongeBob SquarePants and all related titles, logos and characters are trademarks of Viacom International Inc. PORTABLE CD-R/CD-RW STEREO SYSTEM OWNER'S MANUAL SB230/SB231 Copyright 2003 Viacom International Inc.
Owners Manual
Page 2
...exit from the apparatus. 11. Do not install near any service or repairs to this apparatus near water. 6. If the provided plug does not fit into the apparatus, the apparatus has been exposed to persons. Upon completion of any heat sources such as...Use replacement parts as indicated. 16. Read these instructions. 3. Refer all servicing to a wall only if recommended by the manufacturer. 12. Do not block any way, such as power-supply cord or plug is intended to alert the user to the presence of electric shock to rain or moisture, does not operate normally, has changed...
...exit from the apparatus. 11. Do not install near any service or repairs to this apparatus near water. 6. If the provided plug does not fit into the apparatus, the apparatus has been exposed to persons. Upon completion of any heat sources such as...Use replacement parts as indicated. 16. Read these instructions. 3. Refer all servicing to a wall only if recommended by the manufacturer. 12. Do not block any way, such as power-supply cord or plug is intended to alert the user to the presence of electric shock to rain or moisture, does not operate normally, has changed...
Owners Manual
Page 3
.... It has been designed to Part 15 of enjoyment and trouble free operation. In the event you many years of the FCC Rules. For future reference, record the serial number in a residential installation. These limits are designed to malfunctioning. • Avoid using this unit in perfect working order when it left our factory. CAUTION: USE OF CONTROLS, ADJUSTMENTS OR PERFORMANCE OF PROCEDURES OTHER THAN...
.... It has been designed to Part 15 of enjoyment and trouble free operation. In the event you many years of the FCC Rules. For future reference, record the serial number in a residential installation. These limits are designed to malfunctioning. • Avoid using this unit in perfect working order when it left our factory. CAUTION: USE OF CONTROLS, ADJUSTMENTS OR PERFORMANCE OF PROCEDURES OTHER THAN...
Owners Manual
Page 4
... using six (6) 'C' batteries (for CD and radio operation) and two (2) 'AA' batteries (for the unit to keep the time and alarm setting in case the main power is interrupted. The unit will only fit in a polarized AC outlet. Remove this unit with battery power, remove the battery compartment on the rear of the unit in order for clock operation); This polarized AC plug will function without these batteries...
... using six (6) 'C' batteries (for CD and radio operation) and two (2) 'AA' batteries (for the unit to keep the time and alarm setting in case the main power is interrupted. The unit will only fit in a polarized AC outlet. Remove this unit with battery power, remove the battery compartment on the rear of the unit in order for clock operation); This polarized AC plug will function without these batteries...
Owners Manual
Page 5
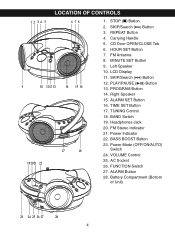
... Display 11. Power Mode (OFF/ON/AUTO) Switch 24. Battery Compartment (Bottom of Unit) 23 24 25 26 27 28 4 HOUR SET Button 7. STOP (I) Button 2. BAND Switch 19. BASS BOOST Button 23. LOCATION OF CONTROLS 12 34 5 6 78 9 10 1112 13 14 15 16 19 20 21 22 17 18 1. REPEAT Button 4. Carrying Handle 5. CD Door OPEN/CLOSE Tab 6. FM Antenna 8. PROGRAM Button 14. Right Speaker 15. ALARM SET Button 16. TIME SET Button 17. TUNING Control 18. Headphones Jack...
... Display 11. Power Mode (OFF/ON/AUTO) Switch 24. Battery Compartment (Bottom of Unit) 23 24 25 26 27 28 4 HOUR SET Button 7. STOP (I) Button 2. BAND Switch 19. BASS BOOST Button 23. LOCATION OF CONTROLS 12 34 5 6 78 9 10 1112 13 14 15 16 19 20 21 22 17 18 1. REPEAT Button 4. Carrying Handle 5. CD Door OPEN/CLOSE Tab 6. FM Antenna 8. PROGRAM Button 14. Right Speaker 15. ALARM SET Button 16. TIME SET Button 17. TUNING Control 18. Headphones Jack...
Owners Manual
Page 6
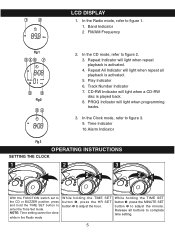
... complete time setting. 5 Time Indicator 10.Alarm Indicator Fig 3 OPERATING INSTRUCTIONS SETTING THE CLOCK 1 2 3 21 21 With the FUNCTION switch set to the CD or BUZZER position, press and hold the TIME SET button to figure 3. 9. NOTE: Time setting cannot be done while in the Radio mode While holding the TIME SET button ‚, press the MINUTE SET button ƒ to adjust the hour. 1 2 FM MHz LCD DISPLAY 1. Play Indicator 6. Repeat All Indicator will light when programming tracks. 3. Track Number Indicator 7. While holding the TIME SET button...
... complete time setting. 5 Time Indicator 10.Alarm Indicator Fig 3 OPERATING INSTRUCTIONS SETTING THE CLOCK 1 2 3 21 21 With the FUNCTION switch set to the CD or BUZZER position, press and hold the TIME SET button to figure 3. 9. NOTE: Time setting cannot be done while in the Radio mode While holding the TIME SET button ‚, press the MINUTE SET button ƒ to adjust the hour. 1 2 FM MHz LCD DISPLAY 1. Play Indicator 6. Repeat All Indicator will light when programming tracks. 3. Track Number Indicator 7. While holding the TIME SET button...

Owners Manual
Page 7
... antenna is received, the FM Stereo indicator will light, if listening to enhance the overall bass sound. Slide the BAND Switch to select the desired AM or FM station. Use the TUNING control to select AM or FM. OPERATING INSTRUCTIONS (CONTINUED) LISTENING TO THE RADIO 1 2 3 Slide the FUNCTION switch to its full length. You may have to turn the unit off. HEADPHONES JACK For private listening, plug...
... antenna is received, the FM Stereo indicator will light, if listening to enhance the overall bass sound. Slide the BAND Switch to select the desired AM or FM station. Use the TUNING control to select AM or FM. OPERATING INSTRUCTIONS (CONTINUED) LISTENING TO THE RADIO 1 2 3 Slide the FUNCTION switch to its full length. You may have to turn the unit off. HEADPHONES JACK For private listening, plug...
Owners Manual
Page 8
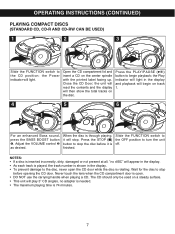
... position to the CD position; The CD should only be used on a steady surface. • This unit will then show the total tracks on the disc. OPERATING INSTRUCTIONS (CONTINUED) PLAYING COMPACT DISCS (STANDARD CD, CD-R AND CD-RW CAN BE USED) 1 2 3 Slide the FUNCTION switch to turn the unit off. the Power indicator will appear in the display. • As each track is played, the track number is shown in the display and playback will stop.
... position to the CD position; The CD should only be used on a steady surface. • This unit will then show the total tracks on the disc. OPERATING INSTRUCTIONS (CONTINUED) PLAYING COMPACT DISCS (STANDARD CD, CD-R AND CD-RW CAN BE USED) 1 2 3 Slide the FUNCTION switch to turn the unit off. the Power indicator will appear in the display. • As each track is played, the track number is shown in the display and playback will stop.
Owners Manual
Page 9
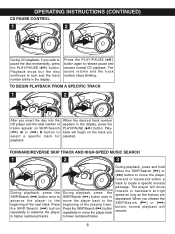
... the PLAY/PAUSE ( ) button again to higher numbered tracks. When the desired track number appears in the display. The player will move the player forward or backward within a track to select a specific track for playback. When you release the SKIP/Search ( ) or ( ) button, normal playback will begin on SKIP/Search ( ) ‚ or ( ) ƒ button to locate a specific musical passage. OPERATING INSTRUCTIONS (CONTINUED) CD PAUSE CONTROL 1 2 During CD playback, if you selected. FORWARD/REVERSE SKIP TRACK...
... the PLAY/PAUSE ( ) button again to higher numbered tracks. When the desired track number appears in the display. The player will move the player forward or backward within a track to select a specific track for playback. When you release the SKIP/Search ( ) or ( ) button, normal playback will begin on SKIP/Search ( ) ‚ or ( ) ƒ button to locate a specific musical passage. OPERATING INSTRUCTIONS (CONTINUED) CD PAUSE CONTROL 1 2 During CD playback, if you selected. FORWARD/REVERSE SKIP TRACK...
Owners Manual
Page 10
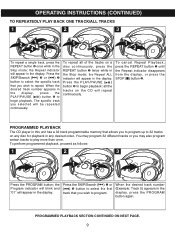
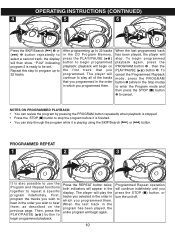
... track number (Example: Track 5) appears in the Stop mode; To cancel Repeat Playback, press the REPEAT button ‚ until the Repeat indicator disappears from the display, or press the STOP (I) button ƒ. Press the SKIP/Search ( ) ‚ or ( ) ƒ button to select the first track that you wish to begin playback; To perform programmed playback, proceed as follows: 1 2 3 1 2 Press the PROGRAM button; OPERATING INSTRUCTIONS (CONTINUED) TO REPEATEDLY PLAY BACK ONE TRACK/ALL TRACKS 1 2 3 2 1 43 1 2 1 2 To repeat a single track...
... track number (Example: Track 5) appears in the Stop mode; To cancel Repeat Playback, press the REPEAT button ‚ until the Repeat indicator disappears from the display, or press the STOP (I) button ƒ. Press the SKIP/Search ( ) ‚ or ( ) ƒ button to select the first track that you wish to begin playback; To perform programmed playback, proceed as follows: 1 2 3 1 2 Press the PROGRAM button; OPERATING INSTRUCTIONS (CONTINUED) TO REPEATEDLY PLAY BACK ONE TRACK/ALL TRACKS 1 2 3 2 1 43 1 2 1 2 To repeat a single track...
Owners Manual
Page 11
... program 2 is ready to be set. To begin programmed playback; First, program the tracks you wish to hear in the CD Program Memory, press the PLAY/PAUSE ( ) button to begin programmed playback again, press the PROGRAM button ‚ , then the PLAY/PAUSE ( ) button ƒ. playback will continue indefinitely until you press the STOP (I ) button „ to cancel. PROGRAMMED REPEAT 1 2 3 It is playing using the SKIP/Search ( ) or ( ) button. Programmed Repeat operation will begin on the previous page. 4 1 OPERATING INSTRUCTIONS...
... program 2 is ready to be set. To begin programmed playback; First, program the tracks you wish to hear in the CD Program Memory, press the PLAY/PAUSE ( ) button to begin programmed playback again, press the PROGRAM button ‚ , then the PLAY/PAUSE ( ) button ƒ. playback will continue indefinitely until you press the STOP (I ) button „ to cancel. PROGRAMMED REPEAT 1 2 3 It is playing using the SKIP/Search ( ) or ( ) button. Programmed Repeat operation will begin on the previous page. 4 1 OPERATING INSTRUCTIONS...
Owners Manual
Page 12
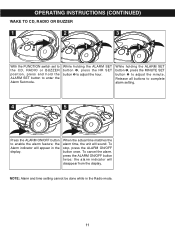
... button twice; NOTE: Alarm and time setting cannot be done while in the display. While holding the ALARM SET button ‚, press the MINUTE SET button ƒ to adjust the hour. While holding the ALARM SET button ‚, press the HR SET button ƒ to adjust the minute. To stop, press the ALARM ON/OFF button once. OPERATING INSTRUCTIONS (CONTINUED) WAKE TO CD, RADIO OR BUZZER 1 2 3 12 12 With the FUNCTION switch set to the CD, RADIO...
... button twice; NOTE: Alarm and time setting cannot be done while in the display. While holding the ALARM SET button ‚, press the MINUTE SET button ƒ to adjust the hour. While holding the ALARM SET button ‚, press the HR SET button ƒ to adjust the minute. To stop, press the ALARM ON/OFF button once. OPERATING INSTRUCTIONS (CONTINUED) WAKE TO CD, RADIO OR BUZZER 1 2 3 12 12 With the FUNCTION switch set to the CD, RADIO...
Owners Manual
Page 13
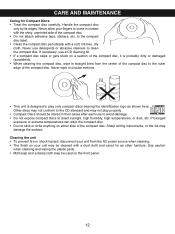
... for Compact Discs • Treat the compact disc carefully. If necessary, use a CD cleaning kit. • If a compact disc skips or gets stuck on your unit may damage the surface. Cleaning the unit • To prevent fire or shock hazard, disconnect your fingers to come in their cases after each use detergents or abrasive cleaners to play properly. • Compact Discs should be cleaned with...
... for Compact Discs • Treat the compact disc carefully. If necessary, use a CD cleaning kit. • If a compact disc skips or gets stuck on your unit may damage the surface. Cleaning the unit • To prevent fire or shock hazard, disconnect your fingers to come in their cases after each use detergents or abrasive cleaners to play properly. • Compact Discs should be cleaned with...

Owners Manual
Page 14
... installed upside-down. Set FUNCTION switch to CD. Connect power cord. Insert fresh batteries correctly. AM or FM, no sound. CD is obtained. Solution Retune the AM or FM broadcast station. Wipe disc with label side up. FUNCTION switch not set to RADIO. Reorient FM telescopic antenna. Set FUNCTION switch to RADIO. Consumer Affairs Dept. 1901 Diplomat Drive Farmers Branch, TX 75234 13 TROUBLESHOOTING GUIDE Should this unit exhibit a problem, check the following before seeking service. Symptom Radio...
... installed upside-down. Set FUNCTION switch to CD. Connect power cord. Insert fresh batteries correctly. AM or FM, no sound. CD is obtained. Solution Retune the AM or FM broadcast station. Wipe disc with label side up. FUNCTION switch not set to RADIO. Reorient FM telescopic antenna. Set FUNCTION switch to RADIO. Consumer Affairs Dept. 1901 Diplomat Drive Farmers Branch, TX 75234 13 TROUBLESHOOTING GUIDE Should this unit exhibit a problem, check the following before seeking service. Symptom Radio...
Owners Manual
Page 15
... cover damage from the date of original purchase in the amount of $9.00 (not required by an unauthorized facility, or products purchased, used, serviced or damaged outside of your check or money order payable to : Emerson Radio Corp. 1901 Diplomat Drive. AU898M 14 For repair or replacement, pack your unit to Emerson Radio Corp. THIS WARRANTY GIVES YOU SPECIFIC LEGAL RIGHTS, AND...
... cover damage from the date of original purchase in the amount of $9.00 (not required by an unauthorized facility, or products purchased, used, serviced or damaged outside of your check or money order payable to : Emerson Radio Corp. 1901 Diplomat Drive. AU898M 14 For repair or replacement, pack your unit to Emerson Radio Corp. THIS WARRANTY GIVES YOU SPECIFIC LEGAL RIGHTS, AND...

Owners Manual
Page 16
¤ EMERSON PART NO.: 21-2048 310-02 Printed in China
¤ EMERSON PART NO.: 21-2048 310-02 Printed in China