
Owners Manual
Page 2
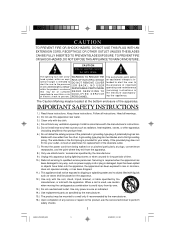
... is intended to DO NOT REMOVE COVER alert the user to the presence of uninsulated 'dangerous voltage' within the product's enclosure (OR BACK), NO USER SERVICEABLE PARTS INSIDE that produce heat. 6.) Do not defeat the safety purpose of any way, such as vases shall be exposed to persons. Use only power source as indicated. 14.) Use replacement parts as specified by the...
... is intended to DO NOT REMOVE COVER alert the user to the presence of uninsulated 'dangerous voltage' within the product's enclosure (OR BACK), NO USER SERVICEABLE PARTS INSIDE that produce heat. 6.) Do not defeat the safety purpose of any way, such as vases shall be exposed to persons. Use only power source as indicated. 14.) Use replacement parts as specified by the...
Owners Manual
Page 3
... this Owner's Manual completely to insure that lets you store up to connect and play any problems with all the functions and operations of this system, charge the battery in the U.S. iE600_050407.p65 2 2 4/5/2007, 11:50 For Your iPod® Thank you for purchasing this Home Audio System from Emerson Research. The digital tuner has a 20 station preset memory that you are completely familiar with the set-up...
... this Owner's Manual completely to insure that lets you store up to connect and play any problems with all the functions and operations of this system, charge the battery in the U.S. iE600_050407.p65 2 2 4/5/2007, 11:50 For Your iPod® Thank you for purchasing this Home Audio System from Emerson Research. The digital tuner has a 20 station preset memory that you are completely familiar with the set-up...
Owners Manual
Page 4
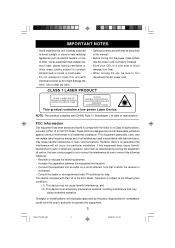
... and, if not installed and used in accordance with the instructions, may cause undesired operation. This device complies with chemical solvents as described in the manual. • Before turning 'On'the power, make certain that AC power cord is subject to the following measures: • Reorient or relocate the receiving antenna. • Increase the separation between the equipment and receiver. • Connect the equipment into...
... and, if not installed and used in accordance with the instructions, may cause undesired operation. This device complies with chemical solvents as described in the manual. • Before turning 'On'the power, make certain that AC power cord is subject to the following measures: • Reorient or relocate the receiving antenna. • Increase the separation between the equipment and receiver. • Connect the equipment into...
Owners Manual
Page 5
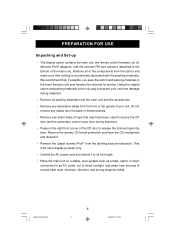
... and the accessories. • Remove any small strips of the CD door to release the lock and open the door. That is accidentally discarded with the packing materials. PREPARATION FOR USE Unpacking and Set-up • The display carton contains the main unit, the remote control handset, six (6) different iPod® adapters, and the external FM wire antenna (attached to the bottom...
... and the accessories. • Remove any small strips of the CD door to release the lock and open the door. That is accidentally discarded with the packing materials. PREPARATION FOR USE Unpacking and Set-up • The display carton contains the main unit, the remote control handset, six (6) different iPod® adapters, and the external FM wire antenna (attached to the bottom...
Owners Manual
Page 9
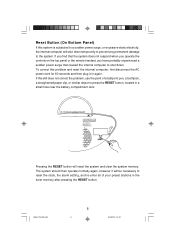
... of your preset stations in again. The system should then operate normally again, however it in the tuner memory after pressing the RESET button. iE600_050407.p65 8 8 4/5/2007, 11:50 Pressing the RESET button will shut down . If this problem and reset the internal computer, first disconnect the AC power cord for 60 seconds and then plug it will be necessary to reset the clock, the alarm setting, and...
... of your preset stations in again. The system should then operate normally again, however it in the tuner memory after pressing the RESET button. iE600_050407.p65 8 8 4/5/2007, 11:50 Pressing the RESET button will shut down . If this problem and reset the internal computer, first disconnect the AC power cord for 60 seconds and then plug it will be necessary to reset the clock, the alarm setting, and...
Owners Manual
Page 14
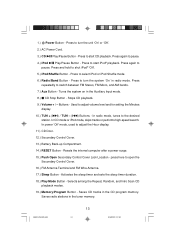
... the tuner memory. In power 'Off'mode, used to select iPod or iPod Shuffle mode. 6.) Radio/Band Button - press here to adjust volume level and for setting the Minutes display. 10.) TUN + ( ) / TUN - ( ) Buttons - Saves CD tracks in radio mode. Used to open the Secondary Control Cover. 16.) FM Antenna Terminal and FM Wire Antenna. 17.) Sleep Button - Press to turn the system 'On'in the CD program memory. Press to turn the unit 'On'or 'Off'. 2.) AC Power Cord. 3.) CD Play/Pause Button...
... the tuner memory. In power 'Off'mode, used to select iPod or iPod Shuffle mode. 6.) Radio/Band Button - press here to adjust volume level and for setting the Minutes display. 10.) TUN + ( ) / TUN - ( ) Buttons - Saves CD tracks in radio mode. Used to open the Secondary Control Cover. 16.) FM Antenna Terminal and FM Wire Antenna. 17.) Sleep Button - Press to turn the system 'On'in the CD program memory. Press to turn the unit 'On'or 'Off'. 2.) AC Power Cord. 3.) CD Play/Pause Button...
Owners Manual
Page 15
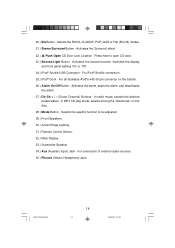
... Speakers. 30.) Accent Edge Lighting. 31.) Remote Control Sensor. 32.) Main Display. 33.) Subwoofer Speaker. 34.) Aux (Auxiliary Input) Jack - In MP3 CD play mode, selects among the "directories" on the bottom. 26.) Alarm On/Off Button - iE600_050407.p65 14 14 4/5/2007, 11:50 For iPod® Shuffle connection. 25.) iPod® Dock - For connection of external audio sources. 35.) Phones (Stereo Headphone) Jack. Activates the snooze function. Activates the alarm, stops the alarm, and deactivates the alarm. 27.) Dir/Ch + / - (Direct Channel) Buttons...
... Speakers. 30.) Accent Edge Lighting. 31.) Remote Control Sensor. 32.) Main Display. 33.) Subwoofer Speaker. 34.) Aux (Auxiliary Input) Jack - In MP3 CD play mode, selects among the "directories" on the bottom. 26.) Alarm On/Off Button - iE600_050407.p65 14 14 4/5/2007, 11:50 For iPod® Shuffle connection. 25.) iPod® Dock - For connection of external audio sources. 35.) Phones (Stereo Headphone) Jack. Activates the snooze function. Activates the alarm, stops the alarm, and deactivates the alarm. 27.) Dir/Ch + / - (Direct Channel) Buttons...

Owners Manual
Page 16
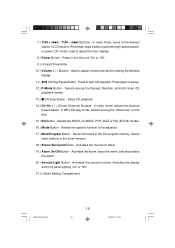
... Press to switch between FM Stereo, FM Mono, and AM bands. 6.) Sleep Button - In iPod mode, skips tracks or performs high-speed 2.) iPod Play/Pause Button - Turns the system on in radio mode. Activates the sleep timer and sets the sleep timer duration. Buttons - Press to select iPod or iPod Shuffle mode. 4.) Aux Button - Remote Control 9 8 10 7 6 7 11 5 10 12 4 13 14 3 15 2 16 1 17 18 1 19 20 21 1.) iPod / search. Press to start iPod® playback...
... Press to switch between FM Stereo, FM Mono, and AM bands. 6.) Sleep Button - In iPod mode, skips tracks or performs high-speed 2.) iPod Play/Pause Button - Turns the system on in radio mode. Activates the sleep timer and sets the sleep timer duration. Buttons - Press to select iPod or iPod Shuffle mode. 4.) Aux Button - Remote Control 9 8 10 7 6 7 11 5 10 12 4 13 14 3 15 2 16 1 17 18 1 19 20 21 1.) iPod / search. Press to start iPod® playback...
Owners Manual
Page 17
... + / - (Direct Channel) Buttons - Activates the snooze function. iE600_050407.p65 16 16 4/5/2007, 11:50 In radio mode, selects the desired preset station. Selects the ROCK, CLASSIC, POP, JAZZ or Flat (EQ Off) modes. 16.) Mode Button - Selects the specific function to adjust the Hour display. 8.) Power Button - Saves CD tracks in the tuner memory. 18.) Stereo Surround Button - Activates the 'Surround'effect. 19.) Alarm On/Off Button - In power 'Off'mode, used to be adjusted. 17.) Mem/Program Button - Press to start CD...
... + / - (Direct Channel) Buttons - Activates the snooze function. iE600_050407.p65 16 16 4/5/2007, 11:50 In radio mode, selects the desired preset station. Selects the ROCK, CLASSIC, POP, JAZZ or Flat (EQ Off) modes. 16.) Mode Button - Selects the specific function to adjust the Hour display. 8.) Power Button - Saves CD tracks in the tuner memory. 18.) Stereo Surround Button - Activates the 'Surround'effect. 19.) Alarm On/Off Button - In power 'Off'mode, used to be adjusted. 17.) Mem/Program Button - Press to start CD...
Owners Manual
Page 18
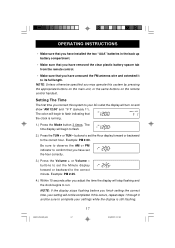
OPERATING INSTRUCTIONS • Make sure that you have installed the two "AAA" batteries in the back up battery compartment. • Make sure that you have removed the clear plastic battery spacer tab from the remote control. • Make sure that you have set the hour correctly. 3.) Press the Volume + or Volume - Setting The Time The first time you connect this system to your AC outlet the display will turn on the remote control handset. If...
OPERATING INSTRUCTIONS • Make sure that you have installed the two "AAA" batteries in the back up battery compartment. • Make sure that you have removed the clear plastic battery spacer tab from the remote control. • Make sure that you have set the hour correctly. 3.) Press the Volume + or Volume - Setting The Time The first time you connect this system to your AC outlet the display will turn on the remote control handset. If...
Owners Manual
Page 21
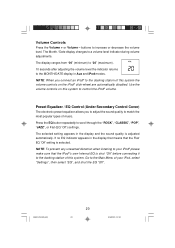
.... Go to the MONTH/DATE display in the display and the sound quality is selected. The display ranges from "00" (minimum) to "30" (maximum). 10 seconds after adjusting the volume level the indicator returns to the Main Menu of music. Press the EQ button repeatedly to the docking station of this system. The selected setting appears in Aux and iPod modes. NOTE: To prevent any unwanted...
.... Go to the MONTH/DATE display in the display and the sound quality is selected. The display ranges from "00" (minimum) to "30" (maximum). 10 seconds after adjusting the volume level the indicator returns to the Main Menu of music. Press the EQ button repeatedly to the docking station of this system. The selected setting appears in Aux and iPod modes. NOTE: To prevent any unwanted...
Owners Manual
Page 22
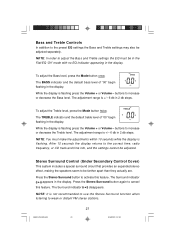
... 'Off'mode with no EQ indicator appearing in the display. buttons to increase or decrease the Bass level. The adjustment range is flashing press the Volume + or Volume - While the display is +/- 6 db in the display. The Surround indicator appears in the display. Stereo Surround Control (Under Secondary Control Cover) This system includes a special surround circuit that provides an expanded stereo effect, making the speakers seem to weak or distant FM stereo stations.
... 'Off'mode with no EQ indicator appearing in the display. buttons to increase or decrease the Bass level. The adjustment range is flashing press the Volume + or Volume - While the display is +/- 6 db in the display. The Surround indicator appears in the display. Stereo Surround Control (Under Secondary Control Cover) This system includes a special surround circuit that provides an expanded stereo effect, making the speakers seem to weak or distant FM stereo stations.
Owners Manual
Page 25
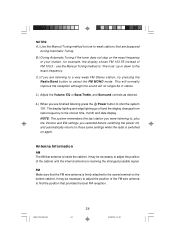
... the FM wire antenna to select the FM MONO mode. FM Make sure that provides the best FM reception. It may be in stereo. 3.) Adjust the Volume, EQ or Bass/Treble, and Surround controls as desired. 4.) When you are finished listening press the Power button to the correct time, month and date display. The display lighting and edge lighting go off , and automatically returns to weak stations that are...
... the FM wire antenna to select the FM MONO mode. FM Make sure that provides the best FM reception. It may be in stereo. 3.) Adjust the Volume, EQ or Bass/Treble, and Surround controls as desired. 4.) When you are finished listening press the Power button to the correct time, month and date display. The display lighting and edge lighting go off , and automatically returns to weak stations that are...

Owners Manual
Page 35
... for use the insert that contains heavy bass. iE600_050407.p65 34 34 4/5/2007, 11:50 The other 5 inserts are designed for the docking area to the Main Menu in your iPod® to the 'Off'position. The docking station in the docking station of time. Go to keep the connector free from dust when no iPod® will fit properly in this system follows...
... for use the insert that contains heavy bass. iE600_050407.p65 34 34 4/5/2007, 11:50 The other 5 inserts are designed for the docking area to the Main Menu in your iPod® to the 'Off'position. The docking station in the docking station of time. Go to keep the connector free from dust when no iPod® will fit properly in this system follows...
Owners Manual
Page 38
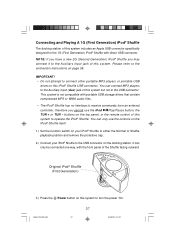
... operate the iPod® Shuffle. Original iPod® Shuffle (First Generation) 3.) Press the Power button on the top panel, or the remote control of this system to turn the power 'On'. Please refer to the connection instructions on the docking station. You can connect MP3 players to the Auxiliary Input (Aux) jack of this system includes an Apple USB connector specifically designed for the 1G (First Generation) iPod® Shuffle with direct USB connector. It can only use the iPod Play/Pause button...
... operate the iPod® Shuffle. Original iPod® Shuffle (First Generation) 3.) Press the Power button on the top panel, or the remote control of this system to turn the power 'On'. Please refer to the connection instructions on the docking station. You can connect MP3 players to the Auxiliary Input (Aux) jack of this system includes an Apple USB connector specifically designed for the 1G (First Generation) iPod® Shuffle with direct USB connector. It can only use the iPod Play/Pause button...
Owners Manual
Page 39
... the iPod Play/Pause button on the iPod® Shuffle to adjust volume until the Volume Level Indicator display is connected to an external auxiliary music source. buttons on the iPod® Shuffle to begin playback in Step 1 above. Charging the iPod® Battery When your selection in either the Normal or Shuffle mode, according to select the iPod Shuffle function. NOTE: Pressing the iPod Play/Pause on this system the battery...
... the iPod Play/Pause button on the iPod® Shuffle to adjust volume until the Volume Level Indicator display is connected to an external auxiliary music source. buttons on the iPod® Shuffle to begin playback in Step 1 above. Charging the iPod® Battery When your selection in either the Normal or Shuffle mode, according to select the iPod Shuffle function. NOTE: Pressing the iPod Play/Pause on this system the battery...
Owners Manual
Page 40
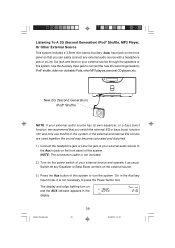
... audio source has its own equalizer, or a bass boost function, we recommend that you switch the external EQ or bass boost function 'Off'and only use the EQ in this system. The display and edge lighting turn the system 'On'in the Auxiliary Input mode. Use the Auxiliary Input jack to press the Power button first. Listening To A 2G (Second Generation) iPod® Shuffle, MP3 Player, Or Other External Source This system includes a 3.5mm mini stereo Auxiliary (Aux) Input jack...
... audio source has its own equalizer, or a bass boost function, we recommend that you switch the external EQ or bass boost function 'Off'and only use the EQ in this system. The display and edge lighting turn the system 'On'in the Auxiliary Input mode. Use the Auxiliary Input jack to press the Power button first. Listening To A 2G (Second Generation) iPod® Shuffle, MP3 Player, Or Other External Source This system includes a 3.5mm mini stereo Auxiliary (Aux) Input jack...
Owners Manual
Page 47
... to play until the sleep timer counts down to "00", press the Power button at any time. Tune to the desired radio station, load and start the desired CD, or start your iPod® and select the desired album, or artist, or genre, etc. 2.) Adjust the Volume level as you are falling asleep to music from an external device connected to the Aux in the display. Sleep To Music Timer This...
... to play until the sleep timer counts down to "00", press the Power button at any time. Tune to the desired radio station, load and start the desired CD, or start your iPod® and select the desired album, or artist, or genre, etc. 2.) Adjust the Volume level as you are falling asleep to music from an external device connected to the Aux in the display. Sleep To Music Timer This...
Owners Manual
Page 48
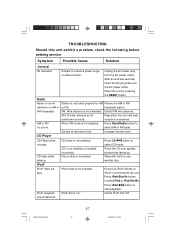
... or sound Station is not installed or installed incorrectly. broadcast station. Increase Volume level. CD is not tuned properly for AM Retune the AM or FM distortion on AM or or FM. iPod® playback sound distorted. FM: Wire antenna is not selected. Volume at minimum level. Press CD button to no sound. iPod® iPod® does not play . iPod mode is not extended. Disc is connected to start playback. Unplug the AC power plug...
... or sound Station is not installed or installed incorrectly. broadcast station. Increase Volume level. CD is not tuned properly for AM Retune the AM or FM distortion on AM or or FM. iPod® playback sound distorted. FM: Wire antenna is not selected. Volume at minimum level. Press CD button to no sound. iPod® iPod® does not play . iPod mode is not extended. Disc is connected to start playback. Unplug the AC power plug...
Owners Manual
Page 51
... original parts and workmanship, under normal use , rental, repairs by California residents) to : Emerson Radio Corp., 5101 Statesman Drive, Irving, TX 75063. We suggest that you record the Serial Number of your check or money order payable to follow operating instructions, commercial use and conditions, for a period of purchase, we will provide repair service at an authorized Depot Repair Facility, or replace the product in...
... original parts and workmanship, under normal use , rental, repairs by California residents) to : Emerson Radio Corp., 5101 Statesman Drive, Irving, TX 75063. We suggest that you record the Serial Number of your check or money order payable to follow operating instructions, commercial use and conditions, for a period of purchase, we will provide repair service at an authorized Depot Repair Facility, or replace the product in...

