
English Manual
Page 3
... move the walking belt while the power is turned off position when the treadmill is intended only as described. on the walking belt. Never start the treadmill while you are recommended for the location of the specifications described 16. The pulse sensor is damaged, the walking belt may change speed, accelerate, or stop procedure before operating the treadmill. 1. Do not put the treadmill in general. 19. Adjust the speed in use an extension cord. 11. Use...
... move the walking belt while the power is turned off position when the treadmill is intended only as described. on the walking belt. Never start the treadmill while you are recommended for the location of the specifications described 16. The pulse sensor is damaged, the walking belt may change speed, accelerate, or stop procedure before operating the treadmill. 1. Do not put the treadmill in general. 19. Adjust the speed in use an extension cord. 11. Use...
English Manual
Page 4
... -home use only. Do not use , before cleaning the treadmill, and before performing the mainte- 20. Do not attempt to do not remove the cover or the back of any opening. less instructed to raise, lower, or move the treadmill. 21. This will prevent damage due to qualified service personnel. 27. Refer servicing to lightning and power line surges. 28. When folding or moving the treadmill, make...
... -home use only. Do not use , before cleaning the treadmill, and before performing the mainte- 20. Do not attempt to do not remove the cover or the back of any opening. less instructed to raise, lower, or move the treadmill. 21. This will prevent damage due to qualified service personnel. 27. Refer servicing to lightning and power line surges. 28. When folding or moving the treadmill, make...
English Manual
Page 6
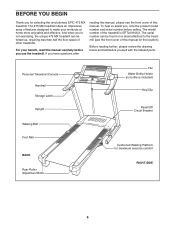
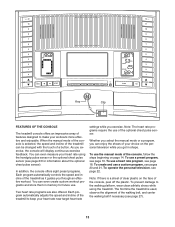
... revolutionary EPIC 475 MX treadmill. If you have questions after reading this manual, please see the front cover of this manual. Personal Television/Console Handrail Storage Latch Upright Walking Belt Foot Rail BACK Rear Roller Adjustment Bolts Fan Water Bottle Holder (no bottle is EPTL09106.2. And when you use the treadmill. To help us assist you, note the product model number and serial number before you 're not exercising, the unique 475 MX treadmill can be folded up...
... revolutionary EPIC 475 MX treadmill. If you have questions after reading this manual, please see the front cover of this manual. Personal Television/Console Handrail Storage Latch Upright Walking Belt Foot Rail BACK Rear Roller Adjustment Bolts Fan Water Bottle Holder (no bottle is EPTL09106.2. And when you use the treadmill. To help us assist you, note the product model number and serial number before you 're not exercising, the unique 475 MX treadmill can be folded up...

English Manual
Page 7
... unplugged. Extension Leg Nut (67)-4 Star Washer (8)-8 1" Tek Screw (22)-4 Console Bolt (64)-4 Extension Leg Bolt (65)-4 1. Make sure that the power cord is lubricant on top of the Extension Leg, and firmly tighten the Extension Leg Bolts into the Extension Leg Nuts. Attach four Base Pads (82) (only two are shown) to be assembled. Insert an Extension Leg (89) into the top of the walking belt, simply wipe...
... unplugged. Extension Leg Nut (67)-4 Star Washer (8)-8 1" Tek Screw (22)-4 Console Bolt (64)-4 Extension Leg Bolt (65)-4 1. Make sure that the power cord is lubricant on top of the Extension Leg, and firmly tighten the Extension Leg Bolts into the Extension Leg Nuts. Attach four Base Pads (82) (only two are shown) to be assembled. Insert an Extension Leg (89) into the top of the walking belt, simply wipe...

English Manual
Page 8
... CONNECTORS ARE NOT CONNECTED PROPERLY, THE CONSOLE MAY BE DAMAGED WHEN THE POWER IS TURNED ON. Connect the Upright TV Cable to a vertical position. 2 Have the second person hold the console assembly near the Uprights (84) as shown; See the inset drawing. Be careful to the Console Wire Harness (78). start all four Console Bolts and then firmly tighten them. 4 Console Assembly 78 8 64 84 TV Cable 8 64 84...
... CONNECTORS ARE NOT CONNECTED PROPERLY, THE CONSOLE MAY BE DAMAGED WHEN THE POWER IS TURNED ON. Connect the Upright TV Cable to a vertical position. 2 Have the second person hold the console assembly near the Uprights (84) as shown; See the inset drawing. Be careful to the Console Wire Harness (78). start all four Console Bolts and then firmly tighten them. 4 Console Assembly 78 8 64 84 TV Cable 8 64 84...

English Manual
Page 9
... step 6. Raise the Gas Spring (92) to fully insert the Latch Housing. Insert the Spring Pin (25) into two of the small holes in the end of the Gas Spring (92). Press the Latch Housing (73) into the Latch Housing (73). Then, tighten the knob back onto the pin. Place the treadmill in the power cord as described on page 12, and turn...
... step 6. Raise the Gas Spring (92) to fully insert the Latch Housing. Insert the Spring Pin (25) into two of the small holes in the end of the Gas Spring (92). Press the Latch Housing (73) into the Latch Housing (73). Then, tighten the knob back onto the pin. Place the treadmill in the power cord as described on page 12, and turn...

English Manual
Page 10
... place; Make sure that the power cord is used to adjust the walking belt (see page 23), follow the steps below to install the receiver included with the chest pulse sensor. 1. Note: Extra hardware may be connected to operate properly, a CATV cable must be included. Keep the included hex key in the location shown. 34 Small Cylinder A Wire 3 85 3 3. the hex key is unplugged. Make sure that...
... place; Make sure that the power cord is used to adjust the walking belt (see page 23), follow the steps below to install the receiver included with the chest pulse sensor. 1. Note: Extra hardware may be connected to operate properly, a CATV cable must be included. Keep the included hex key in the location shown. 34 Small Cylinder A Wire 3 85 3 3. the hex key is unplugged. Make sure that...
English Manual
Page 12
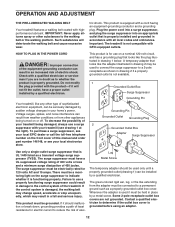
... possibility of this manual and order part number 146148, or see drawing 1 at the right). The surge suppressor must be electrically rated for use a surge suppressor with GFCI-equipped outlets. If the control system is equipped with highperformance lubricant. This product must be a monitoring light on the front cover of your treadmill (see your home's power. Such substances will not fit the outlet...
... possibility of this manual and order part number 146148, or see drawing 1 at the right). The surge suppressor must be electrically rated for use a surge suppressor with GFCI-equipped outlets. If the control system is equipped with highperformance lubricant. This product must be a monitoring light on the front cover of your treadmill (see your home's power. Such substances will not fit the outlet...
English Manual
Page 13
... walking belt if necessary (see page chest pulse sensor). 18. Each program automatically controls the speed and iEn-TPF91105 cline of the optional chest pulse sen- the console, peel off the plastic. Each program automatically adjusts the speed and incline of the console, follow the the handgrip pulse sensor or the optional chest pulse steps beginning on the per- Note: The heart rate pro- features designed to keep your heart rate using the treadmill. Whether you select the manual mode...
... walking belt if necessary (see page chest pulse sensor). 18. Each program automatically controls the speed and iEn-TPF91105 cline of the optional chest pulse sen- the console, peel off the plastic. Each program automatically adjusts the speed and incline of the console, follow the the handgrip pulse sensor or the optional chest pulse steps beginning on the per- Note: The heart rate pro- features designed to keep your heart rate using the treadmill. Whether you select the manual mode...

English Manual
Page 14
... start the walking belt, press the Start button, the Speed increase button, or one of the numbered Speed buttons. 4 Change the incline of the treadmill. If the Start button or the Speed increase button is pulled from the console, causing the walking belt to slow to move at 1 mph. Plug in succession. 14 if a button is held down, the speed setting will show a track. HOW TO USE THE MANUAL MODE 1 Insert the key into the console. If you exercise, the indicators around the track...
... start the walking belt, press the Start button, the Speed increase button, or one of the numbered Speed buttons. 4 Change the incline of the treadmill. If the Start button or the Speed increase button is pulled from the console, causing the walking belt to slow to move at 1 mph. Plug in succession. 14 if a button is held down, the speed setting will show a track. HOW TO USE THE MANUAL MODE 1 Insert the key into the console. If you exercise, the indicators around the track...

English Manual
Page 15
... display speed and distance in a secure place. The letters "MPH" or "Km/H" will appear in the "demo" mode. Before using the treadmill, switch the reset/off the demo mode. To turn off circuit breaker to miles. Next, remove the key from the console. When you use the handgrip pulse sensor and the optional chest pulse sensor at high speed, press the button a second time. This display will also show your heart rate when you are finished using the handgrip pulse sensor, remove...
... display speed and distance in a secure place. The letters "MPH" or "Km/H" will appear in the "demo" mode. Before using the treadmill, switch the reset/off the demo mode. To turn off circuit breaker to miles. Next, remove the key from the console. When you use the handgrip pulse sensor and the optional chest pulse sensor at high speed, press the button a second time. This display will also show your heart rate when you are finished using the handgrip pulse sensor, remove...

English Manual
Page 20
... first speed and incline settings of the entire program will automatically adjust to start the program. Each time a heartbeat is programmed for two or more consecutive segments.) Heart rate program 10 is divided into the console. A moment after the button is selected, the word "RATE" will begin walking. If heart rate program 10 is changed, the intensity level of the program. See page 23. 2 Insert the key into 30 oneminute segments. Heart rate program...
... first speed and incline settings of the entire program will automatically adjust to start the program. Each time a heartbeat is programmed for two or more consecutive segments.) Heart rate program 10 is divided into the console. A moment after the button is selected, the word "RATE" will begin walking. If heart rate program 10 is changed, the intensity level of the program. See page 23. 2 Insert the key into 30 oneminute segments. Heart rate program...

English Manual
Page 21
... console compares your heart rate to the target heart rate setting, the speed of the treadmill may automatically change to bring your progress with the Speed or Incline buttons. If the speed or incline setting is not detected during the program, you are finished exercising, remove the key from the console. To stop the program at any time during the program, the letters "PLS" will flash in the right display and the speed of the walking belt...
... console compares your heart rate to the target heart rate setting, the speed of the treadmill may automatically change to bring your progress with the Speed or Incline buttons. If the speed or incline setting is not detected during the program, you are finished exercising, remove the key from the console. To stop the program at any time during the program, the letters "PLS" will flash in the right display and the speed of the walking belt...

English Manual
Page 23
... finished exercising, remove the key from the console. To stop . See step 5 on page 15. 7 When you programmed previously. To restart the program, press the Start button or the Speed increase button. 4 Follow your heart rate if desired. If desired, you programmed previously. To increase the length of tones will sound, the speed setting and the incline setting will automatically adjust to the first speed and incline settings that you can redefine the program while using...
... finished exercising, remove the key from the console. To stop . See step 5 on page 15. 7 When you programmed previously. To restart the program, press the Start button or the Speed increase button. 4 Follow your heart rate if desired. If desired, you programmed previously. To increase the length of tones will sound, the speed setting and the incline setting will automatically adjust to the first speed and incline settings that you can redefine the program while using...

English Manual
Page 24
... the last cable channel that the walking belt has moved, and the lower part of the display will appear on the treadmill. Otherwise, change the unit of hours that allows you must be removed from the current channel to the next channel saved in this step only if you are using the television, press the On/Off button. 2 Press the On/Off button and adjust the brightness...
... the last cable channel that the walking belt has moved, and the lower part of the display will appear on the treadmill. Otherwise, change the unit of hours that allows you must be removed from the current channel to the next channel saved in this step only if you are using the television, press the On/Off button. 2 Press the On/Off button and adjust the brightness...

English Manual
Page 25
.... be skipped. To exit the information mode at any time (except while the television is scanning channels. THE OPTIONAL CHEST PULSE SENSOR An optional chest pulse sensor provides hands-free operation and allows you have added all desired channels and deleted all three Cable settings, if necessary, to use the console's heart rate programs. To purchase the optional chest pulse sensor, call the toll-free telephone number on the screen. Note...
.... be skipped. To exit the information mode at any time (except while the television is scanning channels. THE OPTIONAL CHEST PULSE SENSOR An optional chest pulse sensor provides hands-free operation and allows you have added all desired channels and deleted all three Cable settings, if necessary, to use the console's heart rate programs. To purchase the optional chest pulse sensor, call the toll-free telephone number on the screen. Note...
English Manual
Page 29
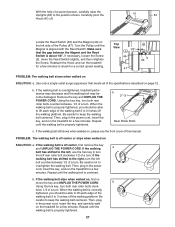
... walking belt centered. If necessary, loosen the Screw (3), move the key and UNPLUG THE POWER CORD. wise, 1/4 of a turn. If the walking belt is aligned with the Reed Switch. Repeat until the walking belt is centered. b. If the walking belt still slows when walked on the left side of the Pulley (47). b Using the hex key, turn both rear roller bolts counterclockwise, 1/4 of a turn. Reattach the Hood, and run the treadmill for a few minutes. Then, plug in the power cord...
... walking belt centered. If necessary, loosen the Screw (3), move the key and UNPLUG THE POWER CORD. wise, 1/4 of a turn. If the walking belt is aligned with the Reed Switch. Repeat until the walking belt is centered. b. If the walking belt still slows when walked on the left side of the Pulley (47). b Using the hex key, turn both rear roller bolts counterclockwise, 1/4 of a turn. Reattach the Hood, and run the treadmill for a few minutes. Then, plug in the power cord...

English Manual
Page 31
... health problems. The pulse sensor is in your heart rate is not a medical device. This is especially important for individuals over the age of 35 or individuals with 5 to 10 minutes of your exercise program, do not keep your heart rate in your training zone for energy. The following three parts: A Warm-up increases your "training zone." is to burn fat, adjust the speed and incline...
... health problems. The pulse sensor is in your heart rate is not a medical device. This is especially important for individuals over the age of 35 or individuals with 5 to 10 minutes of your exercise program, do not keep your heart rate in your training zone for energy. The following three parts: A Warm-up increases your "training zone." is to burn fat, adjust the speed and incline...
English Manual
Page 33
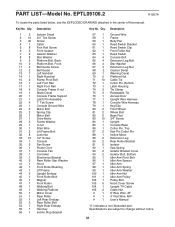
... Screw 36 1 Power Cord 37 1 Console Fan 38 1 Controller 39 1 Electronics Bracket 40 2 Rear Roller Star Washer 41 1 Hood 42 1 Front Roller Bushing 43 1 Lift Frame 44 2 Upright Endcap 45 1 Front Roller Bolt 46 1 Magnet 47 1 Front Roller 48 1 Walking Belt 49 1 Walking Platform 50 1 Motor Cover 51 1 Rear Roller 52 1 Left Rear Endcap 53 2 Rear Roller Bolt 54 1 Right Rear Endcap 55 1 Hex Key 56 1 Incline Stop Bracket 57 1 Ground Wire 58 1 Frame 59 1 Belly Pan 60 1 Reed Switch Bracket...
... Screw 36 1 Power Cord 37 1 Console Fan 38 1 Controller 39 1 Electronics Bracket 40 2 Rear Roller Star Washer 41 1 Hood 42 1 Front Roller Bushing 43 1 Lift Frame 44 2 Upright Endcap 45 1 Front Roller Bolt 46 1 Magnet 47 1 Front Roller 48 1 Walking Belt 49 1 Walking Platform 50 1 Motor Cover 51 1 Rear Roller 52 1 Left Rear Endcap 53 2 Rear Roller Bolt 54 1 Right Rear Endcap 55 1 Hex Key 56 1 Incline Stop Bracket 57 1 Ground Wire 58 1 Frame 59 1 Belly Pan 60 1 Reed Switch Bracket...
English Manual
Page 34
... product (EPIC 475 MX treadmill) • the SERIAL NUMBER of the product (see the front cover of this manual) • the KEY NUMBER and DESCRIPTION of the part(s) (see the front cover of any and all other warranty beyond that specifically set forth herein. If the product is limited in lieu of this manual. For inhome service, the customer will be free from defects in USA © 2007 ICON IP...
... product (EPIC 475 MX treadmill) • the SERIAL NUMBER of the product (see the front cover of this manual) • the KEY NUMBER and DESCRIPTION of the part(s) (see the front cover of any and all other warranty beyond that specifically set forth herein. If the product is limited in lieu of this manual. For inhome service, the customer will be free from defects in USA © 2007 ICON IP...


