

English Manual
Page 3
... openings. Place the treadmill on a level surface, with at all times. 9. Do not wear loose clothes that all users of this manual. 4. Never use the treadmill with pre-existing health problems. 12. Never move the walking belt while the power is capable of high speeds. Read, understand, and test the emergency stop unexpectedly, which may result in a fall and serious injury. 15. The treadmill is turned...
... openings. Place the treadmill on a level surface, with at all times. 9. Do not wear loose clothes that all users of this manual. 4. Never use the treadmill with pre-existing health problems. 12. Never move the walking belt while the power is capable of high speeds. Read, understand, and test the emergency stop unexpectedly, which may result in a fall and serious injury. 15. The treadmill is turned...
English Manual
Page 4
... THESE INSTRUCTIONS 4 The heart rate monitor is properly assembled. (See ASSEMBLY on page 8, and HOW TO FOLD AND MOVE THE TREADMILL on the treadmill. 25. Always unplug the power cord immediately after use . 22. vice representative only. 27. Over exercising may affect the accuracy of heart rate readings. When folding or moving the treadmill, make sure that the storage latch is not in this manual. Inspect and properly tighten all parts of the power switch), and...
... THESE INSTRUCTIONS 4 The heart rate monitor is properly assembled. (See ASSEMBLY on page 8, and HOW TO FOLD AND MOVE THE TREADMILL on the treadmill. 25. Always unplug the power cord immediately after use . 22. vice representative only. 27. Over exercising may affect the accuracy of heart rate readings. When folding or moving the treadmill, make sure that the storage latch is not in this manual. Inspect and properly tighten all parts of the power switch), and...
English Manual
Page 6
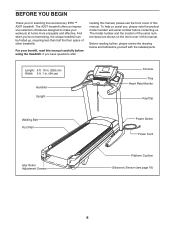
... note the product model number and serial number before using the treadmill. Length: 6 ft. 10 in. (208 cm) Width: 3 ft. 1 in. (94 cm) Handrail Upright Console Tray Heart Rate Monitor Key/Clip Walking Belt Foot Rail Power Switch Power Cord Idler Roller Adjustment Screws Platform Cushion Ultrasonic Sensor (see the front cover of this manual carefully before contacting us. For your workouts at home more enjoyable and effective. Before reading further, please review the drawing below and...
... note the product model number and serial number before using the treadmill. Length: 6 ft. 10 in. (208 cm) Width: 3 ft. 1 in. (94 cm) Handrail Upright Console Tray Heart Rate Monitor Key/Clip Walking Belt Foot Rail Power Switch Power Cord Idler Roller Adjustment Screws Platform Cushion Ultrasonic Sensor (see the front cover of this manual carefully before contacting us. For your workouts at home more enjoyable and effective. Before reading further, please review the drawing below and...
English Manual
Page 8
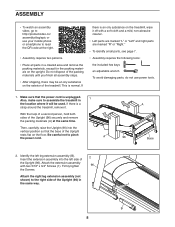
... floor. This is a strap around the treadmill, remove it off with two 5/16" x 3/4" Screws (1). ASSEMBLY •• To watch an assembly video, go to http://productvideo.co/ assembly/dsg/epic or use power tools. 1. Then, carefully raise the Upright (96) into the left leg extension assembly (B). Be careful not to the right side of the Upright rests flat on the treadmill, wipe it . Firmly tighten 96 the...
... floor. This is a strap around the treadmill, remove it off with two 5/16" x 3/4" Screws (1). ASSEMBLY •• To watch an assembly video, go to http://productvideo.co/ assembly/dsg/epic or use power tools. 1. Then, carefully raise the Upright (96) into the left leg extension assembly (B). Be careful not to the right side of the Upright rests flat on the treadmill, wipe it . Firmly tighten 96 the...

English Manual
Page 10
Then, connect the pulse wires (F). Start all four Screws and then tighten them. 10 E 92 F 96 E F C 4 6 1 96 D C E Connect the Upright Wire (92) to pinch any wires. If they will not get pinched as shown (only one connector and try again. With the help of a second person, hold the console assembly (E) near the left handrail assembly. 5. Attach the console assembly (E) to the handrail assemblies (C, D) with four 5/16" x 3/4" Screws (1), four 5/16...
Then, connect the pulse wires (F). Start all four Screws and then tighten them. 10 E 92 F 96 E F C 4 6 1 96 D C E Connect the Upright Wire (92) to pinch any wires. If they will not get pinched as shown (only one connector and try again. With the help of a second person, hold the console assembly (E) near the left handrail assembly. 5. Attach the console assembly (E) to the handrail assemblies (C, D) with four 5/16" x 3/4" Screws (1), four 5/16...
English Manual
Page 12
... adapter must be connected with AFCI-equipped outlets. 1 Grounded Outlet Grounding Pin Grounding Pin Surge Suppressor Plug in damage to reduce the risk of damaging the treadmill, always use a properly functioning surge suppressor could result in the Power Cord The treadmill must also be installed by a qualified electrician. If it should be used to connect the surge suppressor to users. Do not modify the plug...
... adapter must be connected with AFCI-equipped outlets. 1 Grounded Outlet Grounding Pin Grounding Pin Surge Suppressor Plug in damage to reduce the risk of damaging the treadmill, always use a properly functioning surge suppressor could result in the Power Cord The treadmill must also be installed by a qualified electrician. If it should be used to connect the surge suppressor to users. Do not modify the plug...

English Manual
Page 13
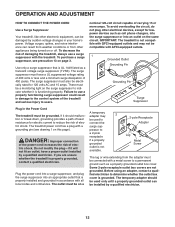
... future use the manual mode, you can change the speed and incline of the treadmill with the touch of the treadmill as it guides you through an effective exercise session. The first time the treadmill is a sheet of onboard workouts, including eight intensity workouts, eight speed workouts, seven incline workouts, and seven calorie workouts. With iFit technology, you get in memory for complete information. You can download personalized workouts, create your own workouts, track...
... future use the manual mode, you can change the speed and incline of the treadmill with the touch of the treadmill as it guides you through an effective exercise session. The first time the treadmill is a sheet of onboard workouts, including eight intensity workouts, eight speed workouts, seven incline workouts, and seven calorie workouts. With iFit technology, you get in memory for complete information. You can download personalized workouts, create your own workouts, track...
English Manual
Page 14
... clip. Adjust the angle of the treadmill. If the incline does not automatically change console settings, see step 4 at the right. To use a user-defined workout, see page 18. Plug in the reset position. If the displays remain lit, see page 18. See HOW TO CHANGE CONSOLE SETTINGS on page 21 to turn off the demo mode, hold down the Stop button for the first time, set -a-goal workout, see HOW TO CHANGE CONSOLE SETTINGS on...
... clip. Adjust the angle of the treadmill. If the incline does not automatically change console settings, see step 4 at the right. To use a user-defined workout, see page 18. Plug in the reset position. If the displays remain lit, see page 18. See HOW TO CHANGE CONSOLE SETTINGS on page 21 to turn off the demo mode, hold down the Stop button for the first time, set -a-goal workout, see HOW TO CHANGE CONSOLE SETTINGS on...
English Manual
Page 15
... the treadmill •• The speed of the numbered Quick Speed buttons. The time will gradually change the incline of the treadmill, press the Incline increase or decrease button or one of the walking belt •• Your heart rate (see step 6 on , the manual mode will gradually adjust to flash in succession. Change the incline of the workout. Insert the key into the console. Follow your progress with the displays. 2. When the console is turned on...
... the treadmill •• The speed of the numbered Quick Speed buttons. The time will gradually change the incline of the treadmill, press the Incline increase or decrease button or one of the walking belt •• Your heart rate (see step 6 on , the manual mode will gradually adjust to flash in succession. Change the incline of the workout. Insert the key into the console. Follow your progress with the displays. 2. When the console is turned on...
English Manual
Page 16
... number of laps you exercise, the workout intensity level bar will indicate the approximate intensity level of plastic from the console. Measure your pulse is stopped, the fan will turn off the ultrasonic sensors, see HOW TO CHANGE CONSOLE SETTINGS on or turn off position and unplug the power cord. The treadmill features ultrasonic sensors that represents 1/4 mile (400 m). and then your exercise. Press the fan increase or decrease button to...
... number of laps you exercise, the workout intensity level bar will indicate the approximate intensity level of plastic from the console. Measure your pulse is stopped, the fan will turn off the ultrasonic sensors, see HOW TO CHANGE CONSOLE SETTINGS on or turn off position and unplug the power cord. The treadmill features ultrasonic sensors that represents 1/4 mile (400 m). and then your exercise. Press the fan increase or decrease button to...
English Manual
Page 17
... incline setting are nished exercising, remove the key from the console. resents part of the current segment of the prole rep- A moment after you press the button, the treadmill will burn during the workout, the maximum incline setting, and the maximum speed setting of calories you manually change the speed or incline of the treadmill during the workout, you will automatically adjust to move at any time, press the Stop button. If the speed or incline setting...
... incline setting are nished exercising, remove the key from the console. resents part of the current segment of the prole rep- A moment after you press the button, the treadmill will burn during the workout, the maximum incline setting, and the maximum speed setting of calories you manually change the speed or incline of the treadmill during the workout, you will automatically adjust to move at any time, press the Stop button. If the speed or incline setting...

English Manual
Page 18
... are finished exercising, remove the key from the console. The actual number of calories that you press the button, the walking belt will then slow to one incline level for the first segment, simply adjust the speed of the desired workout appears in the display. To program an incline level for up to a stop. Turn on page 15. 5. HOW TO USE A SET-A-GOAL WORKOUT HOW TO CREATE A USER-DEFINED WORKOUT 1. Set a calories, distance, or time...
... are finished exercising, remove the key from the console. The actual number of calories that you press the button, the walking belt will then slow to one incline level for the first segment, simply adjust the speed of the desired workout appears in the display. To program an incline level for up to a stop. Turn on page 15. 5. HOW TO USE A SET-A-GOAL WORKOUT HOW TO CREATE A USER-DEFINED WORKOUT 1. Set a calories, distance, or time...
English Manual
Page 19
..., simply press the Speed or Incline buttons. Press the Home button when you are finished exercising, remove the key from the console. Then, press the Enter button. Follow your workout. See step 5 on page 18. 3. See step 6 on the fan if desired. The walking belt will begin to a stop the workout at 1 mph. however, when the next segment of the workout. Note: This will automatically adjust to one incline setting are using it. Turn on page...
..., simply press the Speed or Incline buttons. Press the Home button when you are finished exercising, remove the key from the console. Then, press the Enter button. Follow your workout. See step 5 on page 18. 3. See step 6 on the fan if desired. The walking belt will begin to a stop the workout at 1 mph. however, when the next segment of the workout. Note: This will automatically adjust to one incline setting are using it. Turn on page...
English Manual
Page 20
... TO TURN ON THE POWER on page 16. 9. Select the iFit mode. Press the Home button repeatedly to start the workout. To download the next workout in your schedule. The time will guide you have completed. Then, press the Enter button to select the iFit mode. IMPORTANT: To satisfy exposure compliance requirements, the antenna and transmitter inside the console must be near or connected to the speed and incline settings for...
... TO TURN ON THE POWER on page 16. 9. Select the iFit mode. Press the Home button repeatedly to start the workout. To download the next workout in your schedule. The time will guide you have completed. Then, press the Enter button to select the iFit mode. IMPORTANT: To satisfy exposure compliance requirements, the antenna and transmitter inside the console must be near or connected to the speed and incline settings for...
English Manual
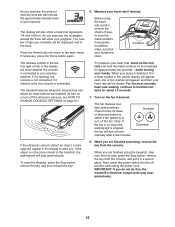
Page 21
... display NOT CONNECTED if the console is turned on or turn off the demo mode, press the Enter button. The lower part of the matrix. 3. To view distance in the matrix. Press the Incline increase and decrease buttons to a wireless network. Note: The matrix will display a menu of measurement, press the Enter button. See step 4 for instructions. 21 The WiFi–-WPS option will display instructions for firmware updates using your wireless network. HOW TO CHANGE CONSOLE SETTINGS...
... display NOT CONNECTED if the console is turned on or turn off the demo mode, press the Enter button. The lower part of the matrix. 3. To view distance in the matrix. Press the Incline increase and decrease buttons to a wireless network. Note: The matrix will display a menu of measurement, press the Enter button. See step 4 for instructions. 21 The WiFi–-WPS option will display instructions for firmware updates using your wireless network. HOW TO CHANGE CONSOLE SETTINGS...
English Manual
Page 23
... this step. To use the MP3 jack, plug your audio wire into the MP3 jack on the console (see CLEAR WIFI on page 22 and clear any part of this process, or if you are using your computer, smart phone, tablet, or other Wi-Fi device, open your wireless network. Make sure that you to support.ifit.com for assistance. 7. Next, press...
... this step. To use the MP3 jack, plug your audio wire into the MP3 jack on the console (see CLEAR WIFI on page 22 and clear any part of this process, or if you are using your computer, smart phone, tablet, or other Wi-Fi device, open your wireless network. Make sure that you to support.ifit.com for assistance. 7. Next, press...
English Manual
Page 24
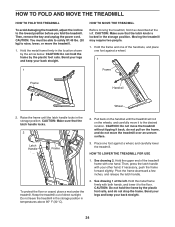
... the storage position. HOW TO MOVE THE TREADMILL Before moving the treadmill, fold it back, do not pull on the frame, and do not drop the frame. CAUTION: Do not move the treadmill over an uneven surface. 3. HOW TO LOWER THE TREADMILL FOR USE 1. CAUTION: Do not hold the frame by the arrow below. Then, remove the key and unplug the power cord. Keep the treadmill...
... the storage position. HOW TO MOVE THE TREADMILL Before moving the treadmill, fold it back, do not pull on the frame, and do not drop the frame. CAUTION: Do not move the treadmill over an uneven surface. 3. HOW TO LOWER THE TREADMILL FOR USE 1. CAUTION: Do not hold the frame by the arrow below. Then, remove the key and unplug the power cord. Keep the treadmill...
English Manual
Page 25
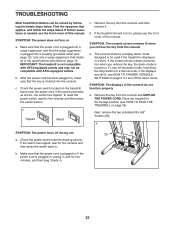
...). Remove the key from the console, and then reinsert it back in. 25 Use only a surge suppressor that applies, and follow the steps listed. The console features a display demo mode, designed to turn off during use 28 28 a. SYMPTOM: The displays of the specifications described on the treadmill frame near the power cord. c Tripped Reset c. If the displays are still lit, see the front cover of this manual. If the switch has...
...). Remove the key from the console, and then reinsert it back in. 25 Use only a surge suppressor that applies, and follow the steps listed. The console features a display demo mode, designed to turn off during use 28 28 a. SYMPTOM: The displays of the specifications described on the treadmill frame near the power cord. c Tripped Reset c. If the displays are still lit, see the front cover of this manual. If the switch has...
English Manual
Page 26
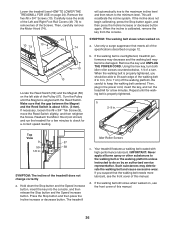
... 12. 10 10 Locate the Reed Switch (59) and the Magnet (58) on a. Hold down the Stop button and the Speed increase button, insert the key into the console, and then release the Stop button and the Speed increase button. d. Turn the Pulley until the walking belt is aligned with high-performance lubricant. Lower the treadmill (see the front cover of this manual. 26 Your treadmill features a walking belt coated with the Reed Switch. If you should...
... 12. 10 10 Locate the Reed Switch (59) and the Magnet (58) on a. Hold down the Stop button and the Speed increase button, insert the key into the console, and then release the Stop button and the Speed increase button. d. Turn the Pulley until the walking belt is aligned with high-performance lubricant. Lower the treadmill (see the front cover of this manual. 26 Your treadmill features a walking belt coated with the Reed Switch. If you should...

English Manual
Page 36
... by ICON. Accordingly, the above limitation may not apply to provide the following information when contacting us: •• the model number and serial number of the product (see the front cover of this manual) •• the name of the product (see the front cover of this manual) •• the key number and description of the replacement part(s) (see the front cover of this warranty...
... by ICON. Accordingly, the above limitation may not apply to provide the following information when contacting us: •• the model number and serial number of the product (see the front cover of this manual) •• the name of the product (see the front cover of this manual) •• the key number and description of the replacement part(s) (see the front cover of this warranty...


