
English Manual
Page 1
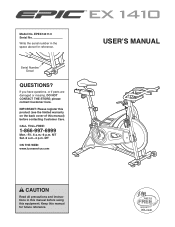
... if parts are damaged or missing, DO NOT CONTACT THE STORE; MT Sat. 8 a.m.-4 p.m. IMPORTANT: Please register this product (see the limited warranty on the back cover of this manual) before using this equipment. Serial Number Decal QUESTIONS? Write the serial number in this manual for reference. MT ON THE WEB: www.iconservice.com USERʼS MANUAL CAUTION Read all precautions and instructions in the space...
... if parts are damaged or missing, DO NOT CONTACT THE STORE; MT Sat. 8 a.m.-4 p.m. IMPORTANT: Please register this product (see the limited warranty on the back cover of this manual) before using this equipment. Serial Number Decal QUESTIONS? Write the serial number in this manual for reference. MT ON THE WEB: www.iconservice.com USERʼS MANUAL CAUTION Read all precautions and instructions in the space...
English Manual
Page 2
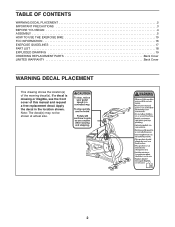
Note: The decal(s) may not be shown at actual size. 2 If a decal is missing or illegible, see the front cover of the warning decal(s). Apply the decal in the location shown. TABLE OF CONTENTS WARNING DECAL PLACEMENT 2 IMPORTANT PRECAUTIONS 3 BEFORE YOU BEGIN 4 ASSEMBLY 5 HOW TO USE THE EXERCISE BIKE 10 FCC INFORMATION 16 EXERCISE GUIDELINES 17 PART LIST 18 EXPLODED DRAWING 19 ORDERING REPLACEMENT PARTS Back Cover LIMITED WARRANTY Back Cover WARNING DECAL PLACEMENT This drawing shows the location(s) of this manual and request a free replacement decal.
Note: The decal(s) may not be shown at actual size. 2 If a decal is missing or illegible, see the front cover of the warning decal(s). Apply the decal in the location shown. TABLE OF CONTENTS WARNING DECAL PLACEMENT 2 IMPORTANT PRECAUTIONS 3 BEFORE YOU BEGIN 4 ASSEMBLY 5 HOW TO USE THE EXERCISE BIKE 10 FCC INFORMATION 16 EXERCISE GUIDELINES 17 PART LIST 18 EXPLODED DRAWING 19 ORDERING REPLACEMENT PARTS Back Cover LIMITED WARRANTY Back Cover WARNING DECAL PLACEMENT This drawing shows the location(s) of this manual and request a free replacement decal.

English Manual
Page 3
... clothes that all users of the exercise bike are adequately informed of all precautions. 10. The exercise bike is especially important for home use the exercise bike in a controlled way. 13. Do not use only. Reduce your pedaling speed in a commercial, rental, or institutional setting. 5. IMPORTANT PRECAUTIONS WARNING: To reduce the risk of serious injury, read all important precautions and instructions in this manual. 3. This is intended...
... clothes that all users of the exercise bike are adequately informed of all precautions. 10. The exercise bike is especially important for home use the exercise bike in a controlled way. 13. Do not use only. Reduce your pedaling speed in a commercial, rental, or institutional setting. 5. IMPORTANT PRECAUTIONS WARNING: To reduce the risk of serious injury, read all important precautions and instructions in this manual. 3. This is intended...
English Manual
Page 4
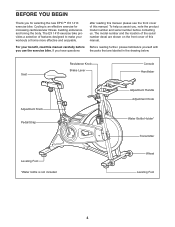
... assist you have questions the parts that are shown on the front cover of this manual. To help us . after reading this manual, please see the front cover of this manual. Seat Resistance Knob Brake Lever Console Handlebar Adjustment Knob Pedal/Strap Adjustment Handle Adjustment Knob Water Bottle Holder* Transmitter Leveling Foot *Water bottle is an effective exercise for selecting the new EPIC™ EX 1410 exercise bike. Cycling is not included Wheel...
... assist you have questions the parts that are shown on the front cover of this manual. To help us . after reading this manual, please see the front cover of this manual. Seat Resistance Knob Brake Lever Console Handlebar Adjustment Knob Pedal/Strap Adjustment Handle Adjustment Knob Water Bottle Holder* Transmitter Leveling Foot *Water bottle is an effective exercise for selecting the new EPIC™ EX 1410 exercise bike. Cycling is not included Wheel...
English Manual
Page 5
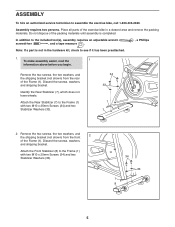
... the rear of the exercise bike in the hardware kit, check to assemble the exercise bike, call 1-800-445-2480. Discard the screws, washers, and shipping bracket. Place all parts of the Frame (1). In addition to the included tool(s), assembly requires an adjustable wrench screwdriver , and a tape measure . , a Phillips Note: If a part is completed. Discard the screws, washers, and shipping bracket. Attach the Rear...
... the rear of the exercise bike in the hardware kit, check to assemble the exercise bike, call 1-800-445-2480. Discard the screws, washers, and shipping bracket. Place all parts of the Frame (1). In addition to the included tool(s), assembly requires an adjustable wrench screwdriver , and a tape measure . , a Phillips Note: If a part is completed. Discard the screws, washers, and shipping bracket. Attach the Rear...

English Manual
Page 6
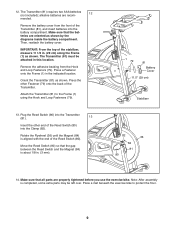
... the Handlebar Post (4) into the Left Crank Arm (not shown). 26 35 4. Move the Handlebar Post (4) upward or downward to the Handlebar Post (4) with an "R." 3 Using an adjustable wrench, firmly tighten the Right Pedal (35) clockwise into an adjustment hole in an adjustment hole. 4 1 23 5. 3. Orient the Handlebar Post (4) as shown. 4 Locate the Adjustment Knob (23) on the front of the Frame...
... the Handlebar Post (4) into the Left Crank Arm (not shown). 26 35 4. Move the Handlebar Post (4) upward or downward to the Handlebar Post (4) with an "R." 3 Using an adjustable wrench, firmly tighten the Right Pedal (35) clockwise into an adjustment hole in an adjustment hole. 4 1 23 5. 3. Orient the Handlebar Post (4) as shown. 4 Locate the Adjustment Knob (23) on the front of the Frame...

English Manual
Page 7
... (2) as shown. 7 Attach the Seat (22) to the desired position, release the Adjustment Knob (23) into an adjustment hole in an adjustment hole. 8. Make sure that the Adjustment Knob is pointing straight ahead before you tighten the Hex Nuts. 22 2 Locate the Adjustment Knob (23) on the rear of the Seat is firmly engaged in the Seat Post, and then tighten the Adjustment Knob. 6. Loosen the Adjustment Knob and pull...
... (2) as shown. 7 Attach the Seat (22) to the desired position, release the Adjustment Knob (23) into an adjustment hole in an adjustment hole. 8. Make sure that the Adjustment Knob is pointing straight ahead before you tighten the Hex Nuts. 22 2 Locate the Adjustment Knob (23) on the rear of the Seat is firmly engaged in the Seat Post, and then tighten the Adjustment Knob. 6. Loosen the Adjustment Knob and pull...

English Manual
Page 8
... may damage the console display or other electronic components. Make sure that the batteries are recommended. Attach the Console (75) to the Handlebar (5) with a Console Screw (77). 11 75 78 77 8 Attach the Console Bracket (78) to the Console Bracket (78) with two Bracket Screws (76). 9 78 76 76 5 10. Then, reattach the battery cover. 10 75 Battery Compartment 11. The Console (75) requires two...
... may damage the console display or other electronic components. Make sure that the batteries are recommended. Attach the Console (75) to the Handlebar (5) with a Console Screw (77). 11 75 78 77 8 Attach the Console Bracket (78) to the Console Bracket (78) with two Bracket Screws (76). 9 78 76 76 5 10. Then, reattach the battery cover. 10 75 Battery Compartment 11. The Console (75) requires two...
English Manual
Page 9
..., measure 11 1/2 in . (3 mm). 1 79 81 Battery Cover 11.5" (29 cm) Stabilizer 82 36 84 81 80 14. alkaline batteries are properly tightened before you use the exercise bike. Move the Reed Switch (80) so that the gap between the Reed Switch and the Magnet (84) is completed, some extra parts may be attached in the indicated location. Press the other end of the Transmitter (81...
..., measure 11 1/2 in . (3 mm). 1 79 81 Battery Cover 11.5" (29 cm) Stabilizer 82 36 84 81 80 14. alkaline batteries are properly tightened before you use the exercise bike. Move the Reed Switch (80) so that the gap between the Reed Switch and the Magnet (84) is completed, some extra parts may be attached in the indicated location. Press the other end of the Transmitter (81...
English Manual
Page 10
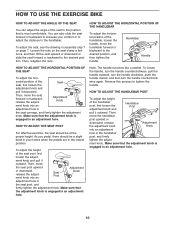
... Seat Post Adjustment Knob adjustment hole in the seat post, and firmly tighten the adjustment knob. Adjustment Knob ment knob into an adjustment hole in the handlebar post, and firmly tighten the adjust- HOW TO ADJUST THE SEAT POST For effective exercise, the seat should be at the proper height. As you pedal, there should be a slight bend in your comfort or to adjust the distance to the handlebar. Then, move the seat...
... Seat Post Adjustment Knob adjustment hole in the seat post, and firmly tighten the adjustment knob. Adjustment Knob ment knob into an adjustment hole in the handlebar post, and firmly tighten the adjust- HOW TO ADJUST THE SEAT POST For effective exercise, the seat should be at the proper height. As you pedal, there should be a slight bend in your comfort or to adjust the distance to the handlebar. Then, move the seat...
English Manual
Page 11
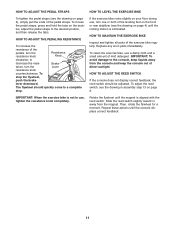
... during use, turn the Lever resistance knob counterclockwise. Replace any worn parts immediately. To clean the exercise bike, use , tighten the resistance knob completely. Then, rotate the flywheel for a moment. Repeat these actions until the magnet is not in assembly step 13 on page 9. Brake tance, turn one or both of mild detergent. The flywheel should be adjusted. HOW TO ADJUST THE REED SWITCH If the console does not display correct...
... during use, turn the Lever resistance knob counterclockwise. Replace any worn parts immediately. To clean the exercise bike, use , tighten the resistance knob completely. Then, rotate the flywheel for a moment. Repeat these actions until the magnet is not in assembly step 13 on page 9. Brake tance, turn one or both of mild detergent. The flywheel should be adjusted. HOW TO ADJUST THE REED SWITCH If the console does not display correct...
English Manual
Page 12
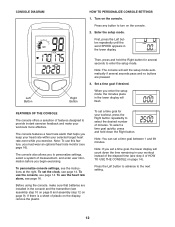
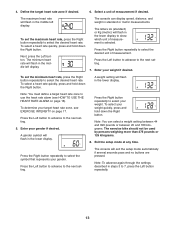
... pass and no buttons are installed in the lower display will exit the setup mode automatically if several seconds to provide instant exercise feedback and make sure that helps you must wear an optional heart rate monitor (see page 16). If there is a sheet of minutes. Turn on the display, remove the plastic. Press any button to the next setting. 12 First, press the Left button repeatedly until...
... pass and no buttons are installed in the lower display will exit the setup mode automatically if several seconds to provide instant exercise feedback and make sure that helps you must wear an optional heart rate monitor (see page 16). If there is a sheet of minutes. Turn on the display, remove the plastic. Press any button to the next setting. 12 First, press the Left button repeatedly until...
English Manual
Page 13
... the middle left display. Press the Left button to advance to the next setting. 5. Press the Right button repeatedly to use the heart rate alarm (see EXERCISE INTENSITY on page 16). Select a unit of measurement. Exit the setup mode at any time. The console can select a weight setting between 44 and 396 pounds or between 20 and 180 kilograms. The exercise bike should not be used by persons...
... the middle left display. Press the Left button to advance to the next setting. 5. Press the Right button repeatedly to use the heart rate alarm (see EXERCISE INTENSITY on page 16). Select a unit of measurement. Exit the setup mode at any time. The console can select a weight setting between 44 and 396 pounds or between 20 and 180 kilograms. The exercise bike should not be used by persons...

English Manual
Page 14
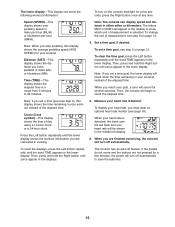
... mode automatically if several seconds to 200 rpm. Press any button to 240 rpm. Wear an optional heart rate monitor if desired. Follow your workout. Note: When you stop pedaling, this display indicates your pedaling speed. Press the Right button repeatedly to turn on page 16), you select the hour setting. HOW TO SET THE CLOCK 1. Turn on the console. The upper left display-This display shows your heart rate (see step 3) or use the heart rate...
... mode automatically if several seconds to 200 rpm. Press any button to 240 rpm. Wear an optional heart rate monitor if desired. Follow your workout. Note: When you stop pedaling, this display indicates your pedaling speed. Press the Right button repeatedly to turn on page 16), you select the hour setting. HOW TO SET THE CLOCK 1. Turn on the console. The upper left display-This display shows your heart rate (see step 3) or use the heart rate...
English Manual
Page 15
... your pedaling speed in miles per hour (ML/H) or kilometers per hour (KM/H). If the pedals do not move and the buttons are not pressed for your workout. Distance (DIST)-This display shows the distance you set a time goal, the lower display will sound for a few minutes, the power will turn off automatically to show the following workout information: To turn off feature. Then, press and hold the Right button until...
... your pedaling speed in miles per hour (ML/H) or kilometers per hour (KM/H). If the pedals do not move and the buttons are not pressed for your workout. Distance (DIST)-This display shows the distance you set a time goal, the lower display will sound for a few minutes, the power will turn off automatically to show the following workout information: To turn off feature. Then, press and hold the Right button until...
English Manual
Page 16
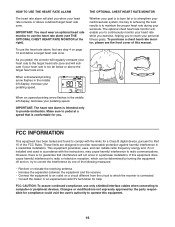
... limits are designed to Part 15 of this equipment. 16 However, there is comfortable for help. As you pedal, the console will regularly compare your heart rate to provide motivation. THE OPTIONAL CHEST HEART RATE MONITOR Whether your goal is to burn fat or to strengthen your cardiovascular system, the key to achieving the best results is to operate this manual. Changes or...
... limits are designed to Part 15 of this equipment. 16 However, there is comfortable for help. As you pedal, the console will regularly compare your heart rate to provide motivation. THE OPTIONAL CHEST HEART RATE MONITOR Whether your goal is to burn fat or to strengthen your cardiovascular system, the key to achieving the best results is to operate this manual. Changes or...
English Manual
Page 17
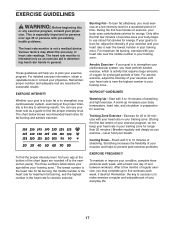
... keep your heart rate in your training zone. Cooling Down-Finish with pre-existing health problems. The heart rate monitor is the heart rate for aerobic exercise. EXERCISE FREQUENCY To maintain or improve your breath. Remember, the key to the nearest ten years). For detailed exercise information, obtain a reputable book or consult your age at the proper intensity is intended only as a guide to use your body begin...
... keep your heart rate in your training zone. Cooling Down-Finish with pre-existing health problems. The heart rate monitor is the heart rate for aerobic exercise. EXERCISE FREQUENCY To maintain or improve your breath. Remember, the key to the nearest ten years). For detailed exercise information, obtain a reputable book or consult your age at the proper intensity is intended only as a guide to use your body begin...
English Manual
Page 18
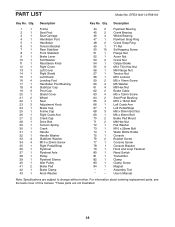
... Screw M5 Washer M8 Hex Nut Brake Cable M5 x 12mm Screw Seat Post Bushing M10 x 16mm Bolt Left Crank Arm Left Pedal/Strap M6 x 30mm Bolt Set M6 x 40mm Bolt Brake Pad Mount M8 Hex Nut Flat Washer M10 x 25mm Bolt Water Bottle Holder Console Bracket Screw Console Screw Console Bracket Hook and Loop Fastener Reed Switch Transmitter Clamp Clamp Screw Magnet Assembly Tool Userʼs Manual Note: Specifications are not illustrated. 18 EPEX14411.0 R0811A Key...
... Screw M5 Washer M8 Hex Nut Brake Cable M5 x 12mm Screw Seat Post Bushing M10 x 16mm Bolt Left Crank Arm Left Pedal/Strap M6 x 30mm Bolt Set M6 x 40mm Bolt Brake Pad Mount M8 Hex Nut Flat Washer M10 x 25mm Bolt Water Bottle Holder Console Bracket Screw Console Screw Console Bracket Hook and Loop Fastener Reed Switch Transmitter Clamp Clamp Screw Magnet Assembly Tool Userʼs Manual Note: Specifications are not illustrated. 18 EPEX14411.0 R0811A Key...
English Manual
Page 19
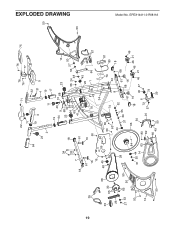
19 22 71 78 76 71 76 77 75 64 23 19 3 32 31 4 5 2 19 11 17 19 34 18 33 7 18 61 64 43 9 23 68 42 54 58 69 62 41 10 68 23 13 56 24 53 27 50 48 45 61 16 25 35 16 50 70 1 66 67 38 35 65 30 26 27 53 65 50 50 50 12 15 48 45 59 59 28 84 51 55 44 14 63 50 34 50 60 81 79 74 80 63 33 8 44 52 18 37 39 55 36 18 50 61 61 68 16 16 40 47 46 68 46 46 46 21 21 83 82 6 20 72 57 73 60 50 49 50 29 50 50 Model No. EPEX14411.0 R0811A EXPLODED DRAWING
19 22 71 78 76 71 76 77 75 64 23 19 3 32 31 4 5 2 19 11 17 19 34 18 33 7 18 61 64 43 9 23 68 42 54 58 69 62 41 10 68 23 13 56 24 53 27 50 48 45 61 16 25 35 16 50 70 1 66 67 38 35 65 30 26 27 53 65 50 50 50 12 15 48 45 59 59 28 84 51 55 44 14 63 50 34 50 60 81 79 74 80 63 33 8 44 52 18 37 39 55 36 18 50 61 61 68 16 16 40 47 46 68 46 46 46 21 21 83 82 6 20 72 57 73 60 50 49 50 29 50 50 Model No. EPEX14411.0 R0811A EXPLODED DRAWING
English Manual
Page 20
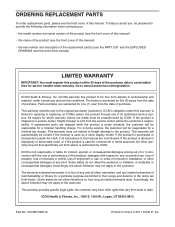
... manual) • the key number and description of the replacement part(s) (see the PART LIST and the EXPLODED DRAWING near the end of any implied warranties of removal or installation; Go to www.iconservice.com/registration. ORDERING REPLACEMENT PARTS To order replacement parts, please see the front cover of the purchase date to avoid added fees for service needed under warranty. No other rights that specifically set forth herein. All repairs...
... manual) • the key number and description of the replacement part(s) (see the PART LIST and the EXPLODED DRAWING near the end of any implied warranties of removal or installation; Go to www.iconservice.com/registration. ORDERING REPLACEMENT PARTS To order replacement parts, please see the front cover of the purchase date to avoid added fees for service needed under warranty. No other rights that specifically set forth herein. All repairs...


