
English Manual
Page 1
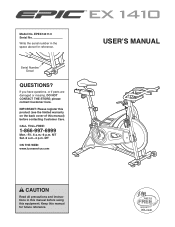
Serial Number Decal QUESTIONS? EPEX14411.0 Serial No. If you have questions, or if parts are damaged or missing, DO NOT CONTACT THE STORE; please contact Customer Care. IMPORTANT: Please register this product (see the limited warranty on the back ...
Serial Number Decal QUESTIONS? EPEX14411.0 Serial No. If you have questions, or if parts are damaged or missing, DO NOT CONTACT THE STORE; please contact Customer Care. IMPORTANT: Please register this product (see the limited warranty on the back ...
English Manual
Page 2
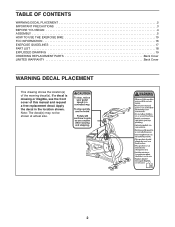
Note: The decal(s) may not be shown at actual size. 2 Apply the decal in the location shown. If a decal is missing or illegible, see the front cover of the warning decal(s). TABLE OF CONTENTS WARNING DECAL PLACEMENT 2 IMPORTANT PRECAUTIONS 3 BEFORE YOU BEGIN 4 ASSEMBLY 5 HOW TO USE THE EXERCISE BIKE 10 FCC INFORMATION 16 EXERCISE GUIDELINES 17 PART LIST 18 EXPLODED DRAWING 19 ORDERING REPLACEMENT PARTS Back Cover LIMITED WARRANTY Back Cover WARNING DECAL PLACEMENT This drawing shows the location(s) of this manual and request a free replacement decal.
Note: The decal(s) may not be shown at actual size. 2 Apply the decal in the location shown. If a decal is missing or illegible, see the front cover of the warning decal(s). TABLE OF CONTENTS WARNING DECAL PLACEMENT 2 IMPORTANT PRECAUTIONS 3 BEFORE YOU BEGIN 4 ASSEMBLY 5 HOW TO USE THE EXERCISE BIKE 10 FCC INFORMATION 16 EXERCISE GUIDELINES 17 PART LIST 18 EXPLODED DRAWING 19 ORDERING REPLACEMENT PARTS Back Cover LIMITED WARRANTY Back Cover WARNING DECAL PLACEMENT This drawing shows the location(s) of this manual and request a free replacement decal.

English Manual
Page 3
... no responsibility for home use of this manual and all warnings on your exercise bike before using the exercise bike; do not wear loose clothes that there is at all parts regularly. Do not put the exercise bike in this manual. 3. To avoid damaging the brake pads, do not arch your...prevent the flywheel from moving. 15. Keep children under age 12 and pets away from moisture and dust. Before beginning any worn parts immediately. 8. Use the exercise bike only as described in a garage or covered patio, or near water. 6. Do not use , tighten the resistance knob completely to...
... no responsibility for home use of this manual and all warnings on your exercise bike before using the exercise bike; do not wear loose clothes that there is at all parts regularly. Do not put the exercise bike in this manual. 3. To avoid damaging the brake pads, do not arch your...prevent the flywheel from moving. 15. Keep children under age 12 and pets away from moisture and dust. Before beginning any worn parts immediately. 8. Use the exercise bike only as described in a garage or covered patio, or near water. 6. Do not use , tighten the resistance knob completely to...
English Manual
Page 4
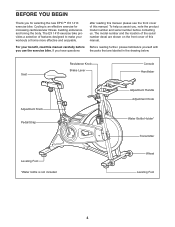
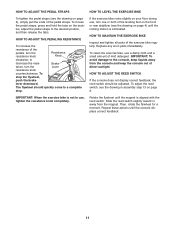
... Handle Adjustment Knob Water Bottle Holder* Transmitter Leveling Foot *Water bottle is an effective exercise for selecting the new EPIC™ EX 1410 exercise bike. Cycling is not included Wheel Leveling Foot 4 after reading this manual carefully before Before reading further, please familiarize ...before contacting us. If you have questions the parts that are shown on the front cover of this manual. The EX 1410 exercise bike provides a selection of this manual. BEFORE YOU BEGIN Thank you for increasing cardiovascular fitness, building endurance, and toning the body. ...
... Handle Adjustment Knob Water Bottle Holder* Transmitter Leveling Foot *Water bottle is an effective exercise for selecting the new EPIC™ EX 1410 exercise bike. Cycling is not included Wheel Leveling Foot 4 after reading this manual carefully before Before reading further, please familiarize ...before contacting us. If you have questions the parts that are shown on the front cover of this manual. The EX 1410 exercise bike provides a selection of this manual. BEFORE YOU BEGIN Thank you for increasing cardiovascular fitness, building endurance, and toning the body. ...
English Manual
Page 5
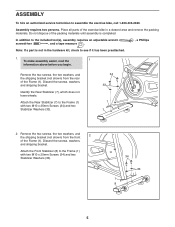
... Frame (1) with two M10 x 25mm Screws (34) and two Stabilizer Washers (33). 34 33 1 8 5 In addition to assemble the exercise bike, call 1-800-445-2480. Identify the Rear Stabilizer (7), which does not have wheels. Remove the two screws, the two washers, and the shipping ... the Rear Stabilizer (7) to the Frame (1) with two M10 x 25mm Screws (34) and two Stabilizer Washers (33). 34 33 1 7 2. Place all parts of the Frame (1). ASSEMBLY To hire an authorized service technician to the included tool(s), assembly requires an adjustable wrench screwdriver , and a tape measure . , a...
... Frame (1) with two M10 x 25mm Screws (34) and two Stabilizer Washers (33). 34 33 1 8 5 In addition to assemble the exercise bike, call 1-800-445-2480. Identify the Rear Stabilizer (7), which does not have wheels. Remove the two screws, the two washers, and the shipping ... the Rear Stabilizer (7) to the Frame (1) with two M10 x 25mm Screws (34) and two Stabilizer Washers (33). 34 33 1 7 2. Place all parts of the Frame (1). ASSEMBLY To hire an authorized service technician to the included tool(s), assembly requires an adjustable wrench screwdriver , and a tape measure . , a...
English Manual
Page 9
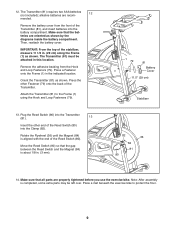
...aligned with the end of the Transmitter. Note: After assembly is about 1/8 in the indicated location. Make sure that all parts are properly tightened before you use the exercise bike. Then, reattach the battery cover. Remove the adhesive backing from the front of the Transmitter (81), and insert batteries into ...1/2 in this location. Move the Reed Switch (80) so that the gap between the Reed Switch and the Magnet (84) is completed, some extra parts may be attached in . (29 cm) along the Frame (1) as shown. alkaline batteries are oriented as shown. IMPORTANT: From the top of the ...
...aligned with the end of the Transmitter. Note: After assembly is about 1/8 in the indicated location. Make sure that all parts are properly tightened before you use the exercise bike. Then, reattach the battery cover. Remove the adhesive backing from the front of the Transmitter (81), and insert batteries into ...1/2 in this location. Move the Reed Switch (80) so that the gap between the Reed Switch and the Magnet (84) is completed, some extra parts may be attached in . (29 cm) along the Frame (1) as shown. alkaline batteries are oriented as shown. IMPORTANT: From the top of the ...
English Manual
Page 11
...release the tabs. To stop . HOW TO MAINTAIN THE EXERCISE BIKE Inspect and tighten all parts of direct sunlight. IMPORTANT: To avoid damage to a complete stop the flywheel, push the brake lever downward. Replace any worn parts immediately. HOW TO ADJUST THE REED SWITCH If the console does... not display correct feedback, the reed switch should quickly come to the console, keep the console out of the exercise bike regularly. Brake tance, turn the Lever resistance...
...release the tabs. To stop . HOW TO MAINTAIN THE EXERCISE BIKE Inspect and tighten all parts of direct sunlight. IMPORTANT: To avoid damage to a complete stop the flywheel, push the brake lever downward. Replace any worn parts immediately. HOW TO ADJUST THE REED SWITCH If the console does... not display correct feedback, the reed switch should quickly come to the console, keep the console out of the exercise bike regularly. Brake tance, turn the Lever resistance...
English Manual
Page 16
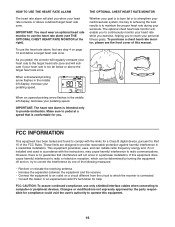
... is connected. • Consult the dealer or an experienced radio/TV technician for you. IMPORTANT: The heart rate alarm is intended only to Part 15 of the FCC Rules. To purchase a chest heart rate monitor, please see THE OPTIONAL CHEST HEART RATE MONITOR at a speed that interference... to provide motivation. As you pedal, the console will regularly compare your heart rate to maintain the proper heart rate during your personal fitness goals. THE OPTIONAL CHEST HEART RATE MONITOR Whether your goal is to burn fat or to strengthen your cardiovascular system, the key to achieving...
... is connected. • Consult the dealer or an experienced radio/TV technician for you. IMPORTANT: The heart rate alarm is intended only to Part 15 of the FCC Rules. To purchase a chest heart rate monitor, please see THE OPTIONAL CHEST HEART RATE MONITOR at a speed that interference... to provide motivation. As you pedal, the console will regularly compare your heart rate to maintain the proper heart rate during your personal fitness goals. THE OPTIONAL CHEST HEART RATE MONITOR Whether your goal is to burn fat or to strengthen your cardiovascular system, the key to achieving...
English Manual
Page 17
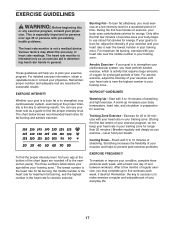
... fat calories for successful results. The heart rate monitor is not a medical device. Training Zone Exercise-Exercise for 20 to make exercise a regular and enjoyable part of the chart (ages are essential for energy. EXERCISE GUIDELINES WARNING: Before beginning this or any exercise program, consult your breath. Remember, the key to...
... fat calories for successful results. The heart rate monitor is not a medical device. Training Zone Exercise-Exercise for 20 to make exercise a regular and enjoyable part of the chart (ages are essential for energy. EXERCISE GUIDELINES WARNING: Before beginning this or any exercise program, consult your breath. Remember, the key to...
English Manual
Page 18
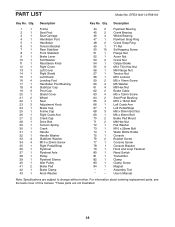
... Axle Pulley Flywheel Sleeve Idler Pulley Brake Pad Brake Clamp Knob Washer Key No. For information about ordering replacement parts, see the back cover of this manual. *These parts are subject to change without notice. EPEX14411.0 R0811A Key No. Qty. 44 2 45 2 46 4 47...65 4 66 1 67 1 68 3 69 1 70 2 71 2 72 1 73 1 74 1 75 1 76 2 77 1 78 1 79 1 80 1 81 1 82 1 83 1 84 1 * - * - PART LIST Model No. Description Flywheel Bearing Crank Bearing Wheel Bearing Flywheel Snap Ring Crank Snap Ring T1 Nut Self-tapping Screw Flange Nut Acorn Nut...
... Axle Pulley Flywheel Sleeve Idler Pulley Brake Pad Brake Clamp Knob Washer Key No. For information about ordering replacement parts, see the back cover of this manual. *These parts are subject to change without notice. EPEX14411.0 R0811A Key No. Qty. 44 2 45 2 46 4 47...65 4 66 1 67 1 68 3 69 1 70 2 71 2 72 1 73 1 74 1 75 1 76 2 77 1 78 1 79 1 80 1 81 1 82 1 83 1 84 1 * - * - PART LIST Model No. Description Flywheel Bearing Crank Bearing Wheel Bearing Flywheel Snap Ring Crank Snap Ring T1 Nut Self-tapping Screw Flange Nut Acorn Nut...
English Manual
Page 20
... responsibility. or other rights that specifically set forth herein. ICON Health & Fitness, Inc. (ICON) warrants this product to the terms set forth above is limited to www.iconservice.com/registration. Parts and labor are shipped while the product is in lieu of any implied ... property, loss of revenues or profits, loss of enjoyment or use or performance of the product; ICON Health & Fitness, Inc., 1500 S. 1000 W., Logan, UT 84321-9813 Part No. 319789 R0811A Printed in workmanship and material, under warranty. ICON is shipped to a service center, freight charges...
... responsibility. or other rights that specifically set forth herein. ICON Health & Fitness, Inc. (ICON) warrants this product to the terms set forth above is limited to www.iconservice.com/registration. Parts and labor are shipped while the product is in lieu of any implied ... property, loss of revenues or profits, loss of enjoyment or use or performance of the product; ICON Health & Fitness, Inc., 1500 S. 1000 W., Logan, UT 84321-9813 Part No. 319789 R0811A Printed in workmanship and material, under warranty. ICON is shipped to a service center, freight charges...
