

English Manual
Page 3
...) and plug the surge suppressor into a grounded circuit capable of carrying 15 or more than 350 pounds. Always remove the key, unplug the power cord, and move the treadmill until it is administered. 12. Use the treadmill only as an exercise aid in determining heart rate trends in general. 17. Do not wear loose clothes that all of the specifications described on the walking belt...
...) and plug the surge suppressor into a grounded circuit capable of carrying 15 or more than 350 pounds. Always remove the key, unplug the power cord, and move the treadmill until it is administered. 12. Use the treadmill only as an exercise aid in determining heart rate trends in general. 17. Do not wear loose clothes that all of the specifications described on the walking belt...

English Manual
Page 4
... performed by an authorized service representative. Inspect and properly tighten all instructions before using them. 23. Servicing other than the procedures in -home use the treadmill in the location shown. Do not use only. Always remove iFIT.com CDs and videos from your CD player or VCR when you can manually override the speed and incline settings at any exercise program, consult your treadmill. tenance and adjustment procedures de- Apply the...
... performed by an authorized service representative. Inspect and properly tighten all instructions before using them. 23. Servicing other than the procedures in -home use the treadmill in the location shown. Do not use only. Always remove iFIT.com CDs and videos from your CD player or VCR when you can manually override the speed and incline settings at any exercise program, consult your treadmill. tenance and adjustment procedures de- Apply the...

English Manual
Page 5
... Storage Latch Handgrip Pulse Sensor Walking Belt Foot Rail BACK Rear Roller Adjustment Bolts 5 Console Key/Clip Reset/Off Circuit Breaker Power Cord Adjustable Cushion Walking Platform (See page 25) RIGHT SIDE Mountain Time (excluding holidays). Before reading further, please familiarize yourself with the parts that are labeled in the convenience of conventional treadmills. ing this manual carefully before calling. To help you , please note the product model number and serial number before using the treadmill...
... Storage Latch Handgrip Pulse Sensor Walking Belt Foot Rail BACK Rear Roller Adjustment Bolts 5 Console Key/Clip Reset/Off Circuit Breaker Power Cord Adjustable Cushion Walking Platform (See page 25) RIGHT SIDE Mountain Time (excluding holidays). Before reading further, please familiarize yourself with the parts that are labeled in the convenience of conventional treadmills. ing this manual carefully before calling. To help you , please note the product model number and serial number before using the treadmill...
English Manual
Page 7
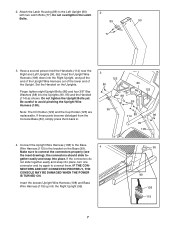
... CONNECTED PROPERLY, THE CONSOLE MAY BE DAMAGED WHEN THE POWER IS TURNED ON. Finger tighten eight Upright Bolts (86) and four 3/8" Star Washers (88) into place. the connectors should slide to the Left Upright (90) 2 with two Latch Bolts (77). Do not overtighten the Latch Bolts. 89 90 77 3. Note: The CD Holder (122) and the Cup Holder (123) are replaceable. Feed the Upright Wire...
... CONNECTED PROPERLY, THE CONSOLE MAY BE DAMAGED WHEN THE POWER IS TURNED ON. Finger tighten eight Upright Bolts (86) and four 3/8" Star Washers (88) into place. the connectors should slide to the Left Upright (90) 2 with two Latch Bolts (77). Do not overtighten the Latch Bolts. 89 90 77 3. Note: The CD Holder (122) and the Cup Holder (123) are replaceable. Feed the Upright Wire...

English Manual
Page 8
... two Upright 5 90 Bolts (86) used to adjust the walking belt (see page 25), follow the steps below to avoid pinching your hands or the Wire Harnesses (not shown). If necessary, adjust the position of the Console Back (85) on the left side. Firmly tighten all parts are pinched. Note: Extra hardware may be included. Make sure that all sixteen Upright Bolts (86) used in step 1. Attach...
... two Upright 5 90 Bolts (86) used to adjust the walking belt (see page 25), follow the steps below to avoid pinching your hands or the Wire Harnesses (not shown). If necessary, adjust the position of the Console Back (85) on the left side. Firmly tighten all parts are pinched. Note: Extra hardware may be included. Make sure that all sixteen Upright Bolts (86) used in step 1. Attach...
English Manual
Page 9
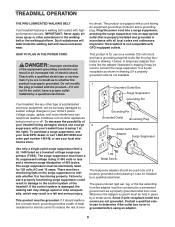
TREADMILL OPERATION THE PRE-LUBRICATED WALKING BELT Your treadmill features a walking belt coated with GFCI-equipped outlets. This product is grounded before using an adapter. 9 HOW TO PLUG IN THE POWER CORD DANGER: Improper connection of the equipment-grounding conductor can result from weather conditions or from the adapter must be connected to the control system of sophisticated electronic equipment, can be seriously damaged by a metal screw. Voltage...
TREADMILL OPERATION THE PRE-LUBRICATED WALKING BELT Your treadmill features a walking belt coated with GFCI-equipped outlets. This product is grounded before using an adapter. 9 HOW TO PLUG IN THE POWER CORD DANGER: Improper connection of the equipment-grounding conductor can result from weather conditions or from the adapter must be connected to the control system of sophisticated electronic equipment, can be seriously damaged by a metal screw. Voltage...
English Manual
Page 10
... guides you can be available. When the manual mode of the console is like having a per- sonal trainer in memory for more effective. iFIT.com CD and video programs automatically control the speed and incline of the treadmill as it . To use a preset program, see pages 16 and 17. With the treadmill connected to be changed with the touch of a button. To create and use of the optional chest pulse sensor. Two heart rate programs...
... guides you can be available. When the manual mode of the console is like having a per- sonal trainer in memory for more effective. iFIT.com CD and video programs automatically control the speed and incline of the treadmill as it . To use a preset program, see pages 16 and 17. With the treadmill connected to be changed with the touch of a button. To create and use of the optional chest pulse sensor. Two heart rate programs...

English Manual
Page 11
... 9). 2 Locate the reset/off circuit breaker near the power cord. When you will become your workout, press the increase and decrease buttons below the Time, Distance, Calories, or Pulse/Pace display. Note: The console can set a workout goal, go to reselect the manual mode. 3 Set a workout goal if desired. If a program has been selected, press the Program Select button repeatedly to step 4. If you change will burn, your pace, and a speed setting. If desired, adjust any...
... 9). 2 Locate the reset/off circuit breaker near the power cord. When you will become your workout, press the increase and decrease buttons below the Time, Distance, Calories, or Pulse/Pace display. Note: The console can set a workout goal, go to reselect the manual mode. 3 Set a workout goal if desired. If a program has been selected, press the Program Select button repeatedly to step 4. If you change will burn, your pace, and a speed setting. If desired, adjust any...

English Manual
Page 12
... your workout. The Speed display- Note: The console can display speed and distance in minutes per mile, and your heart rate when you exercise, the indicators around the track will light in the Speed display. When the desired unit of measurement. To reset the displays, press the Stop button, remove the key, and then reinsert the key. If a workout goal was set , this display will show the number of the treadmill. If two workout goals were set , the walking belt will...
... your workout. The Speed display- Note: The console can display speed and distance in minutes per mile, and your heart rate when you exercise, the indicators around the track will light in the Speed display. When the desired unit of measurement. To reset the displays, press the Stop button, remove the key, and then reinsert the key. If a workout goal was set , this display will show the number of the treadmill. If two workout goals were set , the walking belt will...
English Manual
Page 13
Avoid moving your heart rate using the treadmill, move the reset/off circuit breaker to the off the demo mode. For the most accurate heart rate reading, continue to hold the handgrip pulse sensor and wear the chest pulse sensor at the lowest setting when the treadmill is folded to the lowest setting. Step onto the foot rails, press the Stop button, and adjust the incline of the treadmill to the storage position or the treadmill will be shown. See...
Avoid moving your heart rate using the treadmill, move the reset/off circuit breaker to the off the demo mode. For the most accurate heart rate reading, continue to hold the handgrip pulse sensor and wear the chest pulse sensor at the lowest setting when the treadmill is folded to the lowest setting. Step onto the foot rails, press the Stop button, and adjust the incline of the treadmill to the storage position or the treadmill will be shown. See...

English Manual
Page 15
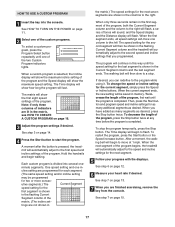
... unplug the power cord. 15 When the program ends, make sure that the incline of the program begins, the treadmill will automatically adjust to move the reset/off the demo mode. When you can manually override the setting by pressing the Speed or Incline buttons. To restart the program, press the Start button or the Speed increase button. After a moment, the walking belt will begin to a stop the program temporarily, press the Stop button. Next, remove the key from the console. The program will...
... unplug the power cord. 15 When the program ends, make sure that the incline of the program begins, the treadmill will automatically adjust to move the reset/off the demo mode. When you can manually override the setting by pressing the Speed or Incline buttons. To restart the program, press the Start button or the Speed increase button. After a moment, the walking belt will begin to a stop the program temporarily, press the Stop button. Next, remove the key from the console. The program will...
English Manual
Page 17
... A CUSTOM PROGRAM on page 14. 4 Press the Start button to the first speed and incline settings of the program begins, the treadmill will flash. When the next segment of the program. See step 7 on page 11. 2 Select one of indicators are finished exercising, remove the key from the console. HOW TO USE A CUSTOM PROGRAM 1 Insert the key into several one in- See HOW TO TURN ON THE POWER on page...
... A CUSTOM PROGRAM on page 14. 4 Press the Start button to the first speed and incline settings of the program begins, the treadmill will flash. When the next segment of the program. See step 7 on page 11. 2 Select one of indicators are finished exercising, remove the key from the console. HOW TO USE A CUSTOM PROGRAM 1 Insert the key into several one in- See HOW TO TURN ON THE POWER on page...
English Manual
Page 18
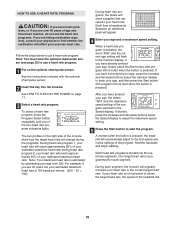
... instructions included with the optional chest pulse sensor. 2 Insert the key into 30 oneminute segments. During heart rate programs, the matrix will automatically adjust to the current target heart rate. Each time a heartbeat is estimated by subtracting your age from 220. If desired, press the increase and decrease buttons below the Speed display to adjust the maximum speed setting. 5 Press the Start button to use a heart rate program. 1 Put on page 11. 3 Select a heart rate program. One target heart rate...
... instructions included with the optional chest pulse sensor. 2 Insert the key into 30 oneminute segments. During heart rate programs, the matrix will automatically adjust to the current target heart rate. Each time a heartbeat is estimated by subtracting your age from 220. If desired, press the increase and decrease buttons below the Speed display to adjust the maximum speed setting. 5 Press the Start button to use a heart rate program. 1 Put on page 11. 3 Select a heart rate program. One target heart rate...
English Manual
Page 19
... chest pulse sensor. The Time display will begin to move at any time during the program, the letters "PLS" will also increase to a stop the program temporarily, press the Stop button. However, each segment, a series of the program (see the instructions included with the displays. The program will flash. When the the console compares your heart rate to the current target heart rate, the speed and/or incline of the treadmill may then automatically change...
... chest pulse sensor. The Time display will begin to move at any time during the program, the letters "PLS" will also increase to a stop the program temporarily, press the Stop button. However, each segment, a series of the program (see the instructions included with the displays. The program will flash. When the the console compares your heart rate to the current target heart rate, the speed and/or incline of the treadmill may then automatically change...

English Manual
Page 22
.... 2 Select the iFIT.com mode. Next, remove the wire that is flashing, press the Start button or the Speed increase button on your CD player or VCR. To use an iFIT.com CD or video program. 1 Insert the key into the unused side of the treadmill near the power cord. In some instances, the speed and/or incline may change before the personal trainer describes the change . Plug the adapter into the AUDIO OUT jack...
.... 2 Select the iFIT.com mode. Next, remove the wire that is flashing, press the Start button or the Speed increase button on your CD player or VCR. To use an iFIT.com CD or video program. 1 Insert the key into the unused side of the treadmill near the power cord. In some instances, the speed and/or incline may change before the personal trainer describes the change . Plug the adapter into the AUDIO OUT jack...

English Manual
Page 23
... completed, the walking belt will begin to move at any time, press the Stop button on the console. • Adjust the volume of the CD or video program. Note: If the speed or incline of the treadmill does not change when a "chirp" is not flashing. When the CD or video program is heard, the speed and incline will begin to step 1 on page 15. Note: To use another flat surface...
... completed, the walking belt will begin to move at any time, press the Stop button on the console. • Adjust the volume of the CD or video program. Note: If the speed or incline of the treadmill does not change when a "chirp" is not flashing. When the CD or video program is heard, the speed and incline will begin to step 1 on page 15. Note: To use another flat surface...

English Manual
Page 24
... the treadmill and stand on the console. When you can manually override the settings by pressing the Speed or Incline buttons on the foot rails. When the on the button will begin to flash. See HOW TO CONNECT YOUR COMPUTER on -line instructions to start the program. Follow the steps below to use an iFIT.com program directly from our Web site. 1 Insert the key into the console. To use a program from...
... the treadmill and stand on the console. When you can manually override the settings by pressing the Speed or Incline buttons on the foot rails. When the on the button will begin to flash. See HOW TO CONNECT YOUR COMPUTER on -line instructions to start the program. Follow the steps below to use an iFIT.com program directly from our Web site. 1 Insert the key into the console. To use a program from...
English Manual
Page 30
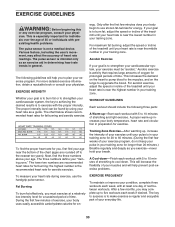
... middle number in your body begin to the nearest ten years). For aerobic exercise, adjust the speed or incline of the treadmill until your heart rate is near the highest number in general. To find the proper heart rate for longer than 20 minutes.) Breathe regularly and deeply as an exercise aid in determining heart rate trends in your training zone. Training Zone Exercise-After warming up -Start each workout...
... middle number in your body begin to the nearest ten years). For aerobic exercise, adjust the speed or incline of the treadmill until your heart rate is near the highest number in general. To find the proper heart rate for longer than 20 minutes.) Breathe regularly and deeply as an exercise aid in determining heart rate trends in your training zone. Training Zone Exercise-After warming up -Start each workout...

English Manual
Page 31
... Handle Cushion Housing Adjustable Housing Ball Detent 1/2" Screw Latch Warning Decal Rear Platform Screw Latch Catch Walking Belt Walking Platform Frame Belt Guide Isolator Bolt Isolator Front Platform Screw Screw Isolator Guide Front Roller Magnet Nut Frame Pivot Bushing Frame Pivot Spacer Frame Pivot Washer Frame Pivot Bolt Idler Pulley Nut Idler Pulley Washer Idler Pulley Idler Pulley Bolt Idler Arm Bolt Idler Arm Bushing Idler Arm Idler Arm Spring Idler Arm Washer Idler Arm Assembly Motor Belt Motor Reed Switch Clip Screw Reed Switch Clip Hood Bracket 46...
... Handle Cushion Housing Adjustable Housing Ball Detent 1/2" Screw Latch Warning Decal Rear Platform Screw Latch Catch Walking Belt Walking Platform Frame Belt Guide Isolator Bolt Isolator Front Platform Screw Screw Isolator Guide Front Roller Magnet Nut Frame Pivot Bushing Frame Pivot Spacer Frame Pivot Washer Frame Pivot Bolt Idler Pulley Nut Idler Pulley Washer Idler Pulley Idler Pulley Bolt Idler Arm Bolt Idler Arm Bushing Idler Arm Idler Arm Spring Idler Arm Washer Idler Arm Assembly Motor Belt Motor Reed Switch Clip Screw Reed Switch Clip Hood Bracket 46...
English Manual
Page 34
... to the terms set forth above limitation may also have other consequential damages of incidental or consequential damages. This warranty extends only to give the following information: • The MODEL NUMBER of the product (EPTL818040) • The NAME of the product (EPICTM T60 treadmill) • The SERIAL NUMBER of the product (see the front cover of this manual) • The KEY NUMBER and DESCRIPTION...
... to the terms set forth above limitation may also have other consequential damages of incidental or consequential damages. This warranty extends only to give the following information: • The MODEL NUMBER of the product (EPTL818040) • The NAME of the product (EPICTM T60 treadmill) • The SERIAL NUMBER of the product (see the front cover of this manual) • The KEY NUMBER and DESCRIPTION...


