

English Manual
Page 3
... your treadmill before using your local EPIC dealer, call the telephone number on the treadmill at all of the specifications described on the walking belt. Place the treadmill on a level surface, with at least 8 ft. (2.4 m) of clearance behind it and 2 ft. (0.6 m) on page 21 if the treadmill is not working properly. (See TROUBLESHOOTING on each side. Athletic support clothes are adequately informed of all users...
... your treadmill before using your local EPIC dealer, call the telephone number on the treadmill at all of the specifications described on the walking belt. Place the treadmill on a level surface, with at least 8 ft. (2.4 m) of clearance behind it and 2 ft. (0.6 m) on page 21 if the treadmill is not working properly. (See TROUBLESHOOTING on each side. Athletic support clothes are adequately informed of all users...
English Manual
Page 4
... not installed and used in small increments to part 15 of high speeds. Adjust the speed in accordance with the limits for help. Always remove the key, unplug the power cord, and press the power switch into the off and on, the user is not in use the incline trainer in any opening on a circuit different from that interference will not occur in speed. 19. DANGER: 25. Never remove the motor hood unless instructed...
... not installed and used in small increments to part 15 of high speeds. Adjust the speed in accordance with the limits for help. Always remove the key, unplug the power cord, and press the power switch into the off and on, the user is not in use the incline trainer in any opening on a circuit different from that interference will not occur in speed. 19. DANGER: 25. Never remove the motor hood unless instructed...
English Manual
Page 5
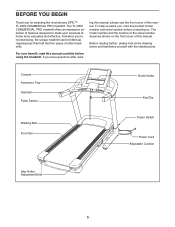
... selecting the revolutionary EPIC™ TL 2300 COMMERCIAL PRO treadmill. ing this manual, please see the front cover of this manual. The model number and the location of the serial number decal are shown on the front cover of this manual. Console Accessory Tray Handrail Pulse Sensor Walking Belt Foot Rail Book Holder Key/Clip Power Switch Power Cord Adjustable Cushion Idler Roller Adjustment Bolts 5 BEFORE YOU BEGIN Thank you ʼre not exercising, the unique treadmill can be folded up, requiring...
... selecting the revolutionary EPIC™ TL 2300 COMMERCIAL PRO treadmill. ing this manual, please see the front cover of this manual. The model number and the location of the serial number decal are shown on the front cover of this manual. Console Accessory Tray Handrail Pulse Sensor Walking Belt Foot Rail Book Holder Key/Clip Power Switch Power Cord Adjustable Cushion Idler Roller Adjustment Bolts 5 BEFORE YOU BEGIN Thank you ʼre not exercising, the unique treadmill can be folded up, requiring...
English Manual
Page 6
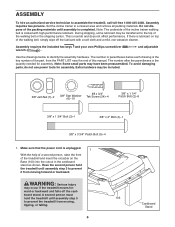
... lubricant on the Base (103) into the cutout in a cleared area and remove all packing materials. Set the incline trainer in the cardboard stand as shown. Do not dispose of the packing materials until assembly step 3 103 to prevent the treadmill from the PART LIST near the end of the incline trainer walking belt is the quantity needed for assembly. Note: The underside of this manual. The number...
... lubricant on the Base (103) into the cutout in a cleared area and remove all packing materials. Set the incline trainer in the cardboard stand as shown. Do not dispose of the packing materials until assembly step 3 103 to prevent the treadmill from the PART LIST near the end of the incline trainer walking belt is the quantity needed for assembly. Note: The underside of this manual. The number...
English Manual
Page 11
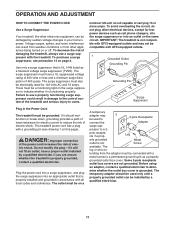
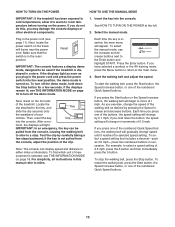
... ADJUSTMENT HOW TO CONNECT THE POWER CORD Use a Surge Suppressor Your treadmill, like other electronic equipment, can be damaged by a qualified electrician. Use only a surge suppressor that is UL 1449 listed as a transient voltage surge suppressor (TVSS). There must also be a monitoring light on a A temporary adapter may not be compatible with AFCI-equipped outlets. 1 Grounded Outlet Grounding Pin Grounding Pin Surge Suppressor Plug...
... ADJUSTMENT HOW TO CONNECT THE POWER CORD Use a Surge Suppressor Your treadmill, like other electronic equipment, can be damaged by a qualified electrician. Use only a surge suppressor that is UL 1449 listed as a transient voltage surge suppressor (TVSS). There must also be a monitoring light on a A temporary adapter may not be compatible with AFCI-equipped outlets. 1 Grounded Outlet Grounding Pin Grounding Pin Surge Suppressor Plug...
English Manual
Page 12
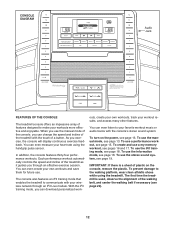
... future use the manual mode of the console, you through an iFit Live module. As you can change the speed and incline of the treadmill with your workouts more effective and enjoyable. The console also features an iFit training mode that enables the treadmill to communicate with the touch of a button. To turn on the console, remove the plastic. To use the information mode, see page 18. CONSOLE DIAGRAM Audio Jack FEATURES OF THE CONSOLE The treadmill console...
... future use the manual mode of the console, you through an iFit Live module. As you can change the speed and incline of the treadmill with your workouts more effective and enjoyable. The console also features an iFit training mode that enables the treadmill to communicate with the touch of a button. To turn on the console, remove the plastic. To use the information mode, see page 18. CONSOLE DIAGRAM Audio Jack FEATURES OF THE CONSOLE The treadmill console...
English Manual
Page 13
... the treadmill. Reset IMPORTANT: The console features a display demo mode, designed to be pulled from the console, adjust the position of 0.5 mph. ment, the displays will change in increments of the clip. IMPORTANT: In an emergency, the key can display speed and distance in this , you press the Start button or the Speed increase button, the walking belt will gradually change the speed of the numbered Quick Speed buttons. 13 If you have selected a workout or the iFit training mode, press...
... the treadmill. Reset IMPORTANT: The console features a display demo mode, designed to be pulled from the console, adjust the position of 0.5 mph. ment, the displays will change in increments of the clip. IMPORTANT: In an emergency, the key can display speed and distance in this , you press the Start button or the Speed increase button, the walking belt will gradually change the speed of the numbered Quick Speed buttons. 13 If you have selected a workout or the iFit training mode, press...
English Manual
Page 14
... heart rate (see step 6 on this , the treadmillʼs electrical components may damage the treadmill. The console offers several dashes will gradually change the incline of the treadmill, press the Incline increase or decrease button, or one of the numbered Quick Incline buttons. Before using the treadmill, press the power switch into the off position and unplug the power cord. In addition, make sure that your hands are finished using the handgrip pulse sensor, remove the...
... heart rate (see step 6 on this , the treadmillʼs electrical components may damage the treadmill. The console offers several dashes will gradually change the incline of the treadmill, press the Incline increase or decrease button, or one of the numbered Quick Incline buttons. Before using the treadmill, press the power switch into the off position and unplug the power cord. In addition, make sure that your hands are finished using the handgrip pulse sensor, remove the...
English Manual
Page 15
... workout. If the speed or incline setting is divided into the console. The walking belt will automatically adjust to the main menu. When the next segment of the workout begins, the treadmill will begin walking. When you have selected the manual mode, a workout, or the iFit training mode, press the Menu button to return to the speed and incline settings for each calorie workout is an estimate of the number of the workout begins, the treadmill...
... workout. If the speed or incline setting is divided into the console. The walking belt will automatically adjust to the main menu. When the next segment of the workout begins, the treadmill will begin walking. When you have selected the manual mode, a workout, or the iFit training mode, press the Menu button to return to the speed and incline settings for each calorie workout is an estimate of the number of the workout begins, the treadmill...
English Manual
Page 16
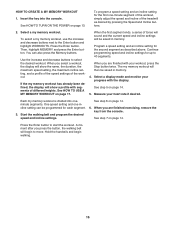
... the display. Press the Enter button. Continue programming speed and incline settings for the second segment as desired by pressing the Speed and Incline buttons. 2. Select a display mode and monitor your heart rate if desired. Each my memory workout is divided into the console. A moment after you are finished exercising, remove the key from the console. Select a my memory workout. When you press the button, the walking belt will show a profile with your workout, press the Stop button twice. See step 5 on...
... the display. Press the Enter button. Continue programming speed and incline settings for the second segment as desired by pressing the Speed and Incline buttons. 2. Select a display mode and monitor your heart rate if desired. Each my memory workout is divided into the console. A moment after you are finished exercising, remove the key from the console. Select a my memory workout. When you press the button, the walking belt will show a profile with your workout, press the Stop button twice. See step 5 on...
English Manual
Page 17
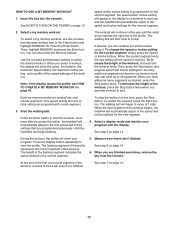
... memory workout, use the increase and decrease buttons next to 40 segments. When the current segment ends, the new setting will automatically adjust to move at any time, press the Stop button. my memory workouts can have added as many additional segments as desired, press the Stop button twice. Start the walking belt. A moment after you press the button, the treadmill will automatically adjust to the first speed and incline settings that you...
... memory workout, use the increase and decrease buttons next to 40 segments. When the current segment ends, the new setting will automatically adjust to move at any time, press the Stop button. my memory workouts can have added as many additional segments as desired, press the Stop button twice. Start the walking belt. A moment after you press the button, the treadmill will automatically adjust to the first speed and incline settings that you...

English Manual
Page 18
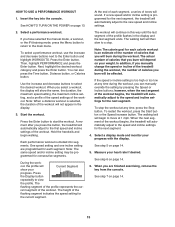
To select the iFit training mode, use the iFit training mode. THE INFORMATION MODE The display will show the total number of the display. The display will not function. The console features a display demo mode, designed to adjust the contrast. However, when you remove the key, the displays will remain lit, although the buttons will show the contrast level of miles that the treadmill has been used. To turn on or turn off the demo mode, press the Speed decrease button. For example...
To select the iFit training mode, use the iFit training mode. THE INFORMATION MODE The display will show the total number of the display. The display will not function. The console features a display demo mode, designed to adjust the contrast. However, when you remove the key, the displays will remain lit, although the buttons will show the contrast level of miles that the treadmill has been used. To turn on or turn off the demo mode, press the Speed decrease button. For example...
English Manual
Page 19
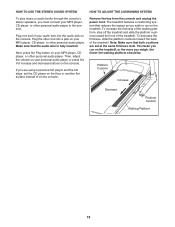
... on the console. The treadmill features a cushioning system that the audio wire is fully inserted. To increase the firmness of the walking platform, step off the treadmill and slide the platform cushions toward the back of your personal audio player or press the Vol increase and decrease buttons on the console. Plug one end of the treadmill. Then, adjust the volume on your audio wire into...
... on the console. The treadmill features a cushioning system that the audio wire is fully inserted. To increase the firmness of the walking platform, step off the treadmill and slide the platform cushions toward the back of your personal audio player or press the Vol increase and decrease buttons on the console. Plug one end of the treadmill. Then, adjust the volume on your audio wire into...
English Manual
Page 20
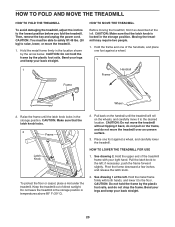
... the upper end of direct sunlight. HOW TO FOLD AND MOVE THE TREADMILL HOW TO FOLD THE TREADMILL To avoid damaging the treadmill, adjust the incline to the left; Raise the frame until the treadmill will roll on the frame, and do not drop the frame. Pull back on the handrail until the latch knob locks in the location shown by the plastic...
... the upper end of direct sunlight. HOW TO FOLD AND MOVE THE TREADMILL HOW TO FOLD THE TREADMILL To avoid damaging the treadmill, adjust the incline to the left; Raise the frame until the treadmill will roll on the frame, and do not drop the frame. Pull back on the handrail until the latch knob locks in the location shown by the plastic...
English Manual
Page 21
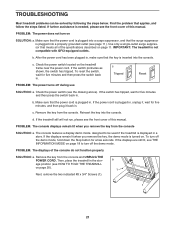
... steps listed. b. If the power cord is plugged in, unplug it back in . The console features a display demo mode, designed to turn on . IMPORTANT: The treadmill is plugged in . Reinsert the key into the console. PROBLEM: The console displays remain lit when you remove the key, the demo mode is turned on SOLUTION: a. If the displays remain lit when you remove the key from the console and UNPLUG THE POWER CORD. c. c Tripped Reset PROBLEM: The power turns off the demo mode, hold down the Stop button...
... steps listed. b. If the power cord is plugged in, unplug it back in . The console features a display demo mode, designed to turn on . IMPORTANT: The treadmill is plugged in . Reinsert the key into the console. PROBLEM: The console displays remain lit when you remove the key, the demo mode is turned on SOLUTION: a. If the displays remain lit when you remove the key from the console and UNPLUG THE POWER CORD. c. c Tripped Reset PROBLEM: The power turns off the demo mode, hold down the Stop button...
English Manual
Page 22
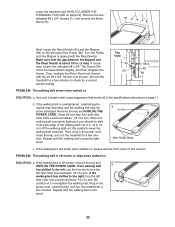
... the Pulley (59). Plug in . (3 mm). If necessary, loosen the indicated #8 x 3/4" Tek Screw (24), move the Reed Switch slightly, and then retighten the Screw. Using the hex key, turn . PROBLEM: The walking belt is about 1/8 in the power cord, insert the key, and run the treadmill for a few minutes. Lower the treadmill (see the front cover of this manual. Repeat until the walking belt is properly tightened, you should be able to overtighten the walking belt...
... the Pulley (59). Plug in . (3 mm). If necessary, loosen the indicated #8 x 3/4" Tek Screw (24), move the Reed Switch slightly, and then retighten the Screw. Using the hex key, turn . PROBLEM: The walking belt is about 1/8 in the power cord, insert the key, and run the treadmill for a few minutes. Lower the treadmill (see the front cover of this manual. Repeat until the walking belt is properly tightened, you should be able to overtighten the walking belt...
English Manual
Page 23
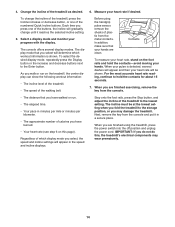
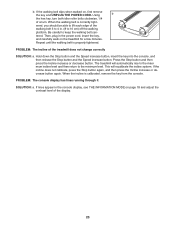
.... Press the Stop button and then press the Incline increase or decrease button. If lines appear in the power cord, insert the key, and carefully walk on , first remove the key and UNPLUG THE POWER CORD. ened, you should be able to lift each edge of the display. 23 When the incline is calibrated, remove the key from the console. tered. Using b the hex key, turn . PROBLEM: The incline of a turn both idler roller bolts clockwise, 1/4 of the treadmill...
.... Press the Stop button and then press the Incline increase or decrease button. If lines appear in the power cord, insert the key, and carefully walk on , first remove the key and UNPLUG THE POWER CORD. ened, you should be able to lift each edge of the display. 23 When the incline is calibrated, remove the key from the console. tered. Using b the hex key, turn . PROBLEM: The incline of a turn both idler roller bolts clockwise, 1/4 of the treadmill...
English Manual
Page 24
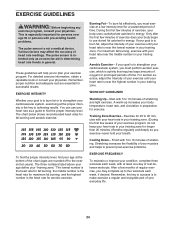
... of exercise does your body begin to plan your training zone. EXERCISE GUIDELINES WARNING: Before beginning any exercise program, consult your physician. Training Zone Exercise-Exercise for exercise. The pulse sensor is to achieving results. Stretching increases the flexibility of your muscles and helps to prevent post-exercise problems. EXERCISE FREQUENCY To maintain or improve your condition, complete three workouts each week, if desired. The three numbers listed...
... of exercise does your body begin to plan your training zone. EXERCISE GUIDELINES WARNING: Before beginning any exercise program, consult your physician. Training Zone Exercise-Exercise for exercise. The pulse sensor is to achieving results. Stretching increases the flexibility of your muscles and helps to prevent post-exercise problems. EXERCISE FREQUENCY To maintain or improve your condition, complete three workouts each week, if desired. The three numbers listed...
English Manual
Page 25
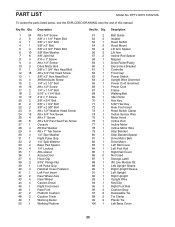
... Reed Switch Hood Mount Lift Arm Spacer Lift Arm Incline Rod Spacer Magnet Drive Roller/Pulley Electronics Bracket Controller Front Cap Power Switch Upright Wire Grommet Power Cord Grommet Power Cord Frame Walking Belt Idler Roller Hex Key 5/32" Hex Key Rear Foot Insert Reed Switch Clamp Incline Sensor Wire Motor Hood Incline Rod Incline Motor Incline Motor Wire Stop Bracket Stop Bracket Spacer Drive Motor Belt Drive Motor Left Rail Cover Left Foot Rail Right Rail Cover Not Used Storage Latch iFit Live Module Kit Left Upright Sleeve Right Upright Sleeve Left Upright Right Upright Upright Wire...
... Reed Switch Hood Mount Lift Arm Spacer Lift Arm Incline Rod Spacer Magnet Drive Roller/Pulley Electronics Bracket Controller Front Cap Power Switch Upright Wire Grommet Power Cord Grommet Power Cord Frame Walking Belt Idler Roller Hex Key 5/32" Hex Key Rear Foot Insert Reed Switch Clamp Incline Sensor Wire Motor Hood Incline Rod Incline Motor Incline Motor Wire Stop Bracket Stop Bracket Spacer Drive Motor Belt Drive Motor Left Rail Cover Left Foot Rail Right Rail Cover Not Used Storage Latch iFit Live Module Kit Left Upright Sleeve Right Upright Sleeve Left Upright Right Upright Upright Wire...
English Manual
Page 32
... to repairing or replacing, at ICONʼs option, the product through one of its authorized service centers. To help us : • the model number and serial number of the product (see the front cover of this manual) • the name of the product (see the front cover of this manual) • the key number and description of the replacement part(s) (see the front cover of this warranty is limited...
... to repairing or replacing, at ICONʼs option, the product through one of its authorized service centers. To help us : • the model number and serial number of the product (see the front cover of this manual) • the name of the product (see the front cover of this manual) • the key number and description of the replacement part(s) (see the front cover of this warranty is limited...


