
English Manual
Page 3
... users of this manual and order part number 146148, or see your local EPIC dealer or call the toll-free telephone number on the same circuit. Wear appropriate exercise clothes when using the treadmill. 17. When connecting the power cord (see HOW TO TURN ON THE POWER on the treadmill at all times. 7. The treadmill is the responsibility of the treadmill. It is capable of this treadmill are adequately informed...
... users of this manual and order part number 146148, or see your local EPIC dealer or call the toll-free telephone number on the same circuit. Wear appropriate exercise clothes when using the treadmill. 17. When connecting the power cord (see HOW TO TURN ON THE POWER on the treadmill at all times. 7. The treadmill is the responsibility of the treadmill. It is capable of this treadmill are adequately informed...

English Manual
Page 4
... point of the treadmill regularly. 24. Never remove the motor hood unless instructed to qualified service personnel. 28. To reduce the risk of electric shock, do so by the pin on the latch knob. 23. Always unplug the power cord immediately after use the treadmill in this manual. There are no user serviceable parts inside. Servicing other than the procedures in any opening. When folding or moving the treadmill, make sure that...
... point of the treadmill regularly. 24. Never remove the motor hood unless instructed to qualified service personnel. 28. To reduce the risk of electric shock, do so by the pin on the latch knob. 23. Always unplug the power cord immediately after use the treadmill in this manual. There are no user serviceable parts inside. Servicing other than the procedures in any opening. When folding or moving the treadmill, make sure that...
English Manual
Page 6
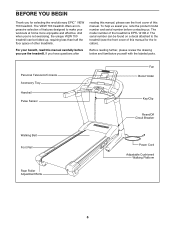
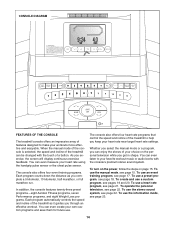
... the treadmill (see the front cover of this manual for selecting the revolutionary EPIC™ VIEW 700 treadmill. Personal Television/Console Accessory Tray Handrail Pulse Sensor Fan Book Holder Key/Clip Reset/Off Circuit Breaker Walking Belt Foot Rail Rear Roller Adjustment Bolts Power Cord Adjustable Cushioned Walking Platform 6 And when you have questions after reading this manual, please see the front cover of other treadmills. If you 're not exercising, the unique VIEW 700 treadmill can be folded up...
... the treadmill (see the front cover of this manual for selecting the revolutionary EPIC™ VIEW 700 treadmill. Personal Television/Console Accessory Tray Handrail Pulse Sensor Fan Book Holder Key/Clip Reset/Off Circuit Breaker Walking Belt Foot Rail Rear Roller Adjustment Bolts Power Cord Adjustable Cushioned Walking Platform 6 And when you have questions after reading this manual, please see the front cover of other treadmills. If you 're not exercising, the unique VIEW 700 treadmill can be folded up...

English Manual
Page 9
...). With the help of a second person, hold the console assembly near the Uprights (73, 74). 4 Console Assembly Connect the Upright Wire Harness (75) to - If they do 73 not, turn one connector and try again. Connect the TV Cable (49) and the AV Wire (97) to con- Then, firmly tighten the six Handrail Bolts. 6 73 90 64 64 90 74 9 4. Make sure that no...
...). With the help of a second person, hold the console assembly near the Uprights (73, 74). 4 Console Assembly Connect the Upright Wire Harness (75) to - If they do 73 not, turn one connector and try again. Connect the TV Cable (49) and the AV Wire (97) to con- Then, firmly tighten the six Handrail Bolts. 6 73 90 64 64 90 74 9 4. Make sure that no...
English Manual
Page 11
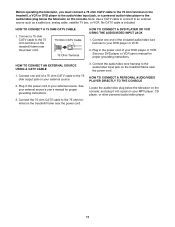
... box, or VCR. See your external source's user's manual for proper grounding instructions. HOW TO CONNECT A PERSONAL AUDIO/VIDEO PLAYER DIRECTLY TO THE CONSOLE Locate the audio/video plug below the television on the treadmill frame near the power cord. 75 Ohm CATV Cable 75 Ohm Terminal HOW TO CONNECT A DVD PLAYER OR VCR USING THE AUDIO/VIDEO INPUT JACK 1. Connect a 75 ohm CATV cable to the 75 ohm terminal on the...
... box, or VCR. See your external source's user's manual for proper grounding instructions. HOW TO CONNECT A PERSONAL AUDIO/VIDEO PLAYER DIRECTLY TO THE CONSOLE Locate the audio/video plug below the television on the treadmill frame near the power cord. 75 Ohm CATV Cable 75 Ohm Terminal HOW TO CONNECT A DVD PLAYER OR VCR USING THE AUDIO/VIDEO INPUT JACK 1. Connect a 75 ohm CATV cable to the 75 ohm terminal on the...

English Manual
Page 12
... covered by high power lines or other end of the chest strap to direct sunlight for extended periods of the sensor unit. The tab should be within arm's length of the chest pulse sensor can be flush with people who have normal heart rhythms. Heart rate reading problems may be replaced (see page 28). 12 For the console to be hand washed and air dried. The chest strap...
... covered by high power lines or other end of the chest strap to direct sunlight for extended periods of the sensor unit. The tab should be within arm's length of the chest pulse sensor can be flush with people who have normal heart rhythms. Heart rate reading problems may be replaced (see page 28). 12 For the console to be hand washed and air dried. The chest strap...
English Manual
Page 13
... this manual and order part number 146148, or see drawing 1 at the right). The green-colored rigid ear, lug, or the like the plug illustrated in drawing 1 below. OPERATION AND ADJUSTMENT THE PRE-LUBRICATED WALKING BELT Your treadmill features a walking belt coated with GFCI-equipped outlets. Important: The treadmill is properly installed and grounded in your home's power. The surge suppressor must be used to connect the...
... this manual and order part number 146148, or see drawing 1 at the right). The green-colored rigid ear, lug, or the like the plug illustrated in drawing 1 below. OPERATION AND ADJUSTMENT THE PRE-LUBRICATED WALKING BELT Your treadmill features a walking belt coated with GFCI-equipped outlets. Important: The treadmill is properly installed and grounded in your home's power. The surge suppressor must be used to connect the...
English Manual
Page 14
... training programs. Each program counts down the distance as it guides you keep your workouts more effective and enjoyable. When the manual mode of the console is selected, the speed and incline of the treadmill can even measure your own custom programs and save them for future use the information mode, see page 15. The console also offers four heart rate programs that control the speed and incline of the treadmill to your favorite workout...
... training programs. Each program counts down the distance as it guides you keep your workouts more effective and enjoyable. When the manual mode of the console is selected, the speed and incline of the treadmill can even measure your own custom programs and save them for future use the information mode, see page 15. The console also offers four heart rate programs that control the speed and incline of the treadmill to your favorite workout...
English Manual
Page 15
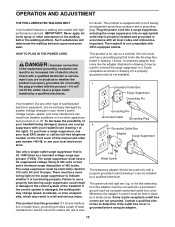
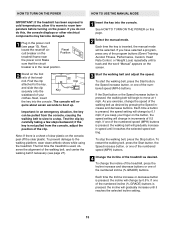
... a stop the walking belt, press the Stop button. HOW TO TURN ON THE POWER HOW TO USE THE MANUAL MODE IMPORTANT: If the treadmill has been exposed to cold temperatures, allow it reaches the selected incline setting. 15 The console will change in the reset position. 2 Stand on the button, the speed setting will change the incline of the treadmill, press the Incline increase and decrease buttons or one of the tread- Find the clip Clip attached...
... a stop the walking belt, press the Stop button. HOW TO TURN ON THE POWER HOW TO USE THE MANUAL MODE IMPORTANT: If the treadmill has been exposed to cold temperatures, allow it reaches the selected incline setting. 15 The console will change in the reset position. 2 Stand on the button, the speed setting will change the incline of the treadmill, press the Incline increase and decrease buttons or one of the tread- Find the clip Clip attached...
English Manual
Page 16
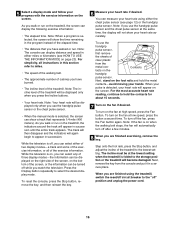
... in the program instead of the exercise information. To reset the console, press the Stop button, remove the key, and then reinsert the key. 6 Measure your progress with the exercise information on the handgrip pulse sensor. Note: Your heart rate will appear in either of two display modes-a track and some of the exercise information, or all of the elapsed time. • The distance that represents 1/4 mile (400 meters). To turn off while you walk or...
... in the program instead of the exercise information. To reset the console, press the Stop button, remove the key, and then reinsert the key. 6 Measure your progress with the exercise information on the handgrip pulse sensor. Note: Your heart rate will appear in either of two display modes-a track and some of the exercise information, or all of the elapsed time. • The distance that represents 1/4 mile (400 meters). To turn off while you walk or...

English Manual
Page 17
To stop . 4 Select a display mode and follow your progress with the exercise information on the screen. To restart the program, press the Start button. If the speed of the walking belt was greater than 5 mph when you are finished using the treadmill, switch the reset/off " position and unplug the power cord. 17 See step 5 on the screen. When the program ends, make sure that the incline of the program and a track will then...
To stop . 4 Select a display mode and follow your progress with the exercise information on the screen. To restart the program, press the Start button. If the speed of the walking belt was greater than 5 mph when you are finished using the treadmill, switch the reset/off " position and unplug the power cord. 17 See step 5 on the screen. When the program ends, make sure that the incline of the program and a track will then...
English Manual
Page 18
... Speed or Incline buttons; One speed setting and one -minute segments. When the first segment ends, the treadmill will continue in memory. 4 Press the Start button to the speed and incline settings for the next segment. 5 Select a display mode and follow your progress with the exercise information on your weight. The program will automatically adjust to start the program. however, when the next segment begins, the treadmill will move at any time, press the Stop button...
... Speed or Incline buttons; One speed setting and one -minute segments. When the first segment ends, the treadmill will continue in memory. 4 Press the Start button to the speed and incline settings for the next segment. 5 Select a display mode and follow your progress with the exercise information on your weight. The program will automatically adjust to start the program. however, when the next segment begins, the treadmill will move at any time, press the Stop button...

English Manual
Page 19
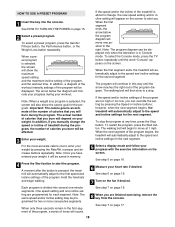
... three minutes will begin walking. See step 7 on page 16. 3 Press the Start button and program the desired speed and incline settings. HOW TO CREATE A CUSTOM PROGRAM 1 Insert the key into one-minute segments. custom programs can be programmed for the first segment, simply adjust the speed and incline of the treadmill as desired by pressing the Speed and Incline buttons. 5 Measure your workout, press the Stop button and then the Speed decrease button. Note: If the...
... three minutes will begin walking. See step 7 on page 16. 3 Press the Start button and program the desired speed and incline settings. HOW TO CREATE A CUSTOM PROGRAM 1 Insert the key into one-minute segments. custom programs can be programmed for the first segment, simply adjust the speed and incline of the treadmill as desired by pressing the Speed and Incline buttons. 5 Measure your workout, press the Stop button and then the Speed decrease button. Note: If the...

English Manual
Page 21
... chest pulse sensor to use a heart rate program. 2 Insert the key into 30 one position to the first speed and incline settings of the treadmill may be programmed for the first two segments). If desired, press the Rate/Wt. If your progress during the workout. 4 Enter a target heart rate setting. If the speed settings and/or incline settings are over 60 years of which display mode is about to change , the speed setting and/or incline setting will indicate your heart rate...
... chest pulse sensor to use a heart rate program. 2 Insert the key into 30 one position to the first speed and incline settings of the treadmill may be programmed for the first two segments). If desired, press the Rate/Wt. If your progress during the workout. 4 Enter a target heart rate setting. If the speed settings and/or incline settings are over 60 years of which display mode is about to change , the speed setting and/or incline setting will indicate your heart rate...

English Manual
Page 22
... the key into the three audio/video RCA jacks, select the Input 1 source. If you must connect your MP3 player, CD player, or personal audio/video player. See step 7 on page 15. 2 Press the TV button to adjust the volume. See HOW TO TURN ON THE POWER on page 16. 8 When you do not wish to use earphones or headphones (not included), plug them...
... the key into the three audio/video RCA jacks, select the Input 1 source. If you must connect your MP3 player, CD player, or personal audio/video player. See step 7 on page 15. 2 Press the TV button to adjust the volume. See HOW TO TURN ON THE POWER on page 16. 8 When you do not wish to use earphones or headphones (not included), plug them...
English Manual
Page 23
... information mode also allows you to change the unit of the display will show the total number of miles or kilometers that the treadmill has been used only when a treadmill is scanning channels), remove the key from the console. In addition, the center of measurement if desired. Press the Speed increase button to adjust the settings of measurement for metric kilometers. decrease button while reinserting the key into the console...
... information mode also allows you to change the unit of the display will show the total number of miles or kilometers that the treadmill has been used only when a treadmill is scanning channels), remove the key from the console. In addition, the center of measurement if desired. Press the Speed increase button to adjust the settings of measurement for metric kilometers. decrease button while reinserting the key into the console...
English Manual
Page 27
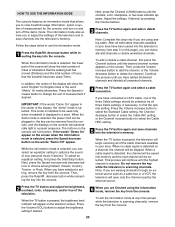
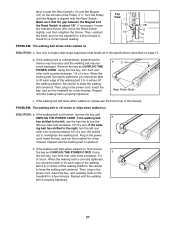
... front cover of the walking belt 3 to the right, turn the left rear roller bolt clockwise 1/2 of a turn . b. PROBLEM: The walking belt is properly tightened. If the walking belt slips when walked on SOLUTION: a. Then, reattach the hood, and run the treadmill for a few minutes. Then, plug in the power cord, insert the key, and run the treadmill for a few minutes. If the walking belt a has shifted to the left, use the hex key to turn the left rear roller bolt...
... front cover of the walking belt 3 to the right, turn the left rear roller bolt clockwise 1/2 of a turn . b. PROBLEM: The walking belt is properly tightened. If the walking belt slips when walked on SOLUTION: a. Then, reattach the hood, and run the treadmill for a few minutes. Then, plug in the power cord, insert the key, and run the treadmill for a few minutes. If the walking belt a has shifted to the left, use the hex key to turn the left rear roller bolt...

English Manual
Page 29
... help prevent post-exercise problems. EXERCISE FREQUENCY To maintain or improve your condition, complete three workouts each week, with preexisting health problems. The pulse sensor is in your training zone for aerobic exercise. The chart below shows recommended heart rates for energy. For maximum fat burning, adjust the speed and incline of the treadmill until your heart rate is near the highest number in your cardiovascular system, the key to achieving...
... help prevent post-exercise problems. EXERCISE FREQUENCY To maintain or improve your condition, complete three workouts each week, with preexisting health problems. The pulse sensor is in your training zone for aerobic exercise. The chart below shows recommended heart rates for energy. For maximum fat burning, adjust the speed and incline of the treadmill until your heart rate is near the highest number in your cardiovascular system, the key to achieving...

English Manual
Page 30
...Endcap Controller Incline Rod Nut Lift Motor Lift Motor Bolt, Top AV Cover Platform Cushion Power Cord Assembly Hood Hood Clip Grommet Walking Belt Frame TV Cable Key No. EPTL14106.2 R1107B To locate the parts listed below, see the EXPLODED DRAWING attached in the center of this manual. PART LIST-Model No. Bolt Allen Wrench Left Rear Foot Left Rear Endcap Rear Roller Platform Nut Platform Bolt, Rear Console Fan Handrail Bolt Console Base Console TV Console Jack Ground Wire Electronics Screw Pulse Receiver Cover Console Wire Harness Upright Bolt Left Upright Right Upright Upright Wire...
...Endcap Controller Incline Rod Nut Lift Motor Lift Motor Bolt, Top AV Cover Platform Cushion Power Cord Assembly Hood Hood Clip Grommet Walking Belt Frame TV Cable Key No. EPTL14106.2 R1107B To locate the parts listed below, see the EXPLODED DRAWING attached in the center of this manual. PART LIST-Model No. Bolt Allen Wrench Left Rear Foot Left Rear Endcap Rear Roller Platform Nut Platform Bolt, Rear Console Fan Handrail Bolt Console Base Console TV Console Jack Ground Wire Electronics Screw Pulse Receiver Cover Console Wire Harness Upright Bolt Left Upright Right Upright Upright Wire...
English Manual
Page 34
... (EPIC VIEW 700 treadmill) • the SERIAL NUMBER of the product (see the front cover of this manual) • the KEY NUMBER and DESCRIPTION of the part(s) (see the front cover of purchase. All repairs for a lifetime. or products used for a minimal trip charge. ICON is warranted for which vary from the service center will be free from defects in workmanship and material, under this warranty is in connection...
... (EPIC VIEW 700 treadmill) • the SERIAL NUMBER of the product (see the front cover of this manual) • the KEY NUMBER and DESCRIPTION of the part(s) (see the front cover of purchase. All repairs for a lifetime. or products used for a minimal trip charge. ICON is warranted for which vary from the service center will be free from defects in workmanship and material, under this warranty is in connection...


