
ESC/VP Level 21 Communication Manual
Page 1
...is at your acceptance of the whole of the "LICENSE AGREEMENT". Please read carefully the following "LICENSE AGREEMENT" before using the EPSON projector. Please be forewarned that use this downloading service. You may change or modify this user's guide without the prior written consent... and consequential damages incurred due to whether or not you agree to as EPSON). Please read carefully "NOTICES" described in part without notice. 4. EPSON shall not be downloaded until you could use of EPSON. 2. Downloading the User's Guide indicates your own risk. The User's ...
...is at your acceptance of the whole of the "LICENSE AGREEMENT". Please read carefully the following "LICENSE AGREEMENT" before using the EPSON projector. Please be forewarned that use this downloading service. You may change or modify this user's guide without the prior written consent... and consequential damages incurred due to whether or not you agree to as EPSON). Please read carefully "NOTICES" described in part without notice. 4. EPSON shall not be downloaded until you could use of EPSON. 2. Downloading the User's Guide indicates your own risk. The User's ...

Installation Guide
Page 2
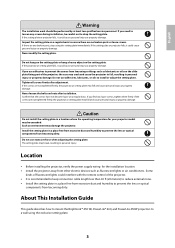
...resulting in this installation guide to a wall. If the wall is mounted, the weight may cause fire or electric shock. Epson takes no responsibility for future reference. Incorrect handling that should be subjected to incorrect handling. When you understand these warnings when reading... injury or property damage. Use M8 nuts and bolts. Warning Caution This symbol indicates information that is designed specifically for your projector when installing the setting plate. If anything other than M8 could result in a place where it might be performed by incorrect...
...resulting in this installation guide to a wall. If the wall is mounted, the weight may cause fire or electric shock. Epson takes no responsibility for future reference. Incorrect handling that should be subjected to incorrect handling. When you understand these warnings when reading... injury or property damage. Use M8 nuts and bolts. Warning Caution This symbol indicates information that is designed specifically for your projector when installing the setting plate. If anything other than M8 could result in a place where it might be performed by incorrect...
Installation Guide
Page 3
...screws. If the screws are not tightened firmly, the projector or setting plate may be exceeded. About This Installation Guide This guide describes how to mount the BrightLink™ 450 Wi, PowerLite® 460, and PowerLite 450W projectors to loosen any loose screws, tighten them firmly. If... the setting plate or projector falls, it could cause personal injury or property damage. Do not...
...screws. If the screws are not tightened firmly, the projector or setting plate may be exceeded. About This Installation Guide This guide describes how to mount the BrightLink™ 450 Wi, PowerLite® 460, and PowerLite 450W projectors to loosen any loose screws, tighten them firmly. If... the setting plate or projector falls, it could cause personal injury or property damage. Do not...
Installation Guide
Page 4
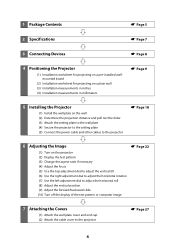
...board (2) Installation worksheet for projecting on a plain wall (3) Installation measurements in inches (4) Installation measurements in millimeters s Page 9 5 Installing the Projector (1) Install the wall plate on the wall (2) Determine the projection distance and pull out the slider (3) Attach the setting plate to the ...wall plate (4) Secure the projector to the setting plate (5) Connect the power cable and other cables to the projector s Page 18 6 Adjusting the Image s Page 22 (1) Turn on the projector (2) Display the test pattern (3) Change the aspect ratio ...
...board (2) Installation worksheet for projecting on a plain wall (3) Installation measurements in inches (4) Installation measurements in millimeters s Page 9 5 Installing the Projector (1) Install the wall plate on the wall (2) Determine the projection distance and pull out the slider (3) Attach the setting plate to the ...wall plate (4) Secure the projector to the setting plate (5) Connect the power cable and other cables to the projector s Page 18 6 Adjusting the Image s Page 22 (1) Turn on the projector (2) Display the test pattern (3) Change the aspect ratio ...
Installation Guide
Page 5
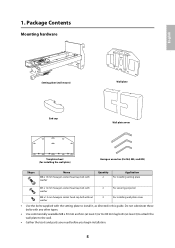
... hexagon socket head cap bolt with washer Quantity 2 Application For installing setting plate M5 x 12 mm hexagon socket head cap bolt with washer 2 For securing projector M4 x 12 mm hexagon socket head cap bolt without 2 For installing wall plate cover washer • Use the bolts supplied with any other types. •...
... hexagon socket head cap bolt with washer Quantity 2 Application For installing setting plate M5 x 12 mm hexagon socket head cap bolt with washer 2 For securing projector M4 x 12 mm hexagon socket head cap bolt without 2 For installing wall plate cover washer • Use the bolts supplied with any other types. •...
Installation Guide
Page 6
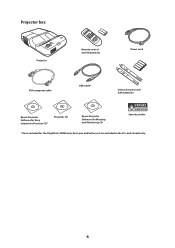
Projector box Projector Remote control and AA batteries Power cord VGA computer cable USB cable* Interactive pens and AAA batteries* Epson Projector Software for Easy Interactive Function CD* Projector CD Epson Projector Software for Meeting and Monitoring CD Security sticker *Items included for the BrightLink 450Wi only. and Canada only. 6 Extra pen and battery set are included in the U.S.
Projector box Projector Remote control and AA batteries Power cord VGA computer cable USB cable* Interactive pens and AAA batteries* Epson Projector Software for Easy Interactive Function CD* Projector CD Epson Projector Software for Meeting and Monitoring CD Security sticker *Items included for the BrightLink 450Wi only. and Canada only. 6 Extra pen and battery set are included in the U.S.
Installation Guide
Page 7
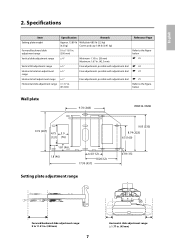
English 2. Specifications Item Specification Remark Setting plate weight Approx. 13.89 lb Wall plate 4.85 lb (2.2 kg) (6.3 kg) Covers and cap 1.04 lb (0.47 kg) Forward/backward slide adjustment range 0 to 11.81 in. (300 mm) Vertical slide adjustment range ± 4 ° Minimum: 1.10 in. (28 mm) Maximum: 1.67 in. (42.5 mm) Vertical tilt adjustment range ± 5 ° Fine adjustments possible with adjustment dial Horizontal rotation adjustment ± 5 ° range Fine adjustments possible with adjustment dial Horizontal roll adjustment range ± 3 ° Fine ...
English 2. Specifications Item Specification Remark Setting plate weight Approx. 13.89 lb Wall plate 4.85 lb (2.2 kg) (6.3 kg) Covers and cap 1.04 lb (0.47 kg) Forward/backward slide adjustment range 0 to 11.81 in. (300 mm) Vertical slide adjustment range ± 4 ° Minimum: 1.10 in. (28 mm) Maximum: 1.67 in. (42.5 mm) Vertical tilt adjustment range ± 5 ° Fine adjustments possible with adjustment dial Horizontal rotation adjustment ± 5 ° range Fine adjustments possible with adjustment dial Horizontal roll adjustment range ± 3 ° Fine ...

Installation Guide
Page 8
Connecting Devices Make sure you have all necessary cables for Easy Interactive Function) Dedicated USB cable (supplied with document camera) 8 Power cord Connection Example External speakers Audio cable (commercially available product) Microphone Document camera LAN cable LAN ... or microphone, that you have the power cable, computer cable, USB cable, and other parts at the location where the setting plate is to the projector. Make sure you will connect to be installed. 3.
Connecting Devices Make sure you have all necessary cables for Easy Interactive Function) Dedicated USB cable (supplied with document camera) 8 Power cord Connection Example External speakers Audio cable (commercially available product) Microphone Document camera LAN cable LAN ... or microphone, that you have the power cable, computer cable, USB cable, and other parts at the location where the setting plate is to the projector. Make sure you will connect to be installed. 3.
Installation Guide
Page 9
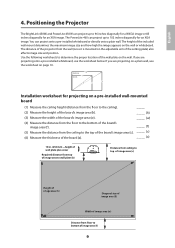
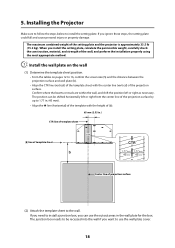
... of image area (w) Distance from floor to 96 inches diagonally for a WXGA image or 85 inches diagonally for an XGA image. The distance of the projector from the wall (once it is mounted on a pre-installed wall-mounted board (1) Measure the ceiling height (distance from the floor to the ceiling). _____... ceiling to top of image area (c) Height of image area (h) Diagonal size of image area (S) Width of the wall plate on the wall. Positioning the Projector The BrightLink 450Wi and PowerLite 450W can project onto a pre-installed whiteboard or directly onto a plain wall.
... of image area (w) Distance from floor to 96 inches diagonally for a WXGA image or 85 inches diagonally for an XGA image. The distance of the projector from the wall (once it is mounted on a pre-installed wall-mounted board (1) Measure the ceiling height (distance from the floor to the ceiling). _____... ceiling to top of image area (c) Height of image area (h) Diagonal size of image area (S) Width of the wall plate on the wall. Positioning the Projector The BrightLink 450Wi and PowerLite 450W can project onto a pre-installed whiteboard or directly onto a plain wall.

Installation Guide
Page 10
... image height (h), find the required distance between the top of the image area and _____ (b) the wall plate (b). (9) Determine the position for your projector installation by adding distances (f ) and (h). (6) Use the tables on pages 12 to 16 to determine the required distance from the top of the ...the tables on the template sheet with the center of the image area. Images appearing less than 28 inches from the floor to install the projector. (7) Determine the aspect ratio of the board or of the images that will be XGA (4:3). For older equipment, this will most likely ...
... image height (h), find the required distance between the top of the image area and _____ (b) the wall plate (b). (9) Determine the position for your projector installation by adding distances (f ) and (h). (6) Use the tables on pages 12 to 16 to determine the required distance from the top of the ...the tables on the template sheet with the center of the image area. Images appearing less than 28 inches from the floor to install the projector. (7) Determine the aspect ratio of the board or of the images that will be XGA (4:3). For older equipment, this will most likely ...

Installation Guide
Page 11
... from wall of the image area. Use the worksheets, the illustration below, and the information in the tables on the following pages to install the projector.
... from wall of the image area. Use the worksheets, the illustration below, and the information in the tables on the following pages to install the projector.
Installation Guide
Page 12
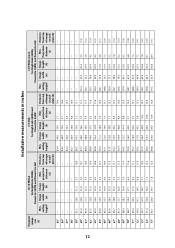
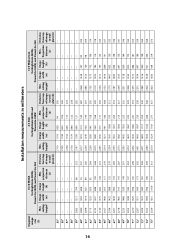
...91.5 65.4 36.8 8.4 14.7 Projection distance (a) Distance from top of image to wall plate (b) 4:3 XGA for BrightLink 450Wi and PowerLite 450W 16:9 Widescreen for BrightLink 450Wi, PowerLite 450W, and PowerLite 460 Min. Image ceiling width height* (w) Image height (h) Min. Installation measurements in inches... 12 Diagonal image size (S) 16:10 WXGA for BrightLink 450Wi, PowerLite 450W, and PowerLite 460 Min. projection distance (a) Distance from top of image to wall plate (b) Min. ceiling ...
...91.5 65.4 36.8 8.4 14.7 Projection distance (a) Distance from top of image to wall plate (b) 4:3 XGA for BrightLink 450Wi and PowerLite 450W 16:9 Widescreen for BrightLink 450Wi, PowerLite 450W, and PowerLite 460 Min. Image ceiling width height* (w) Image height (h) Min. Installation measurements in inches... 12 Diagonal image size (S) 16:10 WXGA for BrightLink 450Wi, PowerLite 450W, and PowerLite 460 Min. projection distance (a) Distance from top of image to wall plate (b) Min. ceiling ...

Installation Guide
Page 13
.... English ceiling height* Image width (w) Image height (h) Min. projection distance (a) Distance from top of image to wall plate (b) 4:3 XGA for BrightLink 450Wi and PowerLite 450W 16:9 Widescreen for BrightLink 450Wi, PowerLite 450W, and PowerLite 460 Min. projection distance (a) Distance from top of image to wall plate (b) 76" 92.8 64.4 40.3 8.1 12... Min. Projection distance (a) Distance from the floor; Image ceiling width height* (w) Image height (h) Min. 13 Diagonal image size (S) 16:10 WXGA for BrightLink 450Wi, PowerLite 450W, and PowerLite 460 Min.
.... English ceiling height* Image width (w) Image height (h) Min. projection distance (a) Distance from top of image to wall plate (b) 4:3 XGA for BrightLink 450Wi and PowerLite 450W 16:9 Widescreen for BrightLink 450Wi, PowerLite 450W, and PowerLite 460 Min. projection distance (a) Distance from top of image to wall plate (b) 76" 92.8 64.4 40.3 8.1 12... Min. Projection distance (a) Distance from the floor; Image ceiling width height* (w) Image height (h) Min. 13 Diagonal image size (S) 16:10 WXGA for BrightLink 450Wi, PowerLite 450W, and PowerLite 460 Min.
Installation Guide
Page 14
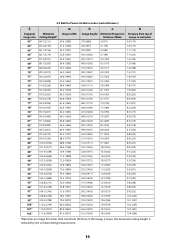
... 241 333 2451 1463 1097 250 338 2471 1483 1113 259 342 2490 1504 1128 268 346 2510 1524 1143 277 351 16:9 Widescreen for BrightLink 450Wi, PowerLite 450W, and PowerLite 460 Min. projection distance (a) Distance from top of image to wall plate (b) - - - - - - - - - - - - - - - - - - - - 2063...165 298 2287 1551 969 173 302 2304 1572 983 181 306 2322 1594 996 189 309 2339 1615 1010 197 313 4:3 XGA for BrightLink 450Wi and PowerLite 450W Min. Installation measurements in millimeters 14 Diagonal image size (S) 55" 56" 57" 58" 59" 60" 61" 62"...
... 241 333 2451 1463 1097 250 338 2471 1483 1113 259 342 2490 1504 1128 268 346 2510 1524 1143 277 351 16:9 Widescreen for BrightLink 450Wi, PowerLite 450W, and PowerLite 460 Min. projection distance (a) Distance from top of image to wall plate (b) - - - - - - - - - - - - - - - - - - - - 2063...165 298 2287 1551 969 173 302 2304 1572 983 181 306 2322 1594 996 189 309 2339 1615 1010 197 313 4:3 XGA for BrightLink 450Wi and PowerLite 450W Min. Installation measurements in millimeters 14 Diagonal image size (S) 55" 56" 57" 58" 59" 60" 61" 62"...

Installation Guide
Page 15
... height* Image width (w) Image height (h) Min. projection distance (a) Distance from top of image to wall plate (b) 4:3 XGA for BrightLink 450Wi and PowerLite 450W Min. projection distance (a) Distance from top of image to wall plate (b) 76" 2356 1637 1023 205 317 2529 ...96" 2701 2068 1292 367 392 - - - - - - - - - - * Based on an image 762 mm from top of image to wall plate (b) 16:9 Widescreen for BrightLink 450Wi, PowerLite 450W, and PowerLite 460 Min. ceiling height* Image width (w) Image height (h) Min. Projection distance (a) Distance from the floor;
... height* Image width (w) Image height (h) Min. projection distance (a) Distance from top of image to wall plate (b) 4:3 XGA for BrightLink 450Wi and PowerLite 450W Min. projection distance (a) Distance from top of image to wall plate (b) 76" 2356 1637 1023 205 317 2529 ...96" 2701 2068 1292 367 392 - - - - - - - - - - * Based on an image 762 mm from top of image to wall plate (b) 16:9 Widescreen for BrightLink 450Wi, PowerLite 450W, and PowerLite 460 Min. ceiling height* Image width (w) Image height (h) Min. Projection distance (a) Distance from the floor;
Installation Guide
Page 16
4:3 XGA for PowerLite 460 in inches (and millimeters) S w h a b Diagonal image size 63" 64" 65" 66" 67" 68" 69" 70" 71" 72" 73" 74" 75" 76" 77" 78" 79" 80" 81" 82" 83" 84" 85" 86" 87" 88" 89" 90" 91" 92" 93" 94" 95" 96" 97" 98" 99" 100" 101" 102" Minimum Image width Ceiling Height* 84.7 (2121) 50.4 (1280) 85.4 (2139) 51.2 (1300) 86.1 (2156) 52.0 (1321) 86.7 (2174) 52.8 (1341) 87.4 (2191) 53.6 (1361) 88.1 (2209) 54.4 (1382) 88.8 (2226) 55.2 (1402) 89.5 (2273) 56.0 (1422) 90.2 (2291) 56.8 (1443) 90.9 (2308) 57.6 (1463) 91.6 (2326) 58.4 (1483) 92.3 (2343) 59.2 (...
4:3 XGA for PowerLite 460 in inches (and millimeters) S w h a b Diagonal image size 63" 64" 65" 66" 67" 68" 69" 70" 71" 72" 73" 74" 75" 76" 77" 78" 79" 80" 81" 82" 83" 84" 85" 86" 87" 88" 89" 90" 91" 92" 93" 94" 95" 96" 97" 98" 99" 100" 101" 102" Minimum Image width Ceiling Height* 84.7 (2121) 50.4 (1280) 85.4 (2139) 51.2 (1300) 86.1 (2156) 52.0 (1321) 86.7 (2174) 52.8 (1341) 87.4 (2191) 53.6 (1361) 88.1 (2209) 54.4 (1382) 88.8 (2226) 55.2 (1402) 89.5 (2273) 56.0 (1422) 90.2 (2291) 56.8 (1443) 90.9 (2308) 57.6 (1463) 91.6 (2326) 58.4 (1483) 92.3 (2343) 59.2 (...

Installation Guide
Page 17
... the table below to 16. PolyVision® TS 600/ TS610 / TSL610/ENO 2610 - - SMART Board 660 - SMART Board 690 - - 17 Epson BrightLink 450Wi 4:3 XGA 16:9 Widescreen - INTERWRITE® BOARD 1077 PolyVision TS610 - Interactive whiteboard sizes Diagonal size 60 inches - 63 inches - 64 inches - 71 inches - 77 inches - 16:10 WXGA 77.5 inches 78 inches...
... the table below to 16. PolyVision® TS 600/ TS610 / TSL610/ENO 2610 - - SMART Board 660 - SMART Board 690 - - 17 Epson BrightLink 450Wi 4:3 XGA 16:9 Widescreen - INTERWRITE® BOARD 1077 PolyVision TS610 - Interactive whiteboard sizes Diagonal size 60 inches - 63 inches - 64 inches - 71 inches - 77 inches - 16:10 WXGA 77.5 inches 78 inches...
Installation Guide
Page 18
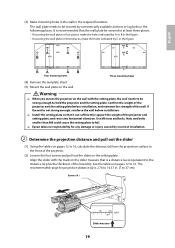
... necessary. The maximum combined weight of the projection surface. If you need to install a junction box, you want to install the setting plate. Installing the Projector Make sure to follow the steps below to use the cutout areas in . (45 mm). • Align the line (horizontal) of the template with the...
... necessary. The maximum combined weight of the projection surface. If you need to install a junction box, you want to install the setting plate. Installing the Projector Make sure to follow the steps below to use the cutout areas in . (45 mm). • Align the line (horizontal) of the template with the...
Installation Guide
Page 19
... the setting plate, the wall needs to be strong enough to hold the projector and the setting plate. Screws (4 ) Slider measure 19 The wall plate needs to the distance (a) ...any damage or injury caused by incorrect installation. Warning ❏ When you mount the projector on the slider measure that the wall plate be secured by C in the following... the setting plate to fall. ❏ Epson takes no responsibility for projection distance (a) is not strong enough, reinforce the wall before installation, and maintain the strength of the projector. (2) Loosen the four screws and pull ...
... the setting plate, the wall needs to be strong enough to hold the projector and the setting plate. Screws (4 ) Slider measure 19 The wall plate needs to the distance (a) ...any damage or injury caused by incorrect installation. Warning ❏ When you mount the projector on the slider measure that the wall plate be secured by C in the following... the setting plate to fall. ❏ Epson takes no responsibility for projection distance (a) is not strong enough, reinforce the wall before installation, and maintain the strength of the projector. (2) Loosen the four screws and pull ...
Installation Guide
Page 20
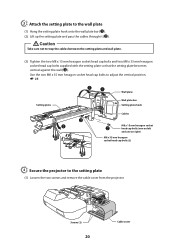
C Attach the setting plate to the setting plate (1) Loosen the two screws and remove the cable cover from the projector. s 25 Setting plate Wall plate Wall plate bar Setting plate hook Cables M8 x 15 mm hexagon socket head cap bolts (one on left and one ...on right) M8 x 35 mm hexagon socket head cap bolts (2) D Secure the projector to the wall plate (1) Hang the setting plate hook onto the wall plate bar (A). (2) Lift up the setting plate and pass the cables through it...
C Attach the setting plate to the setting plate (1) Loosen the two screws and remove the cable cover from the projector. s 25 Setting plate Wall plate Wall plate bar Setting plate hook Cables M8 x 15 mm hexagon socket head cap bolts (one on left and one ...on right) M8 x 35 mm hexagon socket head cap bolts (2) D Secure the projector to the wall plate (1) Hang the setting plate hook onto the wall plate bar (A). (2) Lift up the setting plate and pass the cables through it...
