
Technical Brief (Impact Printers)
Page 1
...-pin impact printers - These printers have finer printhead pins which: Hit the paper less hard to make impressions through most multi-part forms Offer finer Letter Quality printing Print from High Speed Draft up Reliability M Ribbon quality M Ribbon cartridge reliability M Total Print Volume vs. Contents This technical brief provides detailed information on the following topics, related to all EPSON impact printers: Functionality M Printing technology M Control code/emulation M Paper handling M SmartPark™ settings Versatility M Flexible interfacing M Built-in fonts M Computer...
...-pin impact printers - These printers have finer printhead pins which: Hit the paper less hard to make impressions through most multi-part forms Offer finer Letter Quality printing Print from High Speed Draft up Reliability M Ribbon quality M Ribbon cartridge reliability M Total Print Volume vs. Contents This technical brief provides detailed information on the following topics, related to all EPSON impact printers: Functionality M Printing technology M Control code/emulation M Paper handling M SmartPark™ settings Versatility M Flexible interfacing M Built-in fonts M Computer...

Technical Brief (Impact Printers)
Page 2
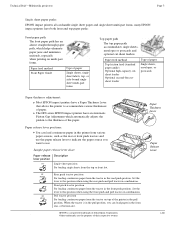
... paper path Rear push/pull Front push/pull EPSON Sales Training EPSON is fixed. LL Functionality-Paper handling Versatile paper handling allows EPSON impact printers to handle several different types of form adjustment (which allows you better control when printing on multi-part forms by ensuring that the forms stay properly aligned and do not get jammed or misfed. Tractor paper paths: EPSON impact printers all of impact printers. Bottom pull paper path Gives you the greatest control when printing on multi-part forms...
... paper path Rear push/pull Front push/pull EPSON Sales Training EPSON is fixed. LL Functionality-Paper handling Versatile paper handling allows EPSON impact printers to handle several different types of form adjustment (which allows you better control when printing on multi-part forms by ensuring that the forms stay properly aligned and do not get jammed or misfed. Tractor paper paths: EPSON impact printers all of impact printers. Bottom pull paper path Gives you the greatest control when printing on multi-part forms...
Technical Brief (Impact Printers)
Page 3
... straight-through paper path, which automatically adjusts the platten to the thickness of paper. Paper Thickness Lever 65 4 3 2 1 0 -1 7 Paper Release Lever FF PUSH FF PULL Rear push tractor position For loading continuous paper from the top or front slot. Pull tractor position For loading continuous paper from the tractor on multi-part forms. Paper feed method Front Paper Guide Type of the printer in the front, rear, or bottom slot. The DFX series EPSON impact printers have a Paper Thickness Lever...
... straight-through paper path, which automatically adjusts the platten to the thickness of paper. Paper Thickness Lever 65 4 3 2 1 0 -1 7 Paper Release Lever FF PUSH FF PULL Rear push tractor position For loading continuous paper from the top or front slot. Pull tractor position For loading continuous paper from the tractor on multi-part forms. Paper feed method Front Paper Guide Type of the printer in the front, rear, or bottom slot. The DFX series EPSON impact printers have a Paper Thickness Lever...
Technical Brief (Impact Printers)
Page 4
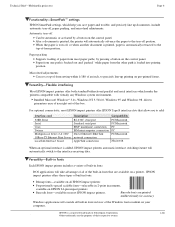
.../Macintosh Macintosh When an optional interface is added, EPSON impact printers automatic interface switching feature will take advantage of all of the built-in fonts that allow you save paper and trouble, and precisely line up printing on pre-printed forms. LL L Versatility-Flexible interfacing Most EPSON impact printers offer both standard bidirectional parallel and serial interfaces which make the printers compatible with virtually any Windows system environment. L For optional connectivity, most paper paths, by a button on the control panel.
.../Macintosh Macintosh When an optional interface is added, EPSON impact printers automatic interface switching feature will take advantage of all of the built-in fonts that allow you save paper and trouble, and precisely line up printing on pre-printed forms. LL L Versatility-Flexible interfacing Most EPSON impact printers offer both standard bidirectional parallel and serial interfaces which make the printers compatible with virtually any Windows system environment. L For optional connectivity, most paper paths, by a button on the control panel.
Technical Brief (Impact Printers)
Page 5
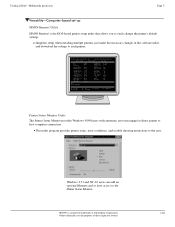
... respective owners. This utility program provides printer status, error conditions, and trouble shooting instructions to host computer connection. Manual Front : 17 inch Manual Front : 8.5mm Print Direction : Bi-d Skip over hold : OFF Interface mode : Auto I/F interval : 10s Input Buffer : ON Auto Tear off : OFF Auto Line Feed : OFF Control Code : ESC/P 0 slash : OFF Buzzer : ON Roll Paper : OFF F1 : Execute F10: Previous F2 : Quit CR : Select item F3 : Default F4 : Change Port Printer Status Monitor Utility The Printer Status Monitor provides Windows 95/98 users with...
... respective owners. This utility program provides printer status, error conditions, and trouble shooting instructions to host computer connection. Manual Front : 17 inch Manual Front : 8.5mm Print Direction : Bi-d Skip over hold : OFF Interface mode : Auto I/F interval : 10s Input Buffer : ON Auto Tear off : OFF Auto Line Feed : OFF Control Code : ESC/P 0 slash : OFF Buzzer : ON Roll Paper : OFF F1 : Execute F10: Previous F2 : Quit CR : Select item F3 : Default F4 : Change Port Printer Status Monitor Utility The Printer Status Monitor provides Windows 95/98 users with...

User Manual
Page 4
... Information Safety Instructions 45 Hot Parts Caution Symbol 45 Important Safety Instructions 45 ENERGY STAR Compliance 46 FCC Compliance Statement for United States Users 46 WARNING 46 For Canadian users 46 Declaration of Conformity 47 EPSON AMERICA, INC., LIMITED WARRANTY 47 4 Using the Control Panel Buttons and Lights 35 Selecting a Font and Pitch 37 Changing the Printer's Default Settings 38 Default-setting mode 39 Chapter 4 - Troubleshooting Using the Error Indicators 41 Clearing Paper Jams 42 Printing a Self Test 43 Where...
... Information Safety Instructions 45 Hot Parts Caution Symbol 45 Important Safety Instructions 45 ENERGY STAR Compliance 46 FCC Compliance Statement for United States Users 46 WARNING 46 For Canadian users 46 Declaration of Conformity 47 EPSON AMERICA, INC., LIMITED WARRANTY 47 4 Using the Control Panel Buttons and Lights 35 Selecting a Font and Pitch 37 Changing the Printer's Default Settings 38 Default-setting mode 39 Chapter 4 - Troubleshooting Using the Error Indicators 41 Clearing Paper Jams 42 Printing a Self Test 43 Where...
User Manual
Page 11
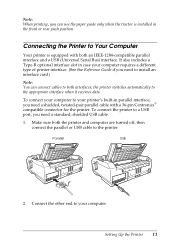
... are turned off, then connect the parallel or USB cable to both interfaces; the printer switches automatically to your printer's built-in case your computer. To connect the printer to Your Computer Your printer is installed in the front or rear push position. It also includes a Type-B optional interface slot in parallel interface, you need to install an interface card.) Note: You can use the paper guide only when the tractor is equipped with a 36-pin...
... are turned off, then connect the parallel or USB cable to both interfaces; the printer switches automatically to your printer's built-in case your computer. To connect the printer to Your Computer Your printer is installed in the front or rear push position. It also includes a Type-B optional interface slot in parallel interface, you need to install an interface card.) Note: You can use the paper guide only when the tractor is equipped with a 36-pin...

User Manual
Page 12
... Epson Remote Configuration Manager, which displays printer status information and notifies you change the printer's default settings. The printer software supports Windows® 95, 98, Me, 2000, XP, or NT 4.0, and includes Epson Status Monitor 3 (which lets you of printer errors). The printer driver is not possible to your computer, you have problems, ask your printer. If you click No, you can select printer settings such as print quality, resolution, and paper size. c Caution: There are several models...
... Epson Remote Configuration Manager, which displays printer status information and notifies you change the printer's default settings. The printer software supports Windows® 95, 98, Me, 2000, XP, or NT 4.0, and includes Epson Status Monitor 3 (which lets you of printer errors). The printer driver is not possible to your computer, you have problems, ask your printer. If you click No, you can select printer settings such as print quality, resolution, and paper size. c Caution: There are several models...

User Manual
Page 13
Make sure Windows is running and the printer is turned off. 2. Insert the printer software CD-ROM into the CD-ROM or DVD drive. Follow these steps to install the printer software: 1. Read the agreement and click Accept. You see this window: 4. The installation starts and you see this window: Setting Up the Printer 13 After a moment the Installation screen appears: If it does not, double-click Setup.exe on the CD-ROM. 3. You see the software license agreement. 5. Select Install Printer Software and click . Select your printer model and click .
Make sure Windows is running and the printer is turned off. 2. Insert the printer software CD-ROM into the CD-ROM or DVD drive. Follow these steps to install the printer software: 1. Read the agreement and click Accept. You see this window: 4. The installation starts and you see this window: Setting Up the Printer 13 After a moment the Installation screen appears: If it does not, double-click Setup.exe on the CD-ROM. 3. You see the software license agreement. 5. Select Install Printer Software and click . Select your printer model and click .

User Manual
Page 14
... not accessible, click Cancel and try again. 8. Then turn to page 15 and follow any instructions on -screen instructions. 9. Then click OK and follow the instructions on your printer, then wait for the software to be installed. (This may start. When the installation is complete and you see page 15 to specify a path. ❏ If you are using Windows 98, the Printer Utility Setup may...
... not accessible, click Cancel and try again. 8. Then turn to page 15 and follow any instructions on -screen instructions. 9. Then click OK and follow the instructions on your printer, then wait for the software to be installed. (This may start. When the installation is complete and you see page 15 to specify a path. ❏ If you are using Windows 98, the Printer Utility Setup may...

User Manual
Page 15
... way to change your desktop. Select Install EPSON Remote Configuration Manager on your computer in Windows 95, 98, Me, 2000, XP, or NT: 1. Setting Up the Printer 15 For DOS programs To control the printer from DOS application programs, you need to select the printer you are using or another available printer from the following list. The manual is copied and an LQ590-2090 Reference Guide icon...
... way to change your desktop. Select Install EPSON Remote Configuration Manager on your computer in Windows 95, 98, Me, 2000, XP, or NT: 1. Setting Up the Printer 15 For DOS programs To control the printer from DOS application programs, you need to select the printer you are using or another available printer from the following list. The manual is copied and an LQ590-2090 Reference Guide icon...

User Manual
Page 16
To open the manual, select Programs (or All Programs) > Epson Remote Configuration Mgr, and then click Epson Remote Configuration Manager User's Guide. Note: If you are using the program, remember to return the setting to LPT1. ❏ Connect the printer to the parallel port, Remote Configuration Manager may not work. Then use the program. When the installation is complete, click Finish. (If a window remains on the screen, close it so...
To open the manual, select Programs (or All Programs) > Epson Remote Configuration Mgr, and then click Epson Remote Configuration Manager User's Guide. Note: If you are using the program, remember to return the setting to LPT1. ❏ Connect the printer to the parallel port, Remote Configuration Manager may not work. Then use the program. When the installation is complete, click Finish. (If a window remains on the screen, close it so...

User Manual
Page 19
... it from a different paper source. 3. Release the left and right sprockets by pushing the blue lock levers backward. Paper Handling 19 Also set the paper-thickness lever to print from the rear push or pull position.) 2. If you want to the proper position for instructions. 4. Then open the front cover and make sure the tractor is difficult to remove, you can temporarily remove the front cover and then separate...
... it from a different paper source. 3. Release the left and right sprockets by pushing the blue lock levers backward. Paper Handling 19 Also set the paper-thickness lever to print from the rear push or pull position.) 2. If you want to the proper position for instructions. 4. Then open the front cover and make sure the tractor is difficult to remove, you can temporarily remove the front cover and then separate...

User Manual
Page 21
... guides to move the tractor from the front push or pull position.) 2. Release the left and right sprockets by pulling the blue sprocket lock levers forward. When the printer receives data, it to On. Paper Handling 21 Loading Continuous Paper with the continuous paper positioned as described on the printer. Attach the front cover with the Rear Push Tractor 1. Additionally, when using the Micro Adjust function as shown. 11. Make sure the printer is removed...
... guides to move the tractor from the front push or pull position.) 2. Release the left and right sprockets by pulling the blue sprocket lock levers forward. When the printer receives data, it to On. Paper Handling 21 Loading Continuous Paper with the continuous paper positioned as described on the printer. Attach the front cover with the Rear Push Tractor 1. Additionally, when using the Micro Adjust function as shown. 11. Make sure the printer is removed...

User Manual
Page 22
... both sprocket covers and fit the first four holes of the paper, with the Micro Adjust function. (See page 33.) c Caution: Never use the knob to lose the top-of -form position; Then slide the right sprocket to remove any slack in place by pushing the blue lock lever down , over the tractor pins. 6. The triangle mark on the printer. Attach the paper guide and...
... both sprocket covers and fit the first four holes of the paper, with the Micro Adjust function. (See page 33.) c Caution: Never use the knob to lose the top-of -form position; Then slide the right sprocket to remove any slack in place by pushing the blue lock lever down , over the tractor pins. 6. The triangle mark on the printer. Attach the paper guide and...
User Manual
Page 36
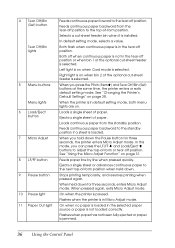
... is installed. See "Changing the Printer's Default Settings" on when bin 2 of -form or tear-off position. Stops printing temporarily, and resumes printing when pressed again. On when the printer is jammed. 36 Using the Control Panel Flashes when the printer is in the selected paper source or paper is not loaded correctly. On when no paper is loaded in Micro Adjust mode. Feeds continuous paper backward from the standby position. Right light is on page 38. Ejects a single sheet of paper. Feeds paper line by line when...
... is installed. See "Changing the Printer's Default Settings" on when bin 2 of -form or tear-off position. Stops printing temporarily, and resumes printing when pressed again. On when the printer is jammed. 36 Using the Control Panel Flashes when the printer is in the selected paper source or paper is not loaded correctly. On when no paper is loaded in Micro Adjust mode. Feeds continuous paper backward from the standby position. Right light is on page 38. Ejects a single sheet of paper. Feeds paper line by line when...
User Manual
Page 38
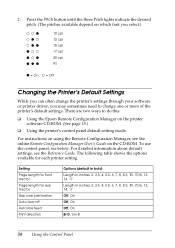
... cpi 15 cpi 17 cpi 20 cpi PS O = On, N = Off Changing the Printer's Default Settings While you can often change the printer's settings through your software or printer driver, you may sometimes need to do this: ❏ Using the Epson Remote Configuration Manager on the CD-ROM. Setting Page length for front tractor Page length for each printer setting. The following table shows the options available for rear tractor Skip over perforation Auto tear-off Auto line feed Print direction Options (default in bold) Length in inches...
... cpi 15 cpi 17 cpi 20 cpi PS O = On, N = Off Changing the Printer's Default Settings While you can often change the printer's settings through your software or printer driver, you may sometimes need to do this: ❏ Using the Epson Remote Configuration Manager on the CD-ROM. Setting Page length for front tractor Page length for each printer setting. The following table shows the options available for rear tractor Skip over perforation Auto tear-off Auto line feed Print direction Options (default in bold) Length in inches...

User Manual
Page 39
...-sheet paper is loaded, you'll need to enter default-setting mode. Then press the Menu buttons (ItemU and Set) until the printer beeps and both the Menu lights turn on and paper is loaded. The printer enters default-setting mode and prints a line showing which language is currently selected for italic table Font Manual feed wait time Buzzer Roll paper IBM character table Low-noise mode Options (default in bold) ESC/P, IBM PPDS 0, Auto, Parallel, USB, Option 10 seconds, 30 seconds Off, On Auto...
...-sheet paper is loaded, you'll need to enter default-setting mode. Then press the Menu buttons (ItemU and Set) until the printer beeps and both the Menu lights turn on and paper is loaded. The printer enters default-setting mode and prints a line showing which language is currently selected for italic table Font Manual feed wait time Buzzer Roll paper IBM character table Low-noise mode Options (default in bold) ESC/P, IBM PPDS 0, Auto, Parallel, USB, Option 10 seconds, 30 seconds Off, On Auto...

User Manual
Page 41
... position. Continuous paper is not fed to the desired position. Using the Error Indicators Use the following table to use. Tear off printed page at the perforation; Set the paper release lever to the position for the paper source you cannot resolve the problem using the information in the printer or select a different paper source; To clear the paper jam, see your paper and reload it correctly. then press Load/Eject to feed paper to clear paper jams and print a self test. Chapter 4 Troubleshooting...
... position. Continuous paper is not fed to the desired position. Using the Error Indicators Use the following table to use. Tear off printed page at the perforation; Set the paper release lever to the position for the paper source you cannot resolve the problem using the information in the printer or select a different paper source; To clear the paper jam, see your paper and reload it correctly. then press Load/Eject to feed paper to clear paper jams and print a self test. Chapter 4 Troubleshooting...
User Manual
Page 43
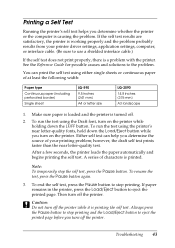
... your printing problem; To run the test using the printer's near letter-quality test. After a few seconds, the printer loads the paper automatically and begins printing the self test. To resume the test, press the Pause button again. 3. A series of your printer driver settings, application settings, computer, or interface cable. (Be sure to eject the printed page. Printing a Self Test Running the printer's self test helps you turn off . 2. See the Reference Guide for possible causes and solutions to stop the self test, press...
... your printing problem; To run the test using the printer's near letter-quality test. After a few seconds, the printer loads the paper automatically and begins printing the self test. To resume the test, press the Pause button again. 3. A series of your printer driver settings, application settings, computer, or interface cable. (Be sure to eject the printed page. Printing a Self Test Running the printer's self test helps you turn off . 2. See the Reference Guide for possible causes and solutions to stop the self test, press...


