
User Guide
Page 1
... written permission of this Epson printer. EPSON and EPSON ESC/P are registered trademarks of Microsoft Corporation. User's Guide Epson disclaims any consumable products other printers. ® 24-pin Dot Matrix Printer All rights reserved. Epson is a registered trademark of any options or any and all rights in any form or by Seiko Epson Corporation. Microsoft, Windows, and Windows NT are for use with Seiko Epson Corporation's operating and maintenance instructions. Copyright © 2004 by...
... written permission of this Epson printer. EPSON and EPSON ESC/P are registered trademarks of Microsoft Corporation. User's Guide Epson disclaims any consumable products other printers. ® 24-pin Dot Matrix Printer All rights reserved. Epson is a registered trademark of any options or any and all rights in any form or by Seiko Epson Corporation. Microsoft, Windows, and Windows NT are for use with Seiko Epson Corporation's operating and maintenance instructions. Copyright © 2004 by...
User Guide
Page 4
... Epson ribbon cartridge 25 Replacing the ribbon cartridge 25 Chapter 5 Control Panel Buttons and Lights 33 Functions auxiliary 36 Compress Printing Mode 38 Chapter 6 Changing your Printer's Settings About Your Printer's Default Settings 39 Understanding default settings 39 Changing default settings 53 Printing a Self-Test 55 Printing Hex Dump 56 Aligning Vertical Lines in Your Printout 58 Chapter 7 Problem Solver Using the error indicators 61 PR2 mode 62 ESC/P and IBM PPDS modes 63 Problems and Solutions 64 Power supply problems 65 Paper loading or feeding problems 66 Printing...
... Epson ribbon cartridge 25 Replacing the ribbon cartridge 25 Chapter 5 Control Panel Buttons and Lights 33 Functions auxiliary 36 Compress Printing Mode 38 Chapter 6 Changing your Printer's Settings About Your Printer's Default Settings 39 Understanding default settings 39 Changing default settings 53 Printing a Self-Test 55 Printing Hex Dump 56 Aligning Vertical Lines in Your Printout 58 Chapter 7 Problem Solver Using the error indicators 61 PR2 mode 62 ESC/P and IBM PPDS modes 63 Problems and Solutions 64 Power supply problems 65 Paper loading or feeding problems 66 Printing...
User Guide
Page 7
... television reception. If you with instructions on operating the impact dot matrix printer PLQ-20/PLQ-20M. You can be determined by one or more information, refer to Find More Information This User's Guide provides you want the User CD-ROM, contact your dealer. This equipment generates, uses, and can radiate radio frequency energy and, if not installed and used in this equipment does cause...
... television reception. If you with instructions on operating the impact dot matrix printer PLQ-20/PLQ-20M. You can be determined by one or more information, refer to Find More Information This User's Guide provides you want the User CD-ROM, contact your dealer. This equipment generates, uses, and can radiate radio frequency energy and, if not installed and used in this equipment does cause...

User Guide
Page 30
... ❏ This mode can use paper that is open . ❏ If you wish to change it, even if you turn off the printer. 20 Paper Handling Follow these steps to adjust the top-of-form position: Note: ❏ The factory set the TOF position for the top-of -form position is open . Refer to the Programming Guide for details. ❏ When you print a multipart form that you set default for PR40+ to...
... ❏ This mode can use paper that is open . ❏ If you wish to change it, even if you turn off the printer. 20 Paper Handling Follow these steps to adjust the top-of-form position: Note: ❏ The factory set the TOF position for the top-of -form position is open . Refer to the Programming Guide for details. ❏ When you print a multipart form that you set default for PR40+ to...

User Guide
Page 33
... the printer cover before turning it back on; The printer prints the guide to select the printing start position, turn off . 3 3 3 Paper Handling 23 After you turn off the printer. The setting does not change even if the printer is selected at least five seconds before printing. otherwise you press the F1/Eject or F2 button, the printer makes a short beep. Press the F2 button while the F1/Eject, Offline, and F2 lights are flashing...
... the printer cover before turning it back on; The printer prints the guide to select the printing start position, turn off . 3 3 3 Paper Handling 23 After you turn off the printer. The setting does not change even if the printer is selected at least five seconds before printing. otherwise you press the F1/Eject or F2 button, the printer makes a short beep. Press the F2 button while the F1/Eject, Offline, and F2 lights are flashing...
User Guide
Page 46
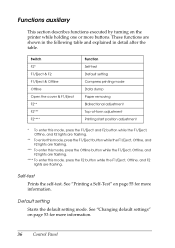
... turning on the printer while holding one or more information. 36 Control Panel See "Changing default settings" on page 55 for more buttons. Switch F2* F1/Eject & F2 F1/Eject & Offline Offline Open the cover & F1/Eject F2** F2*** F2**** Function Self-test Default setting Compress printing mode Data dump Paper removing Bidirectional adjustment Top-of-form adjustment Printing start position adjustment * To enter this mode, press the F1/Eject and F2 button while the F1/Eject, Offline, and F2 lights are flashing...
... turning on the printer while holding one or more information. 36 Control Panel See "Changing default settings" on page 55 for more buttons. Switch F2* F1/Eject & F2 F1/Eject & Offline Offline Open the cover & F1/Eject F2** F2*** F2**** Function Self-test Default setting Compress printing mode Data dump Paper removing Bidirectional adjustment Top-of-form adjustment Printing start position adjustment * To enter this mode, press the F1/Eject and F2 button while the F1/Eject, Offline, and F2 lights are flashing...
User Guide
Page 52
... receiving data and switches to that interface. The parity bit, if used when this option to set the data transfer rate (baud) for the serial interface. Auto I /F bidirectional mode The Parallel Interface bidirectional transfer mode is used , provides a basic form of the serial interface to Off if you print from applications based on the User CD-ROM. Set this mode is set to select Auto when you have connection troubles while printing from Windows applications using the printer driver included on other operating...
... receiving data and switches to that interface. The parity bit, if used when this option to set the data transfer rate (baud) for the serial interface. Auto I /F bidirectional mode The Parallel Interface bidirectional transfer mode is used , provides a basic form of the serial interface to Off if you print from applications based on the User CD-ROM. Set this mode is set to select Auto when you have connection troubles while printing from Windows applications using the printer driver included on other operating...
User Guide
Page 54
... be printed in the default settings mode. This mode is activated when you select On and the Passbook mode is not printed. When you select On, the excess data is set the broken pin number at normal quality if one of the broken pin. When you select After loading, the printer measures the width just after it makes the measurement just before printing the first line. The broken pin number is shown on the sheet...
... be printed in the default settings mode. This mode is activated when you select On and the Passbook mode is not printed. When you select On, the excess data is set the broken pin number at normal quality if one of the broken pin. When you select After loading, the printer measures the width just after it makes the measurement just before printing the first line. The broken pin number is shown on the sheet...
User Guide
Page 63
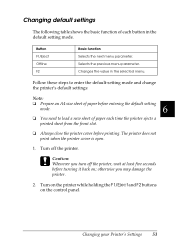
... ; Changing default settings 6 The following table shows the basic function of paper each button in the selected menu. 6 Follow these steps to enter the default-setting mode and change the printer's default settings: 6 Note: ❏ Prepare an A4 size sheet of paper before entering the default setting mode. 6 ❏ You need to load a new sheet of each time the printer ejects a printed sheet from the front slot. 6 ❏ Always close the printer cover before turning it back on the control panel. 6 6 Changing...
... ; Changing default settings 6 The following table shows the basic function of paper each button in the selected menu. 6 Follow these steps to enter the default-setting mode and change the printer's default settings: 6 Note: ❏ Prepare an A4 size sheet of paper before entering the default setting mode. 6 ❏ You need to load a new sheet of each time the printer ejects a printed sheet from the front slot. 6 ❏ Always close the printer cover before turning it back on the control panel. 6 6 Changing...

User Guide
Page 65
... selection of paper before entering the self-test printing mode. 6 ❏ Always close the printer cover before turning it back on page 64 for possible causes and solutions to perform a self-test: 1. See "Problems and Solutions" on ; Note: 6 ❏ Prepare an A4 size sheet of each menu, the menu selection will also return to exit the default setting mode. 6 Printing a Self-Test 6 Running the printer's self-test helps you may damage the 6 printer. Changing your printer driver settings, application settings, computer, or interface cable...
... selection of paper before entering the self-test printing mode. 6 ❏ Always close the printer cover before turning it back on page 64 for possible causes and solutions to perform a self-test: 1. See "Problems and Solutions" on ; Note: 6 ❏ Prepare an A4 size sheet of each menu, the menu selection will also return to exit the default setting mode. 6 Printing a Self-Test 6 Running the printer's self-test helps you may damage the 6 printer. Changing your printer driver settings, application settings, computer, or interface cable...
User Guide
Page 67
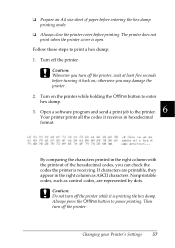
... characters printed in the right column as control codes, are printable, they 6 appear in the right column with the printout of paper before entering the hex dump printing mode. 6 ❏ Always close the printer cover before turning it back on the printer while holding the Offline button to print a hex dump: 1. Always press the Offline button to the printer. Turn off the printer, wait at least five seconds before printing. Open a software program and send a print job to pause printing...
... characters printed in the right column as control codes, are printable, they 6 appear in the right column with the printout of paper before entering the hex dump printing mode. 6 ❏ Always close the printer cover before turning it back on the printer while holding the Offline button to print a hex dump: 1. Always press the Offline button to the printer. Turn off the printer, wait at least five seconds before printing. Open a software program and send a print job to pause printing...
User Guide
Page 73
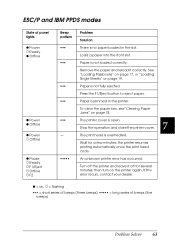
... operation and close the printer cover. 7 O Power F Offline O Pause F Ready F F1/Eject F Offline F F2 - Press the F1/Eject button to eject paper. 7 ••• Paper is jammed in the slot. The print head is not loaded correctly. 7 Remove the paper and reload it off the printer and leave it correctly. then turn on page 19. 7 ••• Paper is not fully ejected. To clear the paper jam, see"Clearing Paper Jams" on , F = flashing...
... operation and close the printer cover. 7 O Power F Offline O Pause F Ready F F1/Eject F Offline F F2 - Press the F1/Eject button to eject paper. 7 ••• Paper is jammed in the slot. The print head is not loaded correctly. 7 Remove the paper and reload it off the printer and leave it correctly. then turn on page 19. 7 ••• Paper is not fully ejected. To clear the paper jam, see"Clearing Paper Jams" on , F = flashing...
User Guide
Page 76
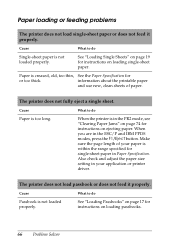
... thin, See the Paper Specification for instructions on loading passbooks. 66 Problem Solver The printer does not load passbook or does not feed it properly. When you are in your paper is too long. Also check and adjust the paper size setting in the ESC/P and IBM PPDS modes, press the F1/Eject button. The printer does not fully eject a single sheet. Make sure the page length of paper. Cause What...
... thin, See the Paper Specification for instructions on loading passbooks. 66 Problem Solver The printer does not load passbook or does not feed it properly. When you are in your paper is too long. Also check and adjust the paper size setting in the ESC/P and IBM PPDS modes, press the F1/Eject button. The printer does not fully eject a single sheet. Make sure the page length of paper. Cause What...

User Guide
Page 77
...-of-form 7 position" on page 20. 7 The printer driver settings you are not selected in from the Windows desktop or in your your software. Printing position problems 7 Wrong top-of-form position Your printing appears too high or low on the page. 7 Cause What to use are using the top-of-form adjusting function. application before printing. 7 7 7 7 Problem Solver 67 top-of-form position settings in your 7 application software. For information on printable areas, see the Paper Specification...
...-of-form 7 position" on page 20. 7 The printer driver settings you are not selected in from the Windows desktop or in your your software. Printing position problems 7 Wrong top-of-form position Your printing appears too high or low on the page. 7 Cause What to use are using the top-of-form adjusting function. application before printing. 7 7 7 7 Problem Solver 67 top-of-form position settings in your 7 application software. For information on printable areas, see the Paper Specification...
User Guide
Page 78
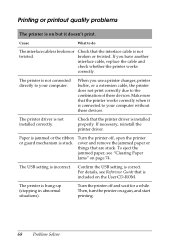
... you have another interface cable, replace the cable and check whether the printer works correctly. For details, see "Clearing Paper Jams" on again, and start printing. 68 Problem Solver Turn the printer off , open the printer cover and remove the jammed paper or things that the interface cable is not twisted. Check that is included on the User CD-ROM. Turn the printer off and wait for a while. Confirm the USB setting is hung-up (stopping in abnormal...
... you have another interface cable, replace the cable and check whether the printer works correctly. For details, see "Clearing Paper Jams" on again, and start printing. 68 Problem Solver Turn the printer off , open the printer cover and remove the jammed paper or things that the interface cable is not twisted. Check that is included on the User CD-ROM. Turn the printer off and wait for a while. Confirm the USB setting is hung-up (stopping in abnormal...
User Guide
Page 79
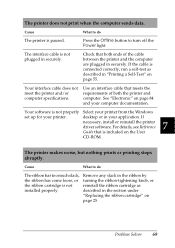
... in securely. If the cable is connected correctly, run a self-test as installed properly. Your software is not plugged in the section under "Replacing the ribbon cartridge" on page 84 and your computer documentation. described in securely. Check that both the printer and 7 computer specifications. Press the Offline button to turn off the Power light. 7 The interface cable is not properly Select your printer from the Windows 7 set up for your application. See...
... in securely. If the cable is connected correctly, run a self-test as installed properly. Your software is not plugged in the section under "Replacing the ribbon cartridge" on page 84 and your computer documentation. described in securely. Check that both the printer and 7 computer specifications. Press the Offline button to turn off the Power light. 7 The interface cable is not properly Select your printer from the Windows 7 set up for your application. See...
User Guide
Page 80
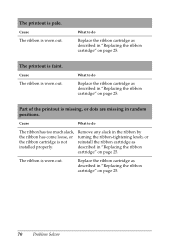
..., Remove any slack in "Replacing the ribbon cartridge" on page 25. The printout is worn out. described in random positions. Part of the printout is missing, or dots are missing in "Replacing the ribbon cartridge" on page 25. 70 Problem Solver The printout is not reinstall the ribbon cartridge as installed properly. Replace the ribbon cartridge as described in the ribbon by the ribbon has come loose, or turning the ribbon...
..., Remove any slack in "Replacing the ribbon cartridge" on page 25. The printout is worn out. described in random positions. Part of the printout is missing, or dots are missing in "Replacing the ribbon cartridge" on page 25. 70 Problem Solver The printout is not reinstall the ribbon cartridge as installed properly. Replace the ribbon cartridge as described in the ribbon by the ribbon has come loose, or turning the ribbon...
User Guide
Page 81
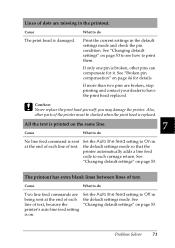
c Caution: Never replace the print head yourself; the default settings mode so that the printer automatically adds a line feed 7 code to each the default settings mode. See 7 line of text, because the "Changing default settings" on . Print the current settings in the default settings mode and check the pin 7 condition. Also, 7 other pins can compensate for details. 7 If more than two pins are Set the Auto line feed setting to Off in being sent at the end of each line of text. Problem Solver...
c Caution: Never replace the print head yourself; the default settings mode so that the printer automatically adds a line feed 7 code to each the default settings mode. See 7 line of text, because the "Changing default settings" on . Print the current settings in the default settings mode and check the pin 7 condition. Also, 7 other pins can compensate for details. 7 If more than two pins are Set the Auto line feed setting to Off in being sent at the end of each line of text. Problem Solver...
User Guide
Page 83
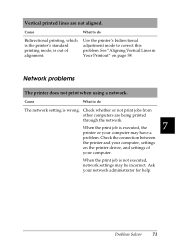
... be incorrect. See "Aligning Vertical Lines in alignment. Check whether or not print jobs from 7 other computers are not aligned. 7 Cause What to correct this 7 printing mode, is wrong. Check the connection between the printer and your computer, settings 7 on page 58. 7 Network problems 7 The printer does not print when using a network. 7 Cause What to do Bidirectional printing, which Use the printer's bidirectional is the printer's standard adjustment mode to do The network setting is out of...
... be incorrect. See "Aligning Vertical Lines in alignment. Check whether or not print jobs from 7 other computers are not aligned. 7 Cause What to correct this 7 printing mode, is wrong. Check the connection between the printer and your computer, settings 7 on page 58. 7 Network problems 7 The printer does not print when using a network. 7 Cause What to do Bidirectional printing, which Use the printer's bidirectional is the printer's standard adjustment mode to do The network setting is out of...
User Guide
Page 92
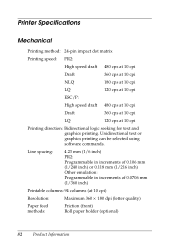
... printing. Printer Specifications Mechanical Printing method: 24-pin impact dot matrix Printing speed: PR2: High speed draft 480 cps at 10 cpi Draft 360 cps at 10 cpi NLQ 180 cps at 10 cpi LQ 120 cps at 10 cpi ESC/P: High speed draft 480 cps at 10 cpi Draft 360 cps at 10 cpi LQ 120 cps at 10 cpi) Resolution: Maximum 360 × 180 dpi (letter quality) Paper feed...
... printing. Printer Specifications Mechanical Printing method: 24-pin impact dot matrix Printing speed: PR2: High speed draft 480 cps at 10 cpi Draft 360 cps at 10 cpi NLQ 180 cps at 10 cpi LQ 120 cps at 10 cpi ESC/P: High speed draft 480 cps at 10 cpi Draft 360 cps at 10 cpi LQ 120 cps at 10 cpi) Resolution: Maximum 360 × 180 dpi (letter quality) Paper feed...


