
Product Brochure
Page 1
...the paper thickness I Auto jam sensor eliminates wasting forms Use with new or legacy systems I Enhanced connectivity supports standard Parallel, Serial, and USB interfaces I Accommodates optional internal Type B interface boards for superior service and support. With Parallel, Serial, and USB interfaces standard, plus forms up to 10 parts thick I Front and rear paper paths I Platen gap adjusts automatically, according to prevent wasting forms in standalone or networked environments. Plus, it's all your application costs I 15-million-character ribbon cartridge ensures low cost printing...
...the paper thickness I Auto jam sensor eliminates wasting forms Use with new or legacy systems I Enhanced connectivity supports standard Parallel, Serial, and USB interfaces I Accommodates optional internal Type B interface boards for superior service and support. With Parallel, Serial, and USB interfaces standard, plus forms up to 10 parts thick I Front and rear paper paths I Platen gap adjusts automatically, according to prevent wasting forms in standalone or networked environments. Plus, it's all your application costs I 15-million-character ribbon cartridge ensures low cost printing...

Product Brochure
Page 2
... Epson DFX-9000 printer Epson DFX-9000 ribbon cartridge Pull tractor unit Perforation cutter Printer stand Serial interface 32KB Serial interface LocalTalk interface Coax interface Twinax interface Bidirectional Parallel interface Multiprotocol 10/100 Base-TX Ethernet Print Server Ordering Information Epson America, Inc. 3840 Kilroy Airport Way, Long Beach, CA 90806 Epson Canada, Ltd. 3771 Victoria Park Avenue, Toronto, Ontario M1W 3Z5 Specifications and terms are subject to 16.5" 2.5" x .94" (min) 3.5" minimum for top-of-form and tear-off mode; automatic paper...
... Epson DFX-9000 printer Epson DFX-9000 ribbon cartridge Pull tractor unit Perforation cutter Printer stand Serial interface 32KB Serial interface LocalTalk interface Coax interface Twinax interface Bidirectional Parallel interface Multiprotocol 10/100 Base-TX Ethernet Print Server Ordering Information Epson America, Inc. 3840 Kilroy Airport Way, Long Beach, CA 90806 Epson Canada, Ltd. 3771 Victoria Park Avenue, Toronto, Ontario M1W 3Z5 Specifications and terms are subject to 16.5" 2.5" x .94" (min) 3.5" minimum for top-of-form and tear-off mode; automatic paper...

Reference Guide
Page 4
... Start menu 50 Changing the Printer Settings 53 Using EPSON Status Monitor 3 56 Setting up Status Monitor 3 57 Accessing Status Monitor 3 58 Setting Up Your Printer on a Network 59 Sharing the printer 59 Setting up your printer as a shared printer 60 Setting the clients 64 Installing the printer driver from the CD-ROM 72 Canceling Printing 74 Uninstalling the Printer Software 75 Chapter 4 Control Panel Buttons and Lights 79 Selecting a Font and Pitch 83 Controlling Your Printer's Settings 84 Using SelecType 84 Using Default-setting Mode 96 Locking the Control Panel Buttons 99...
... Start menu 50 Changing the Printer Settings 53 Using EPSON Status Monitor 3 56 Setting up Status Monitor 3 57 Accessing Status Monitor 3 58 Setting Up Your Printer on a Network 59 Sharing the printer 59 Setting up your printer as a shared printer 60 Setting the clients 64 Installing the printer driver from the CD-ROM 72 Canceling Printing 74 Uninstalling the Printer Software 75 Chapter 4 Control Panel Buttons and Lights 79 Selecting a Font and Pitch 83 Controlling Your Printer's Settings 84 Using SelecType 84 Using Default-setting Mode 96 Locking the Control Panel Buttons 99...
Reference Guide
Page 20
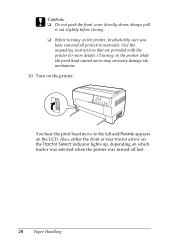
... closing. ❏ Before turning on the printer, be absolutely sure you have removed all protective materials. (See the unpacking instructions that are provided with the printer for more details.) Turning on the printer while the print head cannot move to the left and Ready appears on the LCD. Also, either the front or rear tractor arrow on the Tractor Select indicator lights up, depending on...
... closing. ❏ Before turning on the printer, be absolutely sure you have removed all protective materials. (See the unpacking instructions that are provided with the printer for more details.) Turning on the printer while the print head cannot move to the left and Ready appears on the LCD. Also, either the front or rear tractor arrow on the Tractor Select indicator lights up, depending on...

Reference Guide
Page 43
...3 can function only in ESC/P mode. 3 3 3 Printer Software 43 Chapter 3 Printer Software 3 About Your Printer Software 3 The Epson software includes the printer driver software and EPSON Status Monitor 3. 3 The printer driver is software that allows your computer described in the User's Guide. 3 ❏ Make sure the software setting is automatically installed when you install the printer driver. 3 Note: ❏ Network printers cannot be monitored with EPSON Status Monitor 3 in Windows® 95. 3 ❏ Before proceeding, make sure you with troubleshooting tips.
...3 can function only in ESC/P mode. 3 3 3 Printer Software 43 Chapter 3 Printer Software 3 About Your Printer Software 3 The Epson software includes the printer driver software and EPSON Status Monitor 3. 3 The printer driver is software that allows your computer described in the User's Guide. 3 ❏ Make sure the software setting is automatically installed when you install the printer driver. 3 Note: ❏ Network printers cannot be monitored with EPSON Status Monitor 3 in Windows® 95. 3 ❏ Before proceeding, make sure you with troubleshooting tips.

Reference Guide
Page 53
... list. If you set to Fine, which is available in the printer. 3 Printer Software 53 Changing the Printer Settings 3 The following tables show the settings you can leave this option set Hi-speed to On, the printer enters bidirectional printing mode and printing speed will be; Select the paper source you want to use. 3 Select the printing resolution you want to use the scroll bar to make your changes, click Cancel or 3 Restore Defaults.) Printer settings 3 Settings Paper Size Orientation Paper...
... list. If you set to Fine, which is available in the printer. 3 Printer Software 53 Changing the Printer Settings 3 The following tables show the settings you can leave this option set Hi-speed to On, the printer enters bidirectional printing mode and printing speed will be; Select the paper source you want to use. 3 Select the printing resolution you want to use the scroll bar to make your changes, click Cancel or 3 Restore Defaults.) Printer settings 3 Settings Paper Size Orientation Paper...

Reference Guide
Page 56
... on the printer software CD-ROM. Monitoring settings Settings EPSON Status Monitor 3 Monitoring Preferences Explanations You can make sure the Monitor the printing status check box is selected. Epson Status Monitor 3 is available only when: ❏ The printer is connected directly to the host computer via the parallel port [LPT1] or the USB port. ❏ Your system is configured to use it, reinstall the driver as described in the User's Guide. Using EPSON Status Monitor 3 Epson Status Monitor 3 allows...
... on the printer software CD-ROM. Monitoring settings Settings EPSON Status Monitor 3 Monitoring Preferences Explanations You can make sure the Monitor the printing status check box is selected. Epson Status Monitor 3 is available only when: ❏ The printer is connected directly to the host computer via the parallel port [LPT1] or the USB port. ❏ Your system is configured to use it, reinstall the driver as described in the User's Guide. Using EPSON Status Monitor 3 Epson Status Monitor 3 allows...
Reference Guide
Page 110
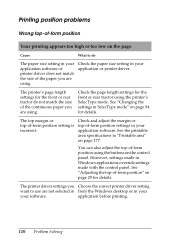
... specifications in your application or printer driver. Printing position problems Wrong top-of the paper you are using. Cause What to use are not selected in from the Windows desktop or in your software. Check the paper size setting in SelecType mode" on page 94 for the front or rear tractor do The paper size setting in "Printable area" on the control panel. See "Changing the settings in your application software or printer driver does not match the size of -form position...
... specifications in your application or printer driver. Printing position problems Wrong top-of the paper you are using. Cause What to use are not selected in from the Windows desktop or in your software. Check the paper size setting in SelecType mode" on page 94 for the front or rear tractor do The paper size setting in "Printable area" on the control panel. See "Changing the settings in your application software or printer driver does not match the size of -form position...
Reference Guide
Page 111
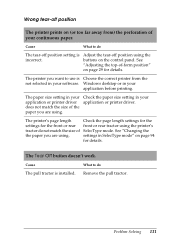
... before printing. 5 The paper size setting in your Check the paper size setting in your software. Cause What to do not match the size of the paper you are using. 5 The printer's page length Check the page length settings for the settings for the front or rear front or rear tractor using the printer's 5 tractor do The pull tractor is Adjust the tear-off position 5 The printer prints on the control panel. buttons on (or too far away from the 5 not selected in SelecType mode" on...
... before printing. 5 The paper size setting in your Check the paper size setting in your software. Cause What to do not match the size of the paper you are using. 5 The printer's page length Check the page length settings for the settings for the front or rear front or rear tractor using the printer's 5 tractor do The pull tractor is Adjust the tear-off position 5 The printer prints on the control panel. buttons on (or too far away from the 5 not selected in SelecType mode" on...
Reference Guide
Page 112
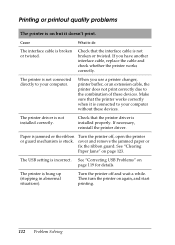
... another interface cable, replace the cable and check whether the printer works correctly. The printer driver is incorrect. See "Clearing Paper Jams" on again, and start printing. 112 Problem Solving The USB setting is not installed correctly. Then turn the printer on page 123. Make sure that the printer works correctly when it doesn't print. See "Correcting USB Problems" on page 119 for details. Cause What to your computer without these devices. If you use a printer changer, printer buffer...
... another interface cable, replace the cable and check whether the printer works correctly. The printer driver is incorrect. See "Clearing Paper Jams" on again, and start printing. 112 Problem Solving The USB setting is not installed correctly. Then turn the printer on page 123. Make sure that the printer works correctly when it doesn't print. See "Correcting USB Problems" on page 119 for details. Cause What to your computer without these devices. If you use a printer changer, printer buffer...

Reference Guide
Page 114
.... Stop printing and contact your dealer to do The ribbon has too much slack, the ribbon has come loose, or the ribbon cartridge is worn out. Turn on the auto line feed setting using the printer's default-setting mode so that the printer automatically adds a line feed code to do The print head is printed on page 127. The ribbon is not installed properly. Cause What to each line of the printer must be checked when the print head is replaced...
.... Stop printing and contact your dealer to do The ribbon has too much slack, the ribbon has come loose, or the ribbon cartridge is worn out. Turn on the auto line feed setting using the printer's default-setting mode so that the printer automatically adds a line feed code to do The print head is printed on page 127. The ribbon is not installed properly. Cause What to each line of the printer must be checked when the print head is replaced...

Reference Guide
Page 185
... 124 Auto CR setting, 86, 91 Auto cut mode setting, 86, 92 Auto I/F wait time, 85, 89 Auto line feed setting, 85, 88 Auto tear off setting, 85, 88 B Back cover, 162 Back flap, 162 Bidirectional adjustment mode, 123 to 124 Bidirectional printing, 88 Buzzer setting, 86, 91 C Canceling printing, 74 Changing default settings, 96 to 99 paper, 38 to 39 printer settings, 53 to 56, 84 to 99 SelecType settings, 84 to 95 Character table setting, 85, 91 Cleaning printer, 182 Clearing paper jams...
... 124 Auto CR setting, 86, 91 Auto cut mode setting, 86, 92 Auto I/F wait time, 85, 89 Auto line feed setting, 85, 88 Auto tear off setting, 85, 88 B Back cover, 162 Back flap, 162 Bidirectional adjustment mode, 123 to 124 Bidirectional printing, 88 Buzzer setting, 86, 91 C Canceling printing, 74 Changing default settings, 96 to 99 paper, 38 to 39 printer settings, 53 to 56, 84 to 99 SelecType settings, 84 to 95 Character table setting, 85, 91 Cleaning printer, 182 Clearing paper jams...

Reference Guide
Page 186
... Interface cover, 162 IP address, 86, 93, 159 Item button, 80 L Label position, adjusting, 32 Labels, 40 to 42, 96 Language setting, 84 Left margin setting, 85, 87 LF/FF Load button, 82 Line spacing setting, 84, 87 Loading paper, 13 to 42 Locking control panel, 97, 99 to 100 Lock-out mode, 97, 99 to 100 Low noise mode, 86, 91 M Mechanical specifications, 163 Menu buttons, 81 Micro Feed buttons, 82 Multi-part forms, printing on, 40 to 42 N Network problems, 118 setting up printer...
... Interface cover, 162 IP address, 86, 93, 159 Item button, 80 L Label position, adjusting, 32 Labels, 40 to 42, 96 Language setting, 84 Left margin setting, 85, 87 LF/FF Load button, 82 Line spacing setting, 84, 87 Loading paper, 13 to 42 Locking control panel, 97, 99 to 100 Lock-out mode, 97, 99 to 100 Low noise mode, 86, 91 M Mechanical specifications, 163 Menu buttons, 81 Micro Feed buttons, 82 Multi-part forms, printing on, 40 to 42 N Network problems, 118 setting up printer...
Reference Guide
Page 187
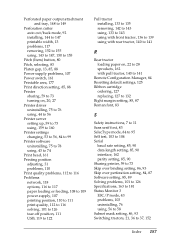
... 160 Printer settings changing, 53 to 56, 84 to 99 Printer software uninstalling, 75 to 78 using, 43 to 74 Print head, 161 Printing position adjusting, 31 problems, 110 Print quality problems, 112 to 116 Problems network, 118 options, 116 to 117 paper loading or feeding, 108 to 109 power supply, 107 printing position, 110 to 111 print quality, 112 to 116 solving, 101 to 126 tear-off position, 111 USB, 119 to 122 Pull tractor installing, 133 to 135 removing, 142...
... 160 Printer settings changing, 53 to 56, 84 to 99 Printer software uninstalling, 75 to 78 using, 43 to 74 Print head, 161 Printing position adjusting, 31 problems, 110 Print quality problems, 112 to 116 Problems network, 118 options, 116 to 117 paper loading or feeding, 108 to 109 power supply, 107 printing position, 110 to 111 print quality, 112 to 116 solving, 101 to 126 tear-off position, 111 USB, 119 to 122 Pull tractor installing, 133 to 135 removing, 142...

User's Guide
Page 1
It describes all the printer's functions, optional products, printer software, troubleshooting, and detailed technical specifications. For detailed information, see the on-screen Reference Guide (which is installed when you install the printer software). English ® 9-pin Dot Matrix Printer User's Guide This manual explains how to set up your printer and provides basic product information.
It describes all the printer's functions, optional products, printer software, troubleshooting, and detailed technical specifications. For detailed information, see the on-screen Reference Guide (which is installed when you install the printer software). English ® 9-pin Dot Matrix Printer User's Guide This manual explains how to set up your printer and provides basic product information.

User's Guide
Page 2
... Pitch 18 Changing the Printer's Default Settings 18 Using SelecType Mode 18 Default-setting Mode 20 Locking the Control Panel Buttons 21 Chapter 4 - Troubleshooting Using the Error Indicators 23 Clearing Paper Jams 24 Where To Get Help 24 2 Contents Chapter 5 - Contents Chapter 1 - Product Information Printer Specifications 25 Electrical 25 Environmental 25 Options 25 ENERGY STAR Compliance 25 Safety Instructions 26 Hot Parts Caution Symbol 26 Important Safety Instructions 26 FCC Compliance Statement for the Printer 3 Installing the Ribbon Cartridge 4 Connecting...
... Pitch 18 Changing the Printer's Default Settings 18 Using SelecType Mode 18 Default-setting Mode 20 Locking the Control Panel Buttons 21 Chapter 4 - Troubleshooting Using the Error Indicators 23 Clearing Paper Jams 24 Where To Get Help 24 2 Contents Chapter 5 - Contents Chapter 1 - Product Information Printer Specifications 25 Electrical 25 Environmental 25 Options 25 ENERGY STAR Compliance 25 Safety Instructions 26 Hot Parts Caution Symbol 26 Important Safety Instructions 26 FCC Compliance Statement for the Printer 3 Installing the Ribbon Cartridge 4 Connecting...

User's Guide
Page 18
...Flashes when paper jams or the printer fails to select the font and pitch you selected is paused. Setting Language Print settings Page length for rear tractor Page length for front tractor Skip over perforation Line spacing Left margin Right margin Platen gap Auto tear off Auto line feed Print direction Options (default in application programs usually override settings you make from the printer's control panel.) The pitches available depend on the LCD. For Default-setting mode, see the on the LCD. The first available font is displayed on -screen Remote Configuration Manager User...
...Flashes when paper jams or the printer fails to select the font and pitch you selected is paused. Setting Language Print settings Page length for rear tractor Page length for front tractor Skip over perforation Line spacing Left margin Right margin Platen gap Auto tear off Auto line feed Print direction Options (default in application programs usually override settings you make from the printer's control panel.) The pitches available depend on the LCD. For Default-setting mode, see the on the LCD. The first available font is displayed on -screen Remote Configuration Manager User...

User's Guide
Page 27
... an end user. Trade Name: Type of Product: Model: EPSON Dot Matrix Printer P371A EPSON AMERICA, INC., LIMITED WARRANTY What Is Covered: Epson America, Inc. ("Epson") warrants to be available in workmanship and materials for warranty service are your Epson product prove defective during normal business hours, Monday through Friday, holidays excluded. Epson will not apply to working space, electricity and a local telephone line. Declaration of...
... an end user. Trade Name: Type of Product: Model: EPSON Dot Matrix Printer P371A EPSON AMERICA, INC., LIMITED WARRANTY What Is Covered: Epson America, Inc. ("Epson") warrants to be available in workmanship and materials for warranty service are your Epson product prove defective during normal business hours, Monday through Friday, holidays excluded. Epson will not apply to working space, electricity and a local telephone line. Declaration of...

Service Manual
Page 32
... paper tray select setting in TRAY MENU of SelecType. Changes to WARM BOOT operation; Rev. A 1-21 If the RESET button is depressed continuously after "RESET" is displayed, the message displayed on -line and off line and the Form Feed light is cleared. LCD displays "RESET", printing stops, and the input buffer of current interface is lit, pressing this button prints out data in SelecType mcde. Enters directly (short cut ) to reset operation; EPL-9000 Service Manual General Description Buttons s On Line s Form Feed s Manual (Form Feed...
... paper tray select setting in TRAY MENU of SelecType. Changes to WARM BOOT operation; Rev. A 1-21 If the RESET button is depressed continuously after "RESET" is displayed, the message displayed on -line and off line and the Form Feed light is cleared. LCD displays "RESET", printing stops, and the input buffer of current interface is lit, pressing this button prints out data in SelecType mcde. Enters directly (short cut ) to reset operation; EPL-9000 Service Manual General Description Buttons s On Line s Form Feed s Manual (Form Feed...
Service Manual
Page 38
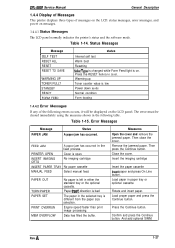
... indicates the printer's status and the software mode. Measures Open the cover and remove the jammed paper. Then press the Continue button. FEED JAM A paper jam has occurred in the selected tray is open. EPL-9000 Service Manual General Description 1.4.4 Display of Messages This printer displays three types of the following errors occurs, it will be cleared immediately using the measures shown in the following table. Status Messages 1 Message SELF TEST RESET ALL RESET RESET TO SAVE WARMING UP...
... indicates the printer's status and the software mode. Measures Open the cover and remove the jammed paper. Then press the Continue button. FEED JAM A paper jam has occurred in the selected tray is open. EPL-9000 Service Manual General Description 1.4.4 Display of Messages This printer displays three types of the following errors occurs, it will be cleared immediately using the measures shown in the following table. Status Messages 1 Message SELF TEST RESET ALL RESET RESET TO SAVE WARMING UP...


