
Technical Brief (Impact Printers)
Page 1
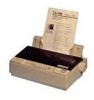
...-pin impact printers - or 24-pin, which : Hit the paper less hard to make impressions through most multi-part forms Offer finer Letter Quality printing Print from High Speed Draft up Reliability M Ribbon quality M Ribbon cartridge reliability M Total Print Volume vs. MTBF M Off-carriage motor assembly Functionality-Printing technology LL Why buy an impact printer? Impact printers are capable of Seiko Epson Corporation. 1/00 Other trademarks are renowned for their respective owners. These printers have the sturdiest printhead pins...
...-pin impact printers - or 24-pin, which : Hit the paper less hard to make impressions through most multi-part forms Offer finer Letter Quality printing Print from High Speed Draft up Reliability M Ribbon quality M Ribbon cartridge reliability M Total Print Volume vs. MTBF M Off-carriage motor assembly Functionality-Printing technology LL Why buy an impact printer? Impact printers are capable of Seiko Epson Corporation. 1/00 Other trademarks are renowned for their respective owners. These printers have the sturdiest printhead pins...

Technical Brief (Impact Printers)
Page 2
... models this tractor is moveable, and in a single pass of the print head and enhances printing with 360 dpi in some it is fixed. Some EPSON impact printers also include additional tractor units, and all include a rear tractor. Bottom pull paper path Gives you the greatest control when printing on multi-part forms by ensuring that the forms stay properly aligned. EPSON 9-pin impact printers utilize ESC/P, the original printer control language. Tractor paper paths: EPSON impact printers all of EPSON's impact printers have optional tractor...
... models this tractor is moveable, and in a single pass of the print head and enhances printing with 360 dpi in some it is fixed. Some EPSON impact printers also include additional tractor units, and all include a rear tractor. Bottom pull paper path Gives you the greatest control when printing on multi-part forms by ensuring that the forms stay properly aligned. EPSON 9-pin impact printers utilize ESC/P, the original printer control language. Tractor paper paths: EPSON impact printers all of EPSON's impact printers have optional tractor...
Technical Brief (Impact Printers)
Page 4
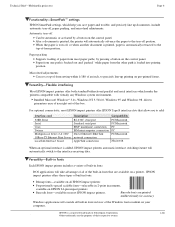
... fonts-selectable in fonts that allow you save paper and trouble, and precisely line up printing on pre-printed forms. LL L Versatility-Flexible interfacing Most EPSON impact printers offer both standard bidirectional parallel and serial interfaces which help you to add: Interface card 32KB Serial Serial Coax Twinax Multiprotocol Series 2 & 100/ 10Base-TX Ethernet Print Server LocalTalk Interface board Description RS-232C serial port Standard serial port IBM® mainframe connection IBM minicomputer connection Direct Ethernet/ EtherTalk network connection AppleTalk connection...
... fonts-selectable in fonts that allow you save paper and trouble, and precisely line up printing on pre-printed forms. LL L Versatility-Flexible interfacing Most EPSON impact printers offer both standard bidirectional parallel and serial interfaces which help you to add: Interface card 32KB Serial Serial Coax Twinax Multiprotocol Series 2 & 100/ 10Base-TX Ethernet Print Server LocalTalk Interface board Description RS-232C serial port Standard serial port IBM® mainframe connection IBM minicomputer connection Direct Ethernet/ EtherTalk network connection AppleTalk connection...
Technical Brief (Impact Printers)
Page 5
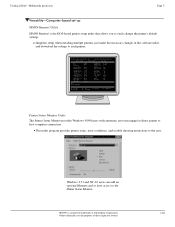
... Page 5 Versatility-Computer-based set-up EPSON Remote! Simplifies setup when installing multiple printers-just make the necessary changes in the software utility, and download the settings to the Printer Status Monitor. L Windows 3.51 and NT 4.0 users can add an optional Ethernet card to have access to each printer L EPSON Remote! Manual Front : 17 inch Manual Front : 8.5mm Print Direction : Bi-d Skip over hold : OFF Interface mode : Auto I/F interval : 10s Input Buffer : ON Auto Tear off : OFF Auto Line Feed : OFF Control Code : ESC/P 0 slash : OFF...
... Page 5 Versatility-Computer-based set-up EPSON Remote! Simplifies setup when installing multiple printers-just make the necessary changes in the software utility, and download the settings to the Printer Status Monitor. L Windows 3.51 and NT 4.0 users can add an optional Ethernet card to have access to each printer L EPSON Remote! Manual Front : 17 inch Manual Front : 8.5mm Print Direction : Bi-d Skip over hold : OFF Interface mode : Auto I/F interval : 10s Input Buffer : ON Auto Tear off : OFF Auto Line Feed : OFF Control Code : ESC/P 0 slash : OFF...
Technical Brief (Impact Printers)
Page 6
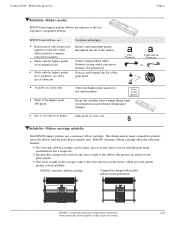
... the print head assembly unit. This lower weight on the carriage reduces the wear and tear on the print head EPSON Sales Training EPSON is a registered trademark of Seiko Epson Corporation. 1/00 Other trademarks are superior to the less expensive compatible ribbons. The design used in a mylar film Made of the highest grade ABS plastic Offers the highest print quality for dot matrix printers Ultra Letter Quality Keeps the cartridge...
... the print head assembly unit. This lower weight on the carriage reduces the wear and tear on the print head EPSON Sales Training EPSON is a registered trademark of Seiko Epson Corporation. 1/00 Other trademarks are superior to the less expensive compatible ribbons. The design used in a mylar film Made of the highest grade ABS plastic Offers the highest print quality for dot matrix printers Ultra Letter Quality Keeps the cartridge...

Product Information Guide
Page 4
... page. The factory default settings are using continuous paper, the printer leaves a 1-inch (25.4-mm) margin between an uppercase O and a zero. Roman Sans Serif Draft Draft Condensed Font 12 Pap Micro Adjust The table below lists all selections. The table below lists the available fonts and shows how the FONT lights appear for each time you select 10 cpi, the printer prints 10 characters per inch. The printer prints text with the control panel. If your printer. See "Adjusting the loading position." &KDUDFWHU...
... page. The factory default settings are using continuous paper, the printer leaves a 1-inch (25.4-mm) margin between an uppercase O and a zero. Roman Sans Serif Draft Draft Condensed Font 12 Pap Micro Adjust The table below lists all selections. The table below lists the available fonts and shows how the FONT lights appear for each time you select 10 cpi, the printer prints 10 characters per inch. The printer prints text with the control panel. If your printer. See "Adjusting the loading position." &KDUDFWHU...

Product Information Guide
Page 5
... LF/FF button, the printer prints the current default settings and the next instruction in the language you how the control panel lights appear for that guides you through the operations. (Once you want the printer to ignore data from setting to setting, the FONT lights turn on the printer to enter the default-settings mode. See your software program to control the printer, if possible. Press the FONT button until the lights indicate the appropriate selection. )217 )217...
... LF/FF button, the printer prints the current default settings and the next instruction in the language you how the control panel lights appear for that guides you through the operations. (Once you want the printer to ignore data from setting to setting, the FONT lights turn on the printer to enter the default-settings mode. See your software program to control the printer, if possible. Press the FONT button until the lights indicate the appropriate selection. )217 )217...
Product Information Guide
Page 8
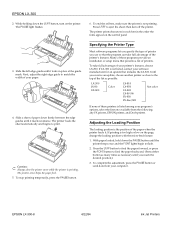
... Next, adjust the right edge guide to the top of printers. Slide a sheet of the paper when the printer loads it locks in the order the fonts appear on the control panel 6SHFLI\LQJýWKHý3ULQWHUý7\SHý Most software programs let you use so that includes the LX-300. then turn on the page, change the loading position with the micro-feed feature. 1. If LX-300 is the position of paper down...
... Next, adjust the right edge guide to the top of printers. Slide a sheet of the paper when the printer loads it locks in the order the fonts appear on the control panel 6SHFLI\LQJýWKHý3ULQWHUý7\SHý Most software programs let you use so that includes the LX-300. then turn on the page, change the loading position with the micro-feed feature. 1. If LX-300 is the position of paper down...

User Manual
Page 9
...on Continuous Paper Printing with the push tractor Switching back to single sheets Printing with the pull tractor Printing on Special Paper Adjusting the paper-thickness lever Multi-part forms Labels Envelopes Changing the Printer Settings Printer setting descriptions Character spacing Shape of zero Skip-over-perforation Character table Auto line feed Page length Auto tear off Tractor Interface Bit rate, parity bit, data length, and ETX/ACK . . . . . . Installing and Using Options Cut-sheet feeder Pull Tractor unit Roll paper holder Color upgrade kit 2-7 2-7 2-11...
...on Continuous Paper Printing with the push tractor Switching back to single sheets Printing with the pull tractor Printing on Special Paper Adjusting the paper-thickness lever Multi-part forms Labels Envelopes Changing the Printer Settings Printer setting descriptions Character spacing Shape of zero Skip-over-perforation Character table Auto line feed Page length Auto tear off Tractor Interface Bit rate, parity bit, data length, and ETX/ACK . . . . . . Installing and Using Options Cut-sheet feeder Pull Tractor unit Roll paper holder Color upgrade kit 2-7 2-7 2-11...

User Manual
Page 10
...not work properly 3-9 Using the pull tractor with the push tractor, continuous paper does not feed properly 3-10 With color upgrade kit installed, printer doesn't operate properly 3-10 Appendix Printer Specifications A-2 Printing A-2 Paper A-3 Mechanical A-6 Electrical A-6 Environmental A-7 Safety approvals A-7 Interface Specifications A-7 Parallel interface specifications A-7 Serial interface specifications A-8 Serial pin assignments A-8 Printer Settings A-9 Command Summary A-10 Sending printer commands A-10 Using the command summary A-10 Printer operation A-11 Data control...
...not work properly 3-9 Using the pull tractor with the push tractor, continuous paper does not feed properly 3-10 With color upgrade kit installed, printer doesn't operate properly 3-10 Appendix Printer Specifications A-2 Printing A-2 Paper A-3 Mechanical A-6 Electrical A-6 Environmental A-7 Safety approvals A-7 Interface Specifications A-7 Parallel interface specifications A-7 Serial interface specifications A-8 Serial pin assignments A-8 Printer Settings A-9 Command Summary A-10 Sending printer commands A-10 Using the command summary A-10 Printer operation A-11 Data control...

User Manual
Page 12
...: t High-speed printing. t Longer printable area. Introduction 1 Print up to 66 lines on A4-size or 62 lines on single sheets without removing the continuous paper supply. Print up to 220 characters per second (cps) in 10-cpi draft mode. Feed continuous paper with the standard tractor in your work environment. This printer fits neatly into available space in the push tractor position). t Pull Tractor (C80030V) for printing continuous paper and multi-part forms (used in the pull-tractor position in...
...: t High-speed printing. t Longer printable area. Introduction 1 Print up to 66 lines on A4-size or 62 lines on single sheets without removing the continuous paper supply. Print up to 220 characters per second (cps) in 10-cpi draft mode. Feed continuous paper with the standard tractor in your work environment. This printer fits neatly into available space in the push tractor position). t Pull Tractor (C80030V) for printing continuous paper and multi-part forms (used in the pull-tractor position in...
User Manual
Page 32
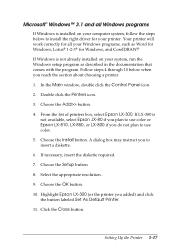
.... 7. Select the appropriate resolution. 9. Choose the Install button. In the Main window, double click the Control Panel icon. 2. A dialog box may instruct you added) and click the button labeled Set As Default Printer. 11. Click the Close button. Highlight Epson LX-300 (or the printer you to install the right driver for Windows, and CorelDRAW.® If Windows is not available, select Epson JX-80 if you plan to use color. 5. Setting Up the Printer 1-17...
.... 7. Select the appropriate resolution. 9. Choose the Install button. In the Main window, double click the Control Panel icon. 2. A dialog box may instruct you added) and click the button labeled Set As Default Printer. 11. Click the Close button. Highlight Epson LX-300 (or the printer you to install the right driver for Windows, and CorelDRAW.® If Windows is not available, select Epson JX-80 if you plan to use color. 5. Setting Up the Printer 1-17...

User Manual
Page 36
... the FONT button while you turn on the printer, you enter the Printer Setting mode, where you can press this button to the paper-park position. PAUSE button Press the PAUSE button to adjust the loading position. MICRO ADJUST Feeds paper forward or backward to stop the printer temporarily during printing or the self test. Using the Printer 2-3 For more about printer settings, see page 1-10. See "Printing with the push tractor." LF/FF button During normal operation, you can change many of -form position...
... the FONT button while you turn on the printer, you enter the Printer Setting mode, where you can press this button to the paper-park position. PAUSE button Press the PAUSE button to adjust the loading position. MICRO ADJUST Feeds paper forward or backward to stop the printer temporarily during printing or the self test. Using the Printer 2-3 For more about printer settings, see page 1-10. See "Printing with the push tractor." LF/FF button During normal operation, you can change many of -form position...

User Manual
Page 48
... the center until the perforation between pages is closed. Then turn on single sheets and continuous forms, your software program settings keep the printing entirely within the printable area. Slide the left edge guide to adjust the loading position. When the printer receives data, it horizontally and fit its notches over the printer's mounting posts. slide the right edge guide to feed the paper forward. Turn the knob until it click...
... the center until the perforation between pages is closed. Then turn on single sheets and continuous forms, your software program settings keep the printing entirely within the printable area. Slide the left edge guide to adjust the loading position. When the printer receives data, it horizontally and fit its notches over the printer's mounting posts. slide the right edge guide to feed the paper forward. Turn the knob until it click...

User Manual
Page 57
.... Installing and Using Options Cut-sheet feeder The optional single-bin cut sheet feeder: 1. Remove the paper guide. 2. You can specify either 10 seconds or 30 seconds. If the tractor is received from the selected interface for the appropriate settings. Interface When this feature is set to Auto, the printer determines which interface is receiving data and switches to that interface until the end of the print job (when no data is installed in the pull-tractor position, remove...
.... Installing and Using Options Cut-sheet feeder The optional single-bin cut sheet feeder: 1. Remove the paper guide. 2. You can specify either 10 seconds or 30 seconds. If the tractor is received from the selected interface for the appropriate settings. Interface When this feature is set to Auto, the printer determines which interface is receiving data and switches to that interface until the end of the print job (when no data is installed in the pull-tractor position, remove...

User Manual
Page 72
... your control panel setting. Check that the software is possible to turn the platen to make minor adjustments to the loading position for your printer. Also, it if necessary. Troubleshooting 3-5 Printed characters are printing labels.) Page length does not match the length of the next page. The print position is printed at the top of the paper. See "Getting the results you expect" on page 1-5. Check the page length set by your software did not print. For instructions...
... your control panel setting. Check that the software is possible to turn the platen to make minor adjustments to the loading position for your printer. Also, it if necessary. Troubleshooting 3-5 Printed characters are printing labels.) Page length does not match the length of the next page. The print position is printed at the top of the paper. See "Getting the results you expect" on page 1-5. Check the page length set by your software did not print. For instructions...

User Manual
Page 77
... width of sending control codes, select the color using both are positioned evenly. Remove slack lengthwise by rotating the paper-feed knob. Make sure that the paper guide is crooked or the paper jams. The pull tractor and push tractor sprockets are not aligned correctly. See Chapter 2. 3-10 Troubleshooting Use the program's setup (or install) procedure to take up for color printing. Follow the instructions on both tractors, be installed properly. When using the ESC r command. (See the "Command...
... width of sending control codes, select the color using both are positioned evenly. Remove slack lengthwise by rotating the paper-feed knob. Make sure that the paper guide is crooked or the paper jams. The pull tractor and push tractor sprockets are not aligned correctly. See Chapter 2. 3-10 Troubleshooting Use the program's setup (or install) procedure to take up for color printing. Follow the instructions on both tractors, be installed properly. When using the ESC r command. (See the "Command...

User Manual
Page 90
... Select Double-Width Mode (one line) 20 14 Cancel Double-Width Mode (one line) 87 57 Turn Double-Width Mode On/Off Print enhancement ASCII ESC E ESC F ESC G ESC H Dec. n 33 21 Description Select NLQ or Draft n = 1: NLQ 0: Draft Select NLQ Font n = 0: Roman 1: Sans Serif Master Select To find the value of n, add together the numbers of the typestyles you want to combine from the list below: n = 0: 10 cpi...
... Select Double-Width Mode (one line) 20 14 Cancel Double-Width Mode (one line) 87 57 Turn Double-Width Mode On/Off Print enhancement ASCII ESC E ESC F ESC G ESC H Dec. n 33 21 Description Select NLQ or Draft n = 1: NLQ 0: Draft Select NLQ Font n = 0: Roman 1: Sans Serif Master Select To find the value of n, add together the numbers of the typestyles you want to combine from the list below: n = 0: 10 cpi...

User Manual
Page 94
... A Adjusting loading position, 2-5 paper-thickness lever, 2-16 Assembling printer, 1-4-9 Attaching paper supports, 1-5 Auto line feed, 2-23 tear off, 2-23 B Bit rate, 2-24 Buttons, 2-2-3 C Changing printer settings, 2-19-24 Character spacing, 2-22 table, 2-23 Choosing a place for the printer, 1-3 Color upgrade kit, 2-31-34 Command summary, A-10-16 Connecting printer to computer, 1-13-16 Continuous paper, 2-7-15 Control panel, 2-2-4 Cut-sheet feeder, 2-24-28 D Data length, 2-24 E Envelopes, 2-18 ETX/ACK, 2-24 F Features, 1-2 Feeder, cut-sheet, 2-24-28 Finding your way around, 2 FONT button...
... A Adjusting loading position, 2-5 paper-thickness lever, 2-16 Assembling printer, 1-4-9 Attaching paper supports, 1-5 Auto line feed, 2-23 tear off, 2-23 B Bit rate, 2-24 Buttons, 2-2-3 C Changing printer settings, 2-19-24 Character spacing, 2-22 table, 2-23 Choosing a place for the printer, 1-3 Color upgrade kit, 2-31-34 Command summary, A-10-16 Connecting printer to computer, 1-13-16 Continuous paper, 2-7-15 Control panel, 2-2-4 Cut-sheet feeder, 2-24-28 D Data length, 2-24 E Envelopes, 2-18 ETX/ACK, 2-24 F Features, 1-2 Feeder, cut-sheet, 2-24-28 Finding your way around, 2 FONT button...

User Manual
Page 95
... Windows, 1-17 MICRO ADJUST, 2-3 Multi-part forms, 2-17 N Non-Windows software, 1-18 O Options installing and using, 2-24-34 troubleshooting, 3-8-11 P Page length, 2-23 Paper continuous, 2-7-15 printing on special, 2-15-18 roll, 2-29-31 single sheet, 2-5-6 Paper handling, troubleshooting, 3-6-8 Paper-thickness lever, adjusting, 2-16 PAPER PARK, 2-3 Parallel interface, 1-13-14 Parity bit, 2-24 PAUSE button, 2-3, 2-22 light, 2-2, 2-22 Plugging in the printer, 1-9 Power supply, troubleshooting, 3-2-3 Printer assembling, 1-4-9 changing the settings, 2-19-24 choosing a place for, 1-3 commands...
... Windows, 1-17 MICRO ADJUST, 2-3 Multi-part forms, 2-17 N Non-Windows software, 1-18 O Options installing and using, 2-24-34 troubleshooting, 3-8-11 P Page length, 2-23 Paper continuous, 2-7-15 printing on special, 2-15-18 roll, 2-29-31 single sheet, 2-5-6 Paper handling, troubleshooting, 3-6-8 Paper-thickness lever, adjusting, 2-16 PAPER PARK, 2-3 Parallel interface, 1-13-14 Parity bit, 2-24 PAUSE button, 2-3, 2-22 light, 2-2, 2-22 Plugging in the printer, 1-9 Power supply, troubleshooting, 3-2-3 Printer assembling, 1-4-9 changing the settings, 2-19-24 choosing a place for, 1-3 commands...


