
User Manual
Page 2
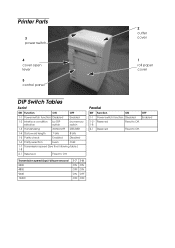
... Printer Parts 3 power switch 2 cutter cover 4 cover open lever 5 control panel 1 roll paper cover DIP Switch Tables Serial SW Function ON OFF 1-1 Power switch function Disabled Enabled 1-2 Interface condition selection by DIP switch by memory switch 1-3 Handshaking XON/XOFF DTR/DSR 1-4 Data word length 7 bits 8 bits 1-5 Parity check Enabled Disabled 1-6 Parity selection Even Odd 1-7 Transmission speed (See the following table.) 1-8 2-1 Reserved Fixed to Off. Parallel SW Function ON OFF 1-1 Power switch function Disabled Enabled 1-2~ Reserved 1-8 Fixed...
... Printer Parts 3 power switch 2 cutter cover 4 cover open lever 5 control panel 1 roll paper cover DIP Switch Tables Serial SW Function ON OFF 1-1 Power switch function Disabled Enabled 1-2 Interface condition selection by DIP switch by memory switch 1-3 Handshaking XON/XOFF DTR/DSR 1-4 Data word length 7 bits 8 bits 1-5 Parity check Enabled Disabled 1-6 Parity selection Even Odd 1-7 Transmission speed (See the following table.) 1-8 2-1 Reserved Fixed to Off. Parallel SW Function ON OFF 1-1 Power switch function Disabled Enabled 1-2~ Reserved 1-8 Fixed...
User Manual
Page 3
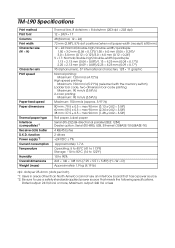
TM-L90 Specifications Print method Print font Columns Print width Character size (W × H) Character sets Print speed Paper feed speed Paper dimensions Thermal paper type Interface (compatible)*1 Receive data buffer D.K.D. function Power supply*2 Current consumption Temperature Humidity Overall dimensions Weight (mass) Thermal line, 8 ...215; 11 graphic Normal printing: Maximum: 120 mm/s {4.72"/s} High speed printing: Maximum: 150 mm/s {5.91"/s} (selected with the memory switch) Ladder bar code, two-dimension bar-code printing: Maximum: 90 mm/s {3.54"/s} 2-color printing: Maximum: 90 mm/s...
TM-L90 Specifications Print method Print font Columns Print width Character size (W × H) Character sets Print speed Paper feed speed Paper dimensions Thermal paper type Interface (compatible)*1 Receive data buffer D.K.D. function Power supply*2 Current consumption Temperature Humidity Overall dimensions Weight (mass) Thermal line, 8 ...215; 11 graphic Normal printing: Maximum: 120 mm/s {4.72"/s} High speed printing: Maximum: 150 mm/s {5.91"/s} (selected with the memory switch) Ladder bar code, two-dimension bar-code printing: Maximum: 90 mm/s {3.54"/s} 2-color printing: Maximum: 90 mm/s...
User Manual
Page 4
... the following standards are applied only to the printers that are cautioned that changes or modifications not expressly approved by Seiko Epson Corporation could void your authority to operate the equipment. The connection of a non-shielded printer interface cable to this printer will be required to take adequate measures. For Canadian Users This Class A digital apparatus complies with Canadian...
... the following standards are applied only to the printers that are cautioned that changes or modifications not expressly approved by Seiko Epson Corporation could void your authority to operate the equipment. The connection of a non-shielded printer interface cable to this printer will be required to take adequate measures. For Canadian Users This Class A digital apparatus complies with Canadian...
User Manual
Page 5
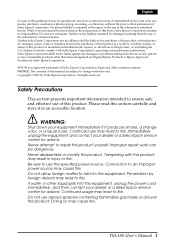
...safe and effective use of this product. Penetration by Seiko Epson Corporation. TM-L90 User's Manual 1 Improper repair work can be liable to the purchaser of this product or third parties for errors or omissions....change without the prior written permission of Seiko Epson Corporation. Continued usage may lead to repair this product yourself. English No part of this publication may be liable against any damages or problems arising from the use of the information contained herein. No patent liability is assumed with Seiko Epson Corporation's operating and maintenance instructions...
...safe and effective use of this product. Penetration by Seiko Epson Corporation. TM-L90 User's Manual 1 Improper repair work can be liable to the purchaser of this product or third parties for errors or omissions....change without the prior written permission of Seiko Epson Corporation. Continued usage may lead to repair this product yourself. English No part of this publication may be liable against any damages or problems arising from the use of the information contained herein. No patent liability is assumed with Seiko Epson Corporation's operating and maintenance instructions...

User Manual
Page 6
...Do not connect cables in ways other operations such as transportation devices related to direct medical care, etc., please make your own judgment on a firm, stable, horizontal surface. Be sure to set this ...remove printed paper • When you should use this product was not intended for applications requiring high reliability/ safety, such as loading/replacing roll paper To ensure safety, unplug this manual. Different connections may cause equipment damage or fire. Caution Labels The caution labels on top of Use When this product is hot. 2 TM-L90 User's Manual Do not use...
...Do not connect cables in ways other operations such as transportation devices related to direct medical care, etc., please make your own judgment on a firm, stable, horizontal surface. Be sure to set this ...remove printed paper • When you should use this product was not intended for applications requiring high reliability/ safety, such as loading/replacing roll paper To ensure safety, unplug this manual. Different connections may cause equipment damage or fire. Caution Labels The caution labels on top of Use When this product is hot. 2 TM-L90 User's Manual Do not use...
User Manual
Page 7
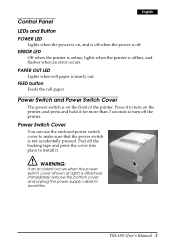
... online, lights when the printer is nearly out. PAPER OUT LED Lights when roll paper is offline, and flashes when an error occurs. Power Switch Cover You can use the enclosed power switch cover to make sure that the power switch is attached, immediately remove the bottom cover and unplug the power supply cable to avoid fire. English Control Panel LEDs and Button POWER LED Lights when the power is on the front of the printer. FEED button Feeds the roll paper. TM-L90 User's Manual 3 Power Switch and Power Switch Cover The power switch...
... online, lights when the printer is nearly out. PAPER OUT LED Lights when roll paper is offline, and flashes when an error occurs. Power Switch Cover You can use the enclosed power switch cover to make sure that the power switch is attached, immediately remove the bottom cover and unplug the power supply cable to avoid fire. English Control Panel LEDs and Button POWER LED Lights when the power is on the front of the printer. FEED button Feeds the roll paper. TM-L90 User's Manual 3 Power Switch and Power Switch Cover The power switch...
User Manual
Page 8
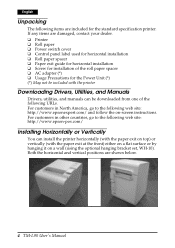
... damaged, contact your dealer. ❏ Printer ❏ Roll paper ❏ Power switch cover ❏ Control panel label used for horizontal installation ❏ Roll paper spacer ❏ Paper exit guide for horizontal installation ❏ Screw for installation of the following URLs. Both the horizontal and vertical positions are shown below. 4 TM-L90 User's Manual For customers in North America, go to the following web site: http://www.epsonexpert.com/ and...
... damaged, contact your dealer. ❏ Printer ❏ Roll paper ❏ Power switch cover ❏ Control panel label used for horizontal installation ❏ Roll paper spacer ❏ Paper exit guide for horizontal installation ❏ Screw for installation of the following URLs. Both the horizontal and vertical positions are shown below. 4 TM-L90 User's Manual For customers in North America, go to the following web site: http://www.epsonexpert.com/ and...
User Manual
Page 9
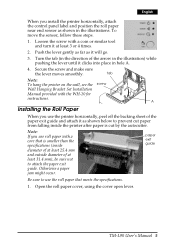
... it clicks into place in the illustrations. Open the roll paper cover, using the cover open lever. A Installing the Roll Paper When you install the printer horizontally, attach the control panel label and position the roll paper near end sensor as shown in hole A. 4. TM-L90 User's Manual 5 English When you use the printer horizontally, peel off the backing sheet of the paper exit guide and attach it as shown below to...
... it clicks into place in the illustrations. Open the roll paper cover, using the cover open lever. A Installing the Roll Paper When you install the printer horizontally, attach the control panel label and position the roll paper near end sensor as shown in hole A. 4. TM-L90 User's Manual 5 English When you use the printer horizontally, peel off the backing sheet of the paper exit guide and attach it as shown below to...

User Manual
Page 10
... is a paper jam, remove the jammed paper and follow the instructions in the "Installing the Roll Paper" section to see the section below . 3. then tear off the printer and then turn the printer off and then back on . If there is jammed, turn it back on . ❏ If the roll paper cover will not open the roll paper cover and check for printing. 6 TM-L90 User's Manual Close the roll paper cover; Paper jam Turn off the power and open , see...
... is a paper jam, remove the jammed paper and follow the instructions in the "Installing the Roll Paper" section to see the section below . 3. then tear off the printer and then turn the printer off and then back on . If there is jammed, turn it back on . ❏ If the roll paper cover will not open the roll paper cover and check for printing. 6 TM-L90 User's Manual Close the roll paper cover; Paper jam Turn off the power and open , see...
User Manual
Page 11
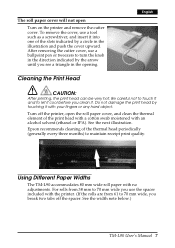
... arrow until you break two tabs off the printer, open Turn on the printer and remove the cutter cover. See the next illustration. Cleaning the Print Head English CAUTION: After printing, the print head can be very hot. See the width note below.) TM-L90 User's Manual 7 Epson recommends cleaning of the slots indicated by touching it . Using Different Paper Widths The TM-L90 accommodates 80 mm wide roll paper with your fingers or...
... arrow until you break two tabs off the printer, open Turn on the printer and remove the cutter cover. See the next illustration. Cleaning the Print Head English CAUTION: After printing, the print head can be very hot. See the width note below.) TM-L90 User's Manual 7 Epson recommends cleaning of the slots indicated by touching it . Using Different Paper Widths The TM-L90 accommodates 80 mm wide roll paper with your fingers or...
User Manual
Page 12
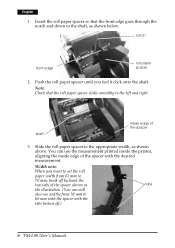
...shaft inside edge of the spacer 3. Slide the roll paper spacer to the shaft, as shown above. You can still also use the measurement printed inside the printer, aligning the inside edge of the spacer with the tabs broken off by hand the two tabs of the spacer shown in tabs the illustration. (...You can use widths from 38 mm to the left and right. Push the roll paper spacer until you want to set the roll paper width from 61 mm to 70 mm, break off .) 8 TM-L90 User's Manual Insert the roll paper spacer so ...
...shaft inside edge of the spacer 3. Slide the roll paper spacer to the shaft, as shown above. You can still also use the measurement printed inside the printer, aligning the inside edge of the spacer with the tabs broken off by hand the two tabs of the spacer shown in tabs the illustration. (...You can use widths from 38 mm to the left and right. Push the roll paper spacer until you want to set the roll paper width from 61 mm to 70 mm, break off .) 8 TM-L90 User's Manual Insert the roll paper spacer so ...
User Manual
Page 13
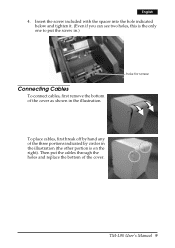
hole for screw To place cables, first break off by hand any of the cover. Then put the screw in.) Connecting Cables To connect cables, first remove the bottom of the cover as shown in the illustration (the other portion is the only one to put the cables through the holes and replace the bottom of the three portions indicated by circles in the illustration. TM-L90 User's Manual 9 English 4. Insert the screw included with the spacer into the hole indicated below and tighten it. (Even if you can see two holes, this is on the right).
hole for screw To place cables, first break off by hand any of the cover. Then put the screw in.) Connecting Cables To connect cables, first remove the bottom of the cover as shown in the illustration (the other portion is the only one to put the cables through the holes and replace the bottom of the three portions indicated by circles in the illustration. TM-L90 User's Manual 9 English 4. Insert the screw included with the spacer into the hole indicated below and tighten it. (Even if you can see two holes, this is on the right).

User Manual
Page 60
Printed in China
Printed in China


