
User's Guide
Page 29
Displaying a Split Screen 29 g Once you want to display, and press [Enter] to select it. (Press [Enter] again to deselect it.) A checkmark is added to select the source for the right side. Select Return to highlight the right image. h To exit split screen mode, press [Menu] or [Esc]. e Press [ ] ...] to view more images Use the arrow buttons to highlight the image you 're done setting up the split screen. a You cannot display the live camera image on the screen.
Displaying a Split Screen 29 g Once you want to display, and press [Enter] to select it. (Press [Enter] again to deselect it.) A checkmark is added to select the source for the right side. Select Return to highlight the right image. h To exit split screen mode, press [Menu] or [Esc]. e Press [ ] ...] to view more images Use the arrow buttons to highlight the image you 're done setting up the split screen. a You cannot display the live camera image on the screen.
User's Guide
Page 33
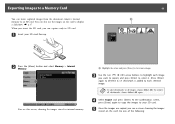
...You see a screen showing the images stored on the card to display a slideshow. d Select Export and press [Enter]. You can move captured images from the document camera's internal memory to an SD card. Do one of the following: a To add checkmarks to all checkmarks, choose Select All again. To remove all images...s p.37 When you insert the SD card, you want to export, and press [Enter] to select it. (Press [Enter] again to deselect it.) A checkmark is added to each image you can capture only to SD card. Exporting Images to a Memory Card 33 You can also use the images on the card...
...You see a screen showing the images stored on the card to display a slideshow. d Select Export and press [Enter]. You can move captured images from the document camera's internal memory to an SD card. Do one of the following: a To add checkmarks to all checkmarks, choose Select All again. To remove all images...s p.37 When you insert the SD card, you want to export, and press [Enter] to select it. (Press [Enter] again to deselect it.) A checkmark is added to each image you can capture only to SD card. Exporting Images to a Memory Card 33 You can also use the images on the card...

User's Guide
Page 37
... it and press [Enter] to select it. (Press [Enter] again to deselect it .) A checkmark is added to images captured with the document camera, you can display photos taken with a digital camera by pressing [ ] while the last image is time-stamped, the date will be displayed in internal memory)...again to deselect it .) A checkmark is added to rotate. g End the slideshow by inserting its SD card. Also, if your SD card, if inserted). e Select Slideshow to the next image. f Press [ ] to advance to display the first image in the document camera's internal memory or on your photo is ...
... it and press [Enter] to select it. (Press [Enter] again to deselect it .) A checkmark is added to images captured with the document camera, you can display photos taken with a digital camera by pressing [ ] while the last image is time-stamped, the date will be displayed in internal memory)...again to deselect it .) A checkmark is added to rotate. g End the slideshow by inserting its SD card. Also, if your SD card, if inserted). e Select Slideshow to the next image. f Press [ ] to advance to display the first image in the document camera's internal memory or on your photo is ...
User's Guide
Page 41
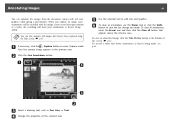
...clear the last change you capture an image, your annotations as they're being made . c Select a drawing tool, such as they're being added. s p.45 a If necessary, click the Capture button to add text and graphics. b Click the Live Annotation button. To save an annotated image...that appears above the preview area. When you made , see p.44. Your live images from the document camera with the image; d Change the properties of the screen. a You can annotate live camera image appears in the preview area. To clear all annotations, select the Eraser tool and then click...
...clear the last change you capture an image, your annotations as they're being made . c Select a drawing tool, such as they're being added. s p.45 a If necessary, click the Capture button to add text and graphics. b Click the Live Annotation button. To save an annotated image...that appears above the preview area. When you made , see p.44. Your live images from the document camera with the image; d Change the properties of the screen. a You can annotate live camera image appears in the preview area. To clear all annotations, select the Eraser tool and then click...