
Technical Reference
Page 13
TM-H6000III Technical Reference Guide Chapter 3 Setup 3.1 Part Name and Basic Operation 3-1 3.1.1 Part Names 3-1 3.1.2 Connectors 3-2 3.1.2.1 Important Installation Notes 3-3 3.1.3 The Control ...How to Use Two-Color Printing 3-24 3.5 Self Tests 3-24 3.5.1 Running the Self Test on Roll Paper 3-24 3.5.2 Running the Self Test with Slip Paper 3-25 3.5.3 Running the Self Test with the Validation paper (Option 3-25 3.5.4 Running the Self Test with the Endorsement Function (Option 3-25 Chapter 4 Maintenance & Troubleshooting 4.1 Maintenance 4-1 4.1.1 Cleaning the Thermal Print Head 4-1...
TM-H6000III Technical Reference Guide Chapter 3 Setup 3.1 Part Name and Basic Operation 3-1 3.1.1 Part Names 3-1 3.1.2 Connectors 3-2 3.1.2.1 Important Installation Notes 3-3 3.1.3 The Control ...How to Use Two-Color Printing 3-24 3.5 Self Tests 3-24 3.5.1 Running the Self Test on Roll Paper 3-24 3.5.2 Running the Self Test with Slip Paper 3-25 3.5.3 Running the Self Test with the Validation paper (Option 3-25 3.5.4 Running the Self Test with the Endorsement Function (Option 3-25 Chapter 4 Maintenance & Troubleshooting 4.1 Maintenance 4-1 4.1.1 Cleaning the Thermal Print Head 4-1...

Technical Reference
Page 65
... light blinks during the self-test printing standby state or macro execution standby state (when the macro execution command is open. E Setup 3-3 Check to warn you that the printer is nearly out of roll paper. The printer has a paper end detector, and it means that the printer is offline. TM-H6000III Technical Reference Guide...
... light blinks during the self-test printing standby state or macro execution standby state (when the macro execution command is open. E Setup 3-3 Check to warn you that the printer is nearly out of roll paper. The printer has a paper end detector, and it means that the printer is offline. TM-H6000III Technical Reference Guide...
Technical Reference
Page 67
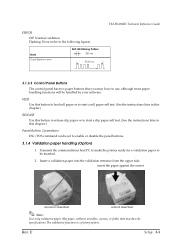
...paper into the validation entrance from host PC to make the printer ready for a validation paper to be set to start a slip paper self test. (See the instructions later in this chapter.) RELEASE Use this button to release slip paper or to enable or disable the panel buttons....command from the upper side. Rev. State Card Ejection error SLIP LED Blinking Pattern 320 ms 5120 ms TM-H6000III Technical Reference Guide 3.1.3.3 Control Panel Buttons The control panel has two paper buttons that matches the specifications.The validation function is a factory option. Flashing: Error (refer to...
...paper into the validation entrance from host PC to make the printer ready for a validation paper to be set to start a slip paper self test. (See the instructions later in this chapter.) RELEASE Use this button to release slip paper or to enable or disable the panel buttons....command from the upper side. Rev. State Card Ejection error SLIP LED Blinking Pattern 320 ms 5120 ms TM-H6000III Technical Reference Guide 3.1.3.3 Control Panel Buttons The control panel has two paper buttons that matches the specifications.The validation function is a factory option. Flashing: Error (refer to...
Technical Reference
Page 80
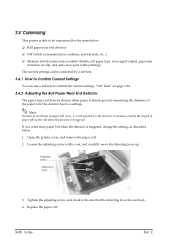
The detector has two settings. If you want more paper left on page 3-24 3.4.2 Adjusting the Roll Paper Near End Detector The paper near end detector ❏ DIP switch (... the setting, as described below : ❏ Roll paper near end detector detects when paper is triggered. "Self Tests" on the roll when the detector is almost gone by a self-test. 3.4.1 How to Confirm Current Settings You can use a self-test to be customized for the detector to measure exactly the length of the paper roll. Adjusting...
The detector has two settings. If you want more paper left on page 3-24 3.4.2 Adjusting the Roll Paper Near End Detector The paper near end detector ❏ DIP switch (... the setting, as described below : ❏ Roll paper near end detector detects when paper is triggered. "Self Tests" on the roll when the detector is almost gone by a self-test. 3.4.1 How to Confirm Current Settings You can use a self-test to be customized for the detector to measure exactly the length of the paper roll. Adjusting...

Technical Reference
Page 86
... use the memory switch utility to print in the other equipment or software, so it completes the self test. The self test prints the printer settings and then prints the following : *** completed *** The printer is in two colors by using two-color thermal paper. They check the control circuits, printer mechanisms, print quality, control software version, and DIP switch...
... use the memory switch utility to print in the other equipment or software, so it completes the self test. The self test prints the printer settings and then prints the following : *** completed *** The printer is in two colors by using two-color thermal paper. They check the control circuits, printer mechanisms, print quality, control software version, and DIP switch...
Technical Reference
Page 87
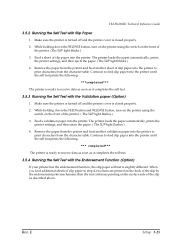
....) 4. TM-H6000III Technical Reference Guide 3.5.2 Running the Self Test with the Endorsement Function (Option) If your printer has the endorsement function, the slip paper self test is ready to receive data as soon as described above. When you feed additional sheets of slip paper in step 4, two lines are printed... on the front of the slip as it completes the self test. 3.5.4 Running the Self Test with Slip Paper 1. Make sure the printer is turned off and the printer cover is...
....) 4. TM-H6000III Technical Reference Guide 3.5.2 Running the Self Test with the Endorsement Function (Option) If your printer has the endorsement function, the slip paper self test is ready to receive data as soon as described above. When you feed additional sheets of slip paper in step 4, two lines are printed... on the front of the slip as it completes the self test. 3.5.4 Running the Self Test with Slip Paper 1. Make sure the printer is turned off and the printer cover is...
Technical Reference
Page 133
... Display is connected or not. See the User's Manual of your Customer Display or you can check the setting with the self test of the TM printer. ❏ Confirm that the Customer Display connector is connected to use the Customer Display connector on the interface. ❏...is not recognized correctly. ❏ Use the Customer Display connector on the printer. 2. TM-H6000III Technical Reference Guide ❏ Confirm that the interface is correctly recognized by the host PC. • Confirm that [EPSON USB Controller for a Customer Display connection? ❏ Fix the baud rate of a ...
... Display is connected or not. See the User's Manual of your Customer Display or you can check the setting with the self test of the TM printer. ❏ Confirm that the Customer Display connector is connected to use the Customer Display connector on the interface. ❏...is not recognized correctly. ❏ Use the Customer Display connector on the printer. 2. TM-H6000III Technical Reference Guide ❏ Confirm that the interface is correctly recognized by the host PC. • Confirm that [EPSON USB Controller for a Customer Display connection? ❏ Fix the baud rate of a ...


