
Technical Brief (Impact Printers)
Page 1
... can handle multi-part forms and multiple paper paths that the printer are the property of their reliability with LQ FX-980-Nine-pin narrow carriage Wide carriage printers have 4 number in their names Narrow carriage printers have paper loaded and waiting. both in purchase price and low cost of an EPSON's impact printer tells you if it has a narrow...
... can handle multi-part forms and multiple paper paths that the printer are the property of their reliability with LQ FX-980-Nine-pin narrow carriage Wide carriage printers have 4 number in their names Narrow carriage printers have paper loaded and waiting. both in purchase price and low cost of an EPSON's impact printer tells you if it has a narrow...
Technical Brief (Impact Printers)
Page 3
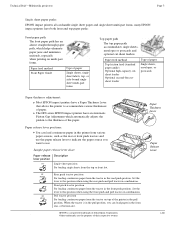
...) Optional high-capacity cutsheet feeder Optional second-bin cutsheet feeder Type of paper. Technical Brief-Multimedia projectors Page 3 Single sheet paper paths: EPSON impact printers all can load paper in the front, rear, or bottom slot. L Paper thickness adjustment: Most EPSON impact printers have a Paper Thickness Lever that allows the printer to this position when using the rear push and pull tractor in...
...) Optional high-capacity cutsheet feeder Optional second-bin cutsheet feeder Type of paper. Technical Brief-Multimedia projectors Page 3 Single sheet paper paths: EPSON impact printers all can load paper in the front, rear, or bottom slot. L Paper thickness adjustment: Most EPSON impact printers have a Paper Thickness Lever that allows the printer to this position when using the rear push and pull tractor in...
Technical Brief (Impact Printers)
Page 4
... of their respective owners. Paper parking Supports loading of paper from the other path is printed, the printer will take advantage of all EPSON impact printers Proportionally-spaced scalable fonts-selectable in fonts that allow you save paper and trouble, and precisely line up printing on most EPSON impact printers. DOS applications will automatically advance the paper to the interface receiving data...
... of their respective owners. Paper parking Supports loading of paper from the other path is printed, the printer will take advantage of all EPSON impact printers Proportionally-spaced scalable fonts-selectable in fonts that allow you save paper and trouble, and precisely line up printing on most EPSON impact printers. DOS applications will automatically advance the paper to the interface receiving data...

Product Brochure
Page 1
... support. Ideal for use control panel that require high quality, multipart forms printing, the reliable Epson LQ-590 and LQ-2090 printers offer extremely low operational costs compared to other impact printers in comparison to increase productivity. With versatile 5-part forms printing, multiple paper loading options, and a durable, long-lasting ribbon, each product races through multipart forms, reports, labels...
... support. Ideal for use control panel that require high quality, multipart forms printing, the reliable Epson LQ-590 and LQ-2090 printers offer extremely low operational costs compared to other impact printers in comparison to increase productivity. With versatile 5-part forms printing, multiple paper loading options, and a durable, long-lasting ribbon, each product races through multipart forms, reports, labels...

Product Brochure
Page 2
... C814012 C814031 Description Epson LQ-590 Impact Printer Ribbon Cartridge High Capacity Cut Sheet Feeder Single Bin Cut Sheet Feeder Additional Pull Tractor Unit Front Sheet Guide Epson LQ-2090 Impact Printer Ribbon Cartridge High Capacity Cut Sheet Feeder Single Bin Cut Sheet Feeder Additional Pull Tractor Unit Front Sheet Guide Front Paper Guide Product Code Description Epson LQ-590 and LQ-2090 Accessories...
... C814012 C814031 Description Epson LQ-590 Impact Printer Ribbon Cartridge High Capacity Cut Sheet Feeder Single Bin Cut Sheet Feeder Additional Pull Tractor Unit Front Sheet Guide Epson LQ-2090 Impact Printer Ribbon Cartridge High Capacity Cut Sheet Feeder Single Bin Cut Sheet Feeder Additional Pull Tractor Unit Front Sheet Guide Front Paper Guide Product Code Description Epson LQ-590 and LQ-2090 Accessories...

User Manual
Page 3
... the Printer Unpacking the Printer 7 Choosing a Place for the Printer 7 Assembling the Printer 8 Connecting the Printer to Your Computer 11 Installing the Printer Software 12 For DOS programs 15 Installing and Using the Online Reference Guide 15 Installing the Remote Configuration Manager 15 Chapter 2 - Paper Handling Setting the Paper Release Lever 17 Adjusting the Paper-Thickness Setting 18 Loading Continuous Paper...
... the Printer Unpacking the Printer 7 Choosing a Place for the Printer 7 Assembling the Printer 8 Connecting the Printer to Your Computer 11 Installing the Printer Software 12 For DOS programs 15 Installing and Using the Online Reference Guide 15 Installing the Remote Configuration Manager 15 Chapter 2 - Paper Handling Setting the Paper Release Lever 17 Adjusting the Paper-Thickness Setting 18 Loading Continuous Paper...

User Manual
Page 17
... Lever Before you start printing, be sure to set the paper release lever to indicate the paper source you need to use paper in your printer. Rear push tractor position For loading continuous paper with the tractor installed in the front push position or when using the rear push... load and use , as described in the table below. For complete paper handling information, see the Reference Guide. Lever position Description Single-sheet position For loading single-sheet paper from the tractor installed on top of the printer in the front, rear, or bottom slot. You can load paper ...
... Lever Before you start printing, be sure to set the paper release lever to indicate the paper source you need to use paper in your printer. Rear push tractor position For loading continuous paper with the tractor installed in the front push position or when using the rear push... load and use , as described in the table below. For complete paper handling information, see the Reference Guide. Lever position Description Single-sheet position For loading single-sheet paper from the tractor installed on top of the printer in the front, rear, or bottom slot. You can load paper ...

User Manual
Page 19
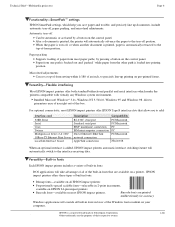
...the proper position for instructions. 4. Paper Handling 19 Make sure the printer is difficult to remove, you can temporarily remove the front cover and then separate the sub cover from it.) Be sure to move it is turned off. Loading Continuous Paper with the Front Push Tractor 1. ...to reattach the sub cover when you have the LQ-2090, remove the sub cover from the front cover. (If it from a different paper source. 3. See "Adjusting the Paper-Thickness Setting" on page 18 for your paper's thickness. Also set the paper-thickness lever to the front push tractor position....
...the proper position for instructions. 4. Paper Handling 19 Make sure the printer is difficult to remove, you can temporarily remove the front cover and then separate the sub cover from it.) Be sure to move it is turned off. Loading Continuous Paper with the Front Push Tractor 1. ...to reattach the sub cover when you have the LQ-2090, remove the sub cover from the front cover. (If it from a different paper source. 3. See "Adjusting the Paper-Thickness Setting" on page 18 for your paper's thickness. Also set the paper-thickness lever to the front push tractor position....

User Manual
Page 21
.... (You may damage the printer or cause it to the rear push tractor position. 3. If the first line on the printer. c Caution: Never use the knob to the middle of -form position; Loading Continuous Paper with the continuous paper positioned as described on the printer and slide the edge guides... to adjust the top-of the paper guide. 12. Release the left and right...
.... (You may damage the printer or cause it to the rear push tractor position. 3. If the first line on the printer. c Caution: Never use the knob to the middle of -form position; Loading Continuous Paper with the continuous paper positioned as described on the printer and slide the edge guides... to adjust the top-of the paper guide. 12. Release the left and right...

User Manual
Page 22
...first four holes of -form position. 22 Paper Handling Make sure your paper, but do not lock it flat on top of the printer indicates the point furthest to adjust the top-of the paper guide. 8. When the printer receives data, it in the paper and lock it to the middle of -form... position; Attach the paper guide and lay it . Slide the left sprocket approximately 0.5 inch (12 mm) from the far left where printing can begin. 5. Then slide the right sprocket to lock it automatically loads the paper and ...
...first four holes of -form position. 22 Paper Handling Make sure your paper, but do not lock it flat on top of the printer indicates the point furthest to adjust the top-of the paper guide. 8. When the printer receives data, it in the paper and lock it to the middle of -form... position; Attach the paper guide and lay it . Slide the left sprocket approximately 0.5 inch (12 mm) from the far left where printing can begin. 5. Then slide the right sprocket to lock it automatically loads the paper and ...

User Manual
Page 23
... tractor position. 3. Paper Handling 23 Make sure the printer is turned off before you insert the paper while the printer is off , and the printer cover is lying flat on , a paper jam may need to match the width of your paper has a clean, straight edge. Make sure your paper, but do not... lock it in the paper slot. Slide the edge guides to the center. 5. Loading Continuous Paper ...
... tractor position. 3. Paper Handling 23 Make sure the printer is turned off before you insert the paper while the printer is off , and the printer cover is lying flat on , a paper jam may need to match the width of your paper has a clean, straight edge. Make sure your paper, but do not... lock it in the paper slot. Slide the edge guides to the center. 5. Loading Continuous Paper ...

User Manual
Page 24
Front slot Before you load paper in place. 9. Slide the right sprocket to the center. 24 Paper Handling Then pull up the paper until it in the front slot, remove the front cover. Slide the edge guides to remove any slack in the paper, then lock it emerges between the ... sprockets. Insert the paper into the front or bottom paper slot as shown below until the perforation between the platen and the ribbon guide. Bottom slot Load paper in the bottom slot with the printable side facing up . 7. Fit four holes of the printer's ribbon. Then load paper with the printable side...
Front slot Before you load paper in place. 9. Slide the right sprocket to the center. 24 Paper Handling Then pull up the paper until it in the front slot, remove the front cover. Slide the edge guides to remove any slack in the paper, then lock it emerges between the ... sprockets. Insert the paper into the front or bottom paper slot as shown below until the perforation between the platen and the ribbon guide. Bottom slot Load paper in the bottom slot with the printable side facing up . 7. Fit four holes of the printer's ribbon. Then load paper with the printable side...
User Manual
Page 25
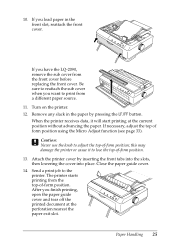
... slot, reattach the front cover. The printer starts printing from a different paper source. 11. Paper Handling 25 10. If you load paper in the paper by inserting the front tabs into the slots, then lowering the cover into place. this may damage the printer or cause it will start printing at ...the perforation nearest the paper exit slot. When the printer receives data, it to the printer. Close the paper guide cover. 14. After you want to adjust the top-of -form position. If necessary, adjust the top of -form position. 13. If you have the LQ-2090, remove the sub...
... slot, reattach the front cover. The printer starts printing from a different paper source. 11. Paper Handling 25 10. If you load paper in the paper by inserting the front tabs into the slots, then lowering the cover into place. this may damage the printer or cause it will start printing at ...the perforation nearest the paper exit slot. When the printer receives data, it to the printer. Close the paper guide cover. 14. After you want to adjust the top-of -form position. If necessary, adjust the top of -form position. 13. If you have the LQ-2090, remove the sub...

User Manual
Page 26
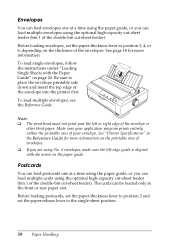
..., tear off the pull tractor and jam in the paper guide. 26 Paper Handling For more information, see the Reference Guide. Loading Single Sheets with the front sheet guide (LQ-590) or the front paper guide (LQ-2090) installed. To feed paper forward and eject it, hold down the LF/FF button... on the LQ-590 and 16.5 inches (420 mm) wide on the LQ-2090. After you are using the paper guide. The paper can load ordinary single sheets and envelopes one at the perforation nearest the paper entry slot. 2. Removing paper from the top of the printer using the pull tractor; the paper could come...
..., tear off the pull tractor and jam in the paper guide. 26 Paper Handling For more information, see the Reference Guide. Loading Single Sheets with the front sheet guide (LQ-590) or the front paper guide (LQ-2090) installed. To feed paper forward and eject it, hold down the LF/FF button... on the LQ-590 and 16.5 inches (420 mm) wide on the LQ-2090. After you are using the paper guide. The paper can load ordinary single sheets and envelopes one at the perforation nearest the paper entry slot. 2. Removing paper from the top of the printer using the pull tractor; the paper could come...

User Manual
Page 27
... information. Turn on page 30.) 2. Load a sheet of -form position. The printer feeds the paper automatically and is in place next to the triangle mark on your paper. 5. Then set the paper-thickness lever to 0 if you are using envelopes, see "Envelopes" on the printer, if necessary. 4. Paper Handling 27 Move the paper release lever to match the...
... information. Turn on page 30.) 2. Load a sheet of -form position. The printer feeds the paper automatically and is in place next to the triangle mark on your paper. 5. Then set the paper-thickness lever to 0 if you are using envelopes, see "Envelopes" on the printer, if necessary. 4. Paper Handling 27 Move the paper release lever to match the...

User Manual
Page 28
... labels, requires a straight or almost straight paper path. Do not try to avoid paper jams. Load thick paper in thickness. ❏ Do not load paper that is the same as that are mounted on continuous backing sheets with sprocket holes for use only the type of labels because the printer may not feed labels on a shiny backing...
... labels, requires a straight or almost straight paper path. Do not try to avoid paper jams. Load thick paper in thickness. ❏ Do not load paper that is the same as that are mounted on continuous backing sheets with sprocket holes for use only the type of labels because the printer may not feed labels on a shiny backing...

User Manual
Page 29
... is curled or has been folded. ❏ Never feed labels backward using the Load/Eject or Tear Off/Bin button. they may come off their backing sheets inside the printer and cause a paper jam. ❏ Do not load paper that is curved, labels may curl around the platen and jam when you resume ...printing. Hold down the LF/FF button to 60% RH ❏ Do not leave labels loaded in the printer between jobs; Do not load labels on the ...
... is curled or has been folded. ❏ Never feed labels backward using the Load/Eject or Tear Off/Bin button. they may come off their backing sheets inside the printer and cause a paper jam. ❏ Do not load paper that is curved, labels may curl around the platen and jam when you resume ...printing. Hold down the LF/FF button to 60% RH ❏ Do not leave labels loaded in the printer between jobs; Do not load labels on the ...
User Manual
Page 30
...using No. 6 envelopes, make sure the left or right edge of the envelope or other thick paper. See "Printer Specifications" in the front or rear paper slot. The cards can load multiple cards using the optional high-capacity cut-sheet feeder (bin 1 of the double-bin cut... within the printable area of the envelope into the printer first. Before loading postcards, set the paper-thickness lever to position 2 and set the paper-thickness lever to the single-sheet position. 30 Paper Handling Before loading envelopes, set the paper release lever to position 3, 4, or 6, depending on...
...using No. 6 envelopes, make sure the left or right edge of the envelope or other thick paper. See "Printer Specifications" in the front or rear paper slot. The cards can load multiple cards using the optional high-capacity cut-sheet feeder (bin 1 of the double-bin cut... within the printable area of the envelope into the printer first. Before loading postcards, set the paper-thickness lever to position 2 and set the paper-thickness lever to the single-sheet position. 30 Paper Handling Before loading envelopes, set the paper release lever to position 3, 4, or 6, depending on...

User Manual
Page 33
...to adjust the top-of-form position; Load paper. (If the tractor is in effect until you change it to exit Micro Adjust mode. The Pause light flashes and the printer enters Micro Adjust mode. 4. Make sure the printer is turned on the page where the printer starts printing. Your top-of-form ...position setting remains in a push position, press the Load/Eject button to advance continuous paper to the current top-of-form position.) If necessary, lift the printer cover so you can use the knob to adjust the top-of-form position, as described below. this may...
...to adjust the top-of-form position; Load paper. (If the tractor is in effect until you change it to exit Micro Adjust mode. The Pause light flashes and the printer enters Micro Adjust mode. 4. Make sure the printer is turned on the page where the printer starts printing. Your top-of-form ...position setting remains in a push position, press the Load/Eject button to advance continuous paper to the current top-of-form position.) If necessary, lift the printer cover so you can use the knob to adjust the top-of-form position, as described below. this may...

User Manual
Page 41
... 42. If you want to the position for the paper source you cannot resolve the problem using the information in the printer or select a different paper source; Set the paper release lever to use. Using the Error Indicators Use the following table to the standby position. Load paper in the manuals, see "Where To Get Help...
... 42. If you want to the position for the paper source you cannot resolve the problem using the information in the printer or select a different paper source; Set the paper release lever to use. Using the Error Indicators Use the following table to the standby position. Load paper in the manuals, see "Where To Get Help...


