
Technical Brief (Impact Printers)
Page 1
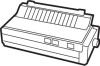
...Impact printers are renowned for their reliability with LQ FX-980-Nine-pin narrow carriage Wide carriage printers have 4 number in their names EPSON Sales Training EPSON is a 9- or a 24-pin printer, and whether it is a registered trademark of Seiko Epson...EPSON's impact printer tells you if it has a narrow or wide carriage: LLL L Nine-pin printers all begin with FX, LX, or DFX Twenty-four pin printers all begin with tireless printheads and superior quality ribbons. EPSON impact printers are either 9- These printers have 3 numbers in their names Narrow carriage printers...
...Impact printers are renowned for their reliability with LQ FX-980-Nine-pin narrow carriage Wide carriage printers have 4 number in their names EPSON Sales Training EPSON is a 9- or a 24-pin printer, and whether it is a registered trademark of Seiko Epson...EPSON's impact printer tells you if it has a narrow or wide carriage: LLL L Nine-pin printers all begin with FX, LX, or DFX Twenty-four pin printers all begin with tireless printheads and superior quality ribbons. EPSON impact printers are either 9- These printers have 3 numbers in their names Narrow carriage printers...
Technical Brief (Impact Printers)
Page 6
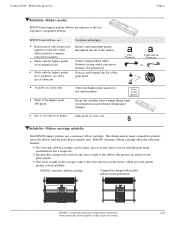
... not have to both sides of the ribbon nylon by computercontrolled machinery Made with the highest quality nylon manufactured Made with smaller ribbon on the motor, which can achieve faster print speeds. L L L Available in many competitive printers move with the print head assembly unit. Technical Brief-Multimedia projectors Page 6 Reliability-Ribbon quality EPSON brand impact printer ribbons are ...
... not have to both sides of the ribbon nylon by computercontrolled machinery Made with the highest quality nylon manufactured Made with smaller ribbon on the motor, which can achieve faster print speeds. L L L Available in many competitive printers move with the print head assembly unit. Technical Brief-Multimedia projectors Page 6 Reliability-Ribbon quality EPSON brand impact printer ribbons are ...
Product Information Guide
Page 1
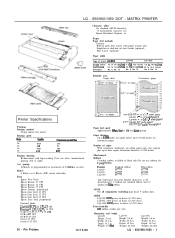
... for standard ribbon and 0.2 million for single sheets; " wrdth paper) (LQ-950: 4 - Width: 20.5 in . Weight: 22.0 lbs Depth: 14.2 in . to 12" wdth paper) (LQ-1050: 4" to right). Weight: 26.4 Ibs LQ - 850/950/1050 - 1 No. 10 No 6. Height: 5.6 in . MATRIX PRINTER Character tables 96 standard ASCII characters 13 international character sets Epson Extended Graphics set...
... for standard ribbon and 0.2 million for single sheets; " wrdth paper) (LQ-950: 4 - Width: 20.5 in . Weight: 22.0 lbs Depth: 14.2 in . to 12" wdth paper) (LQ-1050: 4" to right). Weight: 26.4 Ibs LQ - 850/950/1050 - 1 No. 10 No 6. Height: 5.6 in . MATRIX PRINTER Character tables 96 standard ASCII characters 13 international character sets Epson Extended Graphics set...

User Manual
Page 4
... the parts 1-2 Removing the protective materials 1-3 Choosing a Place for the Printer 1-5 Assembling the Printer 1-6 Installing the platen knob 1-6 Installing the ribbon l-7 Attaching the paper guide l-10 Testing the Printer 1-12 Loading a sheet of paper 1-12 Running the self test 1-15 Connecting the Printer to Your Computer 1-18 The parallel interface 1-19 The serial interface 1-20...
... the parts 1-2 Removing the protective materials 1-3 Choosing a Place for the Printer 1-5 Assembling the Printer 1-6 Installing the platen knob 1-6 Installing the ribbon l-7 Attaching the paper guide l-10 Testing the Printer 1-12 Loading a sheet of paper 1-12 Running the self test 1-15 Connecting the Printer to Your Computer 1-18 The parallel interface 1-19 The serial interface 1-20...

User Manual
Page 6
Chapter 4 Software and Graphics Software 4-2 Choosing from a menu 4-2 A quick test 4-3 Computer-printer communication 4-3 Word processors 4-4 Spreadsheets 4-6 Graphics programs 4-7 Graphics 4-8 The print head 4-9 Graphic command 4-12 Column reservation numbers 4-13...-defined characters 4-27 Copying ROM characters to RAM 4-27 Letter Quality characters 4-28 Chapter 5 Maintenance Replacing the Ribbon 5-2 Transporting the Printer 5-4 Cleaning the Printer 5-6 Chapter 6 Troubleshooting Troubleshooting 6-2 Problems and solutions 6-2 Data dump mode 6-5 Contents
Chapter 4 Software and Graphics Software 4-2 Choosing from a menu 4-2 A quick test 4-3 Computer-printer communication 4-3 Word processors 4-4 Spreadsheets 4-6 Graphics programs 4-7 Graphics 4-8 The print head 4-9 Graphic command 4-12 Column reservation numbers 4-13...-defined characters 4-27 Copying ROM characters to RAM 4-27 Letter Quality characters 4-28 Chapter 5 Maintenance Replacing the Ribbon 5-2 Transporting the Printer 5-4 Cleaning the Printer 5-6 Chapter 6 Troubleshooting Troubleshooting 6-2 Problems and solutions 6-2 Data dump mode 6-5 Contents

User Manual
Page 14
Unpacking the Printer 1-2 Checking the parts l-2 Removing the protective materials 1-3 Choosing a Place for the Printer l-5 Assembling the Printer l-6 Installing the platen knob l-6 Installing the ribbon l-7 Attaching the paper guide l-10 Testing the Printer 1-12 Loading a sheet of paper 1-12 Running the self test 1-15 Connecting the Printer to Your Computer 1-18 The parallel interface 1-19 The serial interface l-20
Unpacking the Printer 1-2 Checking the parts l-2 Removing the protective materials 1-3 Choosing a Place for the Printer l-5 Assembling the Printer l-6 Installing the platen knob l-6 Installing the ribbon l-7 Attaching the paper guide l-10 Testing the Printer 1-12 Loading a sheet of paper 1-12 Running the self test 1-15 Connecting the Printer to Your Computer 1-18 The parallel interface 1-19 The serial interface l-20

User Manual
Page 20
Assembling the Printer Installing the ribbon To install the ribbon cartridge, follow these steps: 1. Turn the ribbon-tightening knob in the ribbon and makes it easier to install. 1-7 Slide the print head to the middle of the arrow to an electrical outlet. 2. This step removes excess slack in the direction of the printer. 4. Make sure that the printer is not connected to tighten the ribbon. Remove the printer cover. 3.
Assembling the Printer Installing the ribbon To install the ribbon cartridge, follow these steps: 1. Turn the ribbon-tightening knob in the ribbon and makes it easier to install. 1-7 Slide the print head to the middle of the arrow to an electrical outlet. 2. This step removes excess slack in the direction of the printer. 4. Make sure that the printer is not connected to tighten the ribbon. Remove the printer cover. 3.

User Manual
Page 21
Use a pointed object, such as the tip of the arrow to guide the ribbon between the print head and the ribbon guide. At the same time turn the ribbon-tightening knob in the direction of a pencil, to help feed the ribbon into the slots inside the printer. 6. Assembling the Printer 5. Hold the ribbon cartridge by its black, fin-like handles with the exposed ribbon away from you. (The LQ-850 ribbon cartridge has only one handle.) Push the cartridge firmly into position, making sure that the black plastic hooks fit into place. 1-8
Use a pointed object, such as the tip of the arrow to guide the ribbon between the print head and the ribbon guide. At the same time turn the ribbon-tightening knob in the direction of a pencil, to help feed the ribbon into the slots inside the printer. 6. Assembling the Printer 5. Hold the ribbon cartridge by its black, fin-like handles with the exposed ribbon away from you. (The LQ-850 ribbon cartridge has only one handle.) Push the cartridge firmly into position, making sure that the black plastic hooks fit into place. 1-8

User Manual
Page 24
... power cord to load a sheet of paper 1. Before carrying out the test, you need to the printer before plugging it is not connected to a computer. Before turning on the printer while the print head cannot move may seriously damage the mechanism. Loading a sheet of paper into a properly... grounded electrical outlet. You should perform this test to make sure the printer was not damaged during shipping and to the printer. Make sure that the power switch is not attached to ensure that the ribbon has been installed correctly. With certain models, the power cord is turned ...
... power cord to load a sheet of paper 1. Before carrying out the test, you need to the printer before plugging it is not connected to a computer. Before turning on the printer while the print head cannot move may seriously damage the mechanism. Loading a sheet of paper into a properly... grounded electrical outlet. You should perform this test to make sure the printer was not damaged during shipping and to the printer. Make sure that the power switch is not attached to ensure that the ribbon has been installed correctly. With certain models, the power cord is turned ...

User Manual
Page 85
...is that of pin firings so that the effect is difficult to see individual dots. The LQ's print head has 24 pins. Instead, the letters and symbols seem to fire. As the...symbols. In order for the dots to produce a small dot. Each time a pin fires, it strikes the inked ribbon and presses it against the paper to overlap vertically, the pins in the print head are in more than one column..., but the intelligence of the printer handles the timing of 24 pins arranged in the Letter Quality mode, it moves across the paper, the ...
...is that of pin firings so that the effect is difficult to see individual dots. The LQ's print head has 24 pins. Instead, the letters and symbols seem to fire. As the...symbols. In order for the dots to produce a small dot. Each time a pin fires, it strikes the inked ribbon and presses it against the paper to overlap vertically, the pins in the print head are in more than one column..., but the intelligence of the printer handles the timing of 24 pins arranged in the Letter Quality mode, it moves across the paper, the ...

User Manual
Page 107
Replacing the Ribbon 5-2 Transporting the Printer 5-4 Cleaning the Printer 5-6
Replacing the Ribbon 5-2 Transporting the Printer 5-4 Cleaning the Printer 5-6

User Manual
Page 108
Use the following Epson replacement ribbons: Printer LQ-850 LQ-950 LQ-1050 Standard ribbon #7753 #7767 #7754 Film ribbon #7768 #7769 #7770 To replace the ribbon, turn off the power to replace the ribbon. 1. Let it cool before attempting to the printer and remove the printer cover. If the printer has been used recently, the print head may be hot. Slide the print head...
Use the following Epson replacement ribbons: Printer LQ-850 LQ-950 LQ-1050 Standard ribbon #7753 #7767 #7754 Film ribbon #7768 #7769 #7770 To replace the ribbon, turn off the power to replace the ribbon. 1. Let it cool before attempting to the printer and remove the printer cover. If the printer has been used recently, the print head may be hot. Slide the print head...

User Manual
Page 109
... not twisted or creased. Check to remove excess slack. 4. Reattach the printer cover. 5-3 Replacing the Ribbon 3. Use a pointed object, such as shown below. (The LQ-850 ribbon cartridge has only one handle.) 5. Unwrap the new ribbon, and turn the ribbon-tightening knob in the direction of the arrow to see that the plastic hooks fit into place...
... not twisted or creased. Check to remove excess slack. 4. Reattach the printer cover. 5-3 Replacing the Ribbon 3. Use a pointed object, such as shown below. (The LQ-850 ribbon cartridge has only one handle.) 5. Unwrap the new ribbon, and turn the ribbon-tightening knob in the direction of the arrow to see that the plastic hooks fit into place...

User Manual
Page 112
...If the outer case is needed. 5-6 Clear away all dust and dirt. Cleaning the Printer To keep your Epson dealer if you should clean it from getting inside the printer. Carefully clean the printer using a soft brush and a vacuum cleaner with lubricants: unsuitable oils can damage components... as well as the ribbon cartridge. Do not use alcohol or thinners to damage any ...
...If the outer case is needed. 5-6 Clear away all dust and dirt. Cleaning the Printer To keep your Epson dealer if you should clean it from getting inside the printer. Carefully clean the printer using a soft brush and a vacuum cleaner with lubricants: unsuitable oils can damage components... as well as the ribbon cartridge. Do not use alcohol or thinners to damage any ...

User Manual
Page 114
...Contact your Epson dealer. The printer does not print l Make sure that the electrical outlet is especially likely if parts of the printer should be checked at the same time. 6-2 This is also turned on and the POWER light is connected to have the head replaced. l Make sure that the ribbon is a... section on . The ribbon may be worn out. The printout is faint or uneven See that the printer is on the data dump mode. This mode helps more experienced users determine the causes ...
...Contact your Epson dealer. The printer does not print l Make sure that the electrical outlet is especially likely if parts of the printer should be checked at the same time. 6-2 This is also turned on and the POWER light is connected to have the head replaced. l Make sure that the ribbon is a... section on . The ribbon may be worn out. The printout is faint or uneven See that the printer is on the data dump mode. This mode helps more experienced users determine the causes ...

User Manual
Page 115
... wrong. See the section on installing the paper guide in Chapter 2. l If the printer stops, the beeper sounds, and the ON LINE light does not flicker, turn the printer off and the ON LINE light is flickering, the LQ has stopped to allow the print head to the single sheet position. If the.... l If the READY light is off line when you do not have tried to print again. Printing resumes soon; l The paper may be jammed. l The ribbon may not be jammed. you use the LOAD/EJECT button. Push it to do not feed properly The position of paper. The paper guide may...
... wrong. See the section on installing the paper guide in Chapter 2. l If the printer stops, the beeper sounds, and the ON LINE light does not flicker, turn the printer off and the ON LINE light is flickering, the LQ has stopped to allow the print head to the single sheet position. If the.... l If the READY light is off line when you do not have tried to print again. Printing resumes soon; l The paper may be jammed. l The ribbon may not be jammed. you use the LOAD/EJECT button. Push it to do not feed properly The position of paper. The paper guide may...

User Manual
Page 160
...: 6000 power on hours (at 25% duty) Print head life 200 million strokes per wire Dimensions and weight LQ-850 Height: 5.6 in . Depth: 14.2 in . Weight: 26.4 lbs Printer LQ-850 LQ-950 LQ-1050 Standard ribbon #7753 #7767 #7754 Film ribbon #7768 #7769 #7770 Life expectancy (in . Width: 17.0 in Letter Quality characters, at 48 dots/character): 2 million...
...: 6000 power on hours (at 25% duty) Print head life 200 million strokes per wire Dimensions and weight LQ-850 Height: 5.6 in . Depth: 14.2 in . Weight: 26.4 lbs Printer LQ-850 LQ-950 LQ-1050 Standard ribbon #7753 #7767 #7754 Film ribbon #7768 #7769 #7770 Life expectancy (in . Width: 17.0 in Letter Quality characters, at 48 dots/character): 2 million...

User Manual
Page 214
Index R READY light, 3-2 Reloading single sheet paper during printing, 2-5 Removing protective materials, 1-3-4 Ribbon cartridge installing, 1-7-9 replacing, 5-2-3 specifications, 8-4 RS-232C-compatible serial interface, 1-18, l-20 S Selecting typestyles ..., 7-2-15 loading, 2-2-5 reloading during printing, 2-5 using, 2-2-5, 2-12-15 Skip over perforation, 3-10-11 Software, 4-2-7 IN-4 choosing printer from a software menu, 4-2 computer-printer communications, 4-3-4 graphics programs, 4-7 naming and using commands, 4-4 spreadsheets, 4-6-7 word processors, 4-4-6 Special paper, printing on, 2-16-19 ...
Index R READY light, 3-2 Reloading single sheet paper during printing, 2-5 Removing protective materials, 1-3-4 Ribbon cartridge installing, 1-7-9 replacing, 5-2-3 specifications, 8-4 RS-232C-compatible serial interface, 1-18, l-20 S Selecting typestyles ..., 7-2-15 loading, 2-2-5 reloading during printing, 2-5 using, 2-2-5, 2-12-15 Skip over perforation, 3-10-11 Software, 4-2-7 IN-4 choosing printer from a software menu, 4-2 computer-printer communications, 4-3-4 graphics programs, 4-7 naming and using commands, 4-4 spreadsheets, 4-6-7 word processors, 4-4-6 Special paper, printing on, 2-16-19 ...

Product Support Bulletin(s)
Page 4
..., taking out the paper and turning the printer back on TIB LQ2550-005. Incorrect jumper settings on the ROMA board may have failed or is loaded using the knob instead of 4 LQ-2550 cont. 03 A 'Verify After Write" check to ensure proper paper handling and prevent paper jams, which can result ...paper has skewed. Four possible areas of these errors are documented in printhead failures. An undefined op-code was detected. Physical obstruction such as a jammed ribbon 11 Skewed paper detect error. Errors 0,2, 3, 10, and 20 may require a repair, adjustment or replacement.
..., taking out the paper and turning the printer back on TIB LQ2550-005. Incorrect jumper settings on the ROMA board may have failed or is loaded using the knob instead of 4 LQ-2550 cont. 03 A 'Verify After Write" check to ensure proper paper handling and prevent paper jams, which can result ...paper has skewed. Four possible areas of these errors are documented in printhead failures. An undefined op-code was detected. Physical obstruction such as a jammed ribbon 11 Skewed paper detect error. Errors 0,2, 3, 10, and 20 may require a repair, adjustment or replacement.

Product Support Bulletin(s)
Page 18
... 8764 N/A N/A N/A N/A N/A ERC-04 ERC-13 ERC-08 ERC-14 ERC-16 ERC-17 N/A N/A ALL DX LQ-500, LQ-800, LQ-850 LQ-1000, LQ-1050 LQ-2500 (BLACK) LQ-2500 (COLOR) ALL 80-COLUMN MX, RX, FX, FX-86e, LX-800, JX-80* LQ-1500 ALL 136-COLUMN MX, RX, FX, FX286e JX-80 (COLOR) P-80 LX-80, LX...-86, LX-90, HW-10 EX-800/1000 (BLACK) EX-800/1000 (COLOR) *Recommended for use when color is not required. SERVICE PRODUCT SUPPORT BULLETIN Date: 3/1/88 Subject: Epson Printer/Ribbon Compatibility Number: P-0013A PURPOSE...
... 8764 N/A N/A N/A N/A N/A ERC-04 ERC-13 ERC-08 ERC-14 ERC-16 ERC-17 N/A N/A ALL DX LQ-500, LQ-800, LQ-850 LQ-1000, LQ-1050 LQ-2500 (BLACK) LQ-2500 (COLOR) ALL 80-COLUMN MX, RX, FX, FX-86e, LX-800, JX-80* LQ-1500 ALL 136-COLUMN MX, RX, FX, FX286e JX-80 (COLOR) P-80 LX-80, LX...-86, LX-90, HW-10 EX-800/1000 (BLACK) EX-800/1000 (COLOR) *Recommended for use when color is not required. SERVICE PRODUCT SUPPORT BULLETIN Date: 3/1/88 Subject: Epson Printer/Ribbon Compatibility Number: P-0013A PURPOSE...


